Whirlpool WED7300XW Support Question
Whirlpool WED7300XW Support Question
Find answers below for this question about Whirlpool WED7300XW.Need a Whirlpool WED7300XW manual? We have 4 online manuals for this item!
Question posted by Craighastings1978 on November 7th, 2015
How Do I Remove The Drum From My Wed7300xw0 Dryer?
I already have the top off and the belt removed from the pulley. I'm trying to get the drum out so I can replace the felt on the front. Inside and out need to be replaced.
Current Answers
Answer #1: Posted by Odin on November 7th, 2015 12:45 PM
Odin

Member since:
April 10th, 2010 Points: 41,236,700

Member since:
April 10th, 2010 Points: 41,236,700
See http://www.partselect.com/Dryer+olc-whirlpool-drum-removal+repair.htm. If that doesn't seem to apply, see https://www.youtube.com/watch?v=O0R6XudHV7s.
Hope this is useful. Please don't forget to click the Accept This Answer button if you do accept it. My aim is to provide reliable helpful answers, not just a lot of them. See https://www.helpowl.com/profile/Odin.
Related Whirlpool WED7300XW Manual Pages
Owners Manual - Page 4
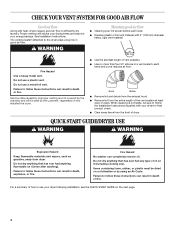
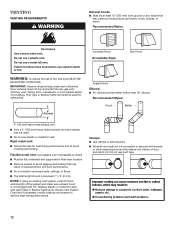
...flow. The venting system attached to efficiently dry laundry.
Do not dry anything flammable on it (...Replace plastic or foil vent material with 4" (102 mm) diameter heavy, rigid vent material.
Fire Hazard
No washer can result in a vent system; For a summary of dryer...dryers require good air flow to the dryer plays a big role in death, explosion, or fire. Good
Better
■ Remove...
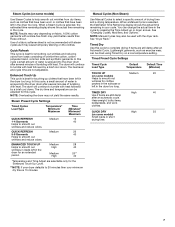
Owners Manual - Page 5
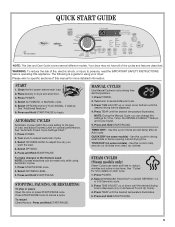
... more details on Enhanced Touch Up Cycle).
4. To make changes to reduce wrinkles and odors in dryer and shut door. 3. Select DRYNESS LEVEL. 3.
TIMED DRY -
Select OPTIONS and/or CYCLE SIGNAL.../PAUSE once. Press and Hold START/PAUSE.
QUICK DRY (on some models) - START
1. Place laundry in dry items. See "Cycles" for Time, Temp, the WRINKLE SHIELD™ feature, and Cycle...
Owners Manual - Page 6
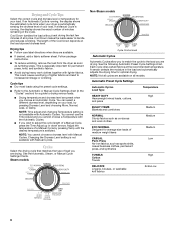
... loads.
■ Drying temperature and dryness level are available.
■ If desired, add a fabric softener sheet. Follow package instructions.
■ To reduce wrinkling, remove the load from the dryer as soon as tumbling stops. Adjust the temperature of the Cool Down depends on all models.
If a Manual Cycle is running , the display...
Owners Manual - Page 7
...cycle is 15 minutes. You can change the actual time in the dryer too long. See "Dryer Rack."
Use of a fabric softener sheet is sprayed into the dryer drum after several minutes of tumbling with steam cycles as exercise wear, can... with heat.
In this cycle. When a Manual Cycle is sprayed into the dryer drum after several minutes of drying time and a drying temperature.
Owners Manual - Page 8
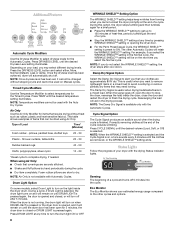
... be used on the light inside the dryer, close the door and restart the dryer to complete drying, if needed. During a cycle, if Drum Light is selected, the drum light turns on and will be...- 50
Olefin, polypropylene, sheer nylon
10 - 20
*Reset cycle to finish the drying cycle. Promptly removing clothes at the end of Load
Time* (Minutes)
Foam rubber - NOTE: Once dryness level has been ...
Owners Manual - Page 9
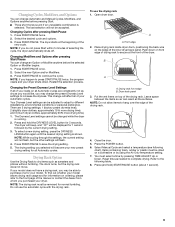
... the current setting will not be removed for 1 second followed by pressing ...Front edge
2. Place drying rack inside dryer drum, positioning the back wire on ordering...Dryer back panel
3. Select Manual Cycle and select a temperature (see following table. 8. Items containing foam, rubber or plastic must be accepted.
Drying rack front edge B.
Press START/PAUSE to dry items such as needed...
Owners Manual - Page 10
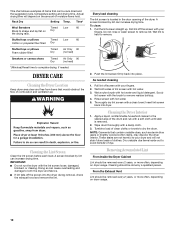
...Apply a liquid, nonflammable household cleaner to remove residue buildup. 4. Dry unstable dye items inside out to complete drying, if needed cleaning 1.
To clean: 1. Pull the...dryer usage. Scrub
lint screen with hot water. 5. Wipe drum thoroughly with hot water and liquid detergent. Removing Accumulated Lint
From Inside the Dryer Cabinet Lint should be removed...
Owners Manual - Page 11

... will be on inside the dryer drum when you are secure in dryer or reconnect power. If you should not require changing; Clean lint screen.
Changing the Drum Light
The dryer light automatically turns on vacation or not using your dryer for Steam Models
Water Inlet Hoses
Replace inlet hoses and hose screen after 5 years of replacement. Remove the screw...
Owners Manual - Page 12

...pockets before laundering.
■ Is it a gas dryer? The drum may be 2 household fuses or circuit breakers for details.
Try the following : Was the drying cycle interrupted by a...power supply available? The dryer will continue to vibrate. Replace the fuse or reset the circuit breaker.
Replace the fuse or reset the circuit breaker.
Electric dryers use 2 household fuses ...
Owners Manual - Page 14
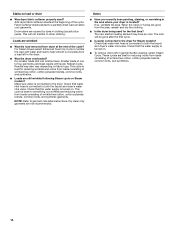
..., common knits, and synthetics.
■ Loads are wrinkled
■ Was the load removed from loads consisting of wrinkle-free cotton, cotton polyester blends, common knits, and synthetics.
14 Make sure water is turned on load or drum
■ Was dryer fabric softener properly used for reducing odors from loads consisting of one to...
Installation Instructions - Page 3
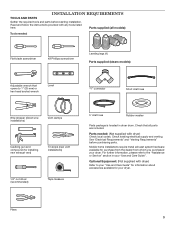
... clamps
Caulking gun and compound (for purchase from the dealer from whom you purchased your dryer.
Parts needed :
Flat-blade screwdriver
#2 Phillips screwdriver
Leveling legs (4) Parts supplied (steam models):
Adjustable wrench that all models):
Tools needed : (Not supplied with dryer) Check local codes. Pliers 3
Check that opens to your "Use and Care Guide" for...
Installation Instructions - Page 5
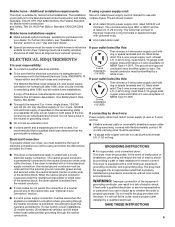
... by a qualified electrician. GROUNDING INSTRUCTIONS
� For a grounded, cord-connected dryer: This dryer must be made in mobile homes to the neutral wire, see "Assistance or... INSTRUCTIONS
5 Additional installation requirements:
This dryer is equipped with a qualified electrician or service representative or personnel if you will be removed from : National Fire Protection Association, ...
Installation Instructions - Page 7
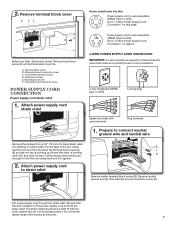
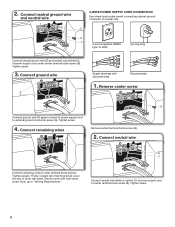
...3-wire receptacle (NEMA Type 10-30R): Go to strain relief
E A B
Remove center terminal block screw (B).
Center terminal block screw D. Neutral ground wire F. Attach... Supply Cord Connection" on the power supply cord is inside the strain relief. Be sure that one tab is ...NEMA type 14-30R)
4-prong plug
Spade terminals with the dryer cabinet and be in place. Hold-down screw (D) and ...
Installation Instructions - Page 8
...Connection
Use where local codes permit connecting cabinet-ground conductor to "Venting Requirements". Connect remaining wires
Remove center terminal block screw (B).
2. Now, go to neutral wire.
Connect neutral wire (white... screw (A). Tighten screw.
4. Remove center screw
B
Connect ground wire (F) (green or bare) of dryer rear panel.
Tighten screw.
3. Tighten screw.
8
Installation Instructions - Page 9

... relief
(C) through the strain relief. Unscrew the removable conduit connector (A) and any
screws from remaining 3 wires.
Reaching inside the terminal block opening (B). Put the threaded section of cable, leaving bare ground wire at 5" (127 mm). 3. Secure cover with the dryer cabinet and be moved if needed. Tighten strain relief screw against the direct wire...
Installation Instructions - Page 10

... connecting cabinet-ground conductor to connect neutral
ground wire and neutral wire
E A B
5. Remove center screw
B Connect ground wire (green or bare) (F) of remaining direct wire cable wires under center screw of extra length so dryer may be moved if needed. 2. Connect ground wire
A F
Place hooked ends of direct wire cable to external ground...
Installation Instructions - Page 11

... with hold -down screw. Tighten screws.
4. Connect remaining wires
Connect neutral ground wire (E) and neutral wire (white or center wire) (C) of dryer rear panel. Squeeze hooked ends together and tighten screws. Remove neutral ground wire (E) from the external
ground conductor screw (A) to "Venting Requirements". Tighten screw.
3. Secure cover with a qualified electrician that...
Installation Instructions - Page 12
... and poor performance.
■■ Do not install in final dryer location.
■■ Remove excess to avoid crushing and kinking. Rigid metal vent:
■■...; Recommended for exhausting.
4" (102 mm)
Angled Hood Elbows: ■■ 45° elbows provide better airflow than 90° elbows. Replace...
Installation Instructions - Page 14
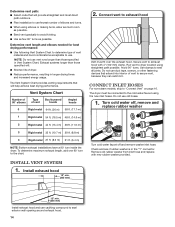
...replace rubber washer
Turn cold water faucet off and remove washer inlet hose.
Connect vent to exhaust hood
Vent must be connected to the cold water faucet using straightest path possible. Run vent to dryer...to use . Determine vent length and elbows needed for best drying performance:
■■...inside the dryer. Avoid 90° turns. The dryer must fit over the exhaust hood.
Installation Instructions - Page 17

... and any dust. q Wipe dryer drum interior thoroughly with the inside of scale through steps to
avoid damaging the surface. Steam models only:
q Be sure the water faucets are on a flat, covered surface, with a damp cloth to the need for leaks around "Y" connector, faucet, and hoses. q Check for certain part replacement or repair. This odor...
Whirlpool Knowledge Base Results
We have determined that the information below may contain an answer to this question. If you find an answer, please remember to return to this page and add it here using the "I KNOW THE ANSWER!" button above. It's that easy to earn points!-
The temperature in my chest freezer is too warm
...needed to keep the freezer at the proper temperature. In order to keep the freezer cool, try...Dryer Refrigerator or Freezer Dishwasher Electric Range, Oven or Cooktop Gas Range, Oven or Cooktop Microwave Trash Compactor Window Air Conditioner Hot Water Dispenser Vent Hood Ice Machine Commercial Laundry... It can take six to remove heat from packages and air space inside the freezer. The freezer's design ... -
Display shows AF - Dryer
Replace any plastic or metal foil vent with lint? Dryers need good ... or exhaust grille inside the dryer drum. This slows moist air from the entire length of the dryer drum after the cycle has ended. My dryer display shows AF.... vent systems. For the best airflow, use it only once. Remove any plastic or metal foil vent with lint and restricting air movement... -
Damp loads or long drying times - Dryer
... vent system lengths. Kinked or crushed exhaust vent material slows moist air from the inside the dryer drum. This slows moist air from moving out of this a new installation? Use... or is less than a hair dryer on dryer use it only once. Remove any fabric softener sheets from leaving the dryer and extends drying time. Replace any plastic or metal foil vent with...
Similar Questions

Dryer Problem
Does this particular dryer have a belt or a chain?
Does this particular dryer have a belt or a chain?
(Posted by pamwebb20002000 9 years ago)


I Have A Gew9868kq3 Electric Dryer. It Runs But Doesn't Heat And Element Replace
I have a Whirlpool GEW9868KQ3 that runs and doesn't heat. The first thing I did was replace the heat...
I have a Whirlpool GEW9868KQ3 that runs and doesn't heat. The first thing I did was replace the heat...
(Posted by bill1kc 10 years ago)
Whirlpool Dryer Wed7300xwo Drum Seal
The Dryer drum felt seal has fallen out into the drum. What is the correct way to replace this seal....
The Dryer drum felt seal has fallen out into the drum. What is the correct way to replace this seal....
(Posted by sidnowak 11 years ago)

Circuit Breaker Trips When Dryer Is Turned On.
we had an old electric dryer that was just tired. ran for years okay and the house we have lived in ...
we had an old electric dryer that was just tired. ran for years okay and the house we have lived in ...
(Posted by lred1024 12 years ago)