Installation Guide
Page 1
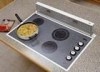
...local electrical inspector's use. Save Installation Instructions for future reference. Part No. 4329225/9763381 Quick Reference Table of Contents: Pages 2 3 4 4 5 6 7- 9 9 10 - 11 12 13 Before you start Electrical requirements Product dimensions Cabinet dimensions Countertop cutout dimensions Vent system requirements Interior-mounted vent motor Installation steps Vent system requirements Exterior-mounted vent motor Installation steps Use and Care Information Accessories Installation Instructions and Use and Care Guide 30" (76.2 cm) 36" (91.4 cm) Retractable (Pop-up) Downdraft Vent...
...local electrical inspector's use. Save Installation Instructions for future reference. Part No. 4329225/9763381 Quick Reference Table of Contents: Pages 2 3 4 4 5 6 7- 9 9 10 - 11 12 13 Before you start Electrical requirements Product dimensions Cabinet dimensions Countertop cutout dimensions Vent system requirements Interior-mounted vent motor Installation steps Vent system requirements Exterior-mounted vent motor Installation steps Use and Care Information Accessories Installation Instructions and Use and Care Guide 30" (76.2 cm) 36" (91.4 cm) Retractable (Pop-up) Downdraft Vent...
Installation Guide
Page 2
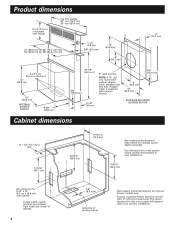
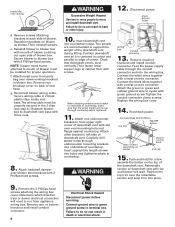
... wiring box cover. The model/serial rating plate is , tell you how to potential hazards that downdraft vent and cooktop location will clear cabinet walls, backsplash, and rear wall studs inside cabinet. All openings in a cabinet with "Create-A-Cooktop" modules, the optional support must be killed or seriously injured if you and others are required if the exterior-mounted vent motor is your appliance. Before making any cutouts and for installation: • safety glasses...
... wiring box cover. The model/serial rating plate is , tell you how to potential hazards that downdraft vent and cooktop location will clear cabinet walls, backsplash, and rear wall studs inside cabinet. All openings in a cabinet with "Create-A-Cooktop" modules, the optional support must be killed or seriously injured if you and others are required if the exterior-mounted vent motor is your appliance. Before making any cutouts and for installation: • safety glasses...
Installation Guide
Page 3
... the wiring box cover. or C.S.A.-listed, 1/2" (12.7 mm) conduit connector must be connected with the electrical rating of the downdraft vent as those published by qualified person(s) in accordance with copper wire only. A wiring diagram is adequate. Electrical requirements IMPORTANT: Observe all applicable Codes and Standards, including fire related construction. A. When cutting or drilling into wall or ceiling, do not damage electrical wiring and other hidden utilities. IMPORTANT: Save Installation instructions...
... the wiring box cover. or C.S.A.-listed, 1/2" (12.7 mm) conduit connector must be connected with the electrical rating of the downdraft vent as those published by qualified person(s) in accordance with copper wire only. A wiring diagram is adequate. Electrical requirements IMPORTANT: Observe all applicable Codes and Standards, including fire related construction. A. When cutting or drilling into wall or ceiling, do not damage electrical wiring and other hidden utilities. IMPORTANT: Save Installation instructions...
Installation Guide
Page 4
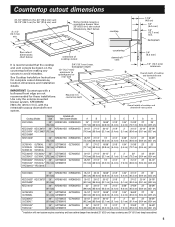
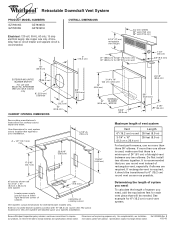
... collar attaches over this vent system will depend upon your installation. 17-9/16" (44.6 cm) all cutouts are for 3-1/4" x 10" (8.3 cm x 25.4 cm) vent system Locate power supply junction box at lower right hand rear corner of cabinet. 4 3/8" (9.5 mm) centerline of cooktop cutout Vent system cutout dimensions for cooktop cutout depth and width. The cutout locations for this hole. Use dimensions for 36" (91.4 cm) vent 1-1/2" (3.8 cm) 3/8" (9.5 mm) 16" (40...
... collar attaches over this vent system will depend upon your installation. 17-9/16" (44.6 cm) all cutouts are for 3-1/4" x 10" (8.3 cm x 25.4 cm) vent system Locate power supply junction box at lower right hand rear corner of cabinet. 4 3/8" (9.5 mm) centerline of cooktop cutout Vent system cutout dimensions for cooktop cutout depth and width. The cutout locations for this hole. Use dimensions for 36" (91.4 cm) vent 1-1/2" (3.8 cm) 3/8" (9.5 mm) 16" (40...
Installation Guide
Page 5
backsplash See cutout dimensions chart below . Use only the exterior-mounted blower system, KPEC992M [900 cfm (25.5 m3/m)], with a bullnosed front edge are not recommended for these installations. Some models require a countertop deeper than standard 25" (63.5 cm) deep countertop and 24" (61.0 cm) deep base cabinet. 5 see cutout dimensions chart below . centerline of cooktop and downdraft vent system Cooktop Models Cooktop Size Installed with Vent System Models KGCS105G 30" KIRD801HSS KIRD802HSS (76.2 cm...
backsplash See cutout dimensions chart below . Use only the exterior-mounted blower system, KPEC992M [900 cfm (25.5 m3/m)], with a bullnosed front edge are not recommended for these installations. Some models require a countertop deeper than standard 25" (63.5 cm) deep countertop and 24" (61.0 cm) deep base cabinet. 5 see cutout dimensions chart below . centerline of cooktop and downdraft vent system Cooktop Models Cooktop Size Installed with Vent System Models KGCS105G 30" KIRD801HSS KIRD802HSS (76.2 cm...
Installation Guide
Page 6
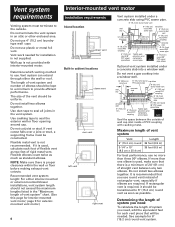
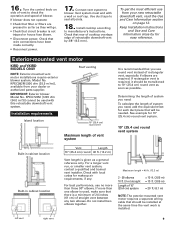
... completely coupling around cap. Do not use 4" (10.2 cm) laundrytype wall caps Do not use round vent instead of PVC coupling with interior-mounted motor. Use caulking tape to seal all joints in the "Maximum length of rigid metal vent. Flexible metal vent is proper clearance within the wall or floor before making exhaust vent cutouts. Vent work needed . The length of vent system and number of system you need : To calculate...
... completely coupling around cap. Do not use 4" (10.2 cm) laundrytype wall caps Do not use round vent instead of PVC coupling with interior-mounted motor. Use caulking tape to seal all joints in the "Maximum length of rigid metal vent. Flexible metal vent is proper clearance within the wall or floor before making exhaust vent cutouts. Vent work needed . The length of vent system and number of system you need : To calculate...
Installation Guide
Page 7
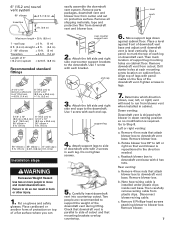
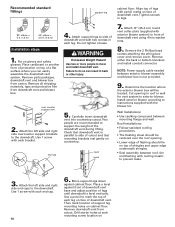
... set on gloves and safety glasses. Remove downdraft vent from plastic clips. Left or right venting: a. over counter support arm 2. Align top of cutout and that attach blower box to mark the top of a flat surface where you can result in each mounting screw location on cabinet floor. Determine which direction (down against front of downdraft vent with pencil marks on cabinet floor. Use a pencil to downdraft vent base. Then mark location of support...
... set on gloves and safety glasses. Remove downdraft vent from plastic clips. Left or right venting: a. over counter support arm 2. Align top of cutout and that attach blower box to mark the top of a flat surface where you can result in each mounting screw location on cabinet floor. Determine which direction (down against front of downdraft vent with pencil marks on cabinet floor. Use a pencil to downdraft vent base. Then mark location of support...
Installation Guide
Page 8
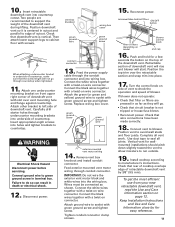
... and install conduit connector. 8 Electrical Shock Hazard Disconnect power before servicing. Failure to countertop. 8. Remove required knockout and install conduit connector. Feed the power supply cable through countertop when tightened. 11. Attach the green (or green and yellow) ground wire to eyelet with slot over down ) electrical connection will need to underside of countertop, make sure that downdraft vent is centered in death or electrical shock. 12. Replace the wiring box cover...
... and install conduit connector. 8 Electrical Shock Hazard Disconnect power before servicing. Failure to countertop. 8. Remove required knockout and install conduit connector. Feed the power supply cable through countertop when tightened. 11. Attach the green (or green and yellow) ground wire to eyelet with slot over down ) electrical connection will need to underside of countertop, make sure that downdraft vent is centered in death or electrical shock. 12. Replace the wiring box cover...
Installation Guide
Page 9
... a minimum of 24 inches (61 cm) of vent system It is not tripped or house fuse blown. • Disconnect power. Use duct tape to blower. Keep Installation Instructions and Use and Care Information close by 3/8" (9.5 mm). Check with local codes for 10" (25.4 cm) round vent system. 10" (25.4 cm) round vent system Built-in cabinet location Built-in as far as they will go. • Check that circuit breaker...
... a minimum of 24 inches (61 cm) of vent system It is not tripped or house fuse blown. • Disconnect power. Use duct tape to blower. Keep Installation Instructions and Use and Care Information close by 3/8" (9.5 mm). Check with local codes for 10" (25.4 cm) round vent system. 10" (25.4 cm) round vent system Built-in cabinet location Built-in as far as they will go. • Check that circuit breaker...
Installation Guide
Page 10
... of downdraft vent. Cut opening . • Lower edge of flashing should be located. Drill starter holes at each mounting screw location on gloves and safety glasses. Remove parts packages, downdraft vent and blower box from cutout. Attach support legs to the downdraft. Carefully insert downdraft vent into countertop cutout. Remove either the back or bottom knockout and install conduit connector. Install exterior blower according to exterior blower. Wall Installations: • Use caulking compound between roof, fan and flashing with...
... of downdraft vent. Cut opening . • Lower edge of flashing should be located. Drill starter holes at each mounting screw location on gloves and safety glasses. Remove parts packages, downdraft vent and blower box from cutout. Attach support legs to the downdraft. Carefully insert downdraft vent into countertop cutout. Remove either the back or bottom knockout and install conduit connector. Install exterior blower according to exterior blower. Wall Installations: • Use caulking compound between roof, fan and flashing with...
Installation Guide
Page 11
... vent to blower. Check that downdraft vent is centered in terminal box. green ground screw green ground wire WARNING Electrical Shock Hazard Disconnect power before servicing. Turn the control knob on wire connector. Keep Installation Instructions and Use and Care Information close by 3/8" (9.5 mm). Replace wiring box cover. Feed exterior-mounted vent motor wiring through the conduit connector and into the wiring box. Position the top trim over vent mounting hole and flange against countertop. Attach other bracket to seal all vent work...
... vent to blower. Check that downdraft vent is centered in terminal box. green ground screw green ground wire WARNING Electrical Shock Hazard Disconnect power before servicing. Turn the control knob on wire connector. Keep Installation Instructions and Use and Care Information close by 3/8" (9.5 mm). Replace wiring box cover. Feed exterior-mounted vent motor wiring through the conduit connector and into the wiring box. Position the top trim over vent mounting hole and flange against countertop. Attach other bracket to seal all vent work...
Installation Guide
Page 12
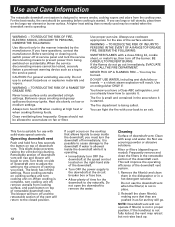
... allowed inside the downdraft, you need. Operating downdraft vent Push and hold for use only. Do Not use to prevent power from being called. Remove the filter(s) and clean them on fan or filter. TO REDUCE THE RISK OF FIRE, ELECTRIC SHOCK, OR INJURY TO PERSONS, OBSERVE THE FOLLOWING: Use this unit only in a hot detergent solution. Before servicing or cleaning unit, switch power off at the circuit breaker box or fuse box. • Allow...
... allowed inside the downdraft, you need. Operating downdraft vent Push and hold for use only. Do Not use to prevent power from being called. Remove the filter(s) and clean them on fan or filter. TO REDUCE THE RISK OF FIRE, ELECTRIC SHOCK, OR INJURY TO PERSONS, OBSERVE THE FOLLOWING: Use this unit only in a hot detergent solution. Before servicing or cleaning unit, switch power off at the circuit breaker box or fuse box. • Allow...
Installation Guide
Page 13
... of purchase, when this warranty does not apply. Damage resulting from your major appliance, to instruct you need service, first see the "Troubleshooting" section of your dealer NOTE: Instructions are excluded from unauthorized modifications made to correct the installation of the Use & Care Guide. Service calls to the appliance. 8. If you how to repair or replace appliance light bulbs, air filters or water filters. In the U.S.A., call...
... of purchase, when this warranty does not apply. Damage resulting from your major appliance, to instruct you need service, first see the "Troubleshooting" section of your dealer NOTE: Instructions are excluded from unauthorized modifications made to correct the installation of the Use & Care Guide. Service calls to the appliance. 8. If you how to repair or replace appliance light bulbs, air filters or water filters. In the U.S.A., call...

Installation Guide
Page 14
.... Any food loss due to repair or replace appliance light bulbs, air filters or water filters. If you how to use your major appliance, to instruct you need service, first see the "Troubleshooting" section of your authorized Whirlpool dealer to the appliance. 9. The removal and reinstallation of the Use & Care Guide. Repairs to parts or systems resulting from warranty coverage. 3. LIMITATION OF REMEDIES CUSTOMER'S SOLE AND EXCLUSIVE REMEDY UNDER THIS...
.... Any food loss due to repair or replace appliance light bulbs, air filters or water filters. If you how to use your major appliance, to instruct you need service, first see the "Troubleshooting" section of your authorized Whirlpool dealer to the appliance. 9. The removal and reinstallation of the Use & Care Guide. Repairs to parts or systems resulting from warranty coverage. 3. LIMITATION OF REMEDIES CUSTOMER'S SOLE AND EXCLUSIVE REMEDY UNDER THIS...
Installation Guide
Page 15
...; Accessory and repair parts sales • Specialized customer assistance (Spanish speaking, hearing impaired, limited vision, etc.) • Referrals to local dealers, service companies, and repair parts distributors Whirlpool-designated service technicians are available to your appliance's complete model and serial numbers, and the purchase date. Requesting Assistance or Service in Canada Call toll-free, 8:30 a.m. To locate the designated service company in the United States. Direct service branches...
...; Accessory and repair parts sales • Specialized customer assistance (Spanish speaking, hearing impaired, limited vision, etc.) • Referrals to local dealers, service companies, and repair parts distributors Whirlpool-designated service technicians are available to your appliance's complete model and serial numbers, and the purchase date. Requesting Assistance or Service in Canada Call toll-free, 8:30 a.m. To locate the designated service company in the United States. Direct service branches...

Installation Guide
Page 16
NOTES Part No. 4329225/9763381 © 2005 Whirlpool Corporation ® Registered trademark/™ trademark of KitchenAid, U.S.A., KitchenAid Canada licensee in Canada 16 Printed in Italy. 10/2005
NOTES Part No. 4329225/9763381 © 2005 Whirlpool Corporation ® Registered trademark/™ trademark of KitchenAid, U.S.A., KitchenAid Canada licensee in Canada 16 Printed in Italy. 10/2005
Dimension Guide
Page 1
Use copper wire only. A timedelay fuse or circuit breaker and separate circuit is required, it should be needed. KPEC992M [900 cfm (25.5 m3/m)] only 9" (22.9 cm) Diameter CABINET OPENING DIMENSIONS 8" (20,3 cm) 16" (40.6 cm) See cooktop manufacturer's instructions for 6" (15.2 cm) round vent system. If rectangular vent is recommended. centerline of cabinet. The cutout locations for 36" (91.4 cm) vent 1-1/2" (3.8 cm) 3/8" (9.5 mm) 16" (40.6 cm) EXTERIOR-MOUNTED BLOWER MOTOR...
Use copper wire only. A timedelay fuse or circuit breaker and separate circuit is required, it should be needed. KPEC992M [900 cfm (25.5 m3/m)] only 9" (22.9 cm) Diameter CABINET OPENING DIMENSIONS 8" (20,3 cm) 16" (40.6 cm) See cooktop manufacturer's instructions for 6" (15.2 cm) round vent system. If rectangular vent is recommended. centerline of cabinet. The cutout locations for 36" (91.4 cm) vent 1-1/2" (3.8 cm) 3/8" (9.5 mm) 16" (40.6 cm) EXTERIOR-MOUNTED BLOWER MOTOR...
Warranty Information
Page 1
... Service" section or by a Whirlpool designated service company. If you how to use your authorized Whirlpool dealer to repair or replace appliance light bulbs, air filters or water filters. After checking "Troubleshooting," additional help can be repaired in accordance with published installation instructions. Service calls to determine if another warranty applies. Any food loss due to or furnished with electrical or plumbing codes, or use . 4. This major appliance is not installed...
... Service" section or by a Whirlpool designated service company. If you how to use your authorized Whirlpool dealer to repair or replace appliance light bulbs, air filters or water filters. After checking "Troubleshooting," additional help can be repaired in accordance with published installation instructions. Service calls to determine if another warranty applies. Any food loss due to or furnished with electrical or plumbing codes, or use . 4. This major appliance is not installed...


