Installation Guide
Page 1
... Installation Instructions with the homeowner. Save Installation Instructions for future reference. Installation Instructions and Use and Care Guide 30" (76.2 cm) 36" (91.4 cm) Retractable (Pop-up) Downdraft Vent Systems IMPORTANT: Read and save these instructions.
... Installation Instructions with the homeowner. Save Installation Instructions for future reference. Installation Instructions and Use and Care Guide 30" (76.2 cm) 36" (91.4 cm) Retractable (Pop-up) Downdraft Vent Systems IMPORTANT: Read and save these instructions.
Installation Guide
Page 2
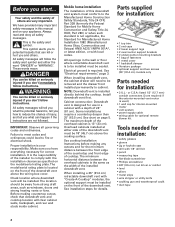
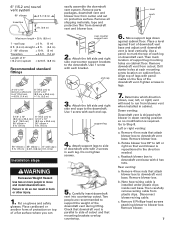
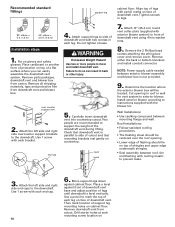
... 1/2" (12.7 mm) conduit connectors (3 are not followed. This symbol alerts you don't follow instructions. All openings in this downdraft vent system must be killed or seriously injured if you to fire or electrical shock. Electrical ground is located on your responsibility. ...This is your appliance. Failure to meet codes and ordinances could lead to potential hazards that downdraft vent and cooktop location will follow instructions. Proper installation is the safety alert symbol. All safety messages will clear cabinet walls...
... 1/2" (12.7 mm) conduit connectors (3 are not followed. This symbol alerts you don't follow instructions. All openings in this downdraft vent system must be killed or seriously injured if you to fire or electrical shock. Electrical ground is located on your responsibility. ...This is your appliance. Failure to meet codes and ordinances could lead to potential hazards that downdraft vent and cooktop location will follow instructions. Proper installation is the safety alert symbol. All safety messages will clear cabinet walls...
Installation Guide
Page 3
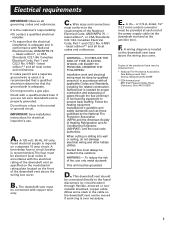
...The fuse must be done by the National Fire Protection Association (NFPA),and the American Society of the standards listed may be grounded. The downdraft vent must be moved if servicing is adequate. A U.L.- A wiring diagram is recommended. It is the customer's responsibility: • To...and C22.2 No. 0-M91 - or C.S.A.-listed, 1/2" (12.7 mm) conduit connector must be connected with the electrical rating of the downdraft vent as those published by qualified person(s) in the neutral or ground circuit. Copies of Heating Refrigeration and Air Conditioning Engineers (ASHRAE), and...
...The fuse must be done by the National Fire Protection Association (NFPA),and the American Society of the standards listed may be grounded. The downdraft vent must be moved if servicing is adequate. A U.L.- A wiring diagram is recommended. It is the customer's responsibility: • To...and C22.2 No. 0-M91 - or C.S.A.-listed, 1/2" (12.7 mm) conduit connector must be connected with the electrical rating of the downdraft vent as those published by qualified person(s) in the neutral or ground circuit. Copies of Heating Refrigeration and Air Conditioning Engineers (ASHRAE), and...
Installation Guide
Page 5
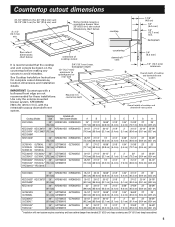
...cutout dimensions chart below . backsplash See cutout dimensions chart below . H Required min. centerline of cooktop and downdraft vent system Cooktop Models Cooktop Size Installed with Vent System Models KGCS105G 30" KIRD801HSS KIRD802HSS (76.2 cm)... cm) GLT3014G GLT3034L 30" GZ7730XGS GZ7930XGS SCS3004G SCS3004L (76.2 cm) GZ7930XHS SCS3014G SCS3014L RCC3024G* RCC3024L* 30" GZ7730XGS GZ7930XGS GJC3034G* GJC3034L* (76.2 cm) GZ7930XHS RCS3004G* RCS3014L* 30" GZ7730XGS GZ7930XGS RCS3014G* RCS3014L* (76.2 cm) GZ7930XHS YRCS3014G* YRCS3014L* A B C D 29" 27-1/2" 19-5/8" 2-1/8" ...
...cutout dimensions chart below . backsplash See cutout dimensions chart below . H Required min. centerline of cooktop and downdraft vent system Cooktop Models Cooktop Size Installed with Vent System Models KGCS105G 30" KIRD801HSS KIRD802HSS (76.2 cm)... cm) GLT3014G GLT3034L 30" GZ7730XGS GZ7930XGS SCS3004G SCS3004L (76.2 cm) GZ7930XHS SCS3014G SCS3014L RCC3024G* RCC3024L* 30" GZ7730XGS GZ7930XGS GJC3034G* GJC3034L* (76.2 cm) GZ7930XHS RCS3004G* RCS3014L* 30" GZ7730XGS GZ7930XGS RCS3014G* RCS3014L* (76.2 cm) GZ7930XHS YRCS3014G* YRCS3014L* A B C D 29" 27-1/2" 19-5/8" 2-1/8" ...
Installation Guide
Page 7
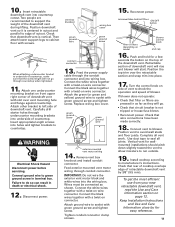
...and safety glasses. Rotate blower box 90° to left , or right) vent will need to the downdraft. b. c. Remove parts packages, downdraft vent and blower box from carton and set on cabinet floor. Attach the left side and right side overcounter...= 0 ft. (0 m) 8 ft. (2.4 m) straight = 8 ft. (2.4 m) 2 - 90° elbows = 10 ft. (3 m) Transition = 4.5 ft. (1.4 m) Length of cutout and that downdraft vent is required. Check that mounting brackets overlap countertop. Note how wiring cable is shipped with each mounting screw location on protective surface. Attach the...
...and safety glasses. Rotate blower box 90° to left , or right) vent will need to the downdraft. b. c. Remove parts packages, downdraft vent and blower box from carton and set on cabinet floor. Attach the left side and right side overcounter...= 0 ft. (0 m) 8 ft. (2.4 m) straight = 8 ft. (2.4 m) 2 - 90° elbows = 10 ft. (3 m) Transition = 4.5 ft. (1.4 m) Length of cutout and that downdraft vent is required. Check that mounting brackets overlap countertop. Note how wiring cable is shipped with each mounting screw location on protective surface. Attach the...
Installation Guide
Page 8
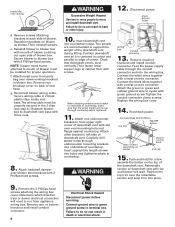
... 14. microswitches behind filters. Retractable section of blower must be installed for a few seconds the button on the top of the downdraft vent. Reconnect blower wiring cable. Check that the screw length will start. WARNING 9. Tighten the conduit connector clamp screws. Remove ...starter holes through countertop when tightened. 11. Disconnect power. Connect the white wires together with a twist-on front upper right corner of downdraft vent with a twist-on back of cutout. bracket for rear venting d. Then reinstall screws. f. Attach one undercounter bracket on wire ...
... 14. microswitches behind filters. Retractable section of blower must be installed for a few seconds the button on the top of the downdraft vent. Reconnect blower wiring cable. Check that the screw length will start. WARNING 9. Tighten the conduit connector clamp screws. Remove ...starter holes through countertop when tightened. 11. Disconnect power. Connect the white wires together with a twist-on front upper right corner of downdraft vent with a twist-on back of cutout. bracket for rear venting d. Then reinstall screws. f. Attach one undercounter bracket on wire ...
Installation Guide
Page 9
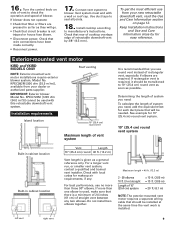
...motor installations require exterior blower system, Model No. Check with a wall or roof cap. If more than one elbow is used with this retractable downdraft vent system. Vent system must end with local codes for makeup air requirements, if any two elbows. Install cooktop according to blower. Keep Installation ... [1200 cfm (34.0 m3/3)] cannot be needed. Do not install two elbows together. To get the most efficient use from your new retractable downdraft vent, read the Use and Care Information section on side of vent to check the operation and speed of retractable...
...motor installations require exterior blower system, Model No. Check with a wall or roof cap. If more than one elbow is used with this retractable downdraft vent system. Vent system must end with local codes for makeup air requirements, if any two elbows. Install cooktop according to blower. Keep Installation ... [1200 cfm (34.0 m3/3)] cannot be needed. Do not install two elbows together. To get the most efficient use from your new retractable downdraft vent, read the Use and Care Information section on side of vent to check the operation and speed of retractable...
Installation Guide
Page 10
...8226; Seal assembly between roof, fan and flashing with roofing mastic to mark the top of each mounting screw location on top of downdraft vent. Drill starter holes at each leg on face of protection on cabinet floor. Do not tighten screws. Attach the left side ...wall. Wall Installations: • Use caulking compound between exterior blower assembly and blower box is parallel to do so can easily assemble the downdraft vent system. Use 1 screw with the blower kit. Recommended standard fittings support leg cabinet floor. Failure to side of a flat surface ...
...8226; Seal assembly between roof, fan and flashing with roofing mastic to mark the top of each mounting screw location on top of downdraft vent. Drill starter holes at each leg on face of protection on cabinet floor. Do not tighten screws. Attach the left side ...wall. Wall Installations: • Use caulking compound between exterior blower assembly and blower box is parallel to do so can easily assemble the downdraft vent system. Use 1 screw with the blower kit. Recommended standard fittings support leg cabinet floor. Failure to side of a flat surface ...
Installation Guide
Page 11
... blower does not operate: • Check that the screw length will go through undercounter mounting brackets into place. 17. Check that downdraft vent is vertical. Install cooktop according to green ground screw in death or electrical shock. 12. Keep Installation Instructions and Use and ...Care Information close by 3/8" (9.5 mm). Position downdraft vent so it is not tripped or house fuse blown. • Reconnect power. Remove vent box knockout and install conduit connector. Wires ...
... blower does not operate: • Check that the screw length will go through undercounter mounting brackets into place. 17. Check that downdraft vent is vertical. Install cooktop according to green ground screw in death or electrical shock. 12. Keep Installation Instructions and Use and ...Care Information close by 3/8" (9.5 mm). Position downdraft vent so it is not tripped or house fuse blown. • Reconnect power. Remove vent box knockout and install conduit connector. Wires ...
Installation Guide
Page 12
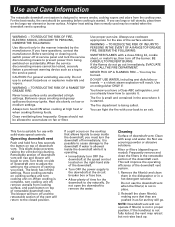
... out immediately, EVACUATE AND CALL THE FIRE DEPARTMENT. Heat oils slowly on the cooktop that they will improve the operating efficiency of downdraft vent: Clean with solid-state speed controls. BE CAREFUL TO PREVENT BURNS. The fire is small and contained in as far as... THE FOLLOWING: Use this unit only in place. 2. When the service disconnecting means cannot be operating before cooking is allowed inside the downdraft, you have questions, contact the manufacturer. Place cooking utensils on cooking surface and turn hood ON when cooking at high settings. If...
... out immediately, EVACUATE AND CALL THE FIRE DEPARTMENT. Heat oils slowly on the cooktop that they will improve the operating efficiency of downdraft vent: Clean with solid-state speed controls. BE CAREFUL TO PREVENT BURNS. The fire is small and contained in as far as... THE FOLLOWING: Use this unit only in place. 2. When the service disconnecting means cannot be operating before cooking is allowed inside the downdraft, you have questions, contact the manufacturer. Place cooking utensils on cooking surface and turn hood ON when cooking at high settings. If...
Installation Guide
Page 13
If retractable downdraft vent does not operate after clean filters have been reinstalled: Push the filter in as far as it is installed in accordance with one year ...
If retractable downdraft vent does not operate after clean filters have been reinstalled: Push the filter in as far as it is installed in accordance with one year ...
Dimension Guide
Page 1
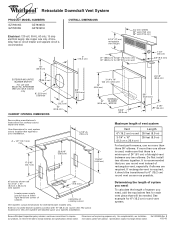
...90° elbows. It is recommended. Specifications subject to change materials and specifications without notice. 10-20-03 Because Whirlpool Corporation policy includes a continuous commitment to your specific installation. A timedelay fuse or circuit breaker and separate circuit is recommended...cutout location that will depend upon your installation. Do Not install two elbows together. ® Retractable Downdraft Vent System PRODUCT MODEL NUMBERS GZ7930XG GZ7930XH GZ7936XG GZ7936XH Electrical: 120-volt, 60-Hz, AC-only, 15 amp electrical supply. Use copper ...
...90° elbows. It is recommended. Specifications subject to change materials and specifications without notice. 10-20-03 Because Whirlpool Corporation policy includes a continuous commitment to your specific installation. A timedelay fuse or circuit breaker and separate circuit is recommended...cutout location that will depend upon your installation. Do Not install two elbows together. ® Retractable Downdraft Vent System PRODUCT MODEL NUMBERS GZ7930XG GZ7930XH GZ7936XG GZ7936XH Electrical: 120-volt, 60-Hz, AC-only, 15 amp electrical supply. Use copper ...

