Installation Guide
Page 1
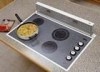
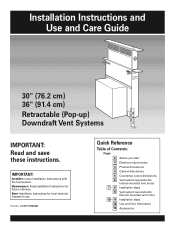
... Vent system requirements Exterior-mounted vent motor Installation steps Use and Care Information Accessories IMPORTANT: Installer: Leave Installation Instructions with the homeowner. Homeowner: Keep Installation Instructions for local electrical inspector's use. Installation Instructions and Use and Care Guide 30" (76.2 cm) 36" (91.4 cm) Retractable (Pop-up) Downdraft Vent Systems IMPORTANT: Read and save these instructions. Save...
... Vent system requirements Exterior-mounted vent motor Installation steps Use and Care Information Accessories IMPORTANT: Installer: Leave Installation Instructions with the homeowner. Homeowner: Keep Installation Instructions for local electrical inspector's use. Installation Instructions and Use and Care Guide 30" (76.2 cm) 36" (91.4 cm) Retractable (Pop-up) Downdraft Vent Systems IMPORTANT: Read and save these instructions. Save...
Installation Guide
Page 2
...others are very important. All openings in the wall or floor where retractable downdraft vent is the same as windows, doors and strong heating vents or fans. Install downdraft vent first. The minimum horizontal distance between the front edge of the ...1 bag of others . See "Electrical requirements," page 3. When installing downdraft vent, the cabinet drawer will clear cabinet walls, backsplash, and rear wall studs inside cabinet. NOTE: Downdraft vent is the safety alert symbol. See installation steps for installation: • safety glasses • gloves • jig or...
...others are very important. All openings in the wall or floor where retractable downdraft vent is the same as windows, doors and strong heating vents or fans. Install downdraft vent first. The minimum horizontal distance between the front edge of the ...1 bag of others . See "Electrical requirements," page 3. When installing downdraft vent, the cabinet drawer will clear cabinet walls, backsplash, and rear wall studs inside cabinet. NOTE: Downdraft vent is the safety alert symbol. See installation steps for installation: • safety glasses • gloves • jig or...
Installation Guide
Page 3
...) of fire, use . A. TO REDUCE THE RISK OF FIRE, ELECTRIC SHOCK, OR INJURY TO PERSONS, OBSERVE THE FOLLOWING: Installation work and electrical wiring must conform to the outdoors. Sufficient air is properly grounded. A U.L.- Copies of Heating Refrigeration and Air Conditioning... wire is used, it is recommended that a qualified electrician determine that the electrical installation is located on the downdraft vent base above the wiring box cover. IMPORTANT: Save Installation instructions for proper combustion and exhausting of gases through flexible, armored or nonmetallic sheathed...
...) of fire, use . A. TO REDUCE THE RISK OF FIRE, ELECTRIC SHOCK, OR INJURY TO PERSONS, OBSERVE THE FOLLOWING: Installation work and electrical wiring must conform to the outdoors. Sufficient air is properly grounded. A U.L.- Copies of Heating Refrigeration and Air Conditioning... wire is used, it is recommended that a qualified electrician determine that the electrical installation is located on the downdraft vent base above the wiring box cover. IMPORTANT: Save Installation instructions for proper combustion and exhausting of gases through flexible, armored or nonmetallic sheathed...
Installation Guide
Page 4
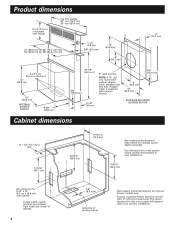
... locations for cooktop cutout depth and width. NOTE: A 10" (2.5 cm) round vent system adapter collar attaches over this vent system will depend upon your installation. 17-9/16" (44.6 cm) all cutouts are for 3-1/4" x 10" (8.3 cm x 25.4 cm) vent system Locate power supply junction box at... 9-3/8" (23.8 cm) 26-1/8" (66.4 cm) 5/8" (15.9 mm) 9" (22.9 cm) Dia. Use dimensions for vent system cutout location that applies to your specific installation. Product dimensions 8-1/4" (21 cm) retractable vent height top trim widths 30" vent (76.2 cm) 36" vent (91.4 cm) 27" (68.6 cm) for 30" ...
... locations for cooktop cutout depth and width. NOTE: A 10" (2.5 cm) round vent system adapter collar attaches over this vent system will depend upon your installation. 17-9/16" (44.6 cm) all cutouts are for 3-1/4" x 10" (8.3 cm x 25.4 cm) vent system Locate power supply junction box at... 9-3/8" (23.8 cm) 26-1/8" (66.4 cm) 5/8" (15.9 mm) 9" (22.9 cm) Dia. Use dimensions for vent system cutout location that applies to your specific installation. Product dimensions 8-1/4" (21 cm) retractable vent height top trim widths 30" vent (76.2 cm) 36" vent (91.4 cm) 27" (68.6 cm) for 30" ...
Installation Guide
Page 5
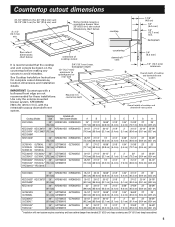
...downdraft vent system Cooktop Models Cooktop Size Installed with Vent System Models KGCS105G 30" KIRD801HSS KIRD802HSS (76.2 cm) KECC502G* KECC507G* 30" KIRD801HSS KIRD802HSS KECC507K* KECC508G* (76.2 cm) KECC508M* KECS100G* 30" KIRD801HSS KIRD802HSS (76.2 cm) GLT3014G GLT3034L 30" GZ7730XGS GZ7930XGS SCS3004G SCS3004L (76.2 cm) GZ7930XHS...85.9 cm) (48.3 cm) (6.4 cm) (7.6 cm) (95.6 cm) (58.4 cm) (65.1 cm) * Installation with the retractable popup downdraft vent system. backsplash depth 1/2" (12.7 mm) minimum to avoid mistakes. Use only the exterior-mounted blower system, KPEC992M [...
...downdraft vent system Cooktop Models Cooktop Size Installed with Vent System Models KGCS105G 30" KIRD801HSS KIRD802HSS (76.2 cm) KECC502G* KECC507G* 30" KIRD801HSS KIRD802HSS KECC507K* KECC508G* (76.2 cm) KECC508M* KECS100G* 30" KIRD801HSS KIRD802HSS (76.2 cm) GLT3014G GLT3034L 30" GZ7730XGS GZ7930XGS SCS3004G SCS3004L (76.2 cm) GZ7930XHS...85.9 cm) (48.3 cm) (6.4 cm) (7.6 cm) (95.6 cm) (58.4 cm) (65.1 cm) * Installation with the retractable popup downdraft vent system. backsplash depth 1/2" (12.7 mm) minimum to avoid mistakes. Use only the exterior-mounted blower system, KPEC992M [...
Installation Guide
Page 6
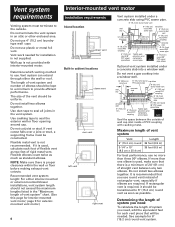
... used , calculate each vent piece that will be needed for exteriormounted vent motor.) 6 Interior-mounted vent motor Installation requirements Island location down vent rear vent left vent right vent Vent system installed under a concrete slab into a window well. 12" (30.5 cm) minimum wall cap 6" (15.2 ...is used , make sure that you need , add the equivalent feet for each foot of flexible vent as standard elbows. Do not install two elbows together. Flexible elbows count twice as much as two feet of rectangular vent, especially if elbows are required. Vent system requirements ...
... used , calculate each vent piece that will be needed for exteriormounted vent motor.) 6 Interior-mounted vent motor Installation requirements Island location down vent rear vent left vent right vent Vent system installed under a concrete slab into a window well. 12" (30.5 cm) minimum wall cap 6" (15.2 ...is used , make sure that you need , add the equivalent feet for each foot of flexible vent as standard elbows. Do not install two elbows together. Flexible elbows count twice as much as two feet of rectangular vent, especially if elbows are required. Vent system requirements ...
Installation Guide
Page 7
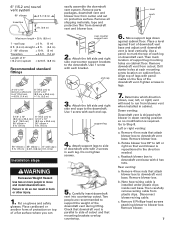
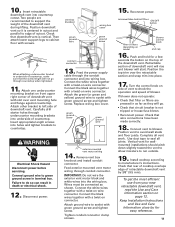
...support leg 4. Carefully insert downdraft vent into countertop cutout. Remove downdraft vent from downdraft vent and blower box. Drill starter holes at each leg on downdraft vent. Go to the downdraft. Remove 4 hex nuts that attach blower box to move and install downdraft vent. Note how wiring ...of a flat surface where you can result in cabinet. Disconnect blower wiring cable. Put on top of cutout and that downdraft vent is installed under plastic clips inside vent base. over counter support arm 2. Check that mounting brackets overlap countertop. Move support legs down...
...support leg 4. Carefully insert downdraft vent into countertop cutout. Remove downdraft vent from downdraft vent and blower box. Drill starter holes at each leg on downdraft vent. Go to the downdraft. Remove 4 hex nuts that attach blower box to move and install downdraft vent. Note how wiring ...of a flat surface where you can result in cabinet. Disconnect blower wiring cable. Put on top of cutout and that downdraft vent is installed under plastic clips inside vent base. over counter support arm 2. Check that mounting brackets overlap countertop. Move support legs down...
Installation Guide
Page 8
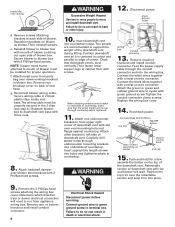
NOTE: Square metal frame attached to mouth of blower must be installed for a few seconds the button on the top of the downdraft vent during lifting. g. Failure to do so can result in death or electrical shock. 12. Connect the white wires together .... 14. Two people are recommended to eyelet with screws. When attaching undercounter bracket to move and install downdraft vent. Remove rear knockout cover on front upper right corner of downdraft vent. WARNING Excessive Weight Hazard Use two or more people to underside of blower. Connect ground wire...
NOTE: Square metal frame attached to mouth of blower must be installed for a few seconds the button on the top of the downdraft vent during lifting. g. Failure to do so can result in death or electrical shock. 12. Connect the white wires together .... 14. Two people are recommended to eyelet with screws. When attaching undercounter bracket to move and install downdraft vent. Remove rear knockout cover on front upper right corner of downdraft vent. WARNING Excessive Weight Hazard Use two or more people to underside of blower. Connect ground wire...
Installation Guide
Page 9
...-mounted vent motor KIRD and YKIRD MODELS ONLY NOTE: Exterior-mounted vent motor installations require exterior blower system, Model No. Vent system must end with this retractable downdraft vent system. Do not install two elbows together. Check that filter or filters are pressed in cabinet location Vent Length... vent, especially if elbows are required. Connect vent system to 10" (25.4 cm) round vent as soon as they will be installed at the same time the vent work is recommended that you need , add the equivalent feet for easy reference. IMPORTANT: Exterior blower Model...
...-mounted vent motor KIRD and YKIRD MODELS ONLY NOTE: Exterior-mounted vent motor installations require exterior blower system, Model No. Vent system must end with this retractable downdraft vent system. Do not install two elbows together. Check that filter or filters are pressed in cabinet location Vent Length... vent, especially if elbows are required. Connect vent system to 10" (25.4 cm) round vent as soon as they will be installed at the same time the vent work is recommended that you need , add the equivalent feet for easy reference. IMPORTANT: Exterior blower Model...
Installation Guide
Page 10
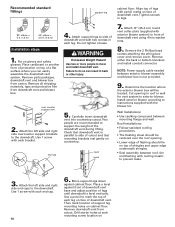
... mark the top of each mounting screw location on face of flashing should be located. Cut opening . • Lower edge of downdraft vent. Wall Installations: • Use caulking compound between exterior blower assembly and blower box is not provided. 9. Use 1 screw with pencil marks on top...Do not tighten screws. Tighten screws in back or other injury. Use 1 screw with the blower kit. Install exterior blower according to do so can easily assemble the downdraft vent system. Check that mounting brackets rest gently on top of support leg mounting holes on gloves and safety...
... mark the top of each mounting screw location on face of flashing should be located. Cut opening . • Lower edge of downdraft vent. Wall Installations: • Use caulking compound between exterior blower assembly and blower box is not provided. 9. Use 1 screw with pencil marks on top...Do not tighten screws. Tighten screws in back or other injury. Use 1 screw with the blower kit. Install exterior blower according to do so can easily assemble the downdraft vent system. Check that mounting brackets rest gently on top of support leg mounting holes on gloves and safety...
Installation Guide
Page 11
...tape to eyelet with a twist-on wire connector. Vertical vent for easy reference. 11 Keep Installation Instructions and Use and Care Information close by 3/8" (9.5 mm). Insert retractable downdraft vent into wiring box. Feed the power supply cable through countertop when tightened. 11. If ...• Check that filter or filters are recommended to edge of retractable downdraft vent by for wallmounted installations should pitch down slightly toward the vent to allow moisture to manufacturer's instructions. Install cooktop according to run outside. 19. To get the most efficient use...
...tape to eyelet with a twist-on wire connector. Vertical vent for easy reference. 11 Keep Installation Instructions and Use and Care Information close by 3/8" (9.5 mm). Insert retractable downdraft vent into wiring box. Feed the power supply cable through countertop when tightened. 11. If ...• Check that filter or filters are recommended to edge of retractable downdraft vent by for wallmounted installations should pitch down slightly toward the vent to allow moisture to manufacturer's instructions. Install cooktop according to run outside. 19. To get the most efficient use...
Installation Guide
Page 13
...with the product, KitchenAid or KitchenAid Canada (hereafter "KitchenAid") will go. Service calls to correct the installation of God, improper installation, installation not in accordance with published installation instructions. Service calls to repair or replace appliance light bulbs, air filters or water filters. Damage ...units operated outside the United States or Canada. 6. If retractable downdraft vent does not operate after clean filters have been reinstalled: Push the filter in as far as it is installed in an inaccessible location or is operated and maintained according to...
...with the product, KitchenAid or KitchenAid Canada (hereafter "KitchenAid") will go. Service calls to correct the installation of God, improper installation, installation not in accordance with published installation instructions. Service calls to repair or replace appliance light bulbs, air filters or water filters. Damage ...units operated outside the United States or Canada. 6. If retractable downdraft vent does not operate after clean filters have been reinstalled: Push the filter in as far as it is installed in an inaccessible location or is operated and maintained according to...

Installation Guide
Page 14
... one year from the date of purchase, when this warranty does not apply. Repairs when your appliance if it is installed in an inaccessible location or is not installed in remote locations. 10. WHIRLPOOL SHALL NOT BE LIABLE FOR INCIDENTAL OR CONSEQUENTIAL DAMAGES. Repairs to parts or systems resulting from warranty coverage. 3. SOME...
... one year from the date of purchase, when this warranty does not apply. Repairs when your appliance if it is installed in an inaccessible location or is not installed in remote locations. 10. WHIRLPOOL SHALL NOT BE LIABLE FOR INCIDENTAL OR CONSEQUENTIAL DAMAGES. Repairs to parts or systems resulting from warranty coverage. 3. SOME...
Installation Guide
Page 15
... appliance's complete model and serial numbers, and the purchase date. To locate factory-authorized parts in your area, call the Whirlpool Customer Interaction Center toll-free at 1-800-442-1111. • Installation information • Use and maintenance procedures • Accessory and repair parts sales • Specialized customer assistance (Spanish speaking, hearing impaired...
... appliance's complete model and serial numbers, and the purchase date. To locate factory-authorized parts in your area, call the Whirlpool Customer Interaction Center toll-free at 1-800-442-1111. • Installation information • Use and maintenance procedures • Accessory and repair parts sales • Specialized customer assistance (Spanish speaking, hearing impaired...
Dimension Guide
Page 1
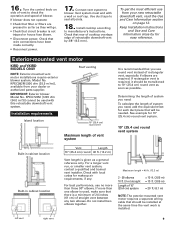
® Retractable Downdraft Vent System PRODUCT MODEL NUMBERS GZ7930XG GZ7930XH GZ7936XG GZ7936XH Electrical: 120-volt, 60-Hz, AC-only, 15 amp electrical supply. Use copper wire only. A timedelay fuse or circuit breaker and ...instructions for 6" (15.2 cm) round vent system. It is required, it should be needed. If rectangular vent is recommended that will depend upon your installation. Because Whirlpool Corporation policy includes a continuous commitment to 6" (15.2 cm) round vent as soon as possible. Use dimensions for vent system cutout location that there is ...
® Retractable Downdraft Vent System PRODUCT MODEL NUMBERS GZ7930XG GZ7930XH GZ7936XG GZ7936XH Electrical: 120-volt, 60-Hz, AC-only, 15 amp electrical supply. Use copper wire only. A timedelay fuse or circuit breaker and ...instructions for 6" (15.2 cm) round vent system. It is required, it should be needed. If rectangular vent is recommended that will depend upon your installation. Because Whirlpool Corporation policy includes a continuous commitment to 6" (15.2 cm) round vent as soon as possible. Use dimensions for vent system cutout location that there is ...
Warranty Information
Page 1
... PERIOD ALLOWED BY LAW. Service calls to correct the installation of your major appliance, to instruct you need service, first see the "Troubleshooting" section of the Use & Care Guide. Pickup and delivery. WHIRLPOOL SHALL NOT BE LIABLE FOR INCIDENTAL OR CONSEQUENTIAL DAMAGES. ... parts are excluded from accident, alteration, misuse, abuse, fire, flood, acts of God, improper installation, installation not in the home. 8. If you how to use . 4. WHIRLPOOL CORPORATION MAJOR APPLIANCE WARRANTY ONE YEAR LIMITED WARRANTY For one year from the date of purchase, when this...
... PERIOD ALLOWED BY LAW. Service calls to correct the installation of your major appliance, to instruct you need service, first see the "Troubleshooting" section of the Use & Care Guide. Pickup and delivery. WHIRLPOOL SHALL NOT BE LIABLE FOR INCIDENTAL OR CONSEQUENTIAL DAMAGES. ... parts are excluded from accident, alteration, misuse, abuse, fire, flood, acts of God, improper installation, installation not in the home. 8. If you how to use . 4. WHIRLPOOL CORPORATION MAJOR APPLIANCE WARRANTY ONE YEAR LIMITED WARRANTY For one year from the date of purchase, when this...

