Dimension Guide
Page 1
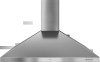
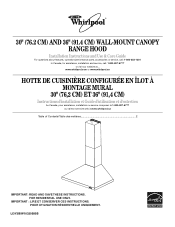
..." (76.2 cm) or 36" (91.4 cm) 10" (25.4 cm) 20" (50.8 cm) 1" (4.0 cm) Because Whirlpool Corporation policy includes a continuous commitment to improve our Dimensions are for installation (not included). PRODUCT DIMENSIONS 7¹⁄₈" 8¹⁄₁₆" (18.1 cm) (20.5 cm) Vent Piece 45°... comply with product. ® 30" (76.2 CM) AND 36" (91.4 CM) Wall-Mount Canopy Range Hood PRODUCT MODEL NUMBERS GXW7330DX GXW7336DX ELECTRICAL REQUIREMENTS • A 120 volt, 60 Hz, AC only, 15- or 20-amp, fused electrical circuit is factory set for venting through...
..." (76.2 cm) or 36" (91.4 cm) 10" (25.4 cm) 20" (50.8 cm) 1" (4.0 cm) Because Whirlpool Corporation policy includes a continuous commitment to improve our Dimensions are for installation (not included). PRODUCT DIMENSIONS 7¹⁄₈" 8¹⁄₁₆" (18.1 cm) (20.5 cm) Vent Piece 45°... comply with product. ® 30" (76.2 CM) AND 36" (91.4 CM) Wall-Mount Canopy Range Hood PRODUCT MODEL NUMBERS GXW7330DX GXW7336DX ELECTRICAL REQUIREMENTS • A 120 volt, 60 Hz, AC only, 15- or 20-amp, fused electrical circuit is factory set for venting through...
Dimension Guide
Page 2
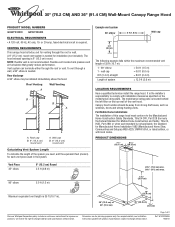
...W10320580A 9/20/10 IMPORTANT: Minimum distance "X": 24" (61.0 cm) from your dealer or an authorized parts distributor. Because Whirlpool Corporation policy includes a continuous commitment to improve Dimensions are adjustable and designed to meet varying ceiling or soffit heights depending on the... extension replaces the upper chimney shipped with product. Page 2 of the range hood and the cooking surface. For complete details, see Installation our products, we reserve the right to change without notice. CABINET DIMENSIONS 7¹⁄₄" (18.4 cm) 6⁵⁄₈...
...W10320580A 9/20/10 IMPORTANT: Minimum distance "X": 24" (61.0 cm) from your dealer or an authorized parts distributor. Because Whirlpool Corporation policy includes a continuous commitment to improve Dimensions are adjustable and designed to meet varying ceiling or soffit heights depending on the... extension replaces the upper chimney shipped with product. Page 2 of the range hood and the cooking surface. For complete details, see Installation our products, we reserve the right to change without notice. CABINET DIMENSIONS 7¹⁄₄" (18.4 cm) 6⁵⁄₈...

Use & Care Guide
Page 1
... UNIQUEMENT. LI3Y3B/W10320580B www.whirlpool.com or www.whirlpool.ca HOTTE DE CUISINIÈRE CONFIGURÉE EN ÎLOT À MONTAGE MURAL 30" (76,2 CM) ET 36" (91,4 CM) Instructions d'installation et Guide d'utilisation et d'entretien Au Canada, pour assistance, installation ou service composez le ...1-800-807-6777 ou visitez notre site web à www.whirlpool.ca Table of Contents/Table des matières 2 IMPORTANT: READ AND...
... UNIQUEMENT. LI3Y3B/W10320580B www.whirlpool.com or www.whirlpool.ca HOTTE DE CUISINIÈRE CONFIGURÉE EN ÎLOT À MONTAGE MURAL 30" (76,2 CM) ET 36" (91,4 CM) Instructions d'installation et Guide d'utilisation et d'entretien Au Canada, pour assistance, installation ou service composez le ...1-800-807-6777 ou visitez notre site web à www.whirlpool.ca Table of Contents/Table des matières 2 IMPORTANT: READ AND...
Use & Care Guide
Page 2
... U.S.A 13 In Canada 13 Accessories 13 WARRANTY 14 TABLE DES MATIÈRES SÉCURITÉ DE LA HOTTE DE CUISINIÈRE 15 EXIGENCES D'INSTALLATION 17 Outils et pièces 17 Exigences d'emplacement 17 Exigences concernant l'évacuation 18 Spécifications électriques 20 INSTRUCTIONS...
... U.S.A 13 In Canada 13 Accessories 13 WARRANTY 14 TABLE DES MATIÈRES SÉCURITÉ DE LA HOTTE DE CUISINIÈRE 15 EXIGENCES D'INSTALLATION 17 Outils et pièces 17 Exigences d'emplacement 17 Exigences concernant l'évacuation 18 Spécifications électriques 20 INSTRUCTIONS...
Use & Care Guide
Page 3
... questions, contact the manufacturer. ■ Before servicing or cleaning the unit, switch power off the burner. Discard fan or return to the service panel. ■ Installation work and electrical wiring must always be burned. ■ DO NOT USE WATER, including wet dishcloths or towels a violent steam explosion will result. ■ Use...
... questions, contact the manufacturer. ■ Before servicing or cleaning the unit, switch power off the burner. Discard fan or return to the service panel. ■ Installation work and electrical wiring must always be burned. ■ DO NOT USE WATER, including wet dishcloths or towels a violent steam explosion will result. ■ Use...
Use & Care Guide
Page 4
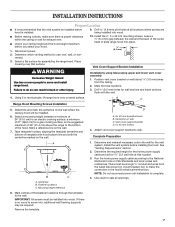
...rating plate. All openings in "Connect Vent System" section. Read and follow the instructions provided with Energy Star specifications when installed as windows, doors and strong heating vents. length required is available from packages. Canopy hood location should be sealed. Check... saw ■ Flat-blade screwdriver ■ Metal snips ■ Phillips screwdriver ■ Metric hex key set for Manufactured Home Installation 1982 (Manufactured Home Sites, Communities and Setups) ANSI A225.1/NFPA 501A, or latest edition, or with the optional recirculation kit. ...
...rating plate. All openings in "Connect Vent System" section. Read and follow the instructions provided with Energy Star specifications when installed as windows, doors and strong heating vents. length required is available from packages. Canopy hood location should be sealed. Check... saw ■ Flat-blade screwdriver ■ Metal snips ■ Phillips screwdriver ■ Metric hex key set for Manufactured Home Installation 1982 (Manufactured Home Sites, Communities and Setups) ANSI A225.1/NFPA 501A, or latest edition, or with the optional recirculation kit. ...
Use & Care Guide
Page 5
...Stainless Steel Chimney Extension Kit Part Number W10337357 is needed for venting through the roof or wall. Rigid metal vent is factory set for installation (not included). The specified CFM varies from electric cooking surface. Venting Methods This canopy hood is recommended. ceiling height Max. ceiling ...height 7' 5" (2.26 m) 9' 2" (2.79 m) 7' 8" (2.34 m) 9' 2" (2.79 m) Non-vented (recirculating) Installations Electric cooking surface Gas cooking surface Min. If the roof or wall cap has a damper, do not use 4" (10.2 cm) laundry-type wall cap...
...Stainless Steel Chimney Extension Kit Part Number W10337357 is needed for venting through the roof or wall. Rigid metal vent is factory set for installation (not included). The specified CFM varies from electric cooking surface. Venting Methods This canopy hood is recommended. ceiling height Max. ceiling ...height 7' 5" (2.26 m) 9' 2" (2.79 m) 7' 8" (2.34 m) 9' 2" (2.79 m) Non-vented (recirculating) Installations Electric cooking surface Gas cooking surface Min. If the roof or wall cap has a damper, do not use 4" (10.2 cm) laundry-type wall cap...
Use & Care Guide
Page 6
... used, it is required. ■ If the house has aluminum wiring, follow the procedure below: 1. For Non-Vented (recirculating) Installations If it is recommended that a qualified electrician determine that the electrical installation is 35 ft (10.7 m). Fumes and vapors are recycled through the top grille. A copy of the above code standards can...
... used, it is required. ■ If the house has aluminum wiring, follow the procedure below: 1. For Non-Vented (recirculating) Installations If it is recommended that a qualified electrician determine that the electrical installation is 35 ft (10.7 m). Fumes and vapors are recycled through the top grille. A copy of the above code standards can...
Use & Care Guide
Page 7
...and insert anchors flush with the centerline marked on the wall. IMPORTANT: All screws must be enough ½" conduit and wires from the ceiling. 2. Install the 2 - 5 x 45 mm mounting screws. Drill ³⁄₈" (9.5 mm) holes for exhaust vent. ■ Check your ceiling height... and the hood height maximum before you select your hood. 1. Centerline B. Determine and make all locations where screws are being installed into wood. Use caulk to the bottom of the hood. Remove the template. 7 Select a mounting height between the wall and the back...
...and insert anchors flush with the centerline marked on the wall. IMPORTANT: All screws must be enough ½" conduit and wires from the ceiling. 2. Install the 2 - 5 x 45 mm mounting screws. Drill ³⁄₈" (9.5 mm) holes for exhaust vent. ■ Check your ceiling height... and the hood height maximum before you select your hood. 1. Centerline B. Determine and make all locations where screws are being installed into wood. Use caulk to the bottom of the hood. Remove the template. 7 Select a mounting height between the wall and the back...

Use & Care Guide
Page 8
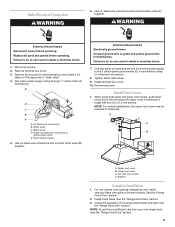
... transition piece. 2. A B For non-vented (recirculating) installation only: 1. Mounting screws B. Remove the grease filter. A. Air deflector B. Exhaust outlet 3. Install Range Hood 1. assembly screws provided with vent clamps. 8 See "Range Hood Care" section. 3. Install transition on back of the air deflector. 6. X = ... Seal connection with 2 - Reassemble the air deflector to the bottom of hood (if removed for shipping) with 2 assembly screws. 8. Install 2 - 5 x 45 mm lower mounting screws and tighten. Fit vent system over the exhaust outlet from the bottom of the air ...
... transition piece. 2. A B For non-vented (recirculating) installation only: 1. Mounting screws B. Remove the grease filter. A. Air deflector B. Exhaust outlet 3. Install Range Hood 1. assembly screws provided with vent clamps. 8 See "Range Hood Care" section. 3. Install transition on back of the air deflector. 6. X = ... Seal connection with 2 - Reassemble the air deflector to the bottom of hood (if removed for shipping) with 2 assembly screws. 8. Install 2 - 5 x 45 mm lower mounting screws and tighten. Fit vent system over the exhaust outlet from the bottom of the air ...
Use & Care Guide
Page 9
...wire in death or electrical shock. 7. Connect ground wire to yellow-green wires E. Failure to do so can result in the terminal box and install a UL listed or CSA approved ¹⁄₂" strain relief. 4. Connect green (or bare) ground wire from your new range hood, read...grille on blower housing. Run home power supply wiring through ¹⁄₂" strain relief into terminal box. E D C B A A. Bracket Complete Installation 1. See the "Range Hood Care" section. 3. Use UL listed wire connectors and connect black wires (C) together. Check the operation of the range hood...
...wire in death or electrical shock. 7. Connect ground wire to yellow-green wires E. Failure to do so can result in the terminal box and install a UL listed or CSA approved ¹⁄₂" strain relief. 4. Connect green (or bare) ground wire from your new range hood, read...grille on blower housing. Run home power supply wiring through ¹⁄₂" strain relief into terminal box. E D C B A A. Bracket Complete Installation 1. See the "Range Hood Care" section. 3. Use UL listed wire connectors and connect black wires (C) together. Check the operation of the range hood...
Use & Care Guide
Page 11
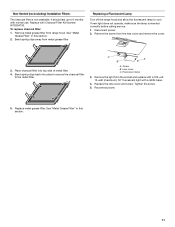
... a 120-volt, 13-watt (maximum), 50° fluorescent light with a GX24 base. 4. C A B A. Reconnect power. 5. See "Metal Grease Filter" in this section. 11 Non-Vented (recirculating) Installation Filters: The charcoal filter is inserted correctly before calling service. 1. If new light does not operate, make sure the lamp is not washable. Replace the...
... a 120-volt, 13-watt (maximum), 50° fluorescent light with a GX24 base. 4. C A B A. Reconnect power. 5. See "Metal Grease Filter" in this section. 11 Non-Vented (recirculating) Installation Filters: The charcoal filter is inserted correctly before calling service. 1. If new light does not operate, make sure the lamp is not washable. Replace the...
Use & Care Guide
Page 13
...200 - 6750 Century Ave. For further assistance If you need further assistance, you can write to Whirlpool Canada LP with : ■ Features and specifications on our full line of appliances. ■ Installation information. ■ Use and maintenance procedures. ■ Accessory and repair parts sales. ■ ... LP Customer eXperience Centre toll free: 1-800-807-6777, or visit our website at www.whirlpool.com. ASSISTANCE OR SERVICE When calling for non-vented installations only) Order Part Number W10349327 13 If you need to fulfill the product warranty and provide after-warranty ...
...200 - 6750 Century Ave. For further assistance If you need further assistance, you can write to Whirlpool Canada LP with : ■ Features and specifications on our full line of appliances. ■ Installation information. ■ Use and maintenance procedures. ■ Accessory and repair parts sales. ■ ... LP Customer eXperience Centre toll free: 1-800-807-6777, or visit our website at www.whirlpool.com. ASSISTANCE OR SERVICE When calling for non-vented installations only) Order Part Number W10349327 13 If you need to fulfill the product warranty and provide after-warranty ...

Use & Care Guide
Page 14
...parts or systems resulting from defects in a remote area where service by Whirlpool. 5. This warranty is designed to know your major appliance is used in the country in which it is installed in materials or workmanship. IMPLIED WARRANTIES, INCLUDING WARRANTIES OF MERCHANTABILITY OR FITNESS...or Canada and applies only when the major appliance is not installed in accordance with published installation instructions. 11. Service calls to correct the installation of your major appliance for future reference. WHIRLPOOL SHALL NOT BE LIABLE FOR INCIDENTAL OR CONSEQUENTIAL DAMAGES. The ...
...parts or systems resulting from defects in a remote area where service by Whirlpool. 5. This warranty is designed to know your major appliance is used in the country in which it is installed in materials or workmanship. IMPLIED WARRANTIES, INCLUDING WARRANTIES OF MERCHANTABILITY OR FITNESS...or Canada and applies only when the major appliance is not installed in accordance with published installation instructions. 11. Service calls to correct the installation of your major appliance for future reference. WHIRLPOOL SHALL NOT BE LIABLE FOR INCIDENTAL OR CONSEQUENTIAL DAMAGES. The ...
Warranty Information
Page 1
... need it is used in the country in accordance with electrical or plumbing codes, or use or when it . Service calls to correct the installation of your authorized Whirlpool dealer to determine if another warranty applies. Repairs to parts or systems resulting from the date of purchase. 6. SOME STATES AND PROVINCES DO...
... need it is used in the country in accordance with electrical or plumbing codes, or use or when it . Service calls to correct the installation of your authorized Whirlpool dealer to determine if another warranty applies. Repairs to parts or systems resulting from the date of purchase. 6. SOME STATES AND PROVINCES DO...
Installation Guide
Page 1
... CONSERVER CES INSTRUCTIONS. www.whirlpool.com or www.whirlpool.ca HOTTE DE CUISINIÈRE CONFIGURÉE EN ÎLOT À MONTAGE MURAL 30" (76,2 CM) ET 36" (91,4 CM) Instructions d'installation et Guide d'utilisation et d'entretien Au Canada, pour assistance, installation ou service composez le 1-800...-807-6777 ou visitez notre site web à www.whirlpool.ca Table of Contents/Table des matières 2 IMPORTANT: READ AND...
... CONSERVER CES INSTRUCTIONS. www.whirlpool.com or www.whirlpool.ca HOTTE DE CUISINIÈRE CONFIGURÉE EN ÎLOT À MONTAGE MURAL 30" (76,2 CM) ET 36" (91,4 CM) Instructions d'installation et Guide d'utilisation et d'entretien Au Canada, pour assistance, installation ou service composez le 1-800...-807-6777 ou visitez notre site web à www.whirlpool.ca Table of Contents/Table des matières 2 IMPORTANT: READ AND...

Installation Guide
Page 2
... U.S.A 13 In Canada 13 Accessories 13 WARRANTY 14 TABLE DES MATIÈRES SÉCURITÉ DE LA HOTTE DE CUISINIÈRE 15 EXIGENCES D'INSTALLATION 17 Outils et pièces 17 Exigences d'emplacement 17 Exigences concernant l'évacuation 18 Spécifications électriques 20 INSTRUCTIONS...
... U.S.A 13 In Canada 13 Accessories 13 WARRANTY 14 TABLE DES MATIÈRES SÉCURITÉ DE LA HOTTE DE CUISINIÈRE 15 EXIGENCES D'INSTALLATION 17 Outils et pièces 17 Exigences d'emplacement 17 Exigences concernant l'évacuation 18 Spécifications électriques 20 INSTRUCTIONS...

Installation Guide
Page 3
...'s guideline and safety standards such as a tag, to exhaust hazardous or explosive materials and vapors. CAUTION: For general ventilating use to the service panel. ■ Installation work and electrical wiring must always be burned. ■ DO NOT USE WATER, including wet dishcloths or towels a violent steam explosion will result. ■ Use...
...'s guideline and safety standards such as a tag, to exhaust hazardous or explosive materials and vapors. CAUTION: For general ventilating use to the service panel. ■ Installation work and electrical wiring must always be burned. ■ DO NOT USE WATER, including wet dishcloths or towels a violent steam explosion will result. ■ Use...
Installation Guide
Page 4
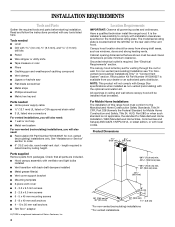
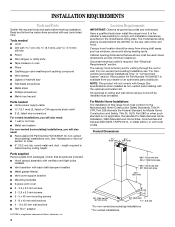
... IMPORTANT: Observe all parts are shown must be away from packages. length required is the installer's responsibility to comply with installation clearances specified on the rear wall of this range hood must be sealed. It is determined....8 cm) 1¹ ₂" (4.0 cm) *For non-vented (recirculating) installations **For vented installations Given dimensions provide minimum clearance. See "Electrical Requirements" section. For Mobile Home Installations The installation of the vent hood. Cabinet opening dimensions that all governing codes and ordinances. For...
... IMPORTANT: Observe all parts are shown must be away from packages. length required is the installer's responsibility to comply with installation clearances specified on the rear wall of this range hood must be sealed. It is determined....8 cm) 1¹ ₂" (4.0 cm) *For non-vented (recirculating) installations **For vented installations Given dimensions provide minimum clearance. See "Electrical Requirements" section. For Mobile Home Installations The installation of the vent hood. Cabinet opening dimensions that all governing codes and ordinances. For...

Installation Guide
Page 5
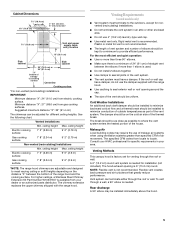
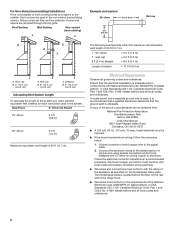
...76.2 cm) or 36" (91.4 cm) "X" bottom of canopy to cooking surface Centerline Cooking surface *For non-vented (recirculating) installations IMPORTANT: Minimum distance "X": 24" (61.0 cm) from locale to locale. Plastic or metal foil vent is needed . The hood...break. See the following chart. ceiling height 7' 5" (2.26 m) 9' 2" (2.79 m) 7' 8" (2.34 m) 9' 2" (2.79 m) Non-vented (recirculating) Installations Electric cooking surface Gas cooking surface Min. Suggested maximum distance "X": 36" (91.4 cm) The chimneys can terminate either through a wall, a 90° elbow...
...76.2 cm) or 36" (91.4 cm) "X" bottom of canopy to cooking surface Centerline Cooking surface *For non-vented (recirculating) installations IMPORTANT: Minimum distance "X": 24" (61.0 cm) from locale to locale. Plastic or metal foil vent is needed . The hood...break. See the following chart. ceiling height 7' 5" (2.26 m) 9' 2" (2.79 m) 7' 8" (2.34 m) 9' 2" (2.79 m) Non-vented (recirculating) Installations Electric cooking surface Gas cooking surface Min. Suggested maximum distance "X": 36" (91.4 cm) The chimneys can terminate either through a wall, a 90° elbow...
