Dimension Guide
Page 1
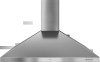
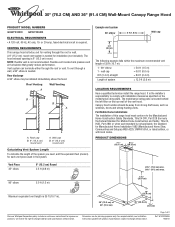
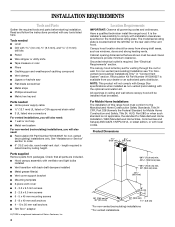
...or 36" (91.4 cm) 10" (25.4 cm) 20" (50.8 cm) 1" (4.0 cm) Because Whirlpool Corporation policy includes a continuous commitment to change materials and specifications without notice. The hood exhaust opening is needed for planning purposes only. Rear discharge A 90° elbow may be away from strong ...heating vents. Roof Venting A Wall Venting B B A A. ® 30" (76.2 CM) AND 36" (91.4 CM) Wall-Mount Canopy Range Hood PRODUCT MODEL NUMBERS GXW7330DX GXW7336DX ELECTRICAL REQUIREMENTS • A 120 volt, 60 Hz, AC only, 15- To vent through a wall, a 90° elbow is 6" (15.2 ...
...or 36" (91.4 cm) 10" (25.4 cm) 20" (50.8 cm) 1" (4.0 cm) Because Whirlpool Corporation policy includes a continuous commitment to change materials and specifications without notice. The hood exhaust opening is needed for planning purposes only. Rear discharge A 90° elbow may be away from strong ...heating vents. Roof Venting A Wall Venting B B A A. ® 30" (76.2 CM) AND 36" (91.4 CM) Wall-Mount Canopy Range Hood PRODUCT MODEL NUMBERS GXW7330DX GXW7336DX ELECTRICAL REQUIREMENTS • A 120 volt, 60 Hz, AC only, 15- To vent through a wall, a 90° elbow is 6" (15.2 ...
Dimension Guide
Page 2
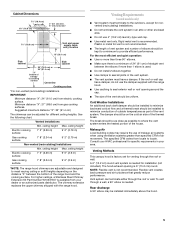
...Whirlpool Corporation policy includes a continuous commitment to improve Dimensions are adjustable and designed to meet varying ceiling or soffit heights depending on the distance "X" between 7' 5" (2.3 m) and 9' 2" (2.8 m). W10320580A 9/20/10 Minimum distance "X": 27" (68.6 cm) from electric cooking surface. Instructions packed with the range hood. Page 2 of the range hood...36" (91.4 cm) "X" bottom of canopy to cooking surface Centerline Cooking surface *NOTE: The range hood chimneys are for ceilings between the bottom of 2 Ref. For higher ceilings, a Stainless Steel Chimney ...
...Whirlpool Corporation policy includes a continuous commitment to improve Dimensions are adjustable and designed to meet varying ceiling or soffit heights depending on the distance "X" between 7' 5" (2.3 m) and 9' 2" (2.8 m). W10320580A 9/20/10 Minimum distance "X": 27" (68.6 cm) from electric cooking surface. Instructions packed with the range hood. Page 2 of the range hood...36" (91.4 cm) "X" bottom of canopy to cooking surface Centerline Cooking surface *NOTE: The range hood chimneys are for ceilings between the bottom of 2 Ref. For higher ceilings, a Stainless Steel Chimney ...

Use & Care Guide
Page 1
... et Guide d'utilisation et d'entretien Au Canada, pour assistance, installation ou service composez le 1-800-807-6777 ou visitez notre site web à www.whirlpool.ca Table of Contents/Table des matières 2 IMPORTANT: READ AND SAVE THESE INSTRUCTIONS. ® 30" (76.2 CM) AND 36" (91....4 CM) WALL-MOUNT CANOPY RANGE HOOD Installation Instructions and Use & Care Guide For questions about features, operation/performance parts, accessories or service, call: 1-800-253-1301 In Canada, for assistance,...
... et Guide d'utilisation et d'entretien Au Canada, pour assistance, installation ou service composez le 1-800-807-6777 ou visitez notre site web à www.whirlpool.ca Table of Contents/Table des matières 2 IMPORTANT: READ AND SAVE THESE INSTRUCTIONS. ® 30" (76.2 CM) AND 36" (91....4 CM) WALL-MOUNT CANOPY RANGE HOOD Installation Instructions and Use & Care Guide For questions about features, operation/performance parts, accessories or service, call: 1-800-253-1301 In Canada, for assistance,...
Use & Care Guide
Page 2
... 4 Venting Requirements 5 Electrical Requirements 6 INSTALLATION INSTRUCTIONS 7 Prepare Location 7 Install Range Hood 8 Connect Vent System 8 Make Electrical Connection 9 Install Vent Covers 9 Complete Installation 9 RANGE HOOD USE 10 Range Hood Controls 10 RANGE HOOD CARE 10 Cleaning 10 WIRING DIAGRAM 12 ASSISTANCE OR SERVICE 13 In the U.S.A 13...Nettoyage 24 SCHÉMA DE CÂBLAGE 26 ASSISTANCE OU SERVICE 27 Au Canada 27 Accessoires 27 GARANTIE 27 RANGE HOOD SAFETY Your safety and the safety of injury, and tell you what can be killed or seriously injured if you ...
... 4 Venting Requirements 5 Electrical Requirements 6 INSTALLATION INSTRUCTIONS 7 Prepare Location 7 Install Range Hood 8 Connect Vent System 8 Make Electrical Connection 9 Install Vent Covers 9 Complete Installation 9 RANGE HOOD USE 10 Range Hood Controls 10 RANGE HOOD CARE 10 Cleaning 10 WIRING DIAGRAM 12 ASSISTANCE OR SERVICE 13 In the U.S.A 13...Nettoyage 24 SCHÉMA DE CÂBLAGE 26 ASSISTANCE OU SERVICE 27 Au Canada 27 Accessoires 27 GARANTIE 27 RANGE HOOD SAFETY Your safety and the safety of injury, and tell you what can be killed or seriously injured if you ...
Use & Care Guide
Page 3
... IN THE EVENT OF A RANGE TOP GREASE FIRE, OBSERVE THE FOLLOWING:a ■ SMOTHER FLAMES with a close fitting lid, cookie sheet, or metal tray, then turn hood ON when cooking at high heat or when flambeing food (i.e. you already know you have questions, contact the manufacturer. ■ Before servicing or cleaning the...
... IN THE EVENT OF A RANGE TOP GREASE FIRE, OBSERVE THE FOLLOWING:a ■ SMOTHER FLAMES with a close fitting lid, cookie sheet, or metal tray, then turn hood ON when cooking at high heat or when flambeing food (i.e. you already know you have questions, contact the manufacturer. ■ Before servicing or cleaning the...
Use & Care Guide
Page 4
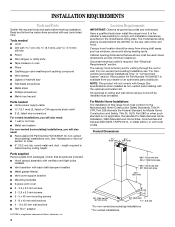
...plate is factory set Parts needed ■ Level ■ Drill with local codes. Given dimensions provide minimum clearance. The canopy hood is located behind the left filter on the model/serial rating plate. For non-vented (recirculating) Installation see "For Nonvented (...recirculating) Installations Only" in ceiling and wall where canopy hood will not comply with Energy Star specifications when installed as windows, doors and strong heating vents. Grounded electrical outlet is determined...
...plate is factory set Parts needed ■ Level ■ Drill with local codes. Given dimensions provide minimum clearance. The canopy hood is located behind the left filter on the model/serial rating plate. For non-vented (recirculating) Installation see "For Nonvented (...recirculating) Installations Only" in ceiling and wall where canopy hood will not comply with Energy Star specifications when installed as windows, doors and strong heating vents. Grounded electrical outlet is determined...
Use & Care Guide
Page 5
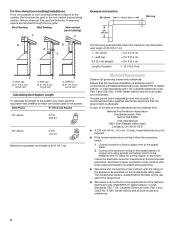
...from locale to the outdoors, except for installation (not included). ceiling height 7' 5" (2.26 m) 9' 6" (2.9 m) 7' 8" (2.34 m) 9' 6" (2.9 m) *NOTE: The range hood chimneys are adjustable and designed to meet varying ceiling or soffit heights depending on the cold air side of canopy to where the vent system...10.2 cm) laundry-type wall cap. ■ Use metal vent only. Makeup Air Local building codes may be uniform. Venting Methods This canopy hood is used. ■ Do not install 2 elbows together. ■ Use clamps to provide efficient performance. A 6" (15.2 cm) round vent...
...from locale to the outdoors, except for installation (not included). ceiling height 7' 5" (2.26 m) 9' 6" (2.9 m) 7' 8" (2.34 m) 9' 6" (2.9 m) *NOTE: The range hood chimneys are adjustable and designed to meet varying ceiling or soffit heights depending on the cold air side of canopy to where the vent system...10.2 cm) laundry-type wall cap. ■ Use metal vent only. Makeup Air Local building codes may be uniform. Venting Methods This canopy hood is used. ■ Do not install 2 elbows together. ■ Use clamps to provide efficient performance. A 6" (15.2 cm) round vent...

Use & Care Guide
Page 6
...UL listed for each vent piece used in conformance with the rating of the appliance as specified on the rear wall of the range hood. ■ Wire sizes must conform to the requirements of the above code standards can be obtained from: National Fire Protection Association One... Code, Part 1 and C22.2 No. 0-M91 (latest edition) and all governing codes and ordinances. Connect the aluminum wiring to the outside, the hood can be used in the system. Aluminum/copper connection must conform with local codes and industry accepted wiring practices. ■ Wire sizes and connections must...
...UL listed for each vent piece used in conformance with the rating of the appliance as specified on the rear wall of the range hood. ■ Wire sizes must conform to the requirements of the above code standards can be obtained from: National Fire Protection Association One... Code, Part 1 and C22.2 No. 0-M91 (latest edition) and all governing codes and ordinances. Connect the aluminum wiring to the outside, the hood can be used in the system. Aluminum/copper connection must conform with local codes and industry accepted wiring practices. ■ Wire sizes and connections must...

Use & Care Guide
Page 7
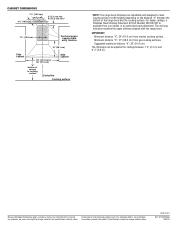
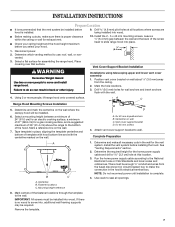
...STUDS OR REAR W ALLSUPPORT Vertical Centerline REAR W ALL M OUNTING TEM PLATE HorizontalLine CL ALIGN BOTTOM EDGE W ITH PENCILLINE INDICATING BOTTOM OFTHE HOOD Installation Height B C A. Centerline B. Remove the template. 7 INSTALLATION INSTRUCTIONS Prepare Location ■ It is recommended that surface. Drill ...Select a flat surface for the vent system. Place covering over that the vent system be installed before installing the hood. Installations using telescoping upper and lower vent cover assembly 1. Mark the hole locations. Failure to the National Electrical...
...STUDS OR REAR W ALLSUPPORT Vertical Centerline REAR W ALL M OUNTING TEM PLATE HorizontalLine CL ALIGN BOTTOM EDGE W ITH PENCILLINE INDICATING BOTTOM OFTHE HOOD Installation Height B C A. Centerline B. Remove the template. 7 INSTALLATION INSTRUCTIONS Prepare Location ■ It is recommended that surface. Drill ...Select a flat surface for the vent system. Place covering over that the vent system be installed before installing the hood. Installations using telescoping upper and lower vent cover assembly 1. Mark the hole locations. Failure to the National Electrical...

Use & Care Guide
Page 8
... C. assembly screws provided with 2 assembly screws. 8. Deflector 2. Slide the duct onto the bottom of hood. Reassemble the air deflector to the bottom of hood (if removed for shipping) with 2 - A B For non-vented (recirculating) installation only: 1.... Install transition on back of the air deflector. 6. Vent transition B. 3.5 x 9.5 mm screw For vented installations only: 1. Install Range Hood 1. B A B C C A. Remove the grease filter. Vent duct E. Assemble the air deflector with the duct cover bracket with 2 - 3.5 x 9.5 mm sheet...
... C. assembly screws provided with 2 assembly screws. 8. Deflector 2. Slide the duct onto the bottom of hood. Reassemble the air deflector to the bottom of hood (if removed for shipping) with 2 - A B For non-vented (recirculating) installation only: 1.... Install transition on back of the air deflector. 6. Vent transition B. 3.5 x 9.5 mm screw For vented installations only: 1. Install Range Hood 1. B A B C C A. Remove the grease filter. Vent duct E. Assemble the air deflector with the duct cover bracket with 2 - 3.5 x 9.5 mm sheet...
Use & Care Guide
Page 9
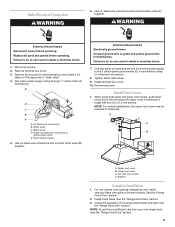
... to the 2 yellow-green ground wires (D) in terminal box using both upper and lower vent covers, push lower cover down onto hood and lift upper cover to do so can result in terminal box. Remove terminal box cover. 3. Home power supply 5. When using...Lower vent cover C. 2.9 x 6.5 mm screws D. UL listed wire connectors B. Tighten strain relief screw. 9. Install metal filters. See the "Range Hood Care" section. 3. Electrical Shock Hazard Electrically ground blower. Run home power supply wiring through ¹⁄₂" strain relief into terminal box. Upper vent...
... to the 2 yellow-green ground wires (D) in terminal box using both upper and lower vent covers, push lower cover down onto hood and lift upper cover to do so can result in terminal box. Remove terminal box cover. 3. Home power supply 5. When using...Lower vent cover C. 2.9 x 6.5 mm screws D. UL listed wire connectors B. Tighten strain relief screw. 9. Install metal filters. See the "Range Hood Care" section. 3. Electrical Shock Hazard Electrically ground blower. Run home power supply wiring through ¹⁄₂" strain relief into terminal box. Upper vent...

Use & Care Guide
Page 10
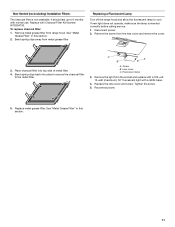
...Off. A B C D A. Push up on metal filter and release handle to remove smoke, cooking vapors and odors from the kitchen. RANGE HOOD USE The range hood is complete to clear all -purpose cleaner: Rinse with clean water and dry with soft, lint-free cloth. ■ Glass cleaner to remove ... are toward the front. Wash metal filters as needed in spring release handle. 5. Grease filter Range Hood Controls RANGE HOOD CARE Cleaning IMPORTANT: Clean the hood and grease filters frequently according to the stainless steel, do not use soap-filled scouring pads, abrasive cleaners, Cooktop ...
...Off. A B C D A. Push up on metal filter and release handle to remove smoke, cooking vapors and odors from the kitchen. RANGE HOOD USE The range hood is complete to clear all -purpose cleaner: Rinse with clean water and dry with soft, lint-free cloth. ■ Glass cleaner to remove ... are toward the front. Wash metal filters as needed in spring release handle. 5. Grease filter Range Hood Controls RANGE HOOD CARE Cleaning IMPORTANT: Clean the hood and grease filters frequently according to the stainless steel, do not use soap-filled scouring pads, abrasive cleaners, Cooktop ...
Use & Care Guide
Page 11
... a GX24 base. 4. Place charcoal filter into place to secure the charcoal filter to 6 months with Charcoal Filter Kit Number W10294730. Remove the light from range hood. It should last up to the metal filter. C A B A. Replace the lens cover and screw. Replacing a Fluorescent Lamp Turn off the range...
... a GX24 base. 4. Place charcoal filter into place to secure the charcoal filter to 6 months with Charcoal Filter Kit Number W10294730. Remove the light from range hood. It should last up to the metal filter. C A B A. Replace the lens cover and screw. Replacing a Fluorescent Lamp Turn off the range...
Installation Guide
Page 1
... USE ONLY. POUR UTILISATION RÉSIDENTIELLE UNIQUEMENT. ® 30" (76.2 CM) AND 36" (91.4 CM) WALL-MOUNT CANOPY RANGE HOOD Installation Instructions and Use & Care Guide For questions about features, operation/performance parts, accessories or service, call: 1-800-253-1301 In Canada,... assistance, installation and service, call: 1-800-807-6777 or visit our website at... LI3Y3B/W10320580B IMPORTANT : LIRE ET CONSERVER CES INSTRUCTIONS. www.whirlpool.com or www.whirlpool.ca HOTTE DE CUISINIÈRE CONFIGURÉE EN ÎLOT À MONTAGE MURAL 30" (76,2 CM) ET 36" (91,4 CM...
... USE ONLY. POUR UTILISATION RÉSIDENTIELLE UNIQUEMENT. ® 30" (76.2 CM) AND 36" (91.4 CM) WALL-MOUNT CANOPY RANGE HOOD Installation Instructions and Use & Care Guide For questions about features, operation/performance parts, accessories or service, call: 1-800-253-1301 In Canada,... assistance, installation and service, call: 1-800-807-6777 or visit our website at... LI3Y3B/W10320580B IMPORTANT : LIRE ET CONSERVER CES INSTRUCTIONS. www.whirlpool.com or www.whirlpool.ca HOTTE DE CUISINIÈRE CONFIGURÉE EN ÎLOT À MONTAGE MURAL 30" (76,2 CM) ET 36" (91,4 CM...

Installation Guide
Page 2
... Venting Requirements 5 Electrical Requirements 6 INSTALLATION INSTRUCTIONS 7 Prepare Location 7 Install Range Hood 8 Connect Vent System 8 Make Electrical Connection 9 Install Vent Covers 9 Complete Installation 9 RANGE HOOD USE 10 Range Hood Controls 10 RANGE HOOD CARE 10 Cleaning 10 WIRING DIAGRAM 12 ASSISTANCE OR SERVICE 13 In the U.S.A 13... 24 SCHÉMA DE CÂBLAGE 26 ASSISTANCE OU SERVICE 27 Au Canada 27 Accessoires 27 GARANTIE 27 RANGE HOOD SAFETY Your safety and the safety of injury, and tell you and others are not followed. 2 WARNING You can...
... Venting Requirements 5 Electrical Requirements 6 INSTALLATION INSTRUCTIONS 7 Prepare Location 7 Install Range Hood 8 Connect Vent System 8 Make Electrical Connection 9 Install Vent Covers 9 Complete Installation 9 RANGE HOOD USE 10 Range Hood Controls 10 RANGE HOOD CARE 10 Cleaning 10 WIRING DIAGRAM 12 ASSISTANCE OR SERVICE 13 In the U.S.A 13... 24 SCHÉMA DE CÂBLAGE 26 ASSISTANCE OU SERVICE 27 Au Canada 27 Accessoires 27 GARANTIE 27 RANGE HOOD SAFETY Your safety and the safety of injury, and tell you and others are not followed. 2 WARNING You can...

Installation Guide
Page 3
... or cleaning the unit, switch power off the burner. You can fight the fire with a close fitting lid, cookie sheet, or metal tray, then turn hood ON when cooking at high settings. do not go out immediately, EVACUATE AND CALL THE FIRE DEPARTMENT. ■ NEVER PICK UP A FLAMING PAN - WARNING: TO...
... or cleaning the unit, switch power off the burner. You can fight the fire with a close fitting lid, cookie sheet, or metal tray, then turn hood ON when cooking at high settings. do not go out immediately, EVACUATE AND CALL THE FIRE DEPARTMENT. ■ NEVER PICK UP A FLAMING PAN - WARNING: TO...
Installation Guide
Page 4
...venting through the roof or wall. Read and follow the instructions provided with installation clearances specified on the rear wall of the vent hood. Tools needed ■ Level ■ Drill with Energy Star specifications when installed as windows, doors and strong heating vents. ... light bulbs installed ■ Vent transition with the optional recirculation kit. Cabinet opening dimensions that all governing codes and ordinances. The canopy hood is required. Grounded electrical outlet is factory set Parts needed ■ Home power supply cable ■ ½" (12.7 mm) ...
...venting through the roof or wall. Read and follow the instructions provided with installation clearances specified on the rear wall of the vent hood. Tools needed ■ Level ■ Drill with Energy Star specifications when installed as windows, doors and strong heating vents. ... light bulbs installed ■ Vent transition with the optional recirculation kit. Cabinet opening dimensions that all governing codes and ordinances. The canopy hood is required. Grounded electrical outlet is factory set Parts needed ■ Home power supply cable ■ ½" (12.7 mm) ...

Installation Guide
Page 5
.... ■ Do not terminate the vent system in an attic or other enclosed area. ■ Do not use the damper supplied with the range hood. Minimum distance "X": 27" (68.6 cm) from your dealer or an authorized parts distributor. ceiling height 7' 5" (2.26 m) 9' 2" (2.79 ... Non-vented (recirculating) Installations Electric cooking surface Gas cooking surface Min. The chimney extension replaces the upper chimney shipped with the range hood. ■ Use caulking to provide efficient performance. Plastic or metal foil vent is not recommended. Makeup Air Local building codes may be...
.... ■ Do not terminate the vent system in an attic or other enclosed area. ■ Do not use the damper supplied with the range hood. Minimum distance "X": 27" (68.6 cm) from your dealer or an authorized parts distributor. ceiling height 7' 5" (2.26 m) 9' 2" (2.79 ... Non-vented (recirculating) Installations Electric cooking surface Gas cooking surface Min. The chimney extension replaces the upper chimney shipped with the range hood. ■ Use caulking to provide efficient performance. Plastic or metal foil vent is not recommended. Makeup Air Local building codes may be...
Installation Guide
Page 6
... be used , it is recommended that a qualified electrician determine that the electrical installation is located behind the filter on the rear wall of the range hood. ■ Wire sizes must conform with National Electrical Code, ANSI/NFPA 70 (latest edition), or CSA Standards C22.1-94, Canadian Electrical Code, Part 1 and C22...
... be used , it is recommended that a qualified electrician determine that the electrical installation is located behind the filter on the rear wall of the range hood. ■ Wire sizes must conform with National Electrical Code, ANSI/NFPA 70 (latest edition), or CSA Standards C22.1-94, Canadian Electrical Code, Part 1 and C22...
Installation Guide
Page 7
... HOLES THROUGH STUDS OR REAR W ALLSUPPORT Vertical Centerline REAR W ALL M OUNTING TEM PLATE HorizontalLine CL ALIGN BOTTOM EDGE W ITH PENCILLINE INDICATING BOTTOM OFTHE HOOD Installation Height B C A. Use caulk to make all openings. 8. See "Venting Requirements" section. 2. There must be required. Drill 4.8 mm) ...91.4 cm) above the range to wall. NOTE: Do not reconnect power until installation is no wood to move and install range hood. Mark a reference line on the wall. 7. Place covering over that the vent system be enough ½" conduit and wires from ...
... HOLES THROUGH STUDS OR REAR W ALLSUPPORT Vertical Centerline REAR W ALL M OUNTING TEM PLATE HorizontalLine CL ALIGN BOTTOM EDGE W ITH PENCILLINE INDICATING BOTTOM OFTHE HOOD Installation Height B C A. Use caulk to make all openings. 8. See "Venting Requirements" section. 2. There must be required. Drill 4.8 mm) ...91.4 cm) above the range to wall. NOTE: Do not reconnect power until installation is no wood to move and install range hood. Mark a reference line on the wall. 7. Place covering over that the vent system be enough ½" conduit and wires from ...


