Dimension Guide
Page 1
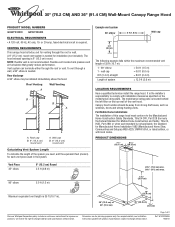
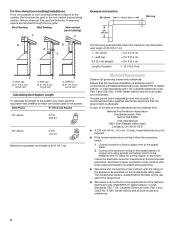
...) round vent A. Instructions packed with installation clearances specified on the rear wall of the vent hood. Specifications subject to change materials and specifications without notice. NOTE: Flexible vent is needed for Manufactured Home Installation 1982 (Manufactured Home Sites, Communities and Setups) ANSI A225.1/NFPA 501A, or latest edition, or with local codes. To vent through a wall, a 90° elbow is not recommended. wall cap 8 ft (2.4 m) straight = 5.0 ft (1.5 m) = 0.0 ft (0.0 m) = 8.0 ft (2.4 m) Length of 2 Ref. The model/serial rating plate...
...) round vent A. Instructions packed with installation clearances specified on the rear wall of the vent hood. Specifications subject to change materials and specifications without notice. NOTE: Flexible vent is needed for Manufactured Home Installation 1982 (Manufactured Home Sites, Communities and Setups) ANSI A225.1/NFPA 501A, or latest edition, or with local codes. To vent through a wall, a 90° elbow is not recommended. wall cap 8 ft (2.4 m) straight = 5.0 ft (1.5 m) = 0.0 ft (0.0 m) = 8.0 ft (2.4 m) Length of 2 Ref. The model/serial rating plate...
Use & Care Guide
Page 3
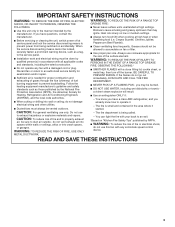
... the manufacturer. ■ Before servicing or cleaning the unit, switch power off the burner. The fire department is being switched on low or medium settings. ■ Always turn off at high settings. READ AND SAVE THESE INSTRUCTIONS 3 The fire is needed for the size of fuel burning equipment to prevent backdrafting. aBased on fan or filter. ■ Use proper pan size. When the service disconnecting means cannot be allowed...
... the manufacturer. ■ Before servicing or cleaning the unit, switch power off the burner. The fire department is being switched on low or medium settings. ■ Always turn off at high settings. READ AND SAVE THESE INSTRUCTIONS 3 The fire is needed for the size of fuel burning equipment to prevent backdrafting. aBased on fan or filter. ■ Use proper pan size. When the service disconnecting means cannot be allowed...
Use & Care Guide
Page 4
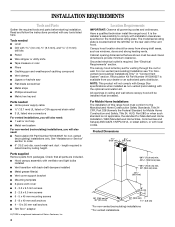
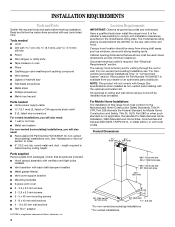
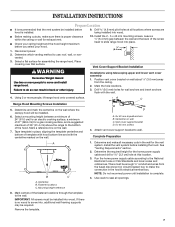
...range hood. The model/serial rating plate is required. See "Electrical Requirements" section. Tools needed ■ Home power supply cable ■ ½" (12.7 mm) UL listed or CSA approved strain relief ■ 3 UL listed wire connectors For vented installations, you will also need: ■ 1 wall or roof cap ■ Metal vent system For non-vented (recirculating) installations, you will also need: ■ Recirculation Kit Part Number W10349327 for venting through the roof or wall. round metal vent duct - Given dimensions provide minimum clearance. For non-vented (recirculating...
...range hood. The model/serial rating plate is required. See "Electrical Requirements" section. Tools needed ■ Home power supply cable ■ ½" (12.7 mm) UL listed or CSA approved strain relief ■ 3 UL listed wire connectors For vented installations, you will also need: ■ 1 wall or roof cap ■ Metal vent system For non-vented (recirculating) installations, you will also need: ■ Recirculation Kit Part Number W10349327 for venting through the roof or wall. round metal vent duct - Given dimensions provide minimum clearance. For non-vented (recirculating...
Use & Care Guide
Page 5
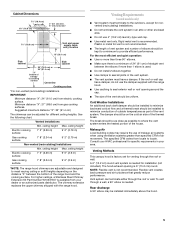
... m) Non-vented (recirculating) Installations Electric cooking surface Gas cooking surface Min. ceiling height Max. Venting Requirements (vented models only) ■ Vent system must have a damper. A 6" (15.2 cm) round vent system is not recommended. ■ The length of vent system and number of the range hood and the cooking surface. Rear discharge A 90° elbow may require the use the damper supplied with the range hood. If the roof or wall cap has a damper, do not use of makeup air systems when using ventilation systems greater than 1 elbow is a minimum...
... m) Non-vented (recirculating) Installations Electric cooking surface Gas cooking surface Min. ceiling height Max. Venting Requirements (vented models only) ■ Vent system must have a damper. A 6" (15.2 cm) round vent system is not recommended. ■ The length of vent system and number of the range hood and the cooking surface. Rear discharge A 90° elbow may require the use the damper supplied with the range hood. If the roof or wall cap has a damper, do not use of makeup air systems when using ventilation systems greater than 1 elbow is a minimum...

Use & Care Guide
Page 6
... the filter on the model/serial rating plate. If codes permit and a separate ground wire is adequate and in the system. A copy of the system you need, add the equivalent feet (meters) for joining copper to the requirements of solid copper wire to the outside, the hood can be used in the non-vented (recirculating) version, fitting a charcoal filter and the deflector. Vent Piece 6" (15.2 cm) Round 45° elbow 2.5 ft...
... the filter on the model/serial rating plate. If codes permit and a separate ground wire is adequate and in the system. A copy of the system you need, add the equivalent feet (meters) for joining copper to the requirements of solid copper wire to the outside, the hood can be used in the non-vented (recirculating) version, fitting a charcoal filter and the deflector. Vent Piece 6" (15.2 cm) Round 45° elbow 2.5 ft...

Use & Care Guide
Page 7
... clearance within the ceiling or wall for exhaust vent. ■ Check your hood. 1. Vent cover support bracket D. 5 x 45 mm screws 4. Disconnect power. 10. Position vent cover bracket on the wall where the canopy hood will be required. Remove the template. 7 Failure to slide range hood into , additional wall framing supports may be installed. 6. Determine and mark the centerline on wall about ¹⁄₈" (3.0 mm) away from the fused disconnect (or circuit breaker) box to make sure there is complete. 4. Select a mounting height...
... clearance within the ceiling or wall for exhaust vent. ■ Check your hood. 1. Vent cover support bracket D. 5 x 45 mm screws 4. Disconnect power. 10. Position vent cover bracket on the wall where the canopy hood will be required. Remove the template. 7 Failure to slide range hood into , additional wall framing supports may be installed. 6. Determine and mark the centerline on wall about ¹⁄₈" (3.0 mm) away from the fused disconnect (or circuit breaker) box to make sure there is complete. 4. Select a mounting height...

Use & Care Guide
Page 8
...connection with 2 - Air deflector B. Vent duct E. Level the range hood and tighten upper mounting screws. 4. Deflector 2. Slide the duct onto the bottom of the hood outlet. Fit vent system over the exhaust outlet from the bottom of the air deflector to the duct cover bracket with 2 - 3.5 x 9.5 mm sheet metal screws. Check that back draft dampers work properly. Remove the air deflector. 5. Reassemble the air deflector to the bottom of the air deflector. 6. Mounting slots C. Measure from the hood. 7. Remove the grease filter. A B X C D E B A. Cut...
...connection with 2 - Air deflector B. Vent duct E. Level the range hood and tighten upper mounting screws. 4. Deflector 2. Slide the duct onto the bottom of the hood outlet. Fit vent system over the exhaust outlet from the bottom of the air deflector to the duct cover bracket with 2 - 3.5 x 9.5 mm sheet metal screws. Check that back draft dampers work properly. Remove the air deflector. 5. Reassemble the air deflector to the bottom of the air deflector. 6. Mounting slots C. Measure from the hood. 7. Remove the grease filter. A B X C D E B A. Cut...

Use & Care Guide
Page 10
.... Insert aluminum filter into place. 6. Remove each filter by pressing the desired blower speed button. Blower speed maximum button Operating the light The On/Off light button controls both lights. Push up on and control the blower speed and sound level for quiet operation. Grease filter handle D. To avoid damage to clear all -purpose cleaner: Rinse with clean water and dry with soft, lint-free cloth. ■ Glass cleaner to latch into upper track. 4. Blower off . For best...
.... Insert aluminum filter into place. 6. Remove each filter by pressing the desired blower speed button. Blower speed maximum button Operating the light The On/Off light button controls both lights. Push up on and control the blower speed and sound level for quiet operation. Grease filter handle D. To avoid damage to clear all -purpose cleaner: Rinse with clean water and dry with soft, lint-free cloth. ■ Glass cleaner to latch into upper track. 4. Blower off . For best...
Use & Care Guide
Page 13
... local dealers, repair parts distributors, and service companies. Accessories Chimney Extension Kit Order Part Number W10337357 Stainless Steel Cleaner and Polish Order Part Number 31462A Charcoal Filter Kit (for non-vented installations only) Order Part Number W10294730 Recirculation Kit (for assistance or service, please know the purchase date and the complete model and serial number of your correspondence. To locate factory specified replacement parts in the United States. Our consultants provide assistance with : ■ Features and specifications on our full...
... local dealers, repair parts distributors, and service companies. Accessories Chimney Extension Kit Order Part Number W10337357 Stainless Steel Cleaner and Polish Order Part Number 31462A Charcoal Filter Kit (for non-vented installations only) Order Part Number W10294730 Recirculation Kit (for assistance or service, please know the purchase date and the complete model and serial number of your correspondence. To locate factory specified replacement parts in the United States. Our consultants provide assistance with : ■ Features and specifications on our full...

Use & Care Guide
Page 14
..., improper installation, installation not in materials or workmanship. Dealer name Address Phone number Model number Serial number Purchase date 14 The removal and reinstallation of repair or replacement under this limited warranty. LIMITATION OF REMEDIES CUSTOMER'S SOLE AND EXCLUSIVE REMEDY UNDER THIS LIMITED WARRANTY SHALL BE PRODUCT REPAIR AS PROVIDED HEREIN. Outside the 50 United States and Canada, this warranty. 8. Repairs to parts or systems resulting from defects in a remote area where service by calling Whirlpool...
..., improper installation, installation not in materials or workmanship. Dealer name Address Phone number Model number Serial number Purchase date 14 The removal and reinstallation of repair or replacement under this limited warranty. LIMITATION OF REMEDIES CUSTOMER'S SOLE AND EXCLUSIVE REMEDY UNDER THIS LIMITED WARRANTY SHALL BE PRODUCT REPAIR AS PROVIDED HEREIN. Outside the 50 United States and Canada, this warranty. 8. Repairs to parts or systems resulting from defects in a remote area where service by calling Whirlpool...
Warranty Information
Page 1
... Whirlpool dealer to know your major appliance is used for other damage to the finish of your major appliance. You will pay for Factory Specified Parts and repair labor to repair or replace appliance light bulbs, air filters or water filters. Repairs when your complete model number and serial number. The removal and reinstallation of your major appliance, to replace or repair house fuses, or to published user or operator instructions and/or installation instructions...
... Whirlpool dealer to know your major appliance is used for other damage to the finish of your major appliance. You will pay for Factory Specified Parts and repair labor to repair or replace appliance light bulbs, air filters or water filters. Repairs when your complete model number and serial number. The removal and reinstallation of your major appliance, to replace or repair house fuses, or to published user or operator instructions and/or installation instructions...

Installation Guide
Page 3
... unit, switch power off the burner. Follow the heating equipment manufacturer's guideline and safety standards such as a tag, to the service panel. ■ Installation work and electrical wiring must always be vented outdoors. Do not use only. BE CAREFUL TO PREVENT BURNS. Discard fan or return to an authorized service facility for Heating, Refrigeration and Air Conditioning Engineers (ASHRAE), and the local code authorities. ■ When cutting...
... unit, switch power off the burner. Follow the heating equipment manufacturer's guideline and safety standards such as a tag, to the service panel. ■ Installation work and electrical wiring must always be vented outdoors. Do not use only. BE CAREFUL TO PREVENT BURNS. Discard fan or return to an authorized service facility for Heating, Refrigeration and Air Conditioning Engineers (ASHRAE), and the local code authorities. ■ When cutting...
Installation Guide
Page 4
... on the rear wall of this range hood must be used. length required is required. Have a qualified technician install the range hood. The model/serial rating plate is located behind the left filter on the model/serial rating plate. Grounded electrical outlet is determined by ceiling height. For non-vented (recirculating) Installation see "For Nonvented (recirculating) Installations Only" in ceiling and wall where canopy hood will be installed must be away from strong draft areas, such as non-vented (recirculating) with any tools listed here. Recirculation Kit Part Number W10349327 is...
... on the rear wall of this range hood must be used. length required is required. Have a qualified technician install the range hood. The model/serial rating plate is located behind the left filter on the model/serial rating plate. Grounded electrical outlet is determined by ceiling height. For non-vented (recirculating) Installation see "For Nonvented (recirculating) Installations Only" in ceiling and wall where canopy hood will be installed must be away from strong draft areas, such as non-vented (recirculating) with any tools listed here. Recirculation Kit Part Number W10349327 is...

Installation Guide
Page 5
... to seal exterior wall or roof opening is not recommended. ■ The length of vent system and number of elbows should be installed immediately above the hood. 5 Rear discharge A 90° elbow may require the use the damper supplied with the range hood. ceiling height Max. The chimney extension replaces the upper chimney shipped with the range hood. ■ Use caulking to provide efficient performance. Consult your dealer or an authorized parts distributor. To vent through the roof or wall.
... to seal exterior wall or roof opening is not recommended. ■ The length of vent system and number of elbows should be installed immediately above the hood. 5 Rear discharge A 90° elbow may require the use the damper supplied with the range hood. ceiling height Max. The chimney extension replaces the upper chimney shipped with the range hood. ■ Use caulking to provide efficient performance. Consult your dealer or an authorized parts distributor. To vent through the roof or wall.
Installation Guide
Page 6
...-amp, fused electrical circuit is used in the system. Roof Venting Wall Venting Non-vented (recirculating) A A B B B A A. Connect the aluminum wiring to the added section of the system you need, add the equivalent feet (meters) for joining copper to the pigtail leads. 2. Deflector B. 6" (15.2 cm) round vent Calculating Vent System Length To calculate the length of copper wire using special connectors and/or tools designed and UL listed for each vent piece used in the non-vented (recirculating) version, fitting a charcoal filter...
...-amp, fused electrical circuit is used in the system. Roof Venting Wall Venting Non-vented (recirculating) A A B B B A A. Connect the aluminum wiring to the added section of the system you need, add the equivalent feet (meters) for joining copper to the pigtail leads. 2. Deflector B. 6" (15.2 cm) round vent Calculating Vent System Length To calculate the length of copper wire using special connectors and/or tools designed and UL listed for each vent piece used in the non-vented (recirculating) version, fitting a charcoal filter...
Installation Guide
Page 7
...screws are being installed into place. ¹⁄₄" (6.4 mm) 2. Failure to use: roof, wall, or nonvented. 3. A C Range Hood Mounting Screws Installation 5. B D A. 8 x 40 mm drywall anchors B. Attach vent cover support bracket to the National Electrical Code or CSA Standards and local codes and ordinances. Fastener locations C. Install the vent system before you select your ceiling height and the hood height maximum before installing the hood. Determine the required height for assembling the range hood. Run the home power supply cable according to wall. Remove...
...screws are being installed into place. ¹⁄₄" (6.4 mm) 2. Failure to use: roof, wall, or nonvented. 3. A C Range Hood Mounting Screws Installation 5. B D A. 8 x 40 mm drywall anchors B. Attach vent cover support bracket to the National Electrical Code or CSA Standards and local codes and ordinances. Fastener locations C. Install the vent system before you select your ceiling height and the hood height maximum before installing the hood. Determine the required height for assembling the range hood. Run the home power supply cable according to wall. Remove...

Installation Guide
Page 8
... Cut the duct to cut vent duct D. Place the assembled air deflector and duct over transition piece. 2. Mounting slots C. Exhaust outlet 3. A B X C D E B A. X = length to the measured size (X). 4. assembly screws provided with vent clamps. 8 Mounting screws B. Vent duct E. Seal connections with the Recirculation Kit. Install Range Hood 1. Air deflector B. Using 2 or more people, hang range hood on 2 mounting screws through the mounting slots on top of hood. Level the range hood and tighten upper mounting screws. 4. Remove the grease filter. Vent cover...
... Cut the duct to cut vent duct D. Place the assembled air deflector and duct over transition piece. 2. Mounting slots C. Exhaust outlet 3. A B X C D E B A. X = length to the measured size (X). 4. assembly screws provided with vent clamps. 8 Mounting screws B. Vent duct E. Seal connections with the Recirculation Kit. Install Range Hood 1. Air deflector B. Using 2 or more people, hang range hood on 2 mounting screws through the mounting slots on top of hood. Level the range hood and tighten upper mounting screws. 4. Remove the grease filter. Vent cover...

Installation Guide
Page 10
... lamp housings B. Blower speed maximum button Operating the light The On/Off light button controls both lights. Operating the blower The BLOWER SPEED buttons turn the blower off and speed minimum button C. Wash metal filters as needed in spring release handle. 5. Push in dishwasher or hot detergent solution. 3. A B C D A. Remove each filter by pressing the desired blower speed button. Press once for On and again for quiet operation. For best results, start the hood before operating hood. Grease filter Range Hood Controls RANGE HOOD CARE Cleaning IMPORTANT: Clean the hood...
... lamp housings B. Blower speed maximum button Operating the light The On/Off light button controls both lights. Operating the blower The BLOWER SPEED buttons turn the blower off and speed minimum button C. Wash metal filters as needed in spring release handle. 5. Push in dishwasher or hot detergent solution. 3. A B C D A. Remove each filter by pressing the desired blower speed button. Press once for On and again for quiet operation. For best results, start the hood before operating hood. Grease filter Range Hood Controls RANGE HOOD CARE Cleaning IMPORTANT: Clean the hood...
Installation Guide
Page 13
... after-warranty service, anywhere in your nearest designated service center. Call the Whirlpool Customer eXperience Center toll free: 1-800-253-1301 or visit our website at www.whirlpool.ca. Accessories Chimney Extension Kit Order Part Number W10337357 Stainless Steel Cleaner and Polish Order Part Number 31462A Charcoal Filter Kit (for non-vented installations only) Order Part Number W10294730 Recirculation Kit (for assistance or service, please know the purchase date and the complete model and serial number of appliances. ■ Installation information. ■ Use...
... after-warranty service, anywhere in your nearest designated service center. Call the Whirlpool Customer eXperience Center toll free: 1-800-253-1301 or visit our website at www.whirlpool.ca. Accessories Chimney Extension Kit Order Part Number W10337357 Stainless Steel Cleaner and Polish Order Part Number 31462A Charcoal Filter Kit (for non-vented installations only) Order Part Number W10294730 Recirculation Kit (for assistance or service, please know the purchase date and the complete model and serial number of appliances. ■ Installation information. ■ Use...

Installation Guide
Page 14
... installation date for future reference. You must be repaired in the home and only in a manner that have been removed, altered or cannot be borne by Whirlpool. 5. Proof of your complete model number and serial number. Any food loss due to repair or replace appliance light bulbs, air filters or water filters. Service must provide proof of the Use & Care Guide. This limited warranty is valid only in the United States or Canada...
... installation date for future reference. You must be repaired in the home and only in a manner that have been removed, altered or cannot be borne by Whirlpool. 5. Proof of your complete model number and serial number. Any food loss due to repair or replace appliance light bulbs, air filters or water filters. Service must provide proof of the Use & Care Guide. This limited warranty is valid only in the United States or Canada...


