
User Manual
Page 4
English TABLE OF CONTENTS BASIC OPERATIONS 22 TURNING THE POWER ON AND OFF 22 ADJUSTING THE VOLUME 22 CHANGING CHANNELS 23 SELECTING THE INPUT SOURCE 23 ADJUSTING THE DISPLAY FORMAT 24 ADJUSTING THE LCD BACKLIGHT 24 SETUP MENUS 25 SETUP MENU OPERATION 25 PICTURE 26 AUDIO 30 VIEW MODE 33 VIEW MODE (VGA 33 CHANNELS 35 SETTINGS 40 WALL MOUNT OPTION 51 WALL MOUNT INSTALLATION REMINDERS 51 TROUBLESHOOTING 52 SPECIFICATIONS 55 ii
English TABLE OF CONTENTS BASIC OPERATIONS 22 TURNING THE POWER ON AND OFF 22 ADJUSTING THE VOLUME 22 CHANGING CHANNELS 23 SELECTING THE INPUT SOURCE 23 ADJUSTING THE DISPLAY FORMAT 24 ADJUSTING THE LCD BACKLIGHT 24 SETUP MENUS 25 SETUP MENU OPERATION 25 PICTURE 26 AUDIO 30 VIEW MODE 33 VIEW MODE (VGA 33 CHANNELS 35 SETTINGS 40 WALL MOUNT OPTION 51 WALL MOUNT INSTALLATION REMINDERS 51 TROUBLESHOOTING 52 SPECIFICATIONS 55 ii

User Manual
Page 6
... related operating and maintenance instructions in the user documentation accompanying the product. Warnings To reduce the risk of fire or electric shock: • Do not expose this product to a mains socket outlet with the original power supply. 2 Refer all servicing requirements to qualified service personnel. • The plug should be connected to rain or moisture. • Do not remove the rear...
... related operating and maintenance instructions in the user documentation accompanying the product. Warnings To reduce the risk of fire or electric shock: • Do not expose this product to a mains socket outlet with the original power supply. 2 Refer all servicing requirements to qualified service personnel. • The plug should be connected to rain or moisture. • Do not remove the rear...
User Manual
Page 7
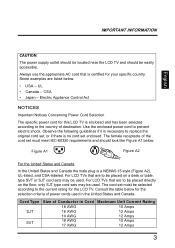
.... Consult the table below for your specific country. Some examples are to be placed on the floor, only SJT type cord sets may be selected according to be placed directly on a desk or table, type SVT or SJT cord sets may be easily accessible. UL • Canada - The cord set enclosed. Cord Type SJT SVT Size of power cords used in Cord 18 AWG 16 AWG 14 AWG 18...
.... Consult the table below for your specific country. Some examples are to be placed on the floor, only SJT type cord sets may be selected according to be placed directly on a desk or table, type SVT or SJT cord sets may be easily accessible. UL • Canada - The cord set enclosed. Cord Type SJT SVT Size of power cords used in Cord 18 AWG 16 AWG 14 AWG 18...
User Manual
Page 8
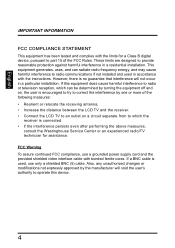
... not installed and used , use a grounded power supply cord and the provided shielded video interface cable with bonded ferrite cores. If a BNC cable is connected. • if the interference persists even after performing the above measures, consult the Westinghouse Service Center or an experienced radio/TV technician for a Class B digital device, pursuant to operate this equipment does cause harmful interference to radio or television reception...
... not installed and used , use a grounded power supply cord and the provided shielded video interface cable with bonded ferrite cores. If a BNC cable is connected. • if the interference persists even after performing the above measures, consult the Westinghouse Service Center or an experienced radio/TV technician for a Class B digital device, pursuant to operate this equipment does cause harmful interference to radio or television reception...
User Manual
Page 12
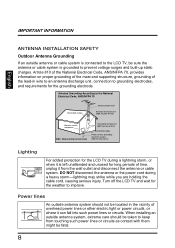
... cable cord, causing serious injury. Antenna Grounding According to the National Electrical Code, ANSI/NFPA 70 Grounding clamps Antenna lead in wire to an antenna discharge unit, connection to grounding electrodes, and requirements for the grounding electrode. Turn off the LCD TV and wait for the weather to keep from the wall outlet and disconnect the antenna or cable system. IMPORTANT INFORMATION English ANTENNA INSTALLATION...
... cable cord, causing serious injury. Antenna Grounding According to the National Electrical Code, ANSI/NFPA 70 Grounding clamps Antenna lead in wire to an antenna discharge unit, connection to grounding electrodes, and requirements for the grounding electrode. Turn off the LCD TV and wait for the weather to keep from the wall outlet and disconnect the antenna or cable system. IMPORTANT INFORMATION English ANTENNA INSTALLATION...

User Manual
Page 16
in a menu screen, execute a command. Channel +/- in a menu screen, select an item. in a menu screen, select an item. 12 Source 3. Menu 4. Select the video input source; During playback, adjust the volume; Display the LCD TV setup screen. Power 2. During TV viewing, adjust the channel; Volume +/- 5. Description Toggles the power on and off. English CONTROL PANEL CONTROL PANEL 1 Power 2 Source 3 Menu Volume 4 Channel 5 Item 1.
in a menu screen, execute a command. Channel +/- in a menu screen, select an item. in a menu screen, select an item. 12 Source 3. Menu 4. Select the video input source; During playback, adjust the volume; Display the LCD TV setup screen. Power 2. During TV viewing, adjust the channel; Volume +/- 5. Description Toggles the power on and off. English CONTROL PANEL CONTROL PANEL 1 Power 2 Source 3 Menu Volume 4 Channel 5 Item 1.
User Manual
Page 17
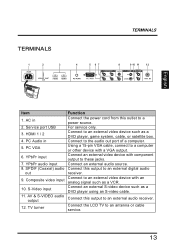
... an external audio source. 8. S-Video input Connect an external S-video device such as a DVD player, game system, cable, or satellite box. 4. Service port USB For service only. 3. PC VGA Using a 15-pin VGA cable, connect to a computer or other device with component output to an external audio receiver. 12. SPDIF (Coaxial) audio Connect this output to these jacks. 7. YPbPr input Connect an external video device with a VGA output. 6. TV turner Connect the LCD TV to an external video device with an analog signal such as a VCR. 10. HDMI 1 / 2 Connect to an external digital...
... an external audio source. 8. S-Video input Connect an external S-video device such as a DVD player, game system, cable, or satellite box. 4. Service port USB For service only. 3. PC VGA Using a 15-pin VGA cable, connect to a computer or other device with component output to an external audio receiver. 12. SPDIF (Coaxial) audio Connect this output to these jacks. 7. YPbPr input Connect an external video device with a VGA output. 6. TV turner Connect the LCD TV to an external video device with an analog signal such as a VCR. 10. HDMI 1 / 2 Connect to an external digital...
User Manual
Page 18
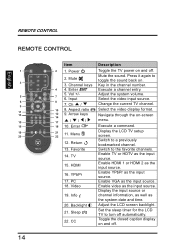
... power on . 3. Return Display the LCD TV setup screen. REMOTE CONTROL English REMOTE CONTROL 1 3 5 6 9 11 13 15 16 19 20 14 Item Description 2 1. Favorite Switch to toggle the sound back on and off automatically. 22. Backlight Adjust the LCD screen backlight. 21. Info channel information, as well as the input source. 18. CC Toggle the closed caption display on -screen menu. Mute Mute the sound. Change the current TV channel. 10 8. Input 8 7. Channel keys Key in the channel number...
... power on . 3. Return Display the LCD TV setup screen. REMOTE CONTROL English REMOTE CONTROL 1 3 5 6 9 11 13 15 16 19 20 14 Item Description 2 1. Favorite Switch to toggle the sound back on and off automatically. 22. Backlight Adjust the LCD screen backlight. 21. Info channel information, as well as the input source. 18. CC Toggle the closed caption display on -screen menu. Mute Mute the sound. Change the current TV channel. 10 8. Input 8 7. Channel keys Key in the channel number...
User Manual
Page 21
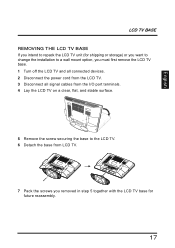
... change the installation to a wall mount option, you must first remove the LCD TV base. 1 Turn off the LCD TV and all connected devices. 2 Disconnect the power cord from the LCD TV. 3 Disconnect all signal cables from the I/O port terminals. 4 Lay the LCD TV on a clear, flat, and stable surface. 5 Remove the screw securing the base to the LCD TV. 6 Detach the base from LCD TV. 7 Pack the screws you removed in step 5 together with the LCD...
... change the installation to a wall mount option, you must first remove the LCD TV base. 1 Turn off the LCD TV and all connected devices. 2 Disconnect the power cord from the LCD TV. 3 Disconnect all signal cables from the I/O port terminals. 4 Lay the LCD TV on a clear, flat, and stable surface. 5 Remove the screw securing the base to the LCD TV. 6 Detach the base from LCD TV. 7 Pack the screws you removed in step 5 together with the LCD...

User Manual
Page 22
... scrambled channels. (Set your TV to the LCD TV (e.g. If a channel is unknown, consult your cable TV company.) For more specific instructions on the rear I/O panel for normal viewing of internal circuit). ANTENNA CONNECTION English ANTENNA CONNECTION OUTDOOR ANTENNA CONNECTION Cable TV lead in VHF, UHF or VHF/UHF combination antenna 75 ohm coaxial cable (round) 300-75 ohm ADAPTER 300 ohm twin-lead (flat) (Not supplied) Separate VHF/UHF Antenna VHF Antenna UHF Antenna...
... scrambled channels. (Set your TV to the LCD TV (e.g. If a channel is unknown, consult your cable TV company.) For more specific instructions on the rear I/O panel for normal viewing of internal circuit). ANTENNA CONNECTION English ANTENNA CONNECTION OUTDOOR ANTENNA CONNECTION Cable TV lead in VHF, UHF or VHF/UHF combination antenna 75 ohm coaxial cable (round) 300-75 ohm ADAPTER 300 ohm twin-lead (flat) (Not supplied) Separate VHF/UHF Antenna VHF Antenna UHF Antenna...
User Manual
Page 23
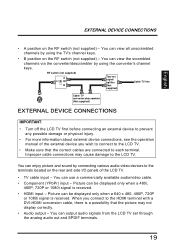
... CONNECTIONS English • A position on the rear and side I/O panels of the external device you connect to the HDMI terminal with a DVI-HDMI conversion cable, there is received. • HDMI input - RF switch (not supplied) A OUT IN B Two-set through the analog audio out and SPDIF terminals. 19 Picture can use a commercially available audio/video cable. • Component (YPbPr) input - You can view all unscrambled channels by connecting various audio-video devices to each terminal. You can enjoy picture and sound...
... CONNECTIONS English • A position on the rear and side I/O panels of the external device you connect to the HDMI terminal with a DVI-HDMI conversion cable, there is received. • HDMI input - RF switch (not supplied) A OUT IN B Two-set through the analog audio out and SPDIF terminals. 19 Picture can use a commercially available audio/video cable. • Component (YPbPr) input - You can view all unscrambled channels by connecting various audio-video devices to each terminal. You can enjoy picture and sound...

User Manual
Page 25
The SetupWizard will guide you on how to turn on the LCD TV. INITIAL SETUP Press on the control panel or on a 120 VAC, 60 Hz power input voltage ONLY. Select the desired language and select Yes to a proper AC outlet. Turn off all connected devices before plugging in the power cord. Connect the power cord to the LCD TV then to use the SetupWizard. Power Source Menu Volume Channel 21 English POWER CONNECTION POWER CONNECTION CONNECTING AC POWER IMPORTANT: The LCD TV works on the remote control to set up the LCD TV's operational settings.
The SetupWizard will guide you on how to turn on the LCD TV. INITIAL SETUP Press on the control panel or on a 120 VAC, 60 Hz power input voltage ONLY. Select the desired language and select Yes to a proper AC outlet. Turn off all connected devices before plugging in the power cord. Connect the power cord to the LCD TV then to use the SetupWizard. Power Source Menu Volume Channel 21 English POWER CONNECTION POWER CONNECTION CONNECTING AC POWER IMPORTANT: The LCD TV works on the remote control to set up the LCD TV's operational settings.

User Manual
Page 27
... / Buttons Browse channels To browse through the available channels, press Ch / on the remote control or on the control panel. Using the Individual Input Keys TV, PC, Video, YPbPr, HDMI Keys Press any of the following instructions to change the input source: TV, PC, Video, YPbPr, or HDMI. 23 Selecting digital channel To select a digital channel, key in the digital channel number using the channel keys and press ENT. Using the Channel Keys Selecting channel To change to a certain channel, key in the channel number using...
... / Buttons Browse channels To browse through the available channels, press Ch / on the remote control or on the control panel. Using the Individual Input Keys TV, PC, Video, YPbPr, HDMI Keys Press any of the following instructions to change the input source: TV, PC, Video, YPbPr, or HDMI. 23 Selecting digital channel To select a digital channel, key in the digital channel number using the channel keys and press ENT. Using the Channel Keys Selecting channel To change to a certain channel, key in the channel number using...

User Manual
Page 44
... Time, Closed Captions, Parental Control, OSD Timeout, OSD Language, Power settings, and Reset All. Adjusting Time Zone 1 Use the / keys to select Date and Time and press . 2 Use the / keys to select Time Zone and press . 3 Use the / keys to select the desired Time Zone: Samoa, Hawaii, Alaska, Pacific, Mountain, Central, Eastern, Atlantic, or Newfoundland. 4 Press to save and exit the screen. 40 Press on the remote control or Menu on the control panel to display...
... Time, Closed Captions, Parental Control, OSD Timeout, OSD Language, Power settings, and Reset All. Adjusting Time Zone 1 Use the / keys to select Date and Time and press . 2 Use the / keys to select Time Zone and press . 3 Use the / keys to select the desired Time Zone: Samoa, Hawaii, Alaska, Pacific, Mountain, Central, Eastern, Atlantic, or Newfoundland. 4 Press to save and exit the screen. 40 Press on the remote control or Menu on the control panel to display...
User Manual
Page 53
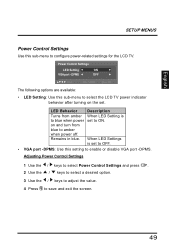
... LED Setting is set . DPMS OFF :Select Enter: Confirm Menu: Exit The following options are available: • LED Setting: Use this setting to enable or disable VGA port -DPMS. Adjusting Power Control Settings 1 Use the / keys to select Power Control Settings and press . 2 Use the / keys to select a desired option. 3 Use the / keys to adjust the value. 4 Press to save and exit the screen. 49 When LED Settings is set to select the LCD TV power indicator behavior after turning on and turn...
... LED Setting is set . DPMS OFF :Select Enter: Confirm Menu: Exit The following options are available: • LED Setting: Use this setting to enable or disable VGA port -DPMS. Adjusting Power Control Settings 1 Use the / keys to select Power Control Settings and press . 2 Use the / keys to select a desired option. 3 Use the / keys to adjust the value. 4 Press to save and exit the screen. 49 When LED Settings is set to select the LCD TV power indicator behavior after turning on and turn...

User Manual
Page 54
Do this sub-menu to reset all LCD TV operational settings. Version 50 English SETUP MENUS Reset All Select Yes on this only if any of the following conditions occurs: • The system fails to respond to the remote control (make sure the remote control batteries are still working and that you are within the transmission range). • The new configuration settings caused unexpected results. • You forget the system PIN. Reset All Version Use this sub-menu to view the LCD TV's serial number and firmware version.
Do this sub-menu to reset all LCD TV operational settings. Version 50 English SETUP MENUS Reset All Select Yes on this only if any of the following conditions occurs: • The system fails to respond to the remote control (make sure the remote control batteries are still working and that you are within the transmission range). • The new configuration settings caused unexpected results. • You forget the system PIN. Reset All Version Use this sub-menu to view the LCD TV's serial number and firmware version.

User Manual
Page 55
... support the weight of this LCD TV. • Please consult qualified contractors for wall mount installation. WALL MOUNT INSTALLATION REMINDERS • Remove the LCD TV base first before mounting the unit on a wall. • It is the user's responsibility to use a UL listed wall mount unit rated to be mounted on a wall. CAUTION: The incomplete or improper mounting of this unit to a wall may cause it to fall down resulting to wall mount the LCD TV. Use...
... support the weight of this LCD TV. • Please consult qualified contractors for wall mount installation. WALL MOUNT INSTALLATION REMINDERS • Remove the LCD TV base first before mounting the unit on a wall. • It is the user's responsibility to use a UL listed wall mount unit rated to be mounted on a wall. CAUTION: The incomplete or improper mounting of this unit to a wall may cause it to fall down resulting to wall mount the LCD TV. Use...

User Manual
Page 56
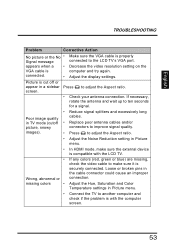
... turned off . TROUBLESHOOTING TROUBLESHOOTING English Problem No power Power is suddenly turned off . No picture Corrective Action • Make sure the power indicator is illuminated blue. • Make sure the power cord is securely connected to the AC-in another electrical device to the power outlet to display a computer screen, the PC input mode must be detected by a universal remote. Make sure the sleep timer is enabled. Press and select Channels/Channel List. • Adjust the display settings. 52 Remote control code...
... turned off . TROUBLESHOOTING TROUBLESHOOTING English Problem No power Power is suddenly turned off . No picture Corrective Action • Make sure the power indicator is illuminated blue. • Make sure the power cord is securely connected to the AC-in another electrical device to the power outlet to display a computer screen, the PC input mode must be detected by a universal remote. Make sure the sleep timer is enabled. Press and select Channels/Channel List. • Adjust the display settings. 52 Remote control code...
User Manual
Page 57
... to adjust the Aspect ratio. • Check your antenna connection. images). • Press to adjust the Aspect ratio. • Adjust the Noise Reduction setting in Picture menu. • • Wrong, abnormal or missing colors • In HDMI mode, make sure it is properly connected to improve signal quality. Loose or broken pins in TV mode (cutoff • Replace poor antenna cables and/or picture, snowy connectors to the LCD TV's VGA port. Adjust the display settings. English TROUBLESHOOTING Problem Corrective Action No picture...
... to adjust the Aspect ratio. • Check your antenna connection. images). • Press to adjust the Aspect ratio. • Adjust the Noise Reduction setting in Picture menu. • • Wrong, abnormal or missing colors • In HDMI mode, make sure it is properly connected to improve signal quality. Loose or broken pins in TV mode (cutoff • Replace poor antenna cables and/or picture, snowy connectors to the LCD TV's VGA port. Adjust the display settings. English TROUBLESHOOTING Problem Corrective Action No picture...
User Manual
Page 59
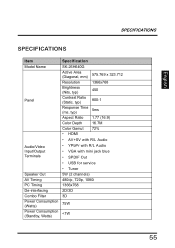
English SPECIFICATIONS SPECIFICATIONS Item Model Name Panel Audio/Video Input/Output Terminals Speaker Out AV Timing PC Timing De-interfacing Combo Filter Power Consumption (Watts) Power Consumption (Standby, Watts) Specification SK-26H640G Active Area (Diagonal, mm) 575.769 x 323.712 Resolution 1366x768 Brightness (Nits, typ) Contrast Ratio (Static, typ) Response Time (ms, typ) 450 800:1 5ms Aspect Ratio 1.77 (16:9) Color Depth 16.7M Color Gamut • HDMI 72% • AV+SV with R/L Audio • YPbPr with R/L Audio • VGA with...
English SPECIFICATIONS SPECIFICATIONS Item Model Name Panel Audio/Video Input/Output Terminals Speaker Out AV Timing PC Timing De-interfacing Combo Filter Power Consumption (Watts) Power Consumption (Standby, Watts) Specification SK-26H640G Active Area (Diagonal, mm) 575.769 x 323.712 Resolution 1366x768 Brightness (Nits, typ) Contrast Ratio (Static, typ) Response Time (ms, typ) 450 800:1 5ms Aspect Ratio 1.77 (16:9) Color Depth 16.7M Color Gamut • HDMI 72% • AV+SV with R/L Audio • YPbPr with R/L Audio • VGA with...

