User Manual
Page 6
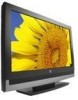
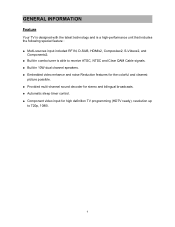
GENERAL INFORMATION Feature Your TV is designed with the latest technology and is a high-performance unit that includes the following special feature : ‹ Multi-sources input included RF IN, D-SUB, ... and Clear QAM Cable signals. ‹ Built-in 10W dual channel speakers. ‹ Embedded video enhance and noise Reduction features for the colorful and clearest picture possible. ‹ Provided multi-channel sound decoder for stereo and bilingual broadcasts. ‹ Automatic sleep timer control. ‹ Component video input for high definition...
GENERAL INFORMATION Feature Your TV is designed with the latest technology and is a high-performance unit that includes the following special feature : ‹ Multi-sources input included RF IN, D-SUB, ... and Clear QAM Cable signals. ‹ Built-in 10W dual channel speakers. ‹ Embedded video enhance and noise Reduction features for the colorful and clearest picture possible. ‹ Provided multi-channel sound decoder for stereo and bilingual broadcasts. ‹ Automatic sleep timer control. ‹ Component video input for high definition...
User Manual
Page 7
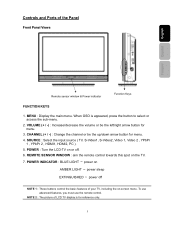
Controls and Ports of LCD TV display is appeared, press the button to select or access the sub-menu. 2. CHANNEL (+ / -) : Change the channel or be the left/right arrow button for menu. 3. NOTE 2 : The picture of the Panel Front Panel Views Français Español English Remote... ─ power off NOTE 1 : These buttons control the basic features of your TV, including the on or off. 6. POWER : Turn the LCD-TV on -screen menu. REMOTE SENSOR WINDOW : aim the remote control towards this spot on the TV. 7. MENU : Display the main menu. VOLUME (+ / -) : Increase/decrease ...
Controls and Ports of LCD TV display is appeared, press the button to select or access the sub-menu. 2. CHANNEL (+ / -) : Change the channel or be the left/right arrow button for menu. 3. NOTE 2 : The picture of the Panel Front Panel Views Français Español English Remote... ─ power off NOTE 1 : These buttons control the basic features of your TV, including the on or off. 6. POWER : Turn the LCD-TV on -screen menu. REMOTE SENSOR WINDOW : aim the remote control towards this spot on the TV. 7. MENU : Display the main menu. VOLUME (+ / -) : Increase/decrease ...
User Manual
Page 14
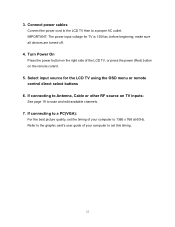
... power button on the right side of your computer to a PC(VGA): For the best picture quality, set this timing. 12 If connecting to set the timing of the LCD TV, or press the power (Red) button on TV inputs: See page 19 to a proper AC outlet. Refer to the graphic card's user ...guide of your computer to 1366 x 768 at 60Hz. Connect power cables Connect the power cord to the LCD TV then to scan and edit available channels. 7. IMPORTANT: The power input voltage for the LCD TV using the OSD menu or remote control direct select buttons 6. If connecting to Antenna, Cable or other RF...
... power button on the right side of your computer to a PC(VGA): For the best picture quality, set this timing. 12 If connecting to set the timing of the LCD TV, or press the power (Red) button on TV inputs: See page 19 to a proper AC outlet. Refer to the graphic card's user ...guide of your computer to 1366 x 768 at 60Hz. Connect power cables Connect the power cord to the LCD TV then to scan and edit available channels. 7. IMPORTANT: The power input voltage for the LCD TV using the OSD menu or remote control direct select buttons 6. If connecting to Antenna, Cable or other RF...

User Manual
Page 15
Remove the four screws underneath the BASE. (See picture below) c. Carefully place the TV face down on a soft clean surface. Français Español English How to remove the BASE a. b. Pull out the BASE from the TV. 13
Remove the four screws underneath the BASE. (See picture below) c. Carefully place the TV face down on a soft clean surface. Français Español English How to remove the BASE a. b. Pull out the BASE from the TV. 13

User Manual
Page 17
DONE button to select or adjust your favorite picture settings. Français Español English Video Menu/Exit Up Exit to previous menu Right Enter Down Video settings: Press arrow keys to close picture setting menu. 15
DONE button to select or adjust your favorite picture settings. Français Español English Video Menu/Exit Up Exit to previous menu Right Enter Down Video settings: Press arrow keys to close picture setting menu. 15
User Manual
Page 18
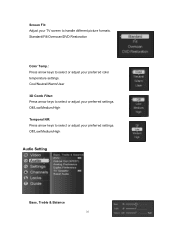
Off/Low/Medium/High Temporal NR: Press arrow keys to select or adjust your preferred settings. Off/Low/Medium/High Audio Setting Bass, Treble & Balance 16 Cool/Neutral/Warm/User 3D Comb Filter: Press arrow keys to handle different picture formats. Screen Fit: Adjust your preferred color temperature settings. Standard/Fill/Overscan/DVD Restoration Color Temp.: Press arrow keys to select or adjust your TV screen to select or adjust your preferred settings.
Off/Low/Medium/High Temporal NR: Press arrow keys to select or adjust your preferred settings. Off/Low/Medium/High Audio Setting Bass, Treble & Balance 16 Cool/Neutral/Warm/User 3D Comb Filter: Press arrow keys to handle different picture formats. Screen Fit: Adjust your preferred color temperature settings. Standard/Fill/Overscan/DVD Restoration Color Temp.: Press arrow keys to select or adjust your TV screen to select or adjust your preferred settings.
User Manual
Page 28
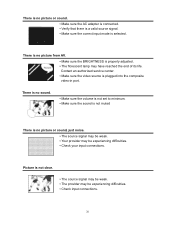
... is not clear. ▪ The source signal may be weak. ▪ The provider may be experiencing difficulties. ▪ Check input connections. 26 Picture is no picture or sound, just noise. ▪ The source signal may be experiencing difficulties. ▪ Check your input connections. There is no... is plugged into the composite video-in port. Contact an authorized service center. ▪ Make sure the video source is selected. There is no picture from AV. ▪ Make sure the BRIGHTNESS is properly adjusted. ▪ The florescent lamp may be weak. ▪ Your provider may have...
... is not clear. ▪ The source signal may be weak. ▪ The provider may be experiencing difficulties. ▪ Check input connections. 26 Picture is no picture or sound, just noise. ▪ The source signal may be experiencing difficulties. ▪ Check your input connections. There is no... is plugged into the composite video-in port. Contact an authorized service center. ▪ Make sure the video source is selected. There is no picture from AV. ▪ Make sure the BRIGHTNESS is properly adjusted. ▪ The florescent lamp may be weak. ▪ Your provider may have...
User Manual
Page 29
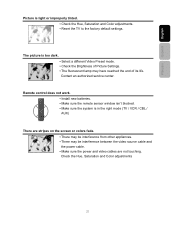
...not work. ▪ Install new batteries. ▪ Make sure the remote sensor window isn't blocked. ▪ Make sure the system is in the right mode (TV / VCR / CBL / AUX) There are stripes on the screen or colors fade. ▪ There may be interference from other appliances. ▪ There may ...have reached the end of Picture Settings. ▪ The fluorescent lamp may be interference between the video source cable and the power cable. ▪ Make sure the power and video ...
...not work. ▪ Install new batteries. ▪ Make sure the remote sensor window isn't blocked. ▪ Make sure the system is in the right mode (TV / VCR / CBL / AUX) There are stripes on the screen or colors fade. ▪ There may be interference from other appliances. ▪ There may ...have reached the end of Picture Settings. ▪ The fluorescent lamp may be interference between the video source cable and the power cable. ▪ Make sure the power and video ...
User Manual
Page 30
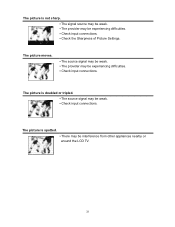
The picture is spotted. ▪ There may be experiencing difficulties. ▪ Check input connections. The picture moves. ▪ The source signal may be weak. ▪ The provider may be interference from other appliances nearby or around the LCD TV. 28 The picture is not sharp. ▪ The signal source may be weak. ▪ The provider may be weak. ▪ Check input connections. The picture is doubled or tripled. ▪ The source signal may be experiencing difficulties. ▪ Check input connections. ▪ Check the Sharpness of Picture Settings.
The picture is spotted. ▪ There may be experiencing difficulties. ▪ Check input connections. The picture moves. ▪ The source signal may be weak. ▪ The provider may be interference from other appliances nearby or around the LCD TV. 28 The picture is not sharp. ▪ The signal source may be weak. ▪ The provider may be weak. ▪ Check input connections. The picture is doubled or tripled. ▪ The source signal may be experiencing difficulties. ▪ Check input connections. ▪ Check the Sharpness of Picture Settings.
User Manual
Page 32
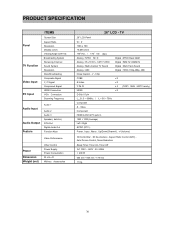
...net) Other Control Power Supply Power Consumption W x H x D Without Accessories 26" LCD - Power , Input , Menu , Up/Down(Channel) , +/-(Volume) 3D Comb-filter , 3D De-interlace , Aspect Ratio Control (ARC) , Auto Picture Control, Noise Reduction Sleep Timer, Timer On, Timer Off AC 100V ~ 240V... , 50 / 60Hz < 200 W 655 mm * 505 mm * 175 mm 11 Kg 30 Chip CVBS x 2 S-Video x 2 Y Pb Pr x 2 (720P / 1080i , HDTV ready ) HDMI x 2 D-Sub 15 pin fH = 31.5 ~ 60KHz / fV = 56 ~ 75Hz Composite S - TV 26" LCD...
...net) Other Control Power Supply Power Consumption W x H x D Without Accessories 26" LCD - Power , Input , Menu , Up/Down(Channel) , +/-(Volume) 3D Comb-filter , 3D De-interlace , Aspect Ratio Control (ARC) , Auto Picture Control, Noise Reduction Sleep Timer, Timer On, Timer Off AC 100V ~ 240V... , 50 / 60Hz < 200 W 655 mm * 505 mm * 175 mm 11 Kg 30 Chip CVBS x 2 S-Video x 2 Y Pb Pr x 2 (720P / 1080i , HDTV ready ) HDMI x 2 D-Sub 15 pin fH = 31.5 ~ 60KHz / fV = 56 ~ 75Hz Composite S - TV 26" LCD...


