
User Manual
Page 2
Français Español English TABLE OF CONTENTS IMPORTANT SAFETY AND PRECAUTIONS 1 Important Information...1 Safety Precautions...2 GENERAL INFORMATION 4 Feature...4 Controls and Ports of the Panel 5 Accessories ...7 Remote Control...8 INSTALLATION & FUNCTION ADJUSTMENT 10 Installation...10 How to remove the Base 13 Function Adjustment ...14 TROUBLESHOOTING ...25 PC INPUT PRESET TIMMING TABLE 29 PRODUCT SPECIFICATION 30 I
Français Español English TABLE OF CONTENTS IMPORTANT SAFETY AND PRECAUTIONS 1 Important Information...1 Safety Precautions...2 GENERAL INFORMATION 4 Feature...4 Controls and Ports of the Panel 5 Accessories ...7 Remote Control...8 INSTALLATION & FUNCTION ADJUSTMENT 10 Installation...10 How to remove the Base 13 Function Adjustment ...14 TROUBLESHOOTING ...25 PC INPUT PRESET TIMMING TABLE 29 PRODUCT SPECIFICATION 30 I
User Manual
Page 3
... or modify this type of copyrighted TV programs is not covered under warranty. Refer any unauthorized recording in whole or in part may also be copyrighted and any service issues to , potentially hazardous display output: side bar images, video game patterns, closed captioning, channel logos and letterbox black bars. Certain Canadian programs may be some cells that any unauthorized changes or modifications to this product to operate it is...
... or modify this type of copyrighted TV programs is not covered under warranty. Refer any unauthorized recording in whole or in part may also be copyrighted and any service issues to , potentially hazardous display output: side bar images, video game patterns, closed captioning, channel logos and letterbox black bars. Certain Canadian programs may be some cells that any unauthorized changes or modifications to this product to operate it is...
User Manual
Page 5
... manufacturer's instructions are designed for further clarification on the screen as damage to fall from coming into contact with the product. An outside antenna, use extreme caution to operate in this product is dropped or struck. 11. Use care when moving the product on an unstable cart, stand, tripod or table. The LCD panel used in an enclosed environment. Use only mounting hardware...
... manufacturer's instructions are designed for further clarification on the screen as damage to fall from coming into contact with the product. An outside antenna, use extreme caution to operate in this product is dropped or struck. 11. Use care when moving the product on an unstable cart, stand, tripod or table. The LCD panel used in an enclosed environment. Use only mounting hardware...
User Manual
Page 6
... Componentx2. ‹ Built-in combo tuner is able to receive ATSC, NTSC and Clear QAM Cable signals. ‹ Built-in 10W dual channel speakers. ‹ Embedded video enhance and noise Reduction features for the colorful and clearest picture possible. ‹ Provided multi-channel sound decoder for stereo and bilingual broadcasts. ‹ Automatic sleep timer control. ‹ Component video input for high definition TV programming (HDTV ready), resolution up to 720p, 1080i. 4
... Componentx2. ‹ Built-in combo tuner is able to receive ATSC, NTSC and Clear QAM Cable signals. ‹ Built-in 10W dual channel speakers. ‹ Embedded video enhance and noise Reduction features for the colorful and clearest picture possible. ‹ Provided multi-channel sound decoder for stereo and bilingual broadcasts. ‹ Automatic sleep timer control. ‹ Component video input for high definition TV programming (HDTV ready), resolution up to 720p, 1080i. 4
User Manual
Page 7
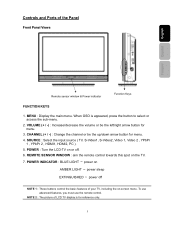
... menu. 4. POWER : Turn the LCD-TV on AMBER LIGHT ─ power sleep EXTINGUISHED ─ power off . 6. REMOTE SENSOR WINDOW : aim the remote control towards this spot on -screen menu. When OSD is for reference only. 5 SOURCE : Select the input source ( TV, S-Video1, S-Video2, Video 1, Video 2 , YPbPr 1 , YPbPr 2 , HDMI1, HDMI2, PC ). 5. POWER INDICATOR : BLUE LIGHT ─ power on or off NOTE 1 : These buttons control the basic features of LCD TV display is appeared, press the button to select or access the sub-menu. 2. VOLUME...
... menu. 4. POWER : Turn the LCD-TV on AMBER LIGHT ─ power sleep EXTINGUISHED ─ power off . 6. REMOTE SENSOR WINDOW : aim the remote control towards this spot on -screen menu. When OSD is for reference only. 5 SOURCE : Select the input source ( TV, S-Video1, S-Video2, Video 1, Video 2 , YPbPr 1 , YPbPr 2 , HDMI1, HDMI2, PC ). 5. POWER INDICATOR : BLUE LIGHT ─ power on or off NOTE 1 : These buttons control the basic features of LCD TV display is appeared, press the button to select or access the sub-menu. 2. VOLUME...
User Manual
Page 8
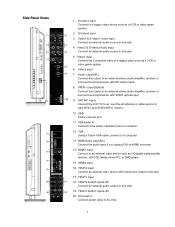
... VGA cable, connect to view NTSC and ATSC(HDTV) content. 10. YPbPr2 Audio2 input(L/R) Connect an external audio source to this output to an external stereo audio amplifier, receiver or surround sound processor with component output to a legacy video such as a VCR or video game system. 2. Video1 input Connect the Composite video to this jack. 5. Video2 input 7. Video2 & S-Video2 Audio input Connect an external audio source to a legacy video device such as a VCR or video game system. 6. USB Factory service port 11. ANT.(RF input) Connect the LCD TV to...
... VGA cable, connect to view NTSC and ATSC(HDTV) content. 10. YPbPr2 Audio2 input(L/R) Connect an external audio source to this output to an external stereo audio amplifier, receiver or surround sound processor with component output to a legacy video such as a VCR or video game system. 2. Video1 input Connect the Composite video to this jack. 5. Video2 input 7. Video2 & S-Video2 Audio input Connect an external audio source to a legacy video device such as a VCR or video game system. 6. USB Factory service port 11. ANT.(RF input) Connect the LCD TV to...
User Manual
Page 10
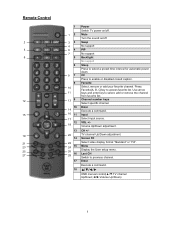
... automatic power down. VOL +/Volume Up/Down adjustment. CC Press to previous channel. Last CH Switch to enable or disabled closed caption. Press Favorite(A, B, C)key to access favorite list. Favorite Select, remove or add your favorite channel. Channel number keys Select specific channel. OSD menual control(▲/▼:TV channel Up/Down;◄/►:Volume Up/Down) 8 Mute Turn the sound on /off . Enter Execute a command. Menu Display the User setup menu. Screen Fit Select video display format "Standard" or "Fill". Remote Control...
... automatic power down. VOL +/Volume Up/Down adjustment. CC Press to previous channel. Last CH Switch to enable or disabled closed caption. Press Favorite(A, B, C)key to access favorite list. Favorite Select, remove or add your favorite channel. Channel number keys Select specific channel. OSD menual control(▲/▼:TV channel Up/Down;◄/►:Volume Up/Down) 8 Mute Turn the sound on /off . Enter Execute a command. Menu Display the User setup menu. Screen Fit Select video display format "Standard" or "Fill". Remote Control...
User Manual
Page 14
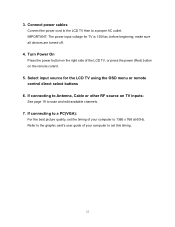
... best picture quality, set the timing of your computer to set this timing. 12 Turn Power On Press the power button on the right side of your computer to the graphic card's user guide of the LCD TV, or press the power (Red) button on TV inputs: See page 19 to a proper AC outlet. IMPORTANT: The power input voltage for the LCD TV using the OSD menu or remote control direct select buttons 6. Connect power cables Connect the power cord to the LCD TV then to scan...
... best picture quality, set the timing of your computer to set this timing. 12 Turn Power On Press the power button on the right side of your computer to the graphic card's user guide of the LCD TV, or press the power (Red) button on TV inputs: See page 19 to a proper AC outlet. IMPORTANT: The power input voltage for the LCD TV using the OSD menu or remote control direct select buttons 6. Connect power cables Connect the power cord to the LCD TV then to scan...
User Manual
Page 16
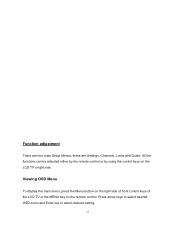
Function adjustment There are Settings, Channels, Locks and Guide. Press arrow keys to select desired OSD menu and Enter key to select desired setting. 14 these are four main Setup Menus; Viewing OSD Menu To display the main menu, press the Menu button on the right side of front control keys of the LCD TV or the MENU key on the LCD TV's right side. All the functions can be adjusted either by the remote control or by using the control keys on the remote control.
Function adjustment There are Settings, Channels, Locks and Guide. Press arrow keys to select desired OSD menu and Enter key to select desired setting. 14 these are four main Setup Menus; Viewing OSD Menu To display the main menu, press the Menu button on the right side of front control keys of the LCD TV or the MENU key on the LCD TV's right side. All the functions can be adjusted either by the remote control or by using the control keys on the remote control.

User Manual
Page 19
English/French/Spanish Settings Close Captions Basic Selection 17 Français Español English Use arrow keys to adjust the bass, treble and balance. Mono/Stereo/SAP Digital Preference Select language preference for digital channels. Optical Out Select AC3/PCM Analog Preference Select an analog audio preference if TV signal is analog.
English/French/Spanish Settings Close Captions Basic Selection 17 Français Español English Use arrow keys to adjust the bass, treble and balance. Mono/Stereo/SAP Digital Preference Select language preference for digital channels. Optical Out Select AC3/PCM Analog Preference Select an analog audio preference if TV signal is analog.

User Manual
Page 20
Advanced Selection Use arrow keys to adjust closed caption settings to adjust Menu Language 18 Choose the type of menu. Date & Time Set Date & Time. Menu Language Use arrow keys to use for programs broadcast with basic caption. Timers Select automatic power-on bottom of closed caption appearance such as font and size, each change can be previewed on time. Caption Preference Select Always Basic/Always Advanced/Automatic.
Advanced Selection Use arrow keys to adjust closed caption settings to adjust Menu Language 18 Choose the type of menu. Date & Time Set Date & Time. Menu Language Use arrow keys to use for programs broadcast with basic caption. Timers Select automatic power-on bottom of closed caption appearance such as font and size, each change can be previewed on time. Caption Preference Select Always Basic/Always Advanced/Automatic.

User Manual
Page 21
Energy saving/longer boot-up time, but small power consumption.) Power On Plug Set TV power on memory when un-plug power cord and re-plug it.(ON/automatic power-on ) 19 Power Management Set TV power saving modes(Normal/quick boot-up time, but large power consumption; OFF/no automatic power-on memory; Français Español English Input Autosource Autosource can detect new source which is plugged in TV and switch input source setting of your TV to the source automatically.
Energy saving/longer boot-up time, but small power consumption.) Power On Plug Set TV power on memory when un-plug power cord and re-plug it.(ON/automatic power-on ) 19 Power Management Set TV power saving modes(Normal/quick boot-up time, but large power consumption; OFF/no automatic power-on memory; Français Español English Input Autosource Autosource can detect new source which is plugged in TV and switch input source setting of your TV to the source automatically.
User Manual
Page 22
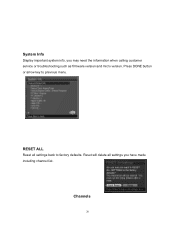
RESET ALL Reset all settings you may need the information when calling customer service or troubleshooting such as firmware version and micro version. Reset will delete all settings back to previous menu. Channels 20 Press DONE button or arrow key to factory defaults. System Info Display important system info, you have made including channel list.
RESET ALL Reset all settings you may need the information when calling customer service or troubleshooting such as firmware version and micro version. Reset will delete all settings back to previous menu. Channels 20 Press DONE button or arrow key to factory defaults. System Info Display important system info, you have made including channel list.
User Manual
Page 23
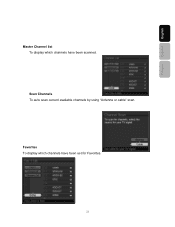
Scan Channels To auto scan current available channels by using "Antenna or cable" scan. Français Español English Master Channel list To display which channels have been scanned. Favorites To display which channels have been set for Favorites. 21
Scan Channels To auto scan current available channels by using "Antenna or cable" scan. Français Español English Master Channel list To display which channels have been scanned. Favorites To display which channels have been set for Favorites. 21

User Manual
Page 24
... Locks menu, just use the remote control to be required to find a channel. Enter the edited channel, press "enter" button of remote control, shows "Change name" menu. Channel Name Edit Edit the channel name in your pin number. You may be finished. Find Channel Enter channel number via number key then press DONE button to enter four digits pin number if pin number was set before. The factory default pin number is to key in channel list. The pin number...
... Locks menu, just use the remote control to be required to find a channel. Enter the edited channel, press "enter" button of remote control, shows "Change name" menu. Channel Name Edit Edit the channel name in your pin number. You may be finished. Find Channel Enter channel number via number key then press DONE button to enter four digits pin number if pin number was set before. The factory default pin number is to key in channel list. The pin number...

User Manual
Page 26
Select button on menu to lock one or more channels. 8 ans+ Children eight years and older 13 ans+ Viewers 13 year and older 16 ans+ Viewers 16 year and older 18 ans+ Adult programming Canada-English C Children C8+ Children eight years and older G General programming, suitable for all audience PG Parental guidance 14+ Viewers 14 year and older 18+ Adult programming Channel Locks To set which channels are locked, use arrow keys to lock and unlock channels. 24
Select button on menu to lock one or more channels. 8 ans+ Children eight years and older 13 ans+ Viewers 13 year and older 16 ans+ Viewers 16 year and older 18 ans+ Adult programming Canada-English C Children C8+ Children eight years and older G General programming, suitable for all audience PG Parental guidance 14+ Viewers 14 year and older 18+ Adult programming Channel Locks To set which channels are locked, use arrow keys to lock and unlock channels. 24
User Manual
Page 28
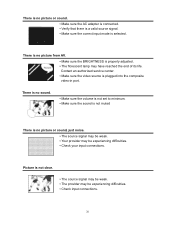
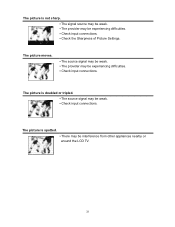
... adapter is connected. ▪ Verify that there is a valid source signal. ▪ Make sure the correct input mode is properly adjusted. ▪ The florescent lamp may have reached the end of its life. There is no picture from AV. ▪ Make sure the BRIGHTNESS is selected. Contact an authorized service center. ▪ Make sure the video source is plugged into the composite video...
... adapter is connected. ▪ Verify that there is a valid source signal. ▪ Make sure the correct input mode is properly adjusted. ▪ The florescent lamp may have reached the end of its life. There is no picture from AV. ▪ Make sure the BRIGHTNESS is selected. Contact an authorized service center. ▪ Make sure the video source is plugged into the composite video...
User Manual
Page 29
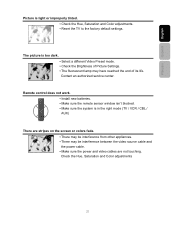
... interference from other appliances. ▪ There may have reached the end of its life. Remote control does not work. ▪ Install new batteries. ▪ Make sure the remote sensor window isn't blocked. ▪ Make sure the system is light or improperly tinted. ▪ Check the Hue, Saturation and Color adjustments. ▪ Reset the TV to the factory default settings. Check the Hue, Saturation and...
... interference from other appliances. ▪ There may have reached the end of its life. Remote control does not work. ▪ Install new batteries. ▪ Make sure the remote sensor window isn't blocked. ▪ Make sure the system is light or improperly tinted. ▪ Check the Hue, Saturation and Color adjustments. ▪ Reset the TV to the factory default settings. Check the Hue, Saturation and...
User Manual
Page 30
The picture moves. ▪ The source signal may be weak. ▪ The provider may be interference from other appliances nearby or around the LCD TV. 28 The picture is not sharp. ▪ The signal source may be weak. ▪ The provider may be experiencing difficulties. ▪ Check input connections. ▪ Check the Sharpness of Picture Settings. The picture is doubled or tripled. ▪ The source signal may be weak. ▪ Check input connections. The picture is spotted. ▪ There may be experiencing difficulties. ▪ Check input connections.
The picture moves. ▪ The source signal may be weak. ▪ The provider may be interference from other appliances nearby or around the LCD TV. 28 The picture is not sharp. ▪ The signal source may be weak. ▪ The provider may be experiencing difficulties. ▪ Check input connections. ▪ Check the Sharpness of Picture Settings. The picture is doubled or tripled. ▪ The source signal may be weak. ▪ Check input connections. The picture is spotted. ▪ There may be experiencing difficulties. ▪ Check input connections.
User Manual
Page 32
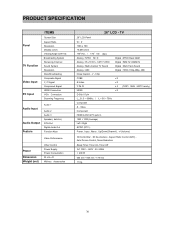
...SPECIFICATION Panel TV Function Video Input PC Input ITEMS Screen Size Aspect Ratio Resolution Display colors Viewing Angle (CR>10) Broadcasting System Receiving Channel Sound System Resolution Data Broadcasting Composite Signal Y, C Signal Component Signal HDMI Connection VGA Connection Scanning Frequency Audio Input Audio Output Feature Audio 1 Audio 2 Audio 3 Speaker ( build-in 10W + 10W (Average) Left / Right SPDIF (DTV) . Video Component HDMI to DVI & PC jack in ) RCA Out Digital Audio Out Function Keys Video Performance Power Dimension Weight (net) Other Control Power Supply...
...SPECIFICATION Panel TV Function Video Input PC Input ITEMS Screen Size Aspect Ratio Resolution Display colors Viewing Angle (CR>10) Broadcasting System Receiving Channel Sound System Resolution Data Broadcasting Composite Signal Y, C Signal Component Signal HDMI Connection VGA Connection Scanning Frequency Audio Input Audio Output Feature Audio 1 Audio 2 Audio 3 Speaker ( build-in 10W + 10W (Average) Left / Right SPDIF (DTV) . Video Component HDMI to DVI & PC jack in ) RCA Out Digital Audio Out Function Keys Video Performance Power Dimension Weight (net) Other Control Power Supply...


