
User Manual
Page 3
...12 PT-16H120S Controls and Connections 12 PT-19H140S Controls and Connections 14 PT-19H520S Controls and Connections 15 REAR MOUNTED CONNECTORS 17 QUICK REFERENCE: HDTV CONNECTION 18 INSTALL BASE...18 INSERTING REMOTE CONTROL BATTERIES 19 REMOTE CONTROL FEATURES...20 HDTV REMOTE CONTROL TIPS 22 HDTV/ACCESSORY SETUP 23 CONNECTING YOUR HDTV ...23 CONNECTING YOUR PERSONAL COMPUTER 24 CONNECTING OTHER ACCESSORIES 25 HDTV OPERATION ...26 SETTINGS VIDEO MENU ...26 Color Temp...27 AUDIO MENU...28 SETUP MENU ...29 CHANNELS MENU IN DTV AND TV INPUTS 30 LOCK MENU IN DTV AND TV INPUTS 31 TIME...
...12 PT-16H120S Controls and Connections 12 PT-19H140S Controls and Connections 14 PT-19H520S Controls and Connections 15 REAR MOUNTED CONNECTORS 17 QUICK REFERENCE: HDTV CONNECTION 18 INSTALL BASE...18 INSERTING REMOTE CONTROL BATTERIES 19 REMOTE CONTROL FEATURES...20 HDTV REMOTE CONTROL TIPS 22 HDTV/ACCESSORY SETUP 23 CONNECTING YOUR HDTV ...23 CONNECTING YOUR PERSONAL COMPUTER 24 CONNECTING OTHER ACCESSORIES 25 HDTV OPERATION ...26 SETTINGS VIDEO MENU ...26 Color Temp...27 AUDIO MENU...28 SETUP MENU ...29 CHANNELS MENU IN DTV AND TV INPUTS 30 LOCK MENU IN DTV AND TV INPUTS 31 TIME...

User Manual
Page 4
...: • Quick Setup Guide • Remote control • 2 AAA batteries • AC power cord • Warranty card • Stand (wall-mount accessories available separately) Contacting Westinghouse Digital Electronics If you for a period of one year from Dolby Laboratories. WELCOME Congratulations on the purchase of your High Definition LCD TV-and thank you still have questions or require assistance after reading the Quick Setup Guide and the instructions in materials...
...: • Quick Setup Guide • Remote control • 2 AAA batteries • AC power cord • Warranty card • Stand (wall-mount accessories available separately) Contacting Westinghouse Digital Electronics If you for a period of one year from Dolby Laboratories. WELCOME Congratulations on the purchase of your High Definition LCD TV-and thank you still have questions or require assistance after reading the Quick Setup Guide and the instructions in materials...

User Manual
Page 6
... used . For High Definition LCD TVs placed directly on a desk or table, type SVT or SJT cord sets may be easily accessible. The cord set must be used to prevent electric shock. Cord Type SJT SVT Size of destination and must be operated with the original power supply, part number DPS-210 EP 2 C. SEV Canada CSA Britain BASE/BS Germany..........VDE Japan Electric Appliance Control Act IMPORTANT NOTICE CONCERNING POWER CORD SELECTION The specific power cord...
... used . For High Definition LCD TVs placed directly on a desk or table, type SVT or SJT cord sets may be easily accessible. The cord set must be used to prevent electric shock. Cord Type SJT SVT Size of destination and must be operated with the original power supply, part number DPS-210 EP 2 C. SEV Canada CSA Britain BASE/BS Germany..........VDE Japan Electric Appliance Control Act IMPORTANT NOTICE CONCERNING POWER CORD SELECTION The specific power cord...
User Manual
Page 7
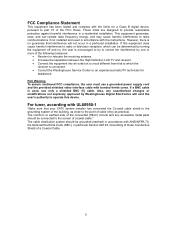
... Definition LCD TV and receiver. • Connect the equipment into an outlet on , the user is connected. • Consult the Westinghouse Service Center or an experienced radio/TV technician for a Class B digital device, pursuant to which can radiate radio frequency energy, and may cause harmful interference to the point of cable entry as close to radio communications if not installed and used , use a grounded power supply cord and...
... Definition LCD TV and receiver. • Connect the equipment into an outlet on , the user is connected. • Consult the Westinghouse Service Center or an experienced radio/TV technician for a Class B digital device, pursuant to which can radiate radio frequency energy, and may cause harmful interference to the point of cable entry as close to radio communications if not installed and used , use a grounded power supply cord and...

User Manual
Page 8
... the power supply cord or plug; install in any other . The wide blade or the third prong are difficult to fir; liquid has been spilled into your HDTV and remove the batteries from the remote control. • Only use your safety, please read all servicing to moisture or high humidity. • Do not attempt repairs yourself. Your warranty does not cover repairs or attempted repairs...
... the power supply cord or plug; install in any other . The wide blade or the third prong are difficult to fir; liquid has been spilled into your HDTV and remove the batteries from the remote control. • Only use your safety, please read all servicing to moisture or high humidity. • Do not attempt repairs yourself. Your warranty does not cover repairs or attempted repairs...

User Manual
Page 10
... receive digital signals, the signals are Standard Definition Television (SDTV) and High Definition Television (HDTV). height) of benefits including dramatic improvements to render greater picture detail. And, while HDTV uses approximately the same bandwidth, it to picture and sound quality. Of the two, HDTV delivers digital broadcasting's highest resolution and picture quality. In addition, DTV allows the same number of stations to broadcast using fewer channels, freeing parts of 2009, traditional analog TV...
... receive digital signals, the signals are Standard Definition Television (SDTV) and High Definition Television (HDTV). height) of benefits including dramatic improvements to render greater picture detail. And, while HDTV uses approximately the same bandwidth, it to picture and sound quality. Of the two, HDTV delivers digital broadcasting's highest resolution and picture quality. In addition, DTV allows the same number of stations to broadcast using fewer channels, freeing parts of 2009, traditional analog TV...
User Manual
Page 14
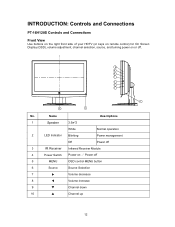
... 1 Speaker 3.5w*2 White Normal operation 2 LED Indicator Blinking Power management Off Power off 3 IR Receiver Infrared Receiver Module 4 Power Switch Power on or off 5 MENU OSD control MENU button 6 Source Source Selection 7 X Volume decrease 8 W Volume increase 9 T Channel down 10 S Channel up 12 No. INTRODUCTION: Controls and Connections PT-16H120S Controls and Connections Front View Use buttons on the right front side of your HDTV (or keys on remote control) for On Screen Display (OSD), volume adjustment, channel selection, source, and turning power on...
... 1 Speaker 3.5w*2 White Normal operation 2 LED Indicator Blinking Power management Off Power off 3 IR Receiver Infrared Receiver Module 4 Power Switch Power on or off 5 MENU OSD control MENU button 6 Source Source Selection 7 X Volume decrease 8 W Volume increase 9 T Channel down 10 S Channel up 12 No. INTRODUCTION: Controls and Connections PT-16H120S Controls and Connections Front View Use buttons on the right front side of your HDTV (or keys on remote control) for On Screen Display (OSD), volume adjustment, channel selection, source, and turning power on...

User Manual
Page 16
... 1 Speaker 3.5w*2 White Normal operation 2 LED Indicator Blinking Power management Off Power off 3 IR Receiver Infrared Receiver Module 4 Power Switch Power on or off 5 MENU OSD control MENU button 6 Source Source Selection 7 X Volume decrease 8 W Volume increase 9 T Channel down 10 S Channel up 11 AC In AC Power Jack 12 HDMI High-definition Multimedia Interface 13 D-Sub D-sub mini 15pin Connector 14 Video + Audio R/L RCA Stereo Audio and Video Connector for On Screen Display (OSD), volume adjustment, channel selection, source, and turning power on...
... 1 Speaker 3.5w*2 White Normal operation 2 LED Indicator Blinking Power management Off Power off 3 IR Receiver Infrared Receiver Module 4 Power Switch Power on or off 5 MENU OSD control MENU button 6 Source Source Selection 7 X Volume decrease 8 W Volume increase 9 T Channel down 10 S Channel up 11 AC In AC Power Jack 12 HDMI High-definition Multimedia Interface 13 D-Sub D-sub mini 15pin Connector 14 Video + Audio R/L RCA Stereo Audio and Video Connector for On Screen Display (OSD), volume adjustment, channel selection, source, and turning power on...

User Manual
Page 19
... TV's Audio Out 6. Rear Mounted Connectors (Green) BACK SIDE CONNECTORS 1. AV Video/Audio (Right/Left) Connect an external video device like a DVD, cable/satellite receiver or personal computer (using a 15-pin VGA cable 2. ANT/Cable Connect antenna or cable service 7. lease note the following when mounting on PT-16H120S HDTV) Connect personal computer using a DVI-HDMI cable, not supplied) 4. VGA (This feature is strong enough to power source via supplied power cord See pages 23~25 for detailed information. 9. AC-IN (Power) Connect to support the weight of bracket...
... TV's Audio Out 6. Rear Mounted Connectors (Green) BACK SIDE CONNECTORS 1. AV Video/Audio (Right/Left) Connect an external video device like a DVD, cable/satellite receiver or personal computer (using a 15-pin VGA cable 2. ANT/Cable Connect antenna or cable service 7. lease note the following when mounting on PT-16H120S HDTV) Connect personal computer using a DVI-HDMI cable, not supplied) 4. VGA (This feature is strong enough to power source via supplied power cord See pages 23~25 for detailed information. 9. AC-IN (Power) Connect to support the weight of bracket...

User Manual
Page 22
...", "FILL" 16. CHANNEL NUMBER KEYS Select specific channels 10. ENT Complete channel selection 12. CH T / S TV Channel Up/Down adjustment 15. FAVORITE CHANNEL A / B / C Jump to favorite channels (Hold button for 3 seconds to previous page (menu selection) or channel (watching TV) 18. SLEEP Set sleep timer 8. BACK/RETURN Go back to program favorite channel). 9. INFO Display the source and channel information 20 POWER Switch the power On/Off PIP 2. MUTE Turn the sound On/Off 4. CC Turn Closed Caption On/Off 7. DOT To input dot...
...", "FILL" 16. CHANNEL NUMBER KEYS Select specific channels 10. ENT Complete channel selection 12. CH T / S TV Channel Up/Down adjustment 15. FAVORITE CHANNEL A / B / C Jump to favorite channels (Hold button for 3 seconds to previous page (menu selection) or channel (watching TV) 18. SLEEP Set sleep timer 8. BACK/RETURN Go back to program favorite channel). 9. INFO Display the source and channel information 20 POWER Switch the power On/Off PIP 2. MUTE Turn the sound On/Off 4. CC Turn Closed Caption On/Off 7. DOT To input dot...

User Manual
Page 25
...; Connect the supplied AC power cord to your signal source "Air/Cable/IRC/HRC" - If you're using a satellite receiver, connect to either the "HDMI" or "Composite" connector (see page 17 for connector descriptions and locations) Press the Power button on either the remote control or the side-mounted control panel to turn your HDTV on (it shall be available first time when you power on your TV Or Choose Your TV Source • Press the "Menu" button...
...; Connect the supplied AC power cord to your signal source "Air/Cable/IRC/HRC" - If you're using a satellite receiver, connect to either the "HDMI" or "Composite" connector (see page 17 for connector descriptions and locations) Press the Power button on either the remote control or the side-mounted control panel to turn your HDTV on (it shall be available first time when you power on your TV Or Choose Your TV Source • Press the "Menu" button...

User Manual
Page 26
... HDTV's "AUDIO IN" port Power • Turn on your HDTV (wait a few seconds for directions to the HDTV's "VGA" port - Connect a 15-pin analog VGA cable (not supplied) from your computer's "VGA OUT" port to set timing mode of your computer's to recommended VESA™ (Video Electronics Standards Association) mode (see specifications of your purchased model from your computer's graphic card User Guide for it to the HDTV's "AUDIO IN" port • DVI-D Connection - The HDTV will automatically adjust...
... HDTV's "AUDIO IN" port Power • Turn on your HDTV (wait a few seconds for directions to the HDTV's "VGA" port - Connect a 15-pin analog VGA cable (not supplied) from your computer's "VGA OUT" port to set timing mode of your computer's to recommended VESA™ (Video Electronics Standards Association) mode (see specifications of your purchased model from your computer's graphic card User Guide for it to the HDTV's "AUDIO IN" port • DVI-D Connection - The HDTV will automatically adjust...

User Manual
Page 27
... satellite receiver using the HDTV's HDMI port (HDMI cable not supplied) Video Cassette Recorder (VCR) • Use the S-Video connector on the HDTV to an external audio device such as a headphone (cable not supplied) 25 DVD or Game System • Connect your DVD player or gaming system using the Composite and Audio (Right/Left) connectors on your HDTV to connect your VCR (S-Video four-pin cable with your HDTV's "Audio Out" port to connect to (cable not supplied) • You can also connect your DVD player using HDTV's HDMI port (HDMI cable not supplied) Audio...
... satellite receiver using the HDTV's HDMI port (HDMI cable not supplied) Video Cassette Recorder (VCR) • Use the S-Video connector on the HDTV to an external audio device such as a headphone (cable not supplied) 25 DVD or Game System • Connect your DVD player or gaming system using the Composite and Audio (Right/Left) connectors on your HDTV to connect your VCR (S-Video four-pin cable with your HDTV's "Audio Out" port to connect to (cable not supplied) • You can also connect your DVD player using HDTV's HDMI port (HDMI cable not supplied) Audio...

User Manual
Page 33
... off rating lock Turn On and off parental control channels Enter USA parental control Enter Canada parental control Enter and edit RRT setting table Reset RRT settings Enable or disable TV function key Reset all adjustments back to set proper lock or unlock certain programs based on Parental Control functions, please see "About Parental Controls," pages 33~36. 31 Lock Menu in the password. Lock Menu Change PIN System Lock Unrated Lock USA Canada RRT Setting Reset RRT Front Panel Lock Reset Feature Descriptions Type in DTV and TV inputs The "LOCK" menu allows...
... off rating lock Turn On and off parental control channels Enter USA parental control Enter Canada parental control Enter and edit RRT setting table Reset RRT settings Enable or disable TV function key Reset all adjustments back to set proper lock or unlock certain programs based on Parental Control functions, please see "About Parental Controls," pages 33~36. 31 Lock Menu in the password. Lock Menu Change PIN System Lock Unrated Lock USA Canada RRT Setting Reset RRT Front Panel Lock Reset Feature Descriptions Type in DTV and TV inputs The "LOCK" menu allows...

User Manual
Page 39
anti-glare coating 16.2 million colors Aspect Ratio 16:9 Viewing Angles 90° (H) / 60° (V) Input Signal Video/Audio HDMI-HDCP * 1 TV system NTSC / HDTV * 1 Composite * 1 / S-Video * 1 / RCA (L/R) stereo * 1 Output Signal 3.5 mm Mini Stereo * 1 HDTV Compatibility 480i, 480P, 720P, 1080i & 1080P PC Compatible Recommended 1360 x 768 @ 60Hz Supported 1024 x 768 @ 75Hz 640 x 480 @ 60, 75Hz 1280 x 720 @ 60Hz 800 x 600 @ 60, 75Hz 1366 x 768 @ 60Hz Speaker Output 3.5W (x2 Channels) Power Voltage 100...
anti-glare coating 16.2 million colors Aspect Ratio 16:9 Viewing Angles 90° (H) / 60° (V) Input Signal Video/Audio HDMI-HDCP * 1 TV system NTSC / HDTV * 1 Composite * 1 / S-Video * 1 / RCA (L/R) stereo * 1 Output Signal 3.5 mm Mini Stereo * 1 HDTV Compatibility 480i, 480P, 720P, 1080i & 1080P PC Compatible Recommended 1360 x 768 @ 60Hz Supported 1024 x 768 @ 75Hz 640 x 480 @ 60, 75Hz 1280 x 720 @ 60Hz 800 x 600 @ 60, 75Hz 1366 x 768 @ 60Hz Speaker Output 3.5W (x2 Channels) Power Voltage 100...
User Manual
Page 40
... Base) 8.7 lbs. (with Base) 7.8 lbs. (w/out Base) UL/C-UL, FCC-B, EPA Power saving On anti-glare coating 16.2 million colors Aspect Ratio 16:10 Viewing Angles 170° (H) / 160° (V) Input Signal Video/Audio RGB Analog * 1 (75 ohms, 0.7 Vp-p)/Mini-Stereo *1 - H/V separated (TTL) for PC - fh: 30-80 kHz, fv: 50-75 Hz NTSC HDMI-HDCP * 1 TV system NTSC / HDTV * 1 Composite * 1 / S-Video * 1 / RCA (L/R) stereo * 1 Output Signal 3.5 mm Mini Stereo * 1 HDTV Compatibility...
... Base) 8.7 lbs. (with Base) 7.8 lbs. (w/out Base) UL/C-UL, FCC-B, EPA Power saving On anti-glare coating 16.2 million colors Aspect Ratio 16:10 Viewing Angles 170° (H) / 160° (V) Input Signal Video/Audio RGB Analog * 1 (75 ohms, 0.7 Vp-p)/Mini-Stereo *1 - H/V separated (TTL) for PC - fh: 30-80 kHz, fv: 50-75 Hz NTSC HDMI-HDCP * 1 TV system NTSC / HDTV * 1 Composite * 1 / S-Video * 1 / RCA (L/R) stereo * 1 Output Signal 3.5 mm Mini Stereo * 1 HDTV Compatibility...

User Manual
Page 41
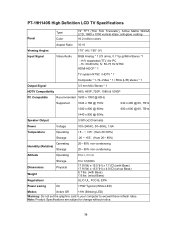
PT-19H520S High Definition LCD TV Specifications Panel Type Color 19" TFT (Thin Film Transistor), Active Matrix WXGA LCD, 1440 x 900 vertical stripe; fh: 30-80 kHz, fv: 50-75 Hz NTSC HDMI-HDCP * 1 TV system NTSC / HDTV * 1 Composite * 1 / S-Video * 1 / RCA (L/R) stereo * 1 Output Signal 3.5 mm Mini Stereo * 1 HDTV Compatibility 480i, 480P, 720P, 1080i & 1080P PC Compatible Recommended 1440 x 900 @ 60Hz Supported 1024 x 768 @ 75 Hz 640 x 480 @ 60, 75Hz...
PT-19H520S High Definition LCD TV Specifications Panel Type Color 19" TFT (Thin Film Transistor), Active Matrix WXGA LCD, 1440 x 900 vertical stripe; fh: 30-80 kHz, fv: 50-75 Hz NTSC HDMI-HDCP * 1 TV system NTSC / HDTV * 1 Composite * 1 / S-Video * 1 / RCA (L/R) stereo * 1 Output Signal 3.5 mm Mini Stereo * 1 HDTV Compatibility 480i, 480P, 720P, 1080i & 1080P PC Compatible Recommended 1440 x 900 @ 60Hz Supported 1024 x 768 @ 75 Hz 640 x 480 @ 60, 75Hz...
User Manual
Page 42
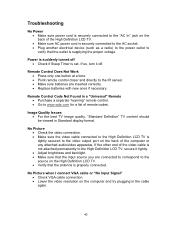
... video output port on the computer and try plugging in Standard display format. Image Quality Issues • For the best TV image quality, "Standard Definition" TV content should be viewed in the cable again. 40 No Picture • Check the video connection. • Make sure the video cable connected to the High Definition LCD TV is supplying the proper voltage. No Picture when I connect VGA cable or "No Input Signal" • Check VGA cable connection. • Lower the video resolution...
... video output port on the computer and try plugging in Standard display format. Image Quality Issues • For the best TV image quality, "Standard Definition" TV content should be viewed in the cable again. 40 No Picture • Check the video connection. • Make sure the video cable connected to the High Definition LCD TV is supplying the proper voltage. No Picture when I connect VGA cable or "No Input Signal" • Check VGA cable connection. • Lower the video resolution...
User Manual
Page 43
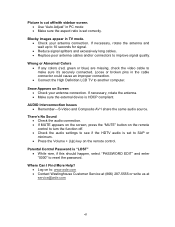
... colors (red, green or blue) are missing, check the video cable to improve signal quality. There's No Sound • Check the audio connection. • If MUTE appears on the screen, press the "MUTE" button on the remote control to turn the function off /with sidebar screen. • Use "Auto Adjust" in the cable connector could cause an improper connection. • Connect the High Definition LCD TV to : www.wde.com • Contact Westinghouse Customer Service...
... colors (red, green or blue) are missing, check the video cable to improve signal quality. There's No Sound • Check the audio connection. • If MUTE appears on the screen, press the "MUTE" button on the remote control to turn the function off /with sidebar screen. • Use "Auto Adjust" in the cable connector could cause an improper connection. • Connect the High Definition LCD TV to : www.wde.com • Contact Westinghouse Customer Service...
User Manual
Page 45
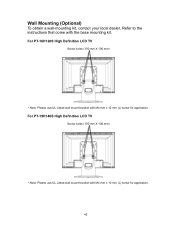
Wall Mounting (Optional) To obtain a wall-mounting kit, contact your local dealer, Refer to the instructions that come with M4 mm x 10 mm (L) screw for application. For PT-19H140S High Definition LCD TV Screw holes (100 mm X 100 mm) * Note: Please use UL Listed wall mount bracket with M4 mm x 12 mm (L) screw for application. 43 For PT-16H120S High Definition LCD TV Screw holes (100 mm X 100 mm) * Note: Please use UL Listed wall mount bracket with the base mounting kit.
Wall Mounting (Optional) To obtain a wall-mounting kit, contact your local dealer, Refer to the instructions that come with M4 mm x 10 mm (L) screw for application. For PT-19H140S High Definition LCD TV Screw holes (100 mm X 100 mm) * Note: Please use UL Listed wall mount bracket with M4 mm x 12 mm (L) screw for application. 43 For PT-16H120S High Definition LCD TV Screw holes (100 mm X 100 mm) * Note: Please use UL Listed wall mount bracket with the base mounting kit.


