User Manual
Page 2
TABLE OF CONTENTS IMPORTANT SAFETY AND PRECAUTIONS 1 Important Information...1 Safety Precautions...2 Image Retention ...3 GENERAL INFORMATION 5 Feature...5 Controls and Ports of the Panel 6 Accessories ...8 Remote Control...9 INSTALLATION AND FUNCTION ADJUSTMENT 11 Installation...11 How to remove the BASE 14 Function adjustment ...15 INSTALLER FUNCTIONS 22 RS232 Connection...22 Dual Menu Mode ...22 Dynamic Setup Menu 22 Installer Features ...23 TROUBLESHOOTING ...25 PC INPUT PRESET TIMMING TABLE 28 PRODUCT SPECIFICATION 29 I
TABLE OF CONTENTS IMPORTANT SAFETY AND PRECAUTIONS 1 Important Information...1 Safety Precautions...2 Image Retention ...3 GENERAL INFORMATION 5 Feature...5 Controls and Ports of the Panel 6 Accessories ...8 Remote Control...9 INSTALLATION AND FUNCTION ADJUSTMENT 11 Installation...11 How to remove the BASE 14 Function adjustment ...15 INSTALLER FUNCTIONS 22 RS232 Connection...22 Dual Menu Mode ...22 Dynamic Setup Menu 22 Installer Features ...23 TROUBLESHOOTING ...25 PC INPUT PRESET TIMMING TABLE 28 PRODUCT SPECIFICATION 29 I

User Manual
Page 4
... Risk of electric shock. Certain Canadian programs may be in permanent damage to display constantly moving images that any unauthorized changes or modifications to , potentially hazardous display output: side bar images, video game patterns, closed captioning, channel logos and letterbox black bars. To prevent this type of damage, it . Refer any unauthorized recording in whole or in part may result in violation of these...
... Risk of electric shock. Certain Canadian programs may be in permanent damage to display constantly moving images that any unauthorized changes or modifications to , potentially hazardous display output: side bar images, video game patterns, closed captioning, channel logos and letterbox black bars. To prevent this type of damage, it . Refer any unauthorized recording in whole or in part may result in violation of these...

User Manual
Page 6
... base can cause the product to protect your monitor from coming into contact with said items, as Image Retention. Sudden stops, excessive force and uneven floor surface can cause the product to turn 3 An outside antenna, use extreme caution to prevent the antenna from Image retention is displayed for further clarification on an unstable cart, stand, tripod or table...
... base can cause the product to protect your monitor from coming into contact with said items, as Image Retention. Sudden stops, excessive force and uneven floor surface can cause the product to turn 3 An outside antenna, use extreme caution to prevent the antenna from Image retention is displayed for further clarification on an unstable cart, stand, tripod or table...

User Manual
Page 7
... installed over the LCD surface, enclosed into the box / wall, or stack the monitor, please make sure the temperature around the display is effective for long period, and changed to another images with little difference in use. • Fixed image should not be limited based on 24 hours a day. Turn off the monitor for as long as continuously changing video patterns and periodically turning off the display...
... installed over the LCD surface, enclosed into the box / wall, or stack the monitor, please make sure the temperature around the display is effective for long period, and changed to another images with little difference in use. • Fixed image should not be limited based on 24 hours a day. Turn off the monitor for as long as continuously changing video patterns and periodically turning off the display...
User Manual
Page 8
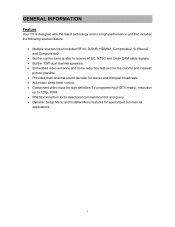
... QAM cable signals. • Built-in 10W dual channel speakers. • Embedded video enhance and noise reduction features for the colorful and clearest picture possible. • Provided multi-channel sound decoder for stereo and bilingual broadcasts. • Automatic sleep timer control. • Component video input for high definition TV programming (HDTV ready), resolution up to 720p, 1080i. • RS232 connection for bi-directional command control and query • Dynamic Setup Menu and Installer Menu features...
... QAM cable signals. • Built-in 10W dual channel speakers. • Embedded video enhance and noise reduction features for the colorful and clearest picture possible. • Provided multi-channel sound decoder for stereo and bilingual broadcasts. • Automatic sleep timer control. • Component video input for high definition TV programming (HDTV ready), resolution up to 720p, 1080i. • RS232 connection for bi-directional command control and query • Dynamic Setup Menu and Installer Menu features...
User Manual
Page 9
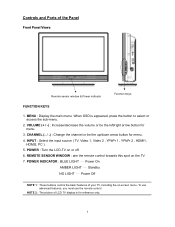
... picture of the Panel Front Panel Views Remote sensor window & Power indicator Function Keys FUNCTION KEYS 1. POWER INDICATOR : BLUE LIGHT ─ Power On AMBER LIGHT ─ Standby NO LIGHT ─ Power Off NOTE 1 : These buttons control the basic features of your TV, including the on the TV. 7. REMOTE SENSOR WINDOW : aim the remote control towards this spot on -screen menu. To use advanced features, you must use the remote control. POWER : Turn the LCD-TV on or off. 6. MENU : Display the main menu. INPUT : Select the input source ( TV, Video 1, Video...
... picture of the Panel Front Panel Views Remote sensor window & Power indicator Function Keys FUNCTION KEYS 1. POWER INDICATOR : BLUE LIGHT ─ Power On AMBER LIGHT ─ Standby NO LIGHT ─ Power Off NOTE 1 : These buttons control the basic features of your TV, including the on the TV. 7. REMOTE SENSOR WINDOW : aim the remote control towards this spot on -screen menu. To use advanced features, you must use the remote control. POWER : Turn the LCD-TV on or off. 6. MENU : Display the main menu. INPUT : Select the input source ( TV, Video 1, Video...

User Manual
Page 10
... or video game system. 6. Audio output(R/L) Connect this jack. 17. USB Factory service port. HDMI1 input Connect to a legacy video such as HD digital cable/satellite receiver, HD STB, Media center PC, or DVD player. 15. YPbPr1 Audio1 input(L/R) 20. Video2 & S-Video2 Audio input Connect an external audio source to an external stereo audio amplifier, receiver or surround sound processor with SPDIF optical input. 9. Video2 input 7. Plug USB converter here for control. 11. HDMI Audio input(R/L) Connect the audio input if you using a DVI-to view NTSC and ATSC(HDTV) content...
... or video game system. 6. Audio output(R/L) Connect this jack. 17. USB Factory service port. HDMI1 input Connect to a legacy video such as HD digital cable/satellite receiver, HD STB, Media center PC, or DVD player. 15. YPbPr1 Audio1 input(L/R) 20. Video2 & S-Video2 Audio input Connect an external audio source to an external stereo audio amplifier, receiver or surround sound processor with SPDIF optical input. 9. Video2 input 7. Plug USB converter here for control. 11. HDMI Audio input(R/L) Connect the audio input if you using a DVI-to view NTSC and ATSC(HDTV) content...

User Manual
Page 11
TV User's Manual Remote Control & Batteries Power Cord Warranty Card USB-RS232 Converter Warranty Card Screw driver & Screws x4 (base) Not required for all models. 8 Accessories LCD -
TV User's Manual Remote Control & Batteries Power Cord Warranty Card USB-RS232 Converter Warranty Card Screw driver & Screws x4 (base) Not required for all models. 8 Accessories LCD -

User Manual
Page 12
... 17 18 Power Switch TV power on /off . CC Press to select a preset time interval for automatic power down. Favorite Select, remove or add your favorite channel. Screen Fit Select video display format "Standard" or "Fill". Menu Display the User setup menu. Channel number keys Select specific channel. Swap No support PIP No support Backlight No support Sleep Press to enable or disabled closed caption. Last CH Switch to access favorite list. Enter Execute a command. Press Favorite(A, B, C)key to previous channel. Input Select input source. Use arrow...
... 17 18 Power Switch TV power on /off . CC Press to select a preset time interval for automatic power down. Favorite Select, remove or add your favorite channel. Screen Fit Select video display format "Standard" or "Fill". Menu Display the User setup menu. Channel number keys Select specific channel. Swap No support PIP No support Backlight No support Sleep Press to enable or disabled closed caption. Last CH Switch to access favorite list. Enter Execute a command. Press Favorite(A, B, C)key to previous channel. Input Select input source. Use arrow...

User Manual
Page 16
... USB port of the LCD TV, or press the power (Red) button on TV inputs: See page 19 to a proper AC outlet. Refer to the graphic card's user guide of your computer to set the timing of your computer to 1366 x 768 at 60Hz. Connect power cables Connect the power cord to the LCD TV then to scan and edit available channels. 8. Turn Power On Press the power button on the right side of the TV for command control...
... USB port of the LCD TV, or press the power (Red) button on TV inputs: See page 19 to a proper AC outlet. Refer to the graphic card's user guide of your computer to set the timing of your computer to 1366 x 768 at 60Hz. Connect power cables Connect the power cord to the LCD TV then to scan and edit available channels. 8. Turn Power On Press the power button on the right side of the TV for command control...

User Manual
Page 18
... to close picture setting menu. Viewing OSD Menu To display the main menu, press the Menu button on the right side of front control keys of the LCD TV or the MENU key on the LCD TV's right side. Aspect ratio: Adjust your preferred color temperature settings. these are four main Setup Menus; Standard/Fill/Overscan Color Temp.: Press arrow keys to select or adjust your TV screen to select or adjust your favorite picture settings. Video Video settings: Press...
... to close picture setting menu. Viewing OSD Menu To display the main menu, press the Menu button on the right side of front control keys of the LCD TV or the MENU key on the LCD TV's right side. Aspect ratio: Adjust your preferred color temperature settings. these are four main Setup Menus; Standard/Fill/Overscan Color Temp.: Press arrow keys to select or adjust your TV screen to select or adjust your favorite picture settings. Video Video settings: Press...

User Manual
Page 19
... Digital Preference Select language preference for programs broadcast with basic caption. English/French/Spanish Settings Closed Caption Basic Selection Choose the type of closed caption appearance such as font and size, each change can be previewed on bottom of menu. 16 3D Comb Filter: Press arrow keys to select or adjust your preferred settings. Optical Out Select AC3/PCM Analog Preference Select an analog audio preference if TV signal is analog...
... Digital Preference Select language preference for programs broadcast with basic caption. English/French/Spanish Settings Closed Caption Basic Selection Choose the type of closed caption appearance such as font and size, each change can be previewed on bottom of menu. 16 3D Comb Filter: Press arrow keys to select or adjust your preferred settings. Optical Out Select AC3/PCM Analog Preference Select an analog audio preference if TV signal is analog...

User Manual
Page 20
Caption Preference Select Always Basic/Always Advanced/Automatic. Menu Language Use arrow keys to previous menu. 17 Press DONE button or arrow key to adjust Menu Language. Select OSD language. System Info Display important system info, you may need the information when calling customer service or troubleshooting such as firmware version and micro version. Date & Time Set Date & Time. Input Use arrow keys to adjust Input Source labels. Timers Select automatic power-on time.
Caption Preference Select Always Basic/Always Advanced/Automatic. Menu Language Use arrow keys to previous menu. 17 Press DONE button or arrow key to adjust Menu Language. Select OSD language. System Info Display important system info, you may need the information when calling customer service or troubleshooting such as firmware version and micro version. Date & Time Set Date & Time. Input Use arrow keys to adjust Input Source labels. Timers Select automatic power-on time.

User Manual
Page 21
Scan Channels To auto scan current available channels by using "Antenna or cable" scan. Power Management TV power mode is set for initial boot, but a much faster Power On/Off time thereafter. Reset All Reset all settings you have made including channel list. Favorites To display which channels have been set to factory defaults. Power On Plug Set TV power on memory when un-plug power cord and re-plug it (ON/automatic power-on ). OFF/no automatic power-on memory; Reset will delete all settings back to Normal where...
Scan Channels To auto scan current available channels by using "Antenna or cable" scan. Power Management TV power mode is set for initial boot, but a much faster Power On/Off time thereafter. Reset All Reset all settings you have made including channel list. Favorites To display which channels have been set to factory defaults. Power On Plug Set TV power on memory when un-plug power cord and re-plug it (ON/automatic power-on ). OFF/no automatic power-on memory; Reset will delete all settings back to Normal where...
User Manual
Page 24
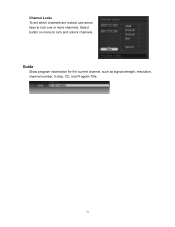
Channel Locks To set which channels are locked, use arrow keys to lock and unlock channels. Guide Show program information for the current channel, such as signal strength, resolution, channel number, V-chip, CC, and Program Title. 21 Select button on menu to lock one or more channels.
Channel Locks To set which channels are locked, use arrow keys to lock and unlock channels. Guide Show program information for the current channel, such as signal strength, resolution, channel number, V-chip, CC, and Program Title. 21 Select button on menu to lock one or more channels.
User Manual
Page 25
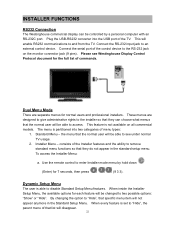
... Westinghouse Display Control Protocol document for normal users and professional installers. To access the Installer Menu: a. The menu is set to "Hide", the parent menu of the Installer features and the ability to remove standard menu functions so that list will enable RS232 communications to disable Standard Setup Menu features. When every feature is partitioned into the USB port of menu types: 1. Connect the serial port of commands. This feature is able to and from the TV...
... Westinghouse Display Control Protocol document for normal users and professional installers. To access the Installer Menu: a. The menu is set to "Hide", the parent menu of the Installer features and the ability to remove standard menu functions so that list will enable RS232 communications to disable Standard Setup Menu features. When every feature is partitioned into the USB port of menu types: 1. Connect the serial port of commands. This feature is able to and from the TV...

User Manual
Page 26
... TV will block access to the Setup menu but still allow the installer to specified source input at each power up . User can also enable and disable the function by holding down the front panel keys in this function, use the Installer Menu password to re-enter the menu and set the TV to turn onto the last channel it was on power up . Setup Menu Lockout This feature will turn onto the last volume setting...
... TV will block access to the Setup menu but still allow the installer to specified source input at each power up . User can also enable and disable the function by holding down the front panel keys in this function, use the Installer Menu password to re-enter the menu and set the TV to turn onto the last channel it was on power up . Setup Menu Lockout This feature will turn onto the last volume setting...
User Manual
Page 27
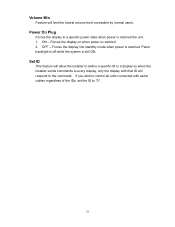
... will allow the installer to define a specific ID to a display so when the installer sends commands to every display, only the display with serial cables regardless of the IDs, set the ID to the command. Forces the display into standby mode when power is still ON. OFF - Panel backlight is off while the system is restored. If you wish to control all units connected with that...
... will allow the installer to define a specific ID to a display so when the installer sends commands to every display, only the display with serial cables regardless of the IDs, set the ID to the command. Forces the display into standby mode when power is still ON. OFF - Panel backlight is off while the system is restored. If you wish to control all units connected with that...

User Manual
Page 32
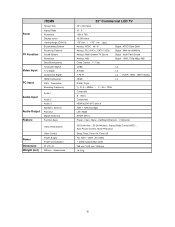
...SPECIFICATION Panel TV Function Video Input PC Input ITEMS Screen Size Aspect Ratio Resolution Display colors Viewing Angle (CR>10) Broadcasting System Receiving Channel Sound System Resolution Data Broadcasting Composite Signal Y, C Signal Component Signal HDMI Connection VGA Connection Scanning Frequency Audio Input Audio Output Feature Audio 1 Audio 2 Audio 3 Speaker ( build-in 10W + 10W (Average) Left / Right SPDIF (DTV) . Video Component HDMI to DVI & PC jack in ) RCA Out Digital Audio Out Function Keys Video Performance Power Dimension Weight (net) Other Control Power Supply...
...SPECIFICATION Panel TV Function Video Input PC Input ITEMS Screen Size Aspect Ratio Resolution Display colors Viewing Angle (CR>10) Broadcasting System Receiving Channel Sound System Resolution Data Broadcasting Composite Signal Y, C Signal Component Signal HDMI Connection VGA Connection Scanning Frequency Audio Input Audio Output Feature Audio 1 Audio 2 Audio 3 Speaker ( build-in 10W + 10W (Average) Left / Right SPDIF (DTV) . Video Component HDMI to DVI & PC jack in ) RCA Out Digital Audio Out Function Keys Video Performance Power Dimension Weight (net) Other Control Power Supply...
User Manual
Page 33
... Analog : NTSC M / N Digital : ATSC/Clear QAM Analog : PLL181Ch., CATV 125Ch Digital : 54M Hz~864M Hz Analog : Multi-channel TV Sound Digital : Multi-Track Sound Analog : 480i Digital : 1080i, 720p,480p, 480i Close Caption , V - Panel TV Function Video Input PC Input ITEMS Screen Size Aspect Ratio Resolution Display colors Viewing Angle (CR>10) Broadcasting System Receiving Channel Sound System Resolution Data Broadcasting Composite Signal Y, C Signal Component Signal HDMI Connection VGA Connection Scanning Frequency Audio Input Audio Output Feature Audio 1 Audio 2 Audio 3 Speaker...
... Analog : NTSC M / N Digital : ATSC/Clear QAM Analog : PLL181Ch., CATV 125Ch Digital : 54M Hz~864M Hz Analog : Multi-channel TV Sound Digital : Multi-Track Sound Analog : 480i Digital : 1080i, 720p,480p, 480i Close Caption , V - Panel TV Function Video Input PC Input ITEMS Screen Size Aspect Ratio Resolution Display colors Viewing Angle (CR>10) Broadcasting System Receiving Channel Sound System Resolution Data Broadcasting Composite Signal Y, C Signal Component Signal HDMI Connection VGA Connection Scanning Frequency Audio Input Audio Output Feature Audio 1 Audio 2 Audio 3 Speaker...


