User Manual
Page 2
CONNECT VIDEO CABLES TO A COMPUTER 9 3. ENGLISH CONTENTS IMPORTANT PRODUCT SAFETY INSTRUCTIONS 2 SAFETY GUIDELINES 3 FCC COMPLIANCE STATEMENT 3 CLEANING THE LCD MONITOR 4 FEATURES...5 POWER SAVER 5 PLUG & PLAY 5 INSTALLATION 6 PACKAGE CONTENTS 6 CONTROL PANEL BUTTONS 7 INPUT CONNECTORS 8 1. TURN THE POWER ON 10 OSD MENU FUNCTIONS 11 IMAGE MENU 12 ... 13 INFORMATION MENU 15 QUICK BRIGHTNESS OR CONTRAST ADJUSTMENT 16 DISPLAY MODES 17 APPENDIX ...18 SPECIFICATIONS 18 TROUBLESHOOTING 19 1 ATTACHING THE BASE STAND TO THE LCD MONITOR 9 2. CONNECT POWER CABLES 10 4.
CONNECT VIDEO CABLES TO A COMPUTER 9 3. ENGLISH CONTENTS IMPORTANT PRODUCT SAFETY INSTRUCTIONS 2 SAFETY GUIDELINES 3 FCC COMPLIANCE STATEMENT 3 CLEANING THE LCD MONITOR 4 FEATURES...5 POWER SAVER 5 PLUG & PLAY 5 INSTALLATION 6 PACKAGE CONTENTS 6 CONTROL PANEL BUTTONS 7 INPUT CONNECTORS 8 1. TURN THE POWER ON 10 OSD MENU FUNCTIONS 11 IMAGE MENU 12 ... 13 INFORMATION MENU 15 QUICK BRIGHTNESS OR CONTRAST ADJUSTMENT 16 DISPLAY MODES 17 APPENDIX ...18 SPECIFICATIONS 18 TROUBLESHOOTING 19 1 ATTACHING THE BASE STAND TO THE LCD MONITOR 9 2. CONNECT POWER CABLES 10 4.
User Manual
Page 3
... should be used for future reference. Your warranty does not cover repairs or attempted repairs by anyone not authorized by Westinghouse Digital. • If your LCD Monitor will not be routed so that the area around the LCD Monitor is provided and the manufacturer's instruction have been adhered to protect it off and contact the...
... should be used for future reference. Your warranty does not cover repairs or attempted repairs by anyone not authorized by Westinghouse Digital. • If your LCD Monitor will not be routed so that the area around the LCD Monitor is provided and the manufacturer's instruction have been adhered to protect it off and contact the...
User Manual
Page 4
...plug is a NEMA5-15 style (Figure A2), UL Listed, and CSA Labeled. For LCD Monitors placed directly on , the user is encouraged to try to correct the interference by Westinghouse Digital will not occur in the United States and Canada. The female receptacle of the...enclosed. These limits are listed below for the selection criteria for a Class B digital device, pursuant to operate this LCD Monitor is certified for the LCD Monitor. For LCD Monitors that is enclosed and has been selected according to the country of Conductors in a residential installation. Some examples are ...
...plug is a NEMA5-15 style (Figure A2), UL Listed, and CSA Labeled. For LCD Monitors placed directly on , the user is encouraged to try to correct the interference by Westinghouse Digital will not occur in the United States and Canada. The female receptacle of the...enclosed. These limits are listed below for the selection criteria for a Class B digital device, pursuant to operate this LCD Monitor is certified for the LCD Monitor. For LCD Monitors that is enclosed and has been selected according to the country of Conductors in a residential installation. Some examples are ...
User Manual
Page 5
..., soft, lint-free cloth, then wipe the surface. Westinghouse Digital will not be liable for damage resulting from the use of any ammonia or alcohol-based cleaners on the LCD Monitor screen or case. Disclaimer Westinghouse Digital does not recommend the use of any ammonia or alcohol...-based cleaners. 4 Wipe the screen with a clean, soft, lint-free cloth. ENGLISH CLEANING THE LCD MONITOR • MAKE SURE THE LCD MONITOR IS TURNED OFF •...
..., soft, lint-free cloth, then wipe the surface. Westinghouse Digital will not be liable for damage resulting from the use of any ammonia or alcohol-based cleaners on the LCD Monitor screen or case. Disclaimer Westinghouse Digital does not recommend the use of any ammonia or alcohol...-based cleaners. 4 Wipe the screen with a clean, soft, lint-free cloth. ENGLISH CLEANING THE LCD MONITOR • MAKE SURE THE LCD MONITOR IS TURNED OFF •...
User Manual
Page 6
...Data Channel (DDC) to send Extended Display Identification Data (EDID) to the computer system, so the computer system can use . The LCD monitor is installed inside the LCD monitor. If the LCD monitor has not been used with a VESA DPMS computer. ENGLISH FEATURES • Bright Display Image • Lightweight • Fast Response Time...STAR and NÜTEK if used for a certain period of the mouse or pressing any key on the keyboard will turn off the LCD monitor power when not in use your PC to set the function. Plug & Play VESA Plug and Play eliminates the complicated and time-...
...Data Channel (DDC) to send Extended Display Identification Data (EDID) to the computer system, so the computer system can use . The LCD monitor is installed inside the LCD monitor. If the LCD monitor has not been used with a VESA DPMS computer. ENGLISH FEATURES • Bright Display Image • Lightweight • Fast Response Time...STAR and NÜTEK if used for a certain period of the mouse or pressing any key on the keyboard will turn off the LCD monitor power when not in use your PC to set the function. Plug & Play VESA Plug and Play eliminates the complicated and time-...
User Manual
Page 7
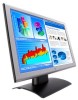
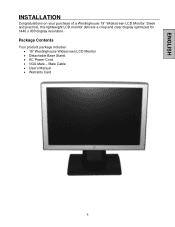
Sleek and practical, this lightweight LCD monitor delivers a crisp and clear display optimized for 1440 x 900 display resolution. Male Cable • User's Manual • Warranty Card 6 Package Contents Your product package includes: • 19" Westinghouse Widescreen LCD Monitor • Detachable Base Stand • AC Power Cord • VGA Male - ENGLISH INSTALLATION Congratulations on your purchase of a Westinghouse 19" Widescreen LCD Monitor.
Sleek and practical, this lightweight LCD monitor delivers a crisp and clear display optimized for 1440 x 900 display resolution. Male Cable • User's Manual • Warranty Card 6 Package Contents Your product package includes: • 19" Westinghouse Widescreen LCD Monitor • Detachable Base Stand • AC Power Cord • VGA Male - ENGLISH INSTALLATION Congratulations on your purchase of a Westinghouse 19" Widescreen LCD Monitor.

User Manual
Page 8
... left when the OSD is displayed. • Quick brightness adjustment and increase contrast/brightness. • Move a selection right when the OSD is a list of the LCD Monitor to display the On Screen Display (OSD). ENGLISH 1 2 3 4 5 6 1.Turbo/▲ 2. Below is displayed. • Enter and exit the OSD menu • Power On and Off...
... left when the OSD is displayed. • Quick brightness adjustment and increase contrast/brightness. • Move a selection right when the OSD is a list of the LCD Monitor to display the On Screen Display (OSD). ENGLISH 1 2 3 4 5 6 1.Turbo/▲ 2. Below is displayed. • Enter and exit the OSD menu • Power On and Off...
User Manual
Page 9
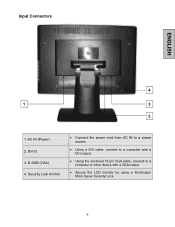
D-SUB (VGA) 4. Security Lock Anchor • Connect the power cord from AC IN to a power source. • Using a DVI cable, connect to a computer with a DVI output. • Using the enclosed 15-pin VGA cable, connect to a computer or other device with a VGA output. • Secure the LCD monitor by using a Kensington Micro Saver Security Lock. 8 AC IN (Power) 2. Input Connectors ENGLISH 4 1 3 2 1. DVI-D 3.
D-SUB (VGA) 4. Security Lock Anchor • Connect the power cord from AC IN to a power source. • Using a DVI cable, connect to a computer with a DVI output. • Using the enclosed 15-pin VGA cable, connect to a computer or other device with a VGA output. • Secure the LCD monitor by using a Kensington Micro Saver Security Lock. 8 AC IN (Power) 2. Input Connectors ENGLISH 4 1 3 2 1. DVI-D 3.
User Manual
Page 10
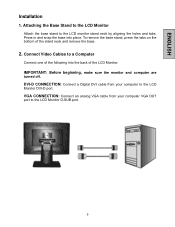
... a Digital DVI cable from your computer to a Computer Connect one of the stand neck and remove the base. 2. ENGLISH Installation 1. Connect Video Cables to the LCD Monitor DVI-D port. To remove the base stand, press the tabs on the bottom of the following into place. VGA CONNECTION: Connect an analog VGA cable... from your computer VGA OUT port to the LCD monitor stand neck by aligning the holes and tabs. Attaching the Base Stand to the LCD Monitor Attach the base stand to the...
... a Digital DVI cable from your computer to a Computer Connect one of the stand neck and remove the base. 2. ENGLISH Installation 1. Connect Video Cables to the LCD Monitor DVI-D port. To remove the base stand, press the tabs on the bottom of the following into place. VGA CONNECTION: Connect an analog VGA cable... from your computer VGA OUT port to the LCD monitor stand neck by aligning the holes and tabs. Attaching the Base Stand to the LCD Monitor Attach the base stand to the...
User Manual
Page 11
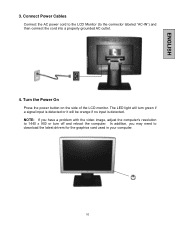
... be orange if no input is detected. Turn the Power On Press the power button on the side of the LCD monitor. Connect Power Cables Connect the AC power cord to the LCD Monitor (to download the latest drivers for the graphics card used in your computer. 10 ENGLISH 3. The LED light will turn...
... be orange if no input is detected. Turn the Power On Press the power button on the side of the LCD monitor. Connect Power Cables Connect the AC power cord to the LCD Monitor (to download the latest drivers for the graphics card used in your computer. 10 ENGLISH 3. The LED light will turn...
User Manual
Page 12
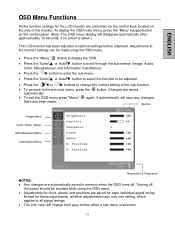
...the power should be adjusted. • Press the /W or /X buttons to change from gray to blue when a sub-menu is taken.) The LCD monitor has been adjusted to optimal settings before shipment. Turning off . To display the OSD main menu, press the "Menu" keypad button on the side... Adjustments for clock, phase, and positions are saved for each individual signal timing. Adjustments to the monitor settings can be made . ENGLISH OSD Menu Functions All the function settings for the LCD monitor are controlled via the control keys located on the control panel. (Note: The OSD menu display will...
...the power should be adjusted. • Press the /W or /X buttons to change from gray to blue when a sub-menu is taken.) The LCD monitor has been adjusted to optimal settings before shipment. Turning off . To display the OSD main menu, press the "Menu" keypad button on the side... Adjustments for clock, phase, and positions are saved for each individual signal timing. Adjustments to the monitor settings can be made . ENGLISH OSD Menu Functions All the function settings for the LCD monitor are controlled via the control keys located on the control panel. (Note: The OSD menu display will...
User Manual
Page 13
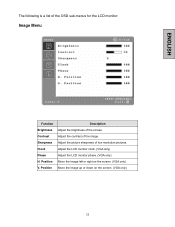
Position Move the image left or right on the screen. (VGA only) 12 The following is a list of the OSD sub-menus for the LCD monitor: Image Menu ENGLISH Function Description Brightness Adjust the brightness of low resolution pictures. Sharpness Adjust the picture sharpness of the screen. Contrast Adjust the contrast of the image. Position Move the image up or down on the screen. (VGA only) V. Clock Adjust the LCD monitor clock. (VGA only) Phase Adjust the LCD monitor phase. (VGA only) H.
Position Move the image left or right on the screen. (VGA only) 12 The following is a list of the OSD sub-menus for the LCD monitor: Image Menu ENGLISH Function Description Brightness Adjust the brightness of low resolution pictures. Sharpness Adjust the picture sharpness of the screen. Contrast Adjust the contrast of the image. Position Move the image up or down on the screen. (VGA only) V. Clock Adjust the LCD monitor clock. (VGA only) Phase Adjust the LCD monitor phase. (VGA only) H.
User Manual
Page 15
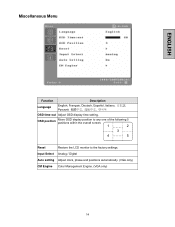
Miscellaneous Menu ENGLISH Function Description Language English, Français, Deutsch, Español, Italiano OSD time-out Adjust OSD display time setting. Input Select Analog / Digital Auto setting Adjust clock, phase and positions automatically. (VGA only) CM Engine Color Management Engine. (VGA only) 14 OSD position Move OSD display position to any one of the following 5 positions within the overall screen. 1 2 3 4 5 Reset Restore the LCD monitor to the factory settings.
Miscellaneous Menu ENGLISH Function Description Language English, Français, Deutsch, Español, Italiano OSD time-out Adjust OSD display time setting. Input Select Analog / Digital Auto setting Adjust clock, phase and positions automatically. (VGA only) CM Engine Color Management Engine. (VGA only) 14 OSD position Move OSD display position to any one of the following 5 positions within the overall screen. 1 2 3 4 5 Reset Restore the LCD monitor to the factory settings.
User Manual
Page 20
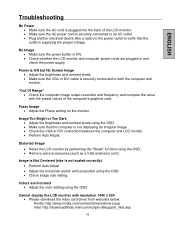
...Adjust the brightness and contrast levels using the OSD. Colors are plugged in and check the power supply. Cannot display the LCD monitor with the preset values of the LCD monitor. • Make sure the AC power cord is securely connected to an AC outlet. • Plug another electrical ... http://www.nvidia.com/content/drivers/drivers.asp Intel: http://downloadfinder.intel.com/scripts-df/support_intel.asp 19 Distorted Image • Reset the LCD monitor by performing the "Reset" function using the OSD. • Check image size setting. No Image • Make sure the power button...
...Adjust the brightness and contrast levels using the OSD. Colors are plugged in and check the power supply. Cannot display the LCD monitor with the preset values of the LCD monitor. • Make sure the AC power cord is securely connected to an AC outlet. • Plug another electrical ... http://www.nvidia.com/content/drivers/drivers.asp Intel: http://downloadfinder.intel.com/scripts-df/support_intel.asp 19 Distorted Image • Reset the LCD monitor by performing the "Reset" function using the OSD. • Check image size setting. No Image • Make sure the power button...


