
User Manual
Page 2
www.wde.com Westinghouse Digital Electronics Santa Fe Springs, CA SE-UM-2204-0701
www.wde.com Westinghouse Digital Electronics Santa Fe Springs, CA SE-UM-2204-0701
User Manual
Page 3
... POWER ON ...6 CONTROL PANEL BUTTONS 7 OSD MENU FUNCTIONS...8 QUICK ADJUSTMENTS...9 DISPLAY MODES ...10 TROUBLESHOOTING ...11 NO POWER ...11 NO SCREEN IMAGE ...11 FUZZY IMAGE ...11 "OUT OF RANGE"...11 CANNOT FIND "PREFERRED" MODE ON MY DISPLAY PROPERTIES 11 IMAGE TOO BRIGHT OR TOO DARK 11 DISTORTED IMAGE ...11 IMAGE IS NOT CENTERED (SIZE IS NOT SCALED CORRECTLY 12 COLORS ARE INCORRECT 12 NO SOUND...12 HOW TO CONNECT A DVI-D INPUT TO THE MONITOR 12 ADDITIONAL QUESTIONS...12 1 CONNECT POWER CABLE 6 4. ATTACHING THE BASE STAND...
... POWER ON ...6 CONTROL PANEL BUTTONS 7 OSD MENU FUNCTIONS...8 QUICK ADJUSTMENTS...9 DISPLAY MODES ...10 TROUBLESHOOTING ...11 NO POWER ...11 NO SCREEN IMAGE ...11 FUZZY IMAGE ...11 "OUT OF RANGE"...11 CANNOT FIND "PREFERRED" MODE ON MY DISPLAY PROPERTIES 11 IMAGE TOO BRIGHT OR TOO DARK 11 DISTORTED IMAGE ...11 IMAGE IS NOT CENTERED (SIZE IS NOT SCALED CORRECTLY 12 COLORS ARE INCORRECT 12 NO SOUND...12 HOW TO CONNECT A DVI-D INPUT TO THE MONITOR 12 ADDITIONAL QUESTIONS...12 1 CONNECT POWER CABLE 6 4. ATTACHING THE BASE STAND...
User Manual
Page 4
... openings must not be blocked or covered. • Do not block the openings by Westinghouse Digital Electronics. • If your LCD Monitor in installation such as vases, shall not be walked on the cabinet are difficult to moisture or high humidity. • Do not attempt repairs yourself. Power Cord Protection Power supply cords should be readily accessible. Your LCD Monitor contains high-voltage parts. IMPORTANT PRODUCT SAFETY INSTRUCTIONS...
... openings must not be blocked or covered. • Do not block the openings by Westinghouse Digital Electronics. • If your LCD Monitor in installation such as vases, shall not be walked on the cabinet are difficult to moisture or high humidity. • Do not attempt repairs yourself. Power Cord Protection Power supply cords should be readily accessible. Your LCD Monitor contains high-voltage parts. IMPORTANT PRODUCT SAFETY INSTRUCTIONS...
User Manual
Page 5
... will void the user's authority to provide reasonable protection against harmful interference in a residential installation. VDE Japan Electric Appliance Control Act IMPORTANT NOTICE CONCERNING POWER CORD SELECTION The specific power cord for your specific country. The cord set must be determined by Westinghouse Digital Electronics will not occur in accordance with the instructions. If a BNC cable used, use a grounded power supply cord and the provided shielded video interface cable with the limits...
... will void the user's authority to provide reasonable protection against harmful interference in a residential installation. VDE Japan Electric Appliance Control Act IMPORTANT NOTICE CONCERNING POWER CORD SELECTION The specific power cord for your specific country. The cord set must be determined by Westinghouse Digital Electronics will not occur in accordance with the instructions. If a BNC cable used, use a grounded power supply cord and the provided shielded video interface cable with the limits...

User Manual
Page 6
... LCD MONITOR • MAKE SURE THE LCD MONITOR IS TURNED OFF • NEVER SPRAY OR POUR ANY LIQUID DIRECTLY ONTO THE SCREEN OR CASE To clean the screen: 1. If it still is not clean, apply a small amount of any ammonia or alcohol-based cleaners on the LCD Monitor screen or case. abrasive detergent onto a clean, soft, lint-free cloth, then wipe the surface. To clean the case: 1. Westinghouse Digital...
... LCD MONITOR • MAKE SURE THE LCD MONITOR IS TURNED OFF • NEVER SPRAY OR POUR ANY LIQUID DIRECTLY ONTO THE SCREEN OR CASE To clean the screen: 1. If it still is not clean, apply a small amount of any ammonia or alcohol-based cleaners on the LCD Monitor screen or case. abrasive detergent onto a clean, soft, lint-free cloth, then wipe the surface. To clean the case: 1. Westinghouse Digital...
User Manual
Page 7
...; Power Saver • Plug & Play • Kensington Security Lock Compatible (optional) Power Saver A power control system, Power Saver, is compatible with EPA ENERGY STAR and NÜTEK if used for a certain period of time, the system will return the original screen image. If the LCD monitor has not been used with a VESA DPMS computer. Plug & Play VESA Plug and Play eliminates the complicated and time-consuming installation process. The LCD monitor uses Display Data...
...; Power Saver • Plug & Play • Kensington Security Lock Compatible (optional) Power Saver A power control system, Power Saver, is compatible with EPA ENERGY STAR and NÜTEK if used for a certain period of time, the system will return the original screen image. If the LCD monitor has not been used with a VESA DPMS computer. Plug & Play VESA Plug and Play eliminates the complicated and time-consuming installation process. The LCD monitor uses Display Data...
User Manual
Page 8
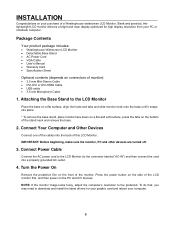
... LCD Monitor. IMPORTANT: Before beginning, make sure the monitor, PC and other devices are turned off. 3. Attaching the Base Stand to download and install the latest drivers for your graphic card and reboot your purchase of this lightweight LCD monitor delivers a bright and clear display optimized for high display resolution from your PC or notebook computer. Connect Power Cable Connect the AC power cord to the LCD Monitor (to the preferred. NOTE: If the monitor image looks fuzzy, adjust...
... LCD Monitor. IMPORTANT: Before beginning, make sure the monitor, PC and other devices are turned off. 3. Attaching the Base Stand to download and install the latest drivers for your graphic card and reboot your purchase of this lightweight LCD monitor delivers a bright and clear display optimized for high display resolution from your PC or notebook computer. Connect Power Cable Connect the AC power cord to the LCD Monitor (to the preferred. NOTE: If the monitor image looks fuzzy, adjust...
User Manual
Page 9
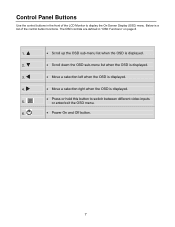
... OSD is displayed. • Scroll down the OSD sub-menu list when the OSD is displayed. • Move a selection left when the OSD is displayed. • Move a selection right when the OSD is a list of the LCD Monitor to switch between different video inputs or enter/exit the OSD menu. • Power On and Off button. 7 Below is displayed. • Press or hold this button to display the On Screen Display (OSD) menu. Control Panel Buttons Use the control buttons in "OSD...
... OSD is displayed. • Scroll down the OSD sub-menu list when the OSD is displayed. • Move a selection left when the OSD is displayed. • Move a selection right when the OSD is a list of the LCD Monitor to switch between different video inputs or enter/exit the OSD menu. • Power On and Off button. 7 Below is displayed. • Press or hold this button to display the On Screen Display (OSD) menu. Control Panel Buttons Use the control buttons in "OSD...
User Manual
Page 10
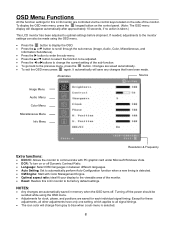
... . (Example) Source Image Menu Audio Menu Color Menu Miscellaneous Menu Info Menu Resolution & Frequency Extra functions: • DDC/CI: Allows the monitor to communicate with Color Management Engine. • Optimal aspect ratio: ideal fit your display to the viewable area of the monitor. To display the OSD main menu, press the keypad button on or off Dynamic Contract Ratio. • Language: Select OSD languages in memory when the OSD turns off the power should be adjusted. •...
... . (Example) Source Image Menu Audio Menu Color Menu Miscellaneous Menu Info Menu Resolution & Frequency Extra functions: • DDC/CI: Allows the monitor to communicate with Color Management Engine. • Optimal aspect ratio: ideal fit your display to the viewable area of the monitor. To display the OSD main menu, press the keypad button on or off Dynamic Contract Ratio. • Language: Select OSD languages in memory when the OSD turns off the power should be adjusted. •...
User Manual
Page 11
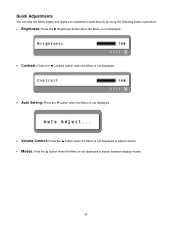
Quick Adjustments You can skip the Menu pages and display an adjustment scale directly by using the following button operations: • Brightness: Press the X Brightness button when the Menu is not displayed. • Contrast: Press the W Contrast button when the Menu is not displayed. • Auto Setting: Press the ▼ button when the Menu is not displayed. • Volume Control: Press the ▲ button when the Menu is not displayed to adjust volume. • Modes: Hold the ▲ button when the Menu is not displayed to switch between display modes. 9
Quick Adjustments You can skip the Menu pages and display an adjustment scale directly by using the following button operations: • Brightness: Press the X Brightness button when the Menu is not displayed. • Contrast: Press the W Contrast button when the Menu is not displayed. • Auto Setting: Press the ▼ button when the Menu is not displayed. • Volume Control: Press the ▲ button when the Menu is not displayed to adjust volume. • Modes: Hold the ▲ button when the Menu is not displayed to switch between display modes. 9
User Manual
Page 12
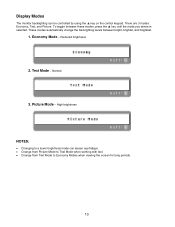
...; key until the mode you desire is selected. Display Modes The monitor backlighting can lessen eye fatigue. • Change from Picture Mode to Text Mode when working with text. • Change from Text Mode to Economy Modes when viewing the screen for long periods. 10 Normal 3. Economy Mode - High brightness NOTES: • Changing to a lower brightness mode can be controlled by using the ▲ key on the control keypad. Picture Mode - There are 3 modes: Economy, Text...
...; key until the mode you desire is selected. Display Modes The monitor backlighting can lessen eye fatigue. • Change from Picture Mode to Text Mode when working with text. • Change from Text Mode to Economy Modes when viewing the screen for long periods. 10 Normal 3. Economy Mode - High brightness NOTES: • Changing to a lower brightness mode can be controlled by using the ▲ key on the control keypad. Picture Mode - There are 3 modes: Economy, Text...
User Manual
Page 13
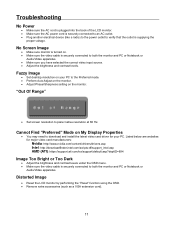
... download and install the latest video card driver for major video card manufacturers: Nvidia: http://www.nvidia.com/content/drivers/drivers.asp Intel: http://downloadfinder.intel.com/scripts-df/support_intel.asp AMD (ATI): https://support.ati.com/ics/support/default.asp?deptID=894 Image Too Bright or Too Dark • Adjust the brightness and contrast levels under the OSD menu. • Make sure the video cable is turned on the monitor. Distorted Image • Reset the LCD monitor...
... download and install the latest video card driver for major video card manufacturers: Nvidia: http://www.nvidia.com/content/drivers/drivers.asp Intel: http://downloadfinder.intel.com/scripts-df/support_intel.asp AMD (ATI): https://support.ati.com/ics/support/default.asp?deptID=894 Image Too Bright or Too Dark • Adjust the brightness and contrast levels under the OSD menu. • Make sure the video cable is turned on the monitor. Distorted Image • Reset the LCD monitor...
User Manual
Page 14
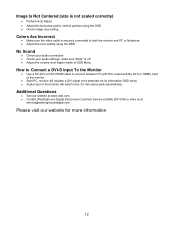
... Westinghouse Digital Electronics Customer Service at (866) 287-5555 or write us at service@westinghousedigital.com. Colors Are Incorrect • Make sure the video cable is off. • Adjust the volume level higher inside of the monitor will switch to both the monitor and PC or Notebook. • Adjust the color setting using the OSD. • Check image size setting. Image Is Not Centered (size is not scaled correctly) • Perform Auto Adjust. • Adjust the horizontal and...
... Westinghouse Digital Electronics Customer Service at (866) 287-5555 or write us at service@westinghousedigital.com. Colors Are Incorrect • Make sure the video cable is off. • Adjust the volume level higher inside of the monitor will switch to both the monitor and PC or Notebook. • Adjust the color setting using the OSD. • Check image size setting. Image Is Not Centered (size is not scaled correctly) • Perform Auto Adjust. • Adjust the horizontal and...


