
English Manual
Page 1
Visit our website at www.weslo.com new products, prizes, fitness tips, and much more! Keep this equipment. Model No. 831.283100 Serial No. Serial Number Decal USER'S MANUAL SEARS, ROEBUCK AND CO., HOFFMAN ESTATES, IL 60179 CAUTION Read all precautions and instructions in this manual before using this manual for future reference.
Visit our website at www.weslo.com new products, prizes, fitness tips, and much more! Keep this equipment. Model No. 831.283100 Serial No. Serial Number Decal USER'S MANUAL SEARS, ROEBUCK AND CO., HOFFMAN ESTATES, IL 60179 CAUTION Read all precautions and instructions in this manual before using this manual for future reference.

English Manual
Page 2
... 3 ASSEMBLY 4 HOW TO OPERATE THE EXERCISE CYCLE 8 MAINTENANCE AND TROUBLESHOOTING 10 CONDITIONING GUIDELINES 12 PART LIST 14 EXPLODED DRAWING 15 ORDERING REPLACEMENT PARTS Back Cover FULL 90 DAY WARRANTY Back Cover IMPORTANT PRECAUTIONS WARNING: To reduce the risk of 12 and pets away from moisture and dust. Always keep your back straight while using the exercise cycle. 1. The exercise cycle does not have a free wheel...
... 3 ASSEMBLY 4 HOW TO OPERATE THE EXERCISE CYCLE 8 MAINTENANCE AND TROUBLESHOOTING 10 CONDITIONING GUIDELINES 12 PART LIST 14 EXPLODED DRAWING 15 ORDERING REPLACEMENT PARTS Back Cover FULL 90 DAY WARRANTY Back Cover IMPORTANT PRECAUTIONS WARNING: To reduce the risk of 12 and pets away from moisture and dust. Always keep your back straight while using the exercise cycle. 1. The exercise cycle does not have a free wheel...
English Manual
Page 3
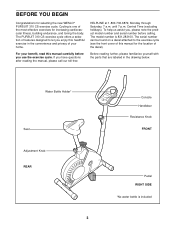
... Bottle Holder* Seat Adjustment Knob REAR 3 Console Handlebar Resistance Knob FRONT Pedal RIGHT SIDE *No water bottle is 831.283100. To help us assist you, please note the product model number and serial number before you use the exercise cycle. The PURSUIT 310 CS exercise cycle offers a selection of features designed to the exercise cycle (see the front cover of this manual for the location of your benefit, read this healthful exercise in the...
... Bottle Holder* Seat Adjustment Knob REAR 3 Console Handlebar Resistance Knob FRONT Pedal RIGHT SIDE *No water bottle is 831.283100. To help us assist you, please note the product model number and serial number before you use the exercise cycle. The PURSUIT 310 CS exercise cycle offers a selection of features designed to the exercise cycle (see the front cover of this manual for the location of your benefit, read this healthful exercise in the...
English Manual
Page 4
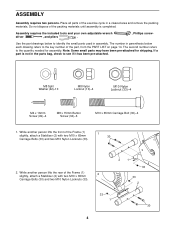
... x 16mm Screw (49)-4 M8 x 15mm Button Screw (34)-6 M10 x 65mm Carriage Bolt (30)-4 1. ASSEMBLY Assembly requires two persons. Use the part drawings below each drawing refers to identify the small parts used in assembly. The second number refers to see if it has been pre-attached. While another person lifts the rear of the exercise cycle in the parts bag, check to the quantity needed for shipping...
... x 16mm Screw (49)-4 M8 x 15mm Button Screw (34)-6 M10 x 65mm Carriage Bolt (30)-4 1. ASSEMBLY Assembly requires two persons. Use the part drawings below each drawing refers to identify the small parts used in assembly. The second number refers to see if it has been pre-attached. While another person lifts the rear of the exercise cycle in the parts bag, check to the quantity needed for shipping...
English Manual
Page 5
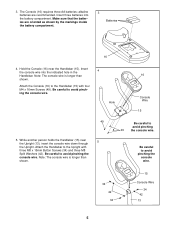
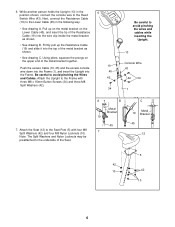
... Button Screws (34) and three M8 Split Washers (42). Hold the Console (16) near 5 the Upright (13), insert the console wire down through the Upright. Attach the Console (16) to avoid pinching the console wire. 34 42 34 15 Console Wire 34 42 13 5 Note: The console wire is longer than shown. Be careful to avoid pinching the console wire. Be careful to avoid pinching 49 the console wire...
... Button Screws (34) and three M8 Split Washers (42). Hold the Console (16) near 5 the Upright (13), insert the console wire down through the Upright. Attach the Console (16) to avoid pinching the console wire. 34 42 34 15 Console Wire 34 42 13 5 Note: The console wire is longer than shown. Be careful to avoid pinching the console wire. Be careful to avoid pinching 49 the console wire...
English Manual
Page 6
... drawing A. Attach the Seat (12) to the Reed Switch Wire (43). Attach the Upright to the Frame with four M8 Split Washers (42) and four M8 Nylon Locknuts (10). Note: The Split Washers and Nylon Locknuts may be preattached to the Lower Cable (45) in the 6 position shown, connect the console wire to the Seat Post (5) with 42 three M8 x 15mm Button Screws (34) and...
... drawing A. Attach the Seat (12) to the Reed Switch Wire (43). Attach the Upright to the Frame with four M8 Split Washers (42) and four M8 Nylon Locknuts (10). Note: The Split Washers and Nylon Locknuts may be preattached to the Lower Cable (45) in the 6 position shown, connect the console wire to the Seat Post (5) with 42 three M8 x 15mm Button Screws (34) and...
English Manual
Page 7
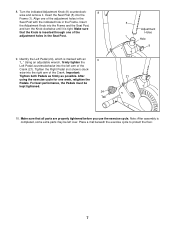
...). Using an adjustable wrench, firmly tighten the Left Pedal counterclockwise into the Frame and the Seat Post, and turn the Knob clockwise until it . For best performance, the Pedals must be left arm of the Crank. Turn the indicated Adjustment Knob (9) counterclock- 8 wise and remove it is marked with the indicated hole in the Seat Post. 9. Make sure that all parts are properly tightened before you use the exercise...
...). Using an adjustable wrench, firmly tighten the Left Pedal counterclockwise into the Frame and the Seat Post, and turn the Knob clockwise until it . For best performance, the Pedals must be left arm of the Crank. Turn the indicated Adjustment Knob (9) counterclock- 8 wise and remove it is marked with the indicated hole in the Seat Post. 9. Make sure that all parts are properly tightened before you use the exercise...
English Manual
Page 8
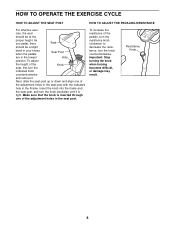
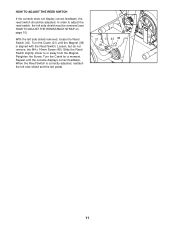
... knees when the pedals Seat Post are in the Frame. Resistance Knob 8 HOW TO OPERATE THE EXERCISE CYCLE HOW TO ADJUST THE SEAT POST HOW TO ADJUST THE PEDALING RESISTANCE For effective exer- Make sure that the knob is tight. To adjust the height of the seat, first turn the Knob indicated knob counterclockwise and remove it is inserted through one of the pedals, turn the resistance knob clockwise; Insert the...
... knees when the pedals Seat Post are in the Frame. Resistance Knob 8 HOW TO OPERATE THE EXERCISE CYCLE HOW TO ADJUST THE SEAT POST HOW TO ADJUST THE PEDALING RESISTANCE For effective exer- Make sure that the knob is tight. To adjust the height of the seat, first turn the Knob indicated knob counterclockwise and remove it is inserted through one of the pedals, turn the resistance knob clockwise; Insert the...
English Manual
Page 9
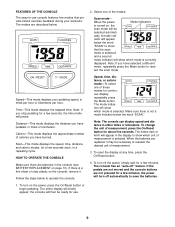
... stop pedaling for a few minutes. Make sure there is selected. Calorie-This mode displays the approximate number of the modes: Scan mode- the console will be ready for about five seconds. A mode indi- To reset the display at any time, press the On/Reset button. 4. To change the unit of these modes for a few minutes, the power will briefly appear; Note: The console can display speed and distance in the console (see BATTERY REPLACEMENT...
... stop pedaling for a few minutes. Make sure there is selected. Calorie-This mode displays the approximate number of the modes: Scan mode- the console will be ready for about five seconds. A mode indi- To reset the display at any time, press the On/Reset button. 4. To change the unit of these modes for a few minutes, the power will briefly appear; Note: The console can display speed and distance in the console (see BATTERY REPLACEMENT...
English Manual
Page 10
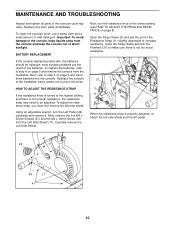
... be replaced; most console problems are the result of mild detergent. Open the Strap Clamp (3) and pull the end of the exercise cycle regularly. BATTERY REPLACEMENT If the console display becomes dim, the batteries should be adjusted. HOW TO ADJUST THE RESISTANCE STRAP If the resistance knob is turned to step 3 on page 8). To clean the exercise cycle, use a damp cloth and a small amount of low batteries. Next, remove the five M4 x 25mm Screws...
... be replaced; most console problems are the result of mild detergent. Open the Strap Clamp (3) and pull the end of the exercise cycle regularly. BATTERY REPLACEMENT If the console display becomes dim, the batteries should be adjusted. HOW TO ADJUST THE RESISTANCE STRAP If the resistance knob is turned to step 3 on page 8). To clean the exercise cycle, use a damp cloth and a small amount of low batteries. Next, remove the five M4 x 25mm Screws...
English Manual
Page 11
.... Turn the Crank (21) until the console displays correct feedback. Retighten the Screw. Slide the Reed Switch slightly closer to adjust the reed switch, the left side shield must be adjusted. Repeat until the Magnet (38) is correctly adjusted, reattach the left side shield and the left side shield removed, locate the Reed Switch (43). In order to or away from the Magnet. With the left pedal...
.... Turn the Crank (21) until the console displays correct feedback. Retighten the Screw. Slide the Reed Switch slightly closer to adjust the reed switch, the left side shield must be adjusted. Repeat until the Magnet (38) is correctly adjusted, reattach the left side shield and the left side shield removed, locate the Reed Switch (43). In order to or away from the Magnet. With the left pedal...
English Manual
Page 12
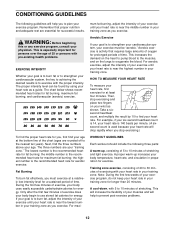
... you stop exercising and place two fingers on the lungs to exercise with pre-existing health problems. EXERCISE INTENSITY Whether your goal is to burn fat or to strengthen your training zone as you exercise. The lowest number is the recommended heart rate for longer than 20 minutes. CONDITIONING GUIDELINES The following three parts: A warm-up increases your training zone. For aerobic exercise, adjust the...
... you stop exercising and place two fingers on the lungs to exercise with pre-existing health problems. EXERCISE INTENSITY Whether your goal is to burn fat or to strengthen your training zone as you exercise. The lowest number is the recommended heart rate for longer than 20 minutes. CONDITIONING GUIDELINES The following three parts: A warm-up increases your training zone. For aerobic exercise, adjust the...
English Manual
Page 13
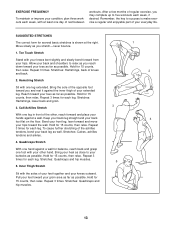
... and hip muscles. 1 2 4 13 SUGGESTED STRETCHES The correct form for each leg. Keep your back leg straight and your knees outward. Repeat 3 times. Toe Touch Stretch Stand with your back leg as possible. Calf/Achilles Stretch With one foot with your knees bent...leg, lean forward and move your hips toward you and rest it against the inner thigh of rest between workouts. Reach toward your condition, plan three workouts each week, with one day of your buttocks as well. Repeat 3 times for several basic stretches is make exercise a regular and enjoyable part...
... and hip muscles. 1 2 4 13 SUGGESTED STRETCHES The correct form for each leg. Keep your back leg straight and your knees outward. Repeat 3 times. Toe Touch Stretch Stand with your back leg as possible. Calf/Achilles Stretch With one foot with your knees bent...leg, lean forward and move your hips toward you and rest it against the inner thigh of rest between workouts. Reach toward your condition, plan three workouts each week, with one day of your buttocks as well. Repeat 3 times for several basic stretches is make exercise a regular and enjoyable part...
English Manual
Page 14
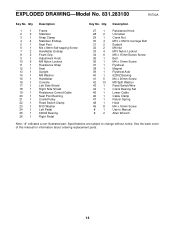
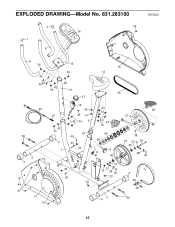
... 1 20 1 21 1 22 1 23 1 24 1 25 1 26 1 Description Frame Stabilizer Strap Clamp Stabilizer Endcap Seat Post M4 x 8mm Self-tapping Screw Handlebar Endcap Foam Grip Adjustment Knob M8 Nylon Locknut Resistance Strap Seat Upright M8 Washer Handlebar Console Left Side Shield Right Side Shield Resistance Control/Cable Seat Post Bushing Crank/Pulley Reed Switch Clamp M10 Washer Left Pedal 6000Z Bearing Right Pedal Key No. EXPLODED DRAWING-Model No. 831.283100 R0702A...
... 1 20 1 21 1 22 1 23 1 24 1 25 1 26 1 Description Frame Stabilizer Strap Clamp Stabilizer Endcap Seat Post M4 x 8mm Self-tapping Screw Handlebar Endcap Foam Grip Adjustment Knob M8 Nylon Locknut Resistance Strap Seat Upright M8 Washer Handlebar Console Left Side Shield Right Side Shield Resistance Control/Cable Seat Post Bushing Crank/Pulley Reed Switch Clamp M10 Washer Left Pedal 6000Z Bearing Right Pedal Key No. EXPLODED DRAWING-Model No. 831.283100 R0702A...
English Manual
Page 15
EXPLODED DRAWING-Model No. 831.283100 7 49 16 7 8 R0702A 8 34 15 34 42 49 42 42 34 13 27 18 12 35 30 4 49 41 45 2 17 41 47 42 34 4 1 19 42 49 10 42 34 5 42 10 42 24 10 20 49 43 22 44 29 3 9 6 40 33 33 36 33 14 31 10 28 32 33 2 4 26 21 38 37 23 31 39 25 28 32 11 4 46 48 30 15
EXPLODED DRAWING-Model No. 831.283100 7 49 16 7 8 R0702A 8 34 15 34 42 49 42 42 34 13 27 18 12 35 30 4 49 41 45 2 17 41 47 42 34 4 1 19 42 49 10 42 34 5 42 10 42 24 10 20 49 43 22 44 29 3 9 6 40 33 33 36 33 14 31 10 28 32 33 2 4 26 21 38 37 23 31 39 25 28 32 11 4 46 48 30 15
English Manual
Page 16
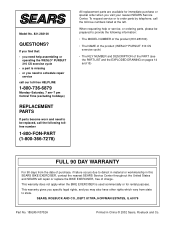
... and SEARS will repair or replace the BIKE EXERCISER, free of the PART (see the PART LIST and the EXPLODED DRAWING on pages 14 and 15) FULL 90 DAY WARRANTY For 90 days from state to order parts by telephone, call the following information: • The MODEL NUMBER of the product (831.283100) • The NAME of the product (WESLO® PURSUIT 310 CS exercise cycle) • The KEY NUMBER and...
... and SEARS will repair or replace the BIKE EXERCISER, free of the PART (see the PART LIST and the EXPLODED DRAWING on pages 14 and 15) FULL 90 DAY WARRANTY For 90 days from state to order parts by telephone, call the following information: • The MODEL NUMBER of the product (831.283100) • The NAME of the product (WESLO® PURSUIT 310 CS exercise cycle) • The KEY NUMBER and...


