
English Manual
Page 3
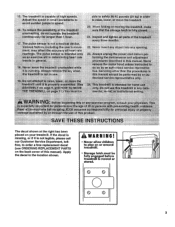
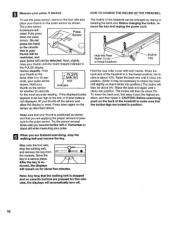
... to play on or around treadmill. • Storage latch must be fully engaged before per- e treadmill isnot.in generaL everleaVe thetreadrmll unattended while 0 remove the key Whari:::; power .cord before treadmill is moved or stored. 0 0 0 0 CD 3 This read ii dlyepd.•odt ,fflptotavien n ended forh•om t 4ilrog00411'(40 especially n ad...
... to play on or around treadmill. • Storage latch must be fully engaged before per- e treadmill isnot.in generaL everleaVe thetreadrmll unattended while 0 remove the key Whari:::; power .cord before treadmill is moved or stored. 0 0 0 0 CD 3 This read ii dlyepd.•odt ,fflptotavien n ended forh•om t 4ilrog00411'(40 especially n ad...
English Manual
Page 4
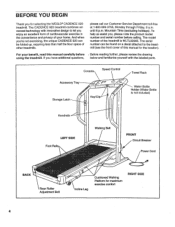
... this manual carefully before calling. Console Speed Control Accessory Tray z77 ,.65 72F Storage Latch Key/Clip Towel Rack Water Bottle Holder (Water Bottle is WLTL92065. BEFORE YOU BEGIN Thank you 're not exercising, the unique CADENCE 920 can be folded up, requiring less than half the floor space of the treadmill is... Adjustment Bolt 0 Incline Leg. please call our Customer Service Department toll-free at 1-800-999-3756, Monday through Friday, 6 a.m. Cushioned Walking Platform for selecting the WESLO® CADENCE 920 treadmill. Mountain Time (excluding holidays).
... this manual carefully before calling. Console Speed Control Accessory Tray z77 ,.65 72F Storage Latch Key/Clip Towel Rack Water Bottle Holder (Water Bottle is WLTL92065. BEFORE YOU BEGIN Thank you 're not exercising, the unique CADENCE 920 can be folded up, requiring less than half the floor space of the treadmill is... Adjustment Bolt 0 Incline Leg. please call our Customer Service Department toll-free at 1-800-999-3756, Monday through Friday, 6 a.m. Cushioned Walking Platform for selecting the WESLO® CADENCE 920 treadmill. Mountain Time (excluding holidays).
English Manual
Page 8
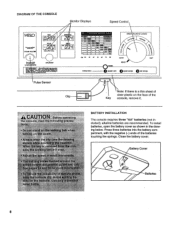
Close the battery cover. alkaline batteries are recommended. Press three batteries into the battery compartment, with the negative (-) ends of the Key console, remove it. Ya ,g3 BATTERY INSTALLATION The console requires three "AA" batteries (not included); DIAGRAM OF THE CONSOLE Monitor Displays Speed ...O O OO • O O CDOOO Aga 20 30 40 50 60 70 80 POWER SPEED RAINING ZONES At' 0)Ck AE O O SLOW RESET O FAST OPERATION ()INSERT KEY 0 RESET SPEED 0 SET SPEED Note: If there is a thin sheet of Clip clear plastic on the face of the batteries touching the springs. towel :re...
Close the battery cover. alkaline batteries are recommended. Press three batteries into the battery compartment, with the negative (-) ends of the Key console, remove it. Ya ,g3 BATTERY INSTALLATION The console requires three "AA" batteries (not included); DIAGRAM OF THE CONSOLE Monitor Displays Speed ...O O OO • O O CDOOO Aga 20 30 40 50 60 70 80 POWER SPEED RAINING ZONES At' 0)Ck AE O O SLOW RESET O FAST OPERATION ()INSERT KEY 0 RESET SPEED 0 SET SPEED Note: If there is a thin sheet of Clip clear plastic on the face of the batteries touching the springs. towel :re...
English Manual
Page 9
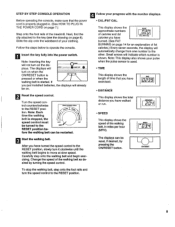
... 20'1 • SPEED This display shows the speed of your progress with the monitor displays. • CALJFAT CAL. Note: Inserting the key will indicate which number is shown. plays. STEP BY STEP CONSOLE OPERATION Before operating the console, make sure that you have exercised. Next,... find the clip attached to the other. trol counterclockwise SPEED TRAINING ZONES to operate the console. 11 Insert the key fully into the power switch. Carefully step onto the walking belt and begin exercising. Follow the steps below to the RESET posi-...
... 20'1 • SPEED This display shows the speed of your progress with the monitor displays. • CALJFAT CAL. Note: Inserting the key will indicate which number is shown. plays. STEP BY STEP CONSOLE OPERATION Before operating the console, make sure that you have exercised. Next,... find the clip attached to the other. trol counterclockwise SPEED TRAINING ZONES to operate the console. 11 Insert the key fully into the power switch. Carefully step onto the walking belt and begin exercising. Follow the steps below to the RESET posi-...
English Manual
Page 10
... Incline Leg Hold the rear roller cover with it clicks into position.) The incline will remain on for the most accurate reading. After the key is stopped and no console buttons are locked in the PULSE display flashes steadily. The pulse sensor is not displayed, lift your pulse. 6... When you are finished exercising, stop the walking belt, and remove the key from TON 0 UISIIIT KIT the console. Hold your pulse will be about 10%. Measure your thumb on the pulse sensor as shown. II To ...
... Incline Leg Hold the rear roller cover with it clicks into position.) The incline will remain on for the most accurate reading. After the key is stopped and no console buttons are locked in the PULSE display flashes steadily. The pulse sensor is not displayed, lift your pulse. 6... When you are finished exercising, stop the walking belt, and remove the key from TON 0 UISIIIT KIT the console. Hold your pulse will be about 10%. Measure your thumb on the pulse sensor as shown. II To ...
English Manual
Page 12
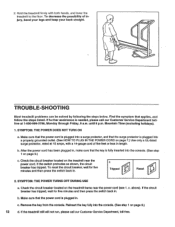
...at 1-800-999-3756, Monday through Friday, 6 a.m. until 6 p.m. If the switch protrudes as shown, the circuit breaker has tripped. c. Reinsert the key fully into the console. (See step 1 on page 9.) c. c. If the treadmill still will not run, please call our Customer Service Department tollfree at ... steps below. Mountain Time (excluding holidays). 1. Make sure that the power cord is plugged into a surge protector, and that the key is plugged in length. After the power cord has been plugged in, make sure that the surge protector is needed, please call our...
...at 1-800-999-3756, Monday through Friday, 6 a.m. until 6 p.m. If the switch protrudes as shown, the circuit breaker has tripped. c. Reinsert the key fully into the console. (See step 1 on page 9.) c. c. If the treadmill still will not run, please call our Customer Service Department tollfree at ... steps below. Mountain Time (excluding holidays). 1. Make sure that the power cord is plugged into a surge protector, and that the key is plugged in length. After the power cord has been plugged in, make sure that the surge protector is needed, please call our...
English Manual
Page 13
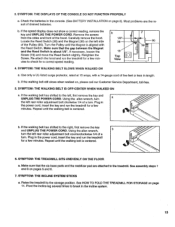
... See assembly steps 1 and 6 on , please call our Customer Service Department, toll-free. 5. Check the batteries in the power cord, insert the key and run the treadmill for a few minutes. Repeat until the walking belt is centered. b. Plug in the console. (See BATTERY INSTALLATION on page 8)....to the left rear roller adjustment bolt counterclockwise 1/4 of drained batteries. b. Using the alien wrench, turn the left , first remove the key and UNPLUG THE POWER CORD. Retighten the Screw. Repeat until the walking belt is centered. 6. SYMPTOM: THE DISPLAYS OF THE CONSOLE DO...
... See assembly steps 1 and 6 on , please call our Customer Service Department, toll-free. 5. Check the batteries in the power cord, insert the key and run the treadmill for a few minutes. Repeat until the walking belt is centered. b. Plug in the console. (See BATTERY INSTALLATION on page 8)....to the left rear roller adjustment bolt counterclockwise 1/4 of drained batteries. b. Using the alien wrench, turn the left , first remove the key and UNPLUG THE POWER CORD. Retighten the Screw. Repeat until the walking belt is centered. 6. SYMPTOM: THE DISPLAYS OF THE CONSOLE DO...
English Manual
Page 14
... measure your training zone in the table Warming up prepares the body for exercise by using the pulse sensor. Remember-these are listed ac- The key to achieving the desired results is too high or too low, adjust the intensity of your training zone as your body begin to use stored...
... measure your training zone in the table Warming up prepares the body for exercise by using the pulse sensor. Remember-these are listed ac- The key to achieving the desired results is too high or too low, adjust the intensity of your training zone as your body begin to use stored...
English Manual
Page 15
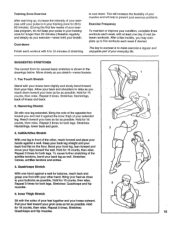
... correct form for 15 counts, then relax. Reach toward the wall. Hold for several basic stretches is shown in front of the other hand. N. 5 5. The key to success is to make exercise a regular and enjoyable part of your extended leg. Hamstring Stretch Sit with the soles of your feet together and...
... correct form for 15 counts, then relax. Reach toward the wall. Hold for several basic stretches is shown in front of the other hand. N. 5 5. The key to success is to make exercise a regular and enjoyable part of your extended leg. Hamstring Stretch Sit with the soles of your feet together and...
English Manual
Page 16
...8226; The MODEL NUMBER OF THE PRODUCT (WLTL92065). • The NAME OF THE PRODUCT (WESLO® CADENCE 920 treadmill). • The SERIAL NUMBER OF THE PRODUCT (see the front cover of this manual). • The KEY NUMBER OF THE PART(S) (see the EXPLODED DRAWING and PART LIST attached to the center ... The warranty extended hereunder is limited in connection with the use , costs of removal, installation or other consequential damages of whatsoever nature. WESLO is made must be received by ICON at one of its scope and duration to the terms set forth above limitation may not apply ...
...8226; The MODEL NUMBER OF THE PRODUCT (WLTL92065). • The NAME OF THE PRODUCT (WESLO® CADENCE 920 treadmill). • The SERIAL NUMBER OF THE PRODUCT (see the front cover of this manual). • The KEY NUMBER OF THE PART(S) (see the EXPLODED DRAWING and PART LIST attached to the center ... The warranty extended hereunder is limited in connection with the use , costs of removal, installation or other consequential damages of whatsoever nature. WESLO is made must be received by ICON at one of its scope and duration to the terms set forth above limitation may not apply ...
English Manual
Page 19
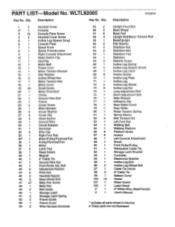
WLTL92065 R1297A Key No. Description 1 2 2* 1 3 18 4 4 5 1 6 1 7 1 8 1 9 1 10 1 11 1 12 1 13 1 14 1 15 1 16 2 17 1 18 1 19 24 20 1 21 1 22 1 23 1 24 2 25 1 26... Screw Handrail Cover Screw Incline Leg Spacer (long) Console Plate Speed Knob Speed Potentiometer Right Console Attachment Reed Switch Clip Key/Clip Motor Belt Power Cord Motor Tension Washer Star Washer Incline Wheel Nut Motor Tension Nut Motor Hood Small Screw Motor ...* Includes all parts shown in the box # These parts are not illustrated Qty. PART LIST Model No. Description Key No. Qty.
WLTL92065 R1297A Key No. Description 1 2 2* 1 3 18 4 4 5 1 6 1 7 1 8 1 9 1 10 1 11 1 12 1 13 1 14 1 15 1 16 2 17 1 18 1 19 24 20 1 21 1 22 1 23 1 24 2 25 1 26... Screw Handrail Cover Screw Incline Leg Spacer (long) Console Plate Speed Knob Speed Potentiometer Right Console Attachment Reed Switch Clip Key/Clip Motor Belt Power Cord Motor Tension Washer Star Washer Incline Wheel Nut Motor Tension Nut Motor Hood Small Screw Motor ...* Includes all parts shown in the box # These parts are not illustrated Qty. PART LIST Model No. Description Key No. Qty.


