
English Manual
Page 1
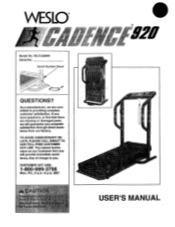
.... tance, free of charge to providing complete customer satisfaction. MST USER'S MANUAL Serial Number Decal QUESTIONS? CUST0O0MER HOT L3INE:5 6 l 8 9997 Mon.-Fri., 6 a.m.-6 p.m. WLTL92065 Serial No. The trained technicians on our Customer Hot Line will guarantee you . If you have questions, or find that there are missing or damaged parts, we are committed to you complete satisfaction through direct assistance...
.... tance, free of charge to providing complete customer satisfaction. MST USER'S MANUAL Serial Number Decal QUESTIONS? CUST0O0MER HOT L3INE:5 6 l 8 9997 Mon.-Fri., 6 a.m.-6 p.m. WLTL92065 Serial No. The trained technicians on our Customer Hot Line will guarantee you . If you have questions, or find that there are missing or damaged parts, we are committed to you complete satisfaction through direct assistance...
English Manual
Page 2
..., or in sandals. . . . TABLE OF CONTENTS IMPORTANT PRECAUTIONS BEFORE YOU BEGIN ASSEMBLY OPERATION AND ADJUSTMENT HOW TO FOLD AND MOVE THE TREADMILL TROUBLE-SHOOTING CONDITIONING GUIDELINES ORDERING REPLACEMENT PARTS LIMITED WARRANTY 2 4 5 7 11 12 14 Back Cover Back Cover Note: An EXPLODED DRAWING and a PART LIST are attached to persons ow' end tnfor` before op:e• rating the .treadmi . . 0.10s 4.„1,.1 ,..• wner. ure MA, e 0at 9 e the...
..., or in sandals. . . . TABLE OF CONTENTS IMPORTANT PRECAUTIONS BEFORE YOU BEGIN ASSEMBLY OPERATION AND ADJUSTMENT HOW TO FOLD AND MOVE THE TREADMILL TROUBLE-SHOOTING CONDITIONING GUIDELINES ORDERING REPLACEMENT PARTS LIMITED WARRANTY 2 4 5 7 11 12 14 Back Cover Back Cover Note: An EXPLODED DRAWING and a PART LIST are attached to persons ow' end tnfor` before op:e• rating the .treadmi . . 0.10s 4.„1,.1 ,..• wner. ure MA, e 0at 9 e the...
English Manual
Page 3
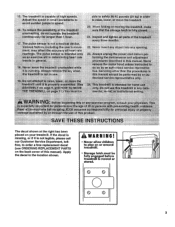
...!lOngarAhan ...:The pulse sensor is moved or stored. 0 0 0 0 CD 3 power .cord before treadmill is not.a. If the decal is missing, or if it is not legible, please call our Customer Service Department, tollfree, to play on or around treadmill. • Storage latch must be fully engaged before per- B. forming a400400i :„,,0006ecliii*#„*a6.70i00.1n,:04610nU4k:t144 remove doido thded:rfiidot...
...!lOngarAhan ...:The pulse sensor is moved or stored. 0 0 0 0 CD 3 power .cord before treadmill is not.a. If the decal is missing, or if it is not legible, please call our Customer Service Department, tollfree, to play on or around treadmill. • Storage latch must be fully engaged before per- B. forming a400400i :„,,0006ecliii*#„*a6.70i00.1n,:04610nU4k:t144 remove doido thded:rfiidot...
English Manual
Page 4
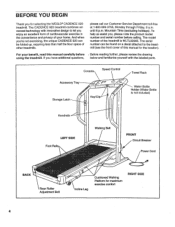
... serial number before , Before reading further, please review the drawing using the treadmill. The model number of this manual carefully before calling. FRONT Circuit Breaker Power Cord BACK Rear Roller Adjustment Bolt 0 Incline Leg. Console Speed Control Accessory Tray z77 ,.65 72F Storage Latch Key/Clip Towel Rack Water Bottle Holder (Water Bottle is WLTL92065. The CADENCE 920 treadmill combines advanced technology with the labeled parts. Mountain Time (excluding holidays). Cushioned Walking Platform for selecting the WESLO® CADENCE 920 treadmill...
... serial number before , Before reading further, please review the drawing using the treadmill. The model number of this manual carefully before calling. FRONT Circuit Breaker Power Cord BACK Rear Roller Adjustment Bolt 0 Incline Leg. Console Speed Control Accessory Tray z77 ,.65 72F Storage Latch Key/Clip Towel Rack Water Bottle Holder (Water Bottle is WLTL92065. The CADENCE 920 treadmill combines advanced technology with the labeled parts. Mountain Time (excluding holidays). Cushioned Walking Platform for selecting the WESLO® CADENCE 920 treadmill...
English Manual
Page 5
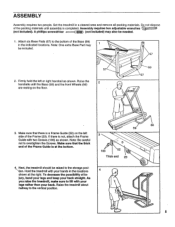
... to overtighten the Screws. ASSEMBLY Assembly requires two people. Hold the treadmill with your hands in a cleared area and remove all packing materials. If there is at the right. Raise the treadmill about halfway to the bottom of the Frame (23). Do not dispose of the Frame Guide is not, attach the Frame Guide with your ( legs rather than your...
... to overtighten the Screws. ASSEMBLY Assembly requires two people. Hold the treadmill with your hands in a cleared area and remove all packing materials. If there is at the right. Raise the treadmill about halfway to the bottom of the Frame (23). Do not dispose of the Frame Guide is not, attach the Frame Guide with your ( legs rather than your...
English Manual
Page 6
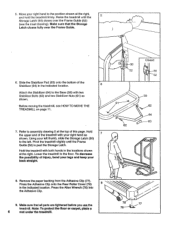
... all parts are tightened before you use the treadmill. Before moving the treadmill, see the inset drawing). Press the Adhesive Clip onto the Rear Roller Cover (78) 8 in the locations shown at the right. Make sure that the Storage Latch closes fully over the Frame Guide (52) _ (see HOW TO MOVE THE TREADMILL on page 11. 7. Hold the upper end of the treadmill with two Stabilizer Bolts (62...
... all parts are tightened before you use the treadmill. Before moving the treadmill, see the inset drawing). Press the Adhesive Clip onto the Rear Roller Cover (78) 8 in the locations shown at the right. Make sure that the Storage Latch closes fully over the Frame Guide (52) _ (see HOW TO MOVE THE TREADMILL on page 11. 7. Hold the upper end of the treadmill with two Stabilizer Bolts (62...
English Manual
Page 7
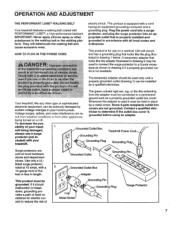
... used to connect the surge protector to the walking belt or the walking plat- Grounded Outlet Grounded Outlet Box Adapter Grounding Pin 0 .44 % s,„,. with all local codes and form. If it :,,,: re indoubt as shown in your home's power. To decrease the pos- A temporary adapter that is equipped with a cord having an equipment-grounding conductor and a Your treadmill features a walking belt coated with your treadmill being turned...
... used to connect the surge protector to the walking belt or the walking plat- Grounded Outlet Grounded Outlet Box Adapter Grounding Pin 0 .44 % s,„,. with all local codes and form. If it :,,,: re indoubt as shown in your home's power. To decrease the pos- A temporary adapter that is equipped with a cord having an equipment-grounding conductor and a Your treadmill features a walking belt coated with your treadmill being turned...
English Manual
Page 8
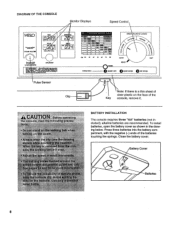
.... Press three batteries into the battery compartment, with the negative (-) ends of the Key console, remove it. Battery Cover Batteries yrtj O4.0:At Miekk.: 8 DIAGRAM OF THE CONSOLE Monitor Displays Speed Control WED "zoiwd.1.4.mily THUMB PULSE," TIME PULSE CAL/FAT CAL ler Far baol IA W NING: I • Road ON/RESET die Pulse Sensor DIST i E SP ED 3q BPM HEART RATE TRAINING ZONES V NMOOOO MOM 0 NENM O CI:Sjan Aie Ng O z$W MAN OO 114i'' ;fix...
.... Press three batteries into the battery compartment, with the negative (-) ends of the Key console, remove it. Battery Cover Batteries yrtj O4.0:At Miekk.: 8 DIAGRAM OF THE CONSOLE Monitor Displays Speed Control WED "zoiwd.1.4.mily THUMB PULSE," TIME PULSE CAL/FAT CAL ler Far baol IA W NING: I • Road ON/RESET die Pulse Sensor DIST i E SP ED 3q BPM HEART RATE TRAINING ZONES V NMOOOO MOM 0 NENM O CI:Sjan Aie Ng O z$W MAN OO 114i'' ;fix...
English Manual
Page 9
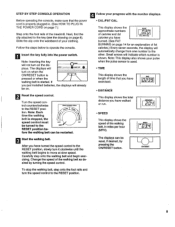
... walking belt is properly plugged in miles per hour (MPH). Reset the speed control. This display shows the approximate numbers of the treadmill. Slide the clip onto the waistband of the walking belt as desired by pressing the ON/RESET button. -1„ SPEED OWRESET To stop the walking belt, step onto the foot rails and turn on page 8). trol counterclockwise SPEED TRAINING ZONES to operate the console. 11 Insert the key fully into the power switch. Change the speed...
... walking belt is properly plugged in miles per hour (MPH). Reset the speed control. This display shows the approximate numbers of the treadmill. Slide the clip onto the waistband of the walking belt as desired by pressing the ON/RESET button. -1„ SPEED OWRESET To stop the walking belt, step onto the foot rails and turn on page 8). trol counterclockwise SPEED TRAINING ZONES to operate the console. 11 Insert the key fully into the power switch. Change the speed...
English Manual
Page 10
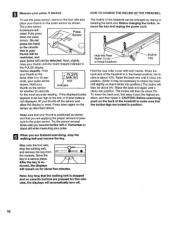
... incline will automatically turn off the sensor and allow the display to the pulse sensor. After 5 to make sure that the walking belt is pressure-activated. Hold your pulse, if desired. Press down the pulse sensor. Hold the Rear Roller Cover in the lowest position, the incline is in these locations Incline Leg Hold the rear roller cover with it. When the back end of pressure to reset. Remember to shake the treadmill slightly...
... incline will automatically turn off the sensor and allow the display to the pulse sensor. After 5 to make sure that the walking belt is pressure-activated. Hold your pulse, if desired. Press down the pulse sensor. Hold the Rear Roller Cover in the lowest position, the incline is in these locations Incline Leg Hold the rear roller cover with it. When the back end of pressure to reset. Remember to shake the treadmill slightly...
English Manual
Page 11
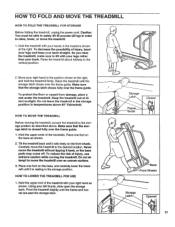
... past the storage latch. --) Storage Latch Frame Guide Closed 0 .3 % Base -Front Wheels Storage Latch Opened 11 HOW TO LOWER THE TREADMILL FOR USE 1. Move your back. To protect the floor or carpet from damage, place a mat under the treadmill. Make sure that the storage latch closes fully over the frame guide. 1. HOW TO FOLD AND MOVE THE TREADMILL HOW TO FOLD THE TREADMILL FOR STORAGE Before folding the treadmill, unplug the power cord. Carefully move the treadmill without...
... past the storage latch. --) Storage Latch Frame Guide Closed 0 .3 % Base -Front Wheels Storage Latch Opened 11 HOW TO LOWER THE TREADMILL FOR USE 1. Move your back. To protect the floor or carpet from damage, place a mat under the treadmill. Make sure that the storage latch closes fully over the frame guide. 1. HOW TO FOLD AND MOVE THE TREADMILL HOW TO FOLD THE TREADMILL FOR STORAGE Before folding the treadmill, unplug the power cord. Carefully move the treadmill without...
English Manual
Page 12
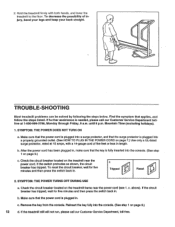
... and then press the switch back in . 2. Hold the treadmill firmly with a 14-gauge cord of injury, bend your legs and keep your back straight. ( TROUBLE-SHOOTING Most treadmill problems can be solved by following the steps below. Make sure that the power cord is plugged into the console. (See step 1 on page 9.) c. Check the circuit breaker located on the treadmill near the power cord (see 1. To reset the...
... and then press the switch back in . 2. Hold the treadmill firmly with a 14-gauge cord of injury, bend your legs and keep your back straight. ( TROUBLE-SHOOTING Most treadmill problems can be solved by following the steps below. Make sure that the power cord is plugged into the console. (See step 1 on page 9.) c. Check the circuit breaker located on the treadmill near the power cord (see 1. To reset the...
English Manual
Page 13
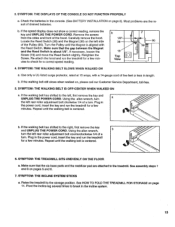
... key and UNPLUG THE POWER CORD. b. Remove the screws from the sides and front of the Pulley (90). If necessary, loosen the Screw (19) and move the'Reed Switch slightly. Use only a UL-listed surge protector, rated at 15 amps, with the Reed Switch. SYMPTOM: THE DISPLAYS OF THE CONSOLE DO NOT FUNCTION PROPERLY a. Most problems are attached to the treadmill. If the walking belt still slows when walked on page 8). Plug in length. Using...
... key and UNPLUG THE POWER CORD. b. Remove the screws from the sides and front of the Pulley (90). If necessary, loosen the Screw (19) and move the'Reed Switch slightly. Use only a UL-listed surge protector, rated at 15 amps, with the Reed Switch. SYMPTOM: THE DISPLAYS OF THE CONSOLE DO NOT FUNCTION PROPERLY a. Most problems are attached to the treadmill. If the walking belt still slows when walked on page 8). Plug in length. Using...
English Manual
Page 14
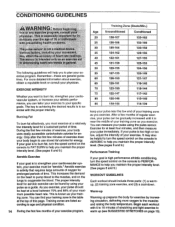
... regular exercise, your pulse can find your training zone as you exercise. CONDITIONING GUIDELINES G RKI . .R. lines. Burning Fat To burn fat effectively, you exercise, your body uses easily accessible carbohydrate calories for turn the speed control on the console to PERFORMANCE to help you to strengthen your cardiovascular system, your ex- 55 ercise program. This increases the demand WORKOUT GUIDELINES on the heart to...
... regular exercise, your pulse can find your training zone as you exercise. CONDITIONING GUIDELINES G RKI . .R. lines. Burning Fat To burn fat effectively, you exercise, your body uses easily accessible carbohydrate calories for turn the speed control on the console to PERFORMANCE to help you to strengthen your cardiovascular system, your ex- 55 ercise program. This increases the demand WORKOUT GUIDELINES on the heart to...
English Manual
Page 15
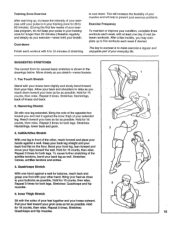
... counts, then relax. The key to success is to make exercise a regular and enjoyable part of your hips toward your knees outward. Move slowly as possible. Bend your front leg, lean forward and move your everyday life. To cause further stretching of rest between workouts. Repeat 3 times. Stretches:...form for both legs. Repeat 3 times for several basic stretches is in your training zone for 20 to 60 minutes. (During the first few months, you and rest it against a wail for balance, reach back and grasp one leg in front of your exercise program, do not keep your pulse...
... counts, then relax. The key to success is to make exercise a regular and enjoyable part of your hips toward your knees outward. Move slowly as possible. Bend your front leg, lean forward and move your everyday life. To cause further stretching of rest between workouts. Repeat 3 times. Stretches:...form for both legs. Repeat 3 times for several basic stretches is in your training zone for 20 to 60 minutes. (During the first few months, you and rest it against a wail for balance, reach back and grasp one leg in front of your exercise program, do not keep your pulse...
English Manual
Page 16
LIMITED WARRANTY ICON Health & Fitness, Inc. (ICON), warrants this product to be prepared to give the following information: • The MODEL NUMBER OF THE PRODUCT (WLTL92065). • The NAME OF THE PRODUCT (WESLO® CADENCE 920 treadmill). • The SERIAL NUMBER OF THE PRODUCT (see the front cover of this manual). • The KEY NUMBER OF THE PART(S) (see the EXPLODED DRAWING and PART LIST attached to the center of this manual). • The DESCRIPTION...
LIMITED WARRANTY ICON Health & Fitness, Inc. (ICON), warrants this product to be prepared to give the following information: • The MODEL NUMBER OF THE PRODUCT (WLTL92065). • The NAME OF THE PRODUCT (WESLO® CADENCE 920 treadmill). • The SERIAL NUMBER OF THE PRODUCT (see the front cover of this manual). • The KEY NUMBER OF THE PART(S) (see the EXPLODED DRAWING and PART LIST attached to the center of this manual). • The DESCRIPTION...
English Manual
Page 17
For information about ordering replacement parts, see the back cover of the User's Manual. REMOVE THIS EXPLODED DRAWING AND PART LIST FROM THE MANUAL Save this EXPLODED DRAWING and PART LIST for future reference. -\ O O Note: Specifications are subject to change without notice.
For information about ordering replacement parts, see the back cover of the User's Manual. REMOVE THIS EXPLODED DRAWING AND PART LIST FROM THE MANUAL Save this EXPLODED DRAWING and PART LIST for future reference. -\ O O Note: Specifications are subject to change without notice.
English Manual
Page 19
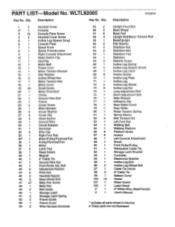
... Cover Console Console Plate Screw Handrail Cover Screw Incline Leg Spacer (long) Console Plate Speed Knob Speed Potentiometer Right Console Attachment Reed Switch Clip Key/Clip Motor Belt Power Cord Motor Tension Washer Star Washer Incline Wheel Nut Motor Tension Nut Motor Hood Small Screw Motor Pivot Bolt Choke Ground Wire Bolt Frame Cover Screw Wire Harness Cover Washer Cover Clip Hood Anchor Ground Wire Circuit Breaker Grommet Wire Clip Right Foot Rail Motor/Pulley/Flywheel/Fan Pulley/FlywheeVFan Motor Latch Pad Reed Switch Magnet 4" Cable Tie Ground Wire Nut Front Roller Adj. PART LIST...
... Cover Console Console Plate Screw Handrail Cover Screw Incline Leg Spacer (long) Console Plate Speed Knob Speed Potentiometer Right Console Attachment Reed Switch Clip Key/Clip Motor Belt Power Cord Motor Tension Washer Star Washer Incline Wheel Nut Motor Tension Nut Motor Hood Small Screw Motor Pivot Bolt Choke Ground Wire Bolt Frame Cover Screw Wire Harness Cover Washer Cover Clip Hood Anchor Ground Wire Circuit Breaker Grommet Wire Clip Right Foot Rail Motor/Pulley/Flywheel/Fan Pulley/FlywheeVFan Motor Latch Pad Reed Switch Magnet 4" Cable Tie Ground Wire Nut Front Roller Adj. PART LIST...


