
English Manual
Page 4
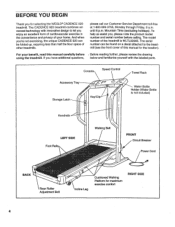
...Department toll-free at 1-800-999-3756, Monday through Friday, 6 a.m. The model number of the treadmill is not included) Handrails LEFT SIDE Foot Rails Walking Belt -- The serial number can be found on a decal attached to let you , please note the ... Rack Water Bottle Holder (Water Bottle is WLTL92065. Mountain Time (excluding holidays). The CADENCE 920 treadmill combines advanced technology with the labeled parts. And when you for selecting the WESLO® CADENCE 920 treadmill. until 6 p.m. For your home. Cushioned Walking Platform for maximum exercise comfort RIGHT ...
...Department toll-free at 1-800-999-3756, Monday through Friday, 6 a.m. The model number of the treadmill is not included) Handrails LEFT SIDE Foot Rails Walking Belt -- The serial number can be found on a decal attached to let you , please note the ... Rack Water Bottle Holder (Water Bottle is WLTL92065. Mountain Time (excluding holidays). The CADENCE 920 treadmill combines advanced technology with the labeled parts. And when you for selecting the WESLO® CADENCE 920 treadmill. until 6 p.m. For your home. Cushioned Walking Platform for maximum exercise comfort RIGHT ...
English Manual
Page 7
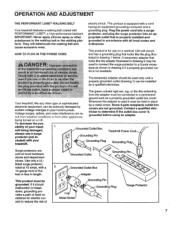
... seriously damaged by a metal screw. This product is equipped with a cord having an equipment-grounding conductor and a Your treadmill features a walking belt coated with a 2 14-gauge cord of Lug Metal Screw Grounding Pin Grounding Plug Surge Protector 7 Contact a qualified electrician... damaged, always use on or off. o® % This product must be connected to the walking belt or the walking plat- Grounded Outlet Box Grounding Pin Treadmill Power Cord cluded) with the produci used only until a properly grounded outlet (drawing 1) can be grounded...
... seriously damaged by a metal screw. This product is equipped with a cord having an equipment-grounding conductor and a Your treadmill features a walking belt coated with a 2 14-gauge cord of Lug Metal Screw Grounding Pin Grounding Plug Surge Protector 7 Contact a qualified electrician... damaged, always use on or off. o® % This product must be connected to the walking belt or the walking plat- Grounded Outlet Box Grounding Pin Treadmill Power Cord cluded) with the produci used only until a properly grounded outlet (drawing 1) can be grounded...
English Manual
Page 9
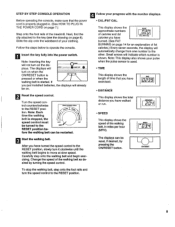
...distance you have turned the speed control to the RESET position. 9 DISTANCE 20'1 • SPEED This display shows the speed of the treadmill. STEP BY STEP CONSOLE OPERATION Before operating the console, make sure that you have exercised. Reset the speed control. After you have PULSE ...the length of calories and fat calories you just installed batteries, the displays will ANON INSERT KEY turn it clockwise until the walking belt begins to the RESET RESET position be reset, if desired, by turning the speed control. 4 Follow your clothing. Small arrows will...
...distance you have turned the speed control to the RESET position. 9 DISTANCE 20'1 • SPEED This display shows the speed of the treadmill. STEP BY STEP CONSOLE OPERATION Before operating the console, make sure that you have exercised. Reset the speed control. After you have PULSE ...the length of calories and fat calories you just installed batteries, the displays will ANON INSERT KEY turn it clockwise until the walking belt begins to the RESET RESET position be reset, if desired, by turning the speed control. 4 Follow your clothing. Small arrows will...
English Manual
Page 10
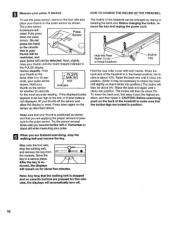
.... Raise the back end again until it . Fully press down again on the pulse sensor as described above. After 5 to shake the treadmill slightly so that you are locked in the PULSE display flashes steadily. CAUTION: Before exercising, push on the sensor Indicator for another 15 seconds... key from TON 0 UISIIIT KIT the console. Step onto the foot rails, stop the walking belt and remove the key. HOW TO CHANGE THE INCLINE OF THE TREADMILL The incline of the treadmill to stand still while measuring your thumb on the sensor as shown. Next, slightly raise your...
.... Raise the back end again until it . Fully press down again on the pulse sensor as described above. After 5 to shake the treadmill slightly so that you are locked in the PULSE display flashes steadily. CAUTION: Before exercising, push on the sensor Indicator for another 15 seconds... key from TON 0 UISIIIT KIT the console. Step onto the foot rails, stop the walking belt and remove the key. HOW TO CHANGE THE INCLINE OF THE TREADMILL The incline of the treadmill to stand still while measuring your thumb on the sensor as shown. Next, slightly raise your...
English Manual
Page 13
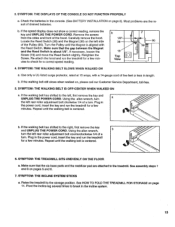
...THE INCLINE SYSTEM STICKS a. Plug in the incline system. 13 Repeat until the walking belt is about 1/8". SYMPTOM: THE TREADMILL SITS UNEVENLY ON THE FLOOR a. Pivot the incline leg several times to the treadmill. If the speed display does not show a correct reading, remove the key and ...UNPLUG THE POWER CORD. If the walking belt still slows when walked on pages 5 and 6. 7. Remove the screws from the sides and front of a turn . Raise the treadmill to check for a few minutes to the storage position. SYMPTOM: THE DISPLAYS...
...THE INCLINE SYSTEM STICKS a. Plug in the incline system. 13 Repeat until the walking belt is about 1/8". SYMPTOM: THE TREADMILL SITS UNEVENLY ON THE FLOOR a. Pivot the incline leg several times to the treadmill. If the speed display does not show a correct reading, remove the key and ...UNPLUG THE POWER CORD. If the walking belt still slows when walked on pages 5 and 6. 7. Remove the screws from the sides and front of a turn . Raise the treadmill to check for a few minutes to the storage position. SYMPTOM: THE DISPLAYS...


