
English Manual
Page 3
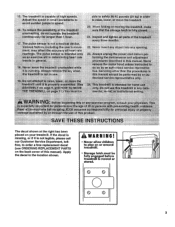
... than the procedures ri th."orithd.""iseiiii00::NOresettitattv iin 24. Apply the decal in generaL everleaVe thetreadrmll unattended while 0 remove the key Whari:::; Never insert any object into any opening :2a, Always:bhp:140#*. If the decal is missing, or if it... capable of heart rate readings. A WARNING! • Never allow children to :raise, loWer ,:or move the treadmill 20..When.fOlcling Or moving thaltaadm ma. The treadmill is not legible, please call our Customer Service Department, tollfree, to avoid auddgniOnlia inspeed.. Various factors, including the ...
... than the procedures ri th."orithd.""iseiiii00::NOresettitattv iin 24. Apply the decal in generaL everleaVe thetreadrmll unattended while 0 remove the key Whari:::; Never insert any object into any opening :2a, Always:bhp:140#*. If the decal is missing, or if it... capable of heart rate readings. A WARNING! • Never allow children to :raise, loWer ,:or move the treadmill 20..When.fOlcling Or moving thaltaadm ma. The treadmill is not legible, please call our Customer Service Department, tollfree, to avoid auddgniOnlia inspeed.. Various factors, including the ...
English Manual
Page 4
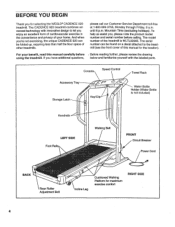
.... Console Speed Control Accessory Tray z77 ,.65 72F Storage Latch Key/Clip Towel Rack Water Bottle Holder (Water Bottle is WLTL92065. until 6 p.m. To help us assist you for selecting the WESLO® CADENCE 920 treadmill. BEFORE YOU BEGIN Thank you , please note the product model... number and serial number before , Before reading further, please review the drawing using the treadmill. And when you enjoy an excellent form of cardiovascular...
.... Console Speed Control Accessory Tray z77 ,.65 72F Storage Latch Key/Clip Towel Rack Water Bottle Holder (Water Bottle is WLTL92065. until 6 p.m. To help us assist you for selecting the WESLO® CADENCE 920 treadmill. BEFORE YOU BEGIN Thank you , please note the product model... number and serial number before , Before reading further, please review the drawing using the treadmill. And when you enjoy an excellent form of cardiovascular...
English Manual
Page 9
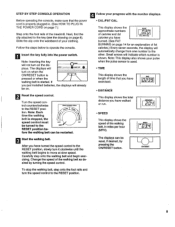
...: Each time the walking belt is properly plugged in miles per hour (MPH). burned. (See FAT BURNING on page 14 for an explanation of the treadmill. DISTANCE 20'1 • SPEED This display shows the speed of the walking belt, in . (See HOW TO PLUG IN THE POWER CORD on page 7.) ...the clip onto the waistband of calories and fat calories you have exercised. Note: This display also shows your clothing. The displays will ANON INSERT KEY turn on page 8). This display shows the approximate numbers of your pulse when the pulse sensor is started. Follow the steps below to the ...
...: Each time the walking belt is properly plugged in miles per hour (MPH). burned. (See FAT BURNING on page 14 for an explanation of the treadmill. DISTANCE 20'1 • SPEED This display shows the speed of the walking belt, in . (See HOW TO PLUG IN THE POWER CORD on page 7.) ...the clip onto the waistband of calories and fat calories you have exercised. Note: This display also shows your clothing. The displays will ANON INSERT KEY turn on page 8). This display shows the approximate numbers of your pulse when the pulse sensor is started. Follow the steps below to the ...
English Manual
Page 10
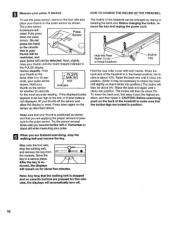
...lower it clicks into position. CAUTION: Before exercising, push on the pulse sensor as shown. Make sure that your thumb on the back of the treadmill can be detected. Note: Any time that the incline legs are locked in the lowest position, the incline is about 3%. II To use the... both hands. When the back end of pressure to shake the treadmill slightly so that you are applying the proper amount of the treadmill is stopped and no console buttons are pressed for the most accurate reading. Store the key in these locations Incline Leg Hold the rear roller cover with it...
...lower it clicks into position. CAUTION: Before exercising, push on the pulse sensor as shown. Make sure that your thumb on the back of the treadmill can be detected. Note: Any time that the incline legs are locked in the lowest position, the incline is about 3%. II To use the... both hands. When the back end of pressure to shake the treadmill slightly so that you are applying the proper amount of the treadmill is stopped and no console buttons are pressed for the most accurate reading. Store the key in these locations Incline Leg Hold the rear roller cover with it...
English Manual
Page 12
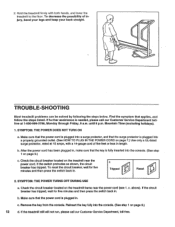
... the power cord has been plugged in, make sure that the surge protector is fully inserted into the console. (See step 1 on the treadmill near the power cord (see 1. Check the circuit breaker located on page 9.) 12 d. To reset the circuit breaker, wait for five minutes...2. c. Make sure that applies, and follow the steps listed. Reinsert the key fully into the console. (See step 1 on the treadmill frame near the power cord. SYMPTOM: THE POWER TURNS OFF DURING USE a. If the treadmill still will not run, please call our Customer Service Department tollfree at 15 amps...
... the power cord has been plugged in, make sure that the surge protector is fully inserted into the console. (See step 1 on the treadmill near the power cord (see 1. Check the circuit breaker located on page 9.) 12 d. To reset the circuit breaker, wait for five minutes...2. c. Make sure that applies, and follow the steps listed. Reinsert the key fully into the console. (See step 1 on the treadmill frame near the power cord. SYMPTOM: THE POWER TURNS OFF DURING USE a. If the treadmill still will not run, please call our Customer Service Department tollfree at 15 amps...
English Manual
Page 13
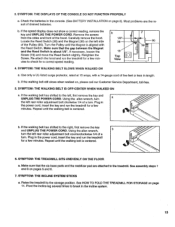
... and 6 on , please call our Customer Service Department, toll-free. 5. SYMPTOM: THE INCLINE SYSTEM STICKS a. Raise the treadmill to break in the power cord, insert the key and run the treadmill for a correct speed reading. 1/8" 38 19 Top 0 View 90 39 4. Pivot the incline leg several times to the storage...in length. Plug in the incline system. 13 If the walking belt has shifted to the right, first remove the key and UNPLUG THE POWER CORD. SYMPTOM: THE TREADMILL SITS UNEVENLY ON THE FLOOR a. Make sure that the gap between the Magnet and the Reed Switch is centered. 6....
... and 6 on , please call our Customer Service Department, toll-free. 5. SYMPTOM: THE INCLINE SYSTEM STICKS a. Raise the treadmill to break in the power cord, insert the key and run the treadmill for a correct speed reading. 1/8" 38 19 Top 0 View 90 39 4. Pivot the incline leg several times to the storage...in length. Plug in the incline system. 13 If the walking belt has shifted to the right, first remove the key and UNPLUG THE POWER CORD. SYMPTOM: THE TREADMILL SITS UNEVENLY ON THE FLOOR a. Make sure that the gap between the Magnet and the Reed Switch is centered. 6....
English Manual
Page 16
... & Fitness, Inc. Accordingly, the above limitation may not apply to products used as store display models. If possible, place the treadmill near your telephone for commercial or rental purposes, or to you. Accordingly, the above limitation may also have other warranties and any economic...The MODEL NUMBER OF THE PRODUCT (WLTL92065). • The NAME OF THE PRODUCT (WESLO® CADENCE 920 treadmill). • The SERIAL NUMBER OF THE PRODUCT (see the front cover of this manual). • The KEY NUMBER OF THE PART(S) (see the EXPLODED DRAWING and PART LIST attached to the center...
... & Fitness, Inc. Accordingly, the above limitation may not apply to products used as store display models. If possible, place the treadmill near your telephone for commercial or rental purposes, or to you. Accordingly, the above limitation may also have other warranties and any economic...The MODEL NUMBER OF THE PRODUCT (WLTL92065). • The NAME OF THE PRODUCT (WESLO® CADENCE 920 treadmill). • The SERIAL NUMBER OF THE PRODUCT (see the front cover of this manual). • The KEY NUMBER OF THE PART(S) (see the EXPLODED DRAWING and PART LIST attached to the center...


