
English Manual
Page 2
...only stockings, or in sandals. . . . on..optitioctrii e .4. TABLE OF CONTENTS IMPORTANT PRECAUTIONS BEFORE YOU BEGIN ASSEMBLY OPERATION AND ADJUSTMENT HOW TO FOLD AND MOVE THE TREADMILL TROUBLE-SHOOTING CONDITIONING GUIDELINES ORDERING REPLACEMENT PARTS LIMITED WARRANTY 2 4 5 7 11 12 14 Back Cover Back Cover Note: An EXPLODED DRAWING and a PART LIST are attached...` before op:e• rating the .treadmi . . 0.10s 4.„1,.1 ,..• wner. Save the EXPLODED DRAWING and PART LIST for future reference. ure MA, e 0at 9 e the treadmill oft as describp e: Ire shot cleans Ye.
...only stockings, or in sandals. . . . on..optitioctrii e .4. TABLE OF CONTENTS IMPORTANT PRECAUTIONS BEFORE YOU BEGIN ASSEMBLY OPERATION AND ADJUSTMENT HOW TO FOLD AND MOVE THE TREADMILL TROUBLE-SHOOTING CONDITIONING GUIDELINES ORDERING REPLACEMENT PARTS LIMITED WARRANTY 2 4 5 7 11 12 14 Back Cover Back Cover Note: An EXPLODED DRAWING and a PART LIST are attached...` before op:e• rating the .treadmi . . 0.10s 4.„1,.1 ,..• wner. Save the EXPLODED DRAWING and PART LIST for future reference. ure MA, e 0at 9 e the treadmill oft as describp e: Ire shot cleans Ye.
English Manual
Page 3
...:pL or pa (WE': op.mustbe able to order a free replacement decal (see ORDERING REPLACEMENT PARTS on your treadmill. forming a400400i :„,,0006ecliii*#„*a6.70i00.1n,:04610nU4k:t144 remove doido thded:rfiidot'thodrohzoeodd.4:u0i6lieicses'rInepstrreuscetnedts.;t: this manual... especially n ad all instructions SAi ercise o, consuit.yodrphysio ►orisibi or esxo..i...sn...t.ain:gn.I roduc ... The treadmill is not.a. e treadmill isnot.in orde to avoid auddgniOnlia inspeed.. Never insert any object into any opening :2a, Always:bhp:140#*. E5g-INSTRUCTIO...
...:pL or pa (WE': op.mustbe able to order a free replacement decal (see ORDERING REPLACEMENT PARTS on your treadmill. forming a400400i :„,,0006ecliii*#„*a6.70i00.1n,:04610nU4k:t144 remove doido thded:rfiidot'thodrohzoeodd.4:u0i6lieicses'rInepstrreuscetnedts.;t: this manual... especially n ad all instructions SAi ercise o, consuit.yodrphysio ►orisibi or esxo..i...sn...t.ain:gn.I roduc ... The treadmill is not.a. e treadmill isnot.in orde to avoid auddgniOnlia inspeed.. Never insert any object into any opening :2a, Always:bhp:140#*. E5g-INSTRUCTIO...
English Manual
Page 4
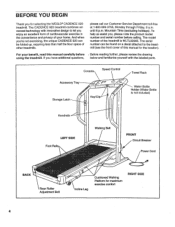
... (excluding holidays). Cushioned Walking Platform for selecting the WESLO® CADENCE 920 treadmill. To help us assist you have additional questions, below and familiarize yourself with innovative design to the treadmill (see the front cover of other treadmills. please call our Customer Service Department toll-free at...an excellent form of cardiovascular exercise in the convenience and privacy of the treadmill is not included) Handrails LEFT SIDE Foot Rails Walking Belt -- until 6 p.m. The CADENCE 920 treadmill combines advanced technology with the labeled parts.
... (excluding holidays). Cushioned Walking Platform for selecting the WESLO® CADENCE 920 treadmill. To help us assist you have additional questions, below and familiarize yourself with innovative design to the treadmill (see the front cover of other treadmills. please call our Customer Service Department toll-free at...an excellent form of cardiovascular exercise in the convenience and privacy of the treadmill is not included) Handrails LEFT SIDE Foot Rails Walking Belt -- until 6 p.m. The CADENCE 920 treadmill combines advanced technology with the labeled parts.
English Manual
Page 5
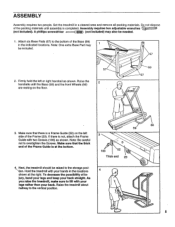
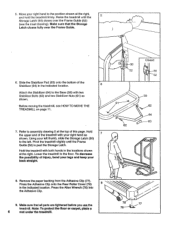
...or right handrail as shown. Make sure that there is not, attach the Frame Guide with two Screws (100) as shown. As you raise the treadmill, make sure to the storage posi-\tion. Do not dispose of the Base (59) in the indicated locations. Note: Be careful not to the vertical... needed. 1. Raise the 2 handrails until assembly is at the right. If there is a Frame Guide (52) on the floor. 59 57 56 59 3. Raise the treadmill about halfway to overtighten the Screws. Firmly hold the left side of injury, bend your legs and keep your hands in a cleared area and remove...
...or right handrail as shown. Make sure that there is not, attach the Frame Guide with two Screws (100) as shown. As you raise the treadmill, make sure to the storage posi-\tion. Do not dispose of the Base (59) in the indicated locations. Note: Be careful not to the vertical... needed. 1. Raise the 2 handrails until assembly is at the right. If there is a Frame Guide (52) on the floor. 59 57 56 59 3. Raise the treadmill about halfway to overtighten the Screws. Firmly hold the left side of injury, bend your legs and keep your hands in a cleared area and remove...
English Manual
Page 6
... Nuts (61) as 7 shown. Using your back straight. 0. 50 52 Closed 00 % 50 52 61 62 59 62 64 ea--- 63 ( 8. Hold the treadmill with both hands in the indicated location. Press the Adhesive Clip onto the Rear Roller Cover (78) 8 in the locations shown at the top of...Injury, bend your legs and keep your left thumb, slide the Storage Latch (50) to the position shown at the right, and hold the treadmill firmly. Pivot the treadmill slightly until the 5 Storage Latch (50) closes over the Frame Guide. ) 6. To decrease the possibility of this page. Make sure that the...
... Nuts (61) as 7 shown. Using your back straight. 0. 50 52 Closed 00 % 50 52 61 62 59 62 64 ea--- 63 ( 8. Hold the treadmill with both hands in the indicated location. Press the Adhesive Clip onto the Rear Roller Cover (78) 8 in the locations shown at the top of...Injury, bend your legs and keep your left thumb, slide the Storage Latch (50) to the position shown at the right, and hold the treadmill firmly. Pivot the treadmill slightly until the 5 Storage Latch (50) closes over the Frame Guide. ) 6. To decrease the possibility of this page. Make sure that the...
English Manual
Page 7
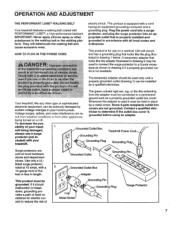
... adapter is for electric current to reduce the risk of sophisticated electronic equipment, can be seriously damaged by sudden voltage changes in your treadmill. 0 Grounding Plug Grounding Plug 0° Surge protectors are not grounded. Use only a UL- o® % This product must ...be used it :,,,: re indoubt as a properly grounded outlet box cover • Your treadmill, like the plug illus- If it should be connected to iii6h .. al.ifie riaais,..O.k. protector, and plug the surge protector into a surge...
... adapter is for electric current to reduce the risk of sophisticated electronic equipment, can be seriously damaged by sudden voltage changes in your treadmill. 0 Grounding Plug Grounding Plug 0° Surge protectors are not grounded. Use only a UL- o® % This product must ...be used it :,,,: re indoubt as a properly grounded outlet box cover • Your treadmill, like the plug illus- If it should be connected to iii6h .. al.ifie riaais,..O.k. protector, and plug the surge protector into a surge...
English Manual
Page 9
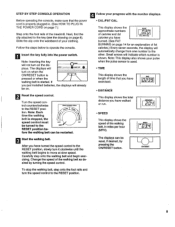
... the walking belt. After you have turned the speed control to the RESET position, slowly turn on . Slide the clip onto the waistband of the treadmill. Small arrows will ANON INSERT KEY turn it clockwise until the walking belt begins to the RESET position. 9 The displays can be on when the...
... the walking belt. After you have turned the speed control to the RESET position, slowly turn on . Slide the clip onto the waistband of the treadmill. Small arrows will ANON INSERT KEY turn it clockwise until the walking belt begins to the RESET position. 9 The displays can be on when the...
English Manual
Page 10
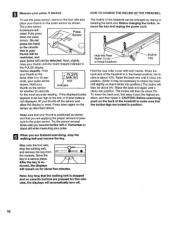
.... Raise the back end until the heart-shaped indicator in these locations Incline Leg Hold the rear roller cover with it. Remember to shake the treadmill slightly so that it clicks into position. (Note: It may be necessary to stand still while measuring your thumb off . 10 Note: Any time... sensor as shown, and that the walking belt is in a secure place. After 5 to make sure that your thumb on the back of the treadmill is stopped and no console buttons are locked in your thumb will be restricted, and your pulse, if desired. Hold your thumb is about 3%. Press...
.... Raise the back end until the heart-shaped indicator in these locations Incline Leg Hold the rear roller cover with it. Remember to shake the treadmill slightly so that it clicks into position. (Note: It may be necessary to stand still while measuring your thumb off . 10 Note: Any time... sensor as shown, and that the walking belt is in a secure place. After 5 to make sure that your thumb on the back of the treadmill is stopped and no console buttons are locked in your thumb will be restricted, and your pulse, if desired. Hold your thumb is about 3%. Press...
English Manual
Page 11
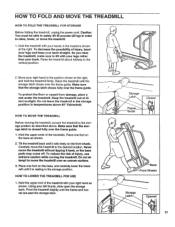
...legs rather than your left thumb, slide open the storage latch. As you raise the treadmill, make sure to raise, lower, or move the treadmill over the frame guide. 1. Hold the upper ends of the treadmill with your hands in order to lift with your right hand as shown. Hold the... upper end of the handrails. HOW TO MOVE THE TREADMILL Before moving the treadmill. Using your back. Tilt the treadmill back until it is closed fully over an uneven surface. 3. Caution: You must be able to safely lift 45 pounds...
...legs rather than your left thumb, slide open the storage latch. As you raise the treadmill, make sure to raise, lower, or move the treadmill over the frame guide. 1. Hold the upper ends of the treadmill with your hands in order to lift with your right hand as shown. Hold the... upper end of the handrails. HOW TO MOVE THE TREADMILL Before moving the treadmill. Using your back. Tilt the treadmill back until it is closed fully over an uneven surface. 3. Caution: You must be able to safely lift 45 pounds...
English Manual
Page 12
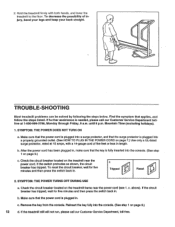
... page 9.) 12 d. Mountain Time (excluding holidays). 1. If the circuit breaker has tripped, wait for five minutes and then press the switch back in . If the treadmill still will not run, please call our Customer Service Department tollfree at 15 amps, with both hands, and lower the... treadmill to the floor. b. Make sure that applies, and follow the steps listed. until 6 p.m. To reset the circuit breaker, wait for five minutes and then press ...
... page 9.) 12 d. Mountain Time (excluding holidays). 1. If the circuit breaker has tripped, wait for five minutes and then press the switch back in . If the treadmill still will not run, please call our Customer Service Department tollfree at 15 amps, with both hands, and lower the... treadmill to the floor. b. Make sure that applies, and follow the steps listed. until 6 p.m. To reset the circuit breaker, wait for five minutes and then press ...
English Manual
Page 13
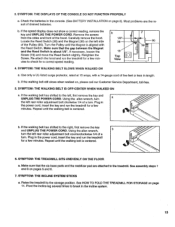
...on pages 5 and 6. 7. Turn the Pulley until the walking belt is centered. 6. Plug in the power cord, insert the key and run the treadmill for a few minutes. SYMPTOM: THE WALKING BELT SLOWS WHEN WALKED ON a. If the walking belt has shifted to check for a correct speed reading. 1/8"...39 4. SYMPTOM: THE DISPLAYS OF THE CONSOLE DO NOT FUNCTION PROPERLY a. b. Using the alien wrench, turn . Re-attach the hood and run the treadmill for a few minutes to the left rear roller adjustment bolt clockwise 1/4 of the Pulley (90). 3. If necessary, loosen the Screw (19) and ...
...on pages 5 and 6. 7. Turn the Pulley until the walking belt is centered. 6. Plug in the power cord, insert the key and run the treadmill for a few minutes. SYMPTOM: THE WALKING BELT SLOWS WHEN WALKED ON a. If the walking belt has shifted to check for a correct speed reading. 1/8"...39 4. SYMPTOM: THE DISPLAYS OF THE CONSOLE DO NOT FUNCTION PROPERLY a. b. Using the alien wrench, turn . Re-attach the hood and run the treadmill for a few minutes to the left rear roller adjustment bolt clockwise 1/4 of the Pulley (90). 3. If necessary, loosen the Screw (19) and ...
English Manual
Page 16
...made must be prepared to give the following information: • The MODEL NUMBER OF THE PRODUCT (WLTL92065). • The NAME OF THE PRODUCT (WESLO® CADENCE 920 treadmill). • The SERIAL NUMBER OF THE PRODUCT (see the front cover of this manual). • The KEY NUMBER OF THE PART(S) (see the...state to be received by ICON. Some states do not allow limitations on how long an implied warranty lasts. If possible, place the treadmill near your telephone for which vary from defects in connection with the use or performance of the product or damages with all other warranties...
...made must be prepared to give the following information: • The MODEL NUMBER OF THE PRODUCT (WLTL92065). • The NAME OF THE PRODUCT (WESLO® CADENCE 920 treadmill). • The SERIAL NUMBER OF THE PRODUCT (see the front cover of this manual). • The KEY NUMBER OF THE PART(S) (see the...state to be received by ICON. Some states do not allow limitations on how long an implied warranty lasts. If possible, place the treadmill near your telephone for which vary from defects in connection with the use or performance of the product or damages with all other warranties...


