

English Manual
Page 3
... the decal in speed. 18. Never start the treadmill while you are standing on your treadmill. Never move the treadmill. 20. The treadmill is turned off. DANGER: 24. Do not use . 19. 14. Never leave the treadmill unattended while it is not in any opening. Always remove the key and unplug the power cord when the...
... the decal in speed. 18. Never start the treadmill while you are standing on your treadmill. Never move the treadmill. 20. The treadmill is turned off. DANGER: 24. Do not use . 19. 14. Never leave the treadmill unattended while it is not in any opening. Always remove the key and unplug the power cord when the...
English Manual
Page 4
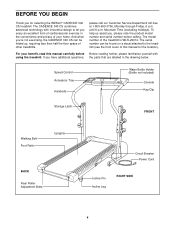
...not included) Console Key/Clip Storage Latch FRONT Walking Belt Foot Rails Uprights BACK Rear Roller Adjustment Bolts Circuit Breaker Power Cord Incline Pin Incline Leg RIGHT SIDE 4 For your home. The serial number can be found on a decal attached to the treadmill (see the front... cover of your benefit, read this manual for selecting the WESLO® CADENCE 340 CS treadmill. The CADENCE 340 CS combines advanced technology with using the treadmill. If you have additional questions, the parts that are ...
...not included) Console Key/Clip Storage Latch FRONT Walking Belt Foot Rails Uprights BACK Rear Roller Adjustment Bolts Circuit Breaker Power Cord Incline Pin Incline Leg RIGHT SIDE 4 For your home. The serial number can be found on a decal attached to the treadmill (see the front... cover of your benefit, read this manual for selecting the WESLO® CADENCE 340 CS treadmill. The CADENCE 340 CS combines advanced technology with using the treadmill. If you have additional questions, the parts that are ...
English Manual
Page 8
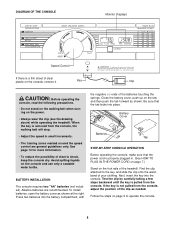
... liquids on the power. • Always wear the clip (see the drawing above) while operating the treadmill. Be sure that the power cord is removed from the console, adjust the position of the treadmill. When the key is properly plugged in small increments. • The training zones marked around the speed control are...
... liquids on the power. • Always wear the clip (see the drawing above) while operating the treadmill. Be sure that the power cord is removed from the console, adjust the position of the treadmill. When the key is properly plugged in small increments. • The training zones marked around the speed control are...
English Manual
Page 9
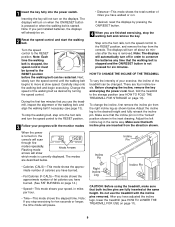
...Mode Arrows arrows will not turn on . 2 Reset the speed control and start the walking belt. The modes are described below . Next, fold the treadmill to the storage position (see page 13). Make sure that the incline pin is turned on, the console will already be on when the ON... the incline of your progress with the incline pins removed. HOW TO CHANGE THE INCLINE OF THE TREADMILL To vary the intensity of the treadmill can be changed. Before changing the incline, remove the key and unplug the power cord. Turn the speed control to the desired height and fully reinsert the ...
...Mode Arrows arrows will not turn on . 2 Reset the speed control and start the walking belt. The modes are described below . Next, fold the treadmill to the storage position (see page 13). Make sure that the incline pin is turned on, the console will already be on when the ON... the incline of your progress with the incline pins removed. HOW TO CHANGE THE INCLINE OF THE TREADMILL To vary the intensity of the treadmill can be changed. Before changing the incline, remove the key and unplug the power cord. Turn the speed control to the desired height and fully reinsert the ...
English Manual
Page 10
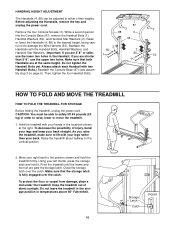
... ADJUSTMENT The Handrails (4, 88) can be able to safely lift 45 pounds (20 kg) in order to raise, lower or move the treadmill. 1. Before adjusting the Handrails, remove the key and unplug the power cord. 87 Remove the four Console Screws (3). Reattach the 2 Handrails with your legs rather than 5' 8", use the lower...
... ADJUSTMENT The Handrails (4, 88) can be able to safely lift 45 pounds (20 kg) in order to raise, lower or move the treadmill. 1. Before adjusting the Handrails, remove the key and unplug the power cord. 87 Remove the four Console Screws (3). Reattach the 2 Handrails with your legs rather than 5' 8", use the lower...
English Manual
Page 12
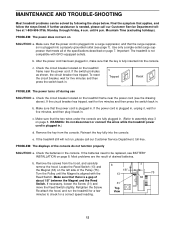
Important: The treadmill is not compatible with the Reed Switch. Check the circuit breaker located on page 7. To reset the circuit breaker, wait for five minutes and then press the switch back in .) d. c. Reinsert the key fully into a surge suppressor, and that applies, and follow ...in the console. Make sure that meets all of the specifications described on the treadmill frame near the power cord (see page 7). Remove the screws from the console. Remove the key from the hood, and carefully remove the hood. Most problems are fully plugged in...
Important: The treadmill is not compatible with the Reed Switch. Check the circuit breaker located on page 7. To reset the circuit breaker, wait for five minutes and then press the switch back in .) d. c. Reinsert the key fully into a surge suppressor, and that applies, and follow ...in the console. Make sure that meets all of the specifications described on the treadmill frame near the power cord (see page 7). Remove the screws from the console. Remove the key from the hood, and carefully remove the hood. Most problems are fully plugged in...
English Manual
Page 13
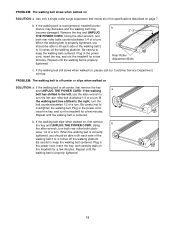
... able to keep the walking belt centered. Be careful to lift each side of a turn . Plug in the power cord, insert the key, and run the treadmill for a few minutes. Be careful not to 4 inches off the walking platform. Repeat until the walking belt is properly tightened. wise, ... off the walking platform. Use only a single-outlet surge suppressor that meets all of a turn . Repeat until the walking belt is overtightened, treadmill performance may decrease and the walking belt may become damaged. PROBLEM: The walking belt is off -center or slips when walked on page 7. Using...
... able to keep the walking belt centered. Be careful to lift each side of a turn . Plug in the power cord, insert the key, and run the treadmill for a few minutes. Be careful not to 4 inches off the walking platform. Repeat until the walking belt is properly tightened. wise, ... off the walking platform. Use only a single-outlet surge suppressor that meets all of a turn . Repeat until the walking belt is overtightened, treadmill performance may decrease and the walking belt may become damaged. PROBLEM: The walking belt is off -center or slips when walked on page 7. Using...
English Manual
Page 14
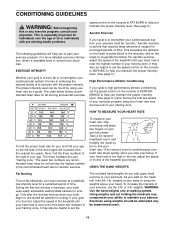
..., first find the three numbers to the right of your cardiovascular system, the key to use the 2-lb. During the first few minutes of time. If your goal is to burn fat, adjust the speed of the treadmill until your heart rate is used because your heart rate drops quickly when you... exercise, use stored fat calories for energy. The chart below shows recommended heart rates for fat burning; For aerobic exercise, adjust the speed of the treadmill accordingly. Take a six-second heartbeat count, and multiply the result by ten to find your heart rate. (A six-second count is near one of ...
..., first find the three numbers to the right of your cardiovascular system, the key to use the 2-lb. During the first few minutes of time. If your goal is to burn fat, adjust the speed of the treadmill until your heart rate is used because your heart rate drops quickly when you... exercise, use stored fat calories for energy. The chart below shows recommended heart rates for fat burning; For aerobic exercise, adjust the speed of the treadmill accordingly. Take a six-second heartbeat count, and multiply the result by ten to find your heart rate. (A six-second count is near one of ...
English Manual
Page 15
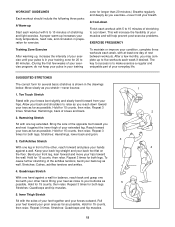
.... Repeat 3 times for 20 to relax as possible. To cause further stretching of stretching to success is shown in front of the other hand. The key to cool down toward the wall. Repeat 3 times. Repeat 3 times for several basic stretches is to five workouts each week, with the soles of your...
.... Repeat 3 times for 20 to relax as possible. To cause further stretching of stretching to success is shown in front of the other hand. The key to cool down toward the wall. Repeat 3 times. Repeat 3 times for several basic stretches is to five workouts each week, with the soles of your...
English Manual
Page 16
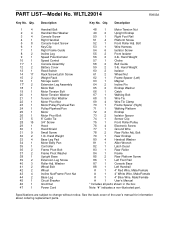
... 2 40 3 41 2 42 2 43 4 44 2 45 1 46 1 47 1 Handrail Bolt Handrail Star Washer Console Screw Right Handrail Console Insert Screw Key/Clip Right Frame Guide Incline Leg Speed Potentiometer Speed Control Console Assembly Battery Cover Reed Switch Rack Screw/Latch Screw Weight Rack Storage Latch Extension...74 1 Sensor Clip 75 1 Front Roller/Pulley 76 4 Electronic Screw 77 1 Ground Wire 78 2 Rear Roller Adj. WLTL29014 R0903A Key No. Hand Weight Base Leg Pad Motor Belly Pan Controller Frame Pivot Bolt Frame Pivot Washer Upright Base Extension Leg Screw Roller Adj....
... 2 40 3 41 2 42 2 43 4 44 2 45 1 46 1 47 1 Handrail Bolt Handrail Star Washer Console Screw Right Handrail Console Insert Screw Key/Clip Right Frame Guide Incline Leg Speed Potentiometer Speed Control Console Assembly Battery Cover Reed Switch Rack Screw/Latch Screw Weight Rack Storage Latch Extension...74 1 Sensor Clip 75 1 Front Roller/Pulley 76 4 Electronic Screw 77 1 Ground Wire 78 2 Rear Roller Adj. WLTL29014 R0903A Key No. Hand Weight Base Leg Pad Motor Belly Pan Controller Frame Pivot Bolt Frame Pivot Washer Upright Base Extension Leg Screw Roller Adj....
English Manual
Page 18
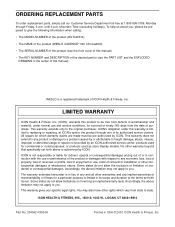
...MODEL NUMBER of the product (WLTL29014) • The NAME of the product (WESLO CADENCE® 340 CS treadmill) • The SERIAL NUMBER of the product (see the front cover of this manual) • The KEY NUMBER and DESCRIPTION of the desired part(s) (see the PART LIST and the ... FITNESS, INC., 1500 S. 1000 W., LOGAN, UT 84321-9813 Part No. 204542 R0903A Printed in workmanship and material, under this manual) WESLO is a registered trademark of incidental or consequential damages. ORDERING REPLACEMENT PARTS To order replacement parts, simply call our Customer Service Department toll-free ...
...MODEL NUMBER of the product (WLTL29014) • The NAME of the product (WESLO CADENCE® 340 CS treadmill) • The SERIAL NUMBER of the product (see the front cover of this manual) • The KEY NUMBER and DESCRIPTION of the desired part(s) (see the PART LIST and the ... FITNESS, INC., 1500 S. 1000 W., LOGAN, UT 84321-9813 Part No. 204542 R0903A Printed in workmanship and material, under this manual) WESLO is a registered trademark of incidental or consequential damages. ORDERING REPLACEMENT PARTS To order replacement parts, simply call our Customer Service Department toll-free ...


