
English Manual
Page 1
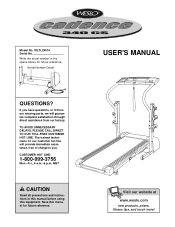
..., fitness tips, and much more! WLTL29014 Serial No. Write the serial number in this manual before using this manual for future reference. If you . The trained technicians on our customer hot line will provide immediate assistance, free of charge to you have questions, or if there are missing parts, we will guarantee complete satisfaction through direct assistance from our factory. ® Model...
..., fitness tips, and much more! WLTL29014 Serial No. Write the serial number in this manual before using this manual for future reference. If you . The trained technicians on our customer hot line will provide immediate assistance, free of charge to you have questions, or if there are missing parts, we will guarantee complete satisfaction through direct assistance from our factory. ® Model...
English Manual
Page 2
... the control system is the responsibility of the owner to use an extension cord. 11. When connecting the power cord (see your local WESLO dealer or call 1-800-8063651 and order part number 146148. 12. TABLE OF CONTENTS IMPORTANT PRECAUTIONS 2 BEFORE YOU BEGIN 4 ASSEMBLY 5 OPERATION AND ADJUSTMENT 7 HOW TO FOLD AND MOVE THE TREADMILL 10 MAINTENANCE AND TROUBLE-SHOOTING 12 CONDITIONING GUIDELINES 14 ORDERING REPLACEMENT PARTS Back Cover LIMITED WARRANTY Back Cover Note: A PART LIST...
... the control system is the responsibility of the owner to use an extension cord. 11. When connecting the power cord (see your local WESLO dealer or call 1-800-8063651 and order part number 146148. 12. TABLE OF CONTENTS IMPORTANT PRECAUTIONS 2 BEFORE YOU BEGIN 4 ASSEMBLY 5 OPERATION AND ADJUSTMENT 7 HOW TO FOLD AND MOVE THE TREADMILL 10 MAINTENANCE AND TROUBLE-SHOOTING 12 CONDITIONING GUIDELINES 14 ORDERING REPLACEMENT PARTS Back Cover LIMITED WARRANTY Back Cover Note: A PART LIST...

English Manual
Page 3
... tighten all instructions before performing the maintenance and adjustment procedures described in -home use , before cleaning the treadmill, and before using the treadmill. 16. This treadmill is not in small increments to do so by placing objects under the treadmill. 21. Do not attempt to maintain your treadmill. Never move the treadmill until it is fully closed. 22. Adjust the speed in use of actual size. 3 Never remove the motor hood...
... tighten all instructions before performing the maintenance and adjustment procedures described in -home use , before cleaning the treadmill, and before using the treadmill. 16. This treadmill is not in small increments to do so by placing objects under the treadmill. 21. Do not attempt to maintain your treadmill. Never move the treadmill until it is fully closed. 22. Adjust the speed in use of actual size. 3 Never remove the motor hood...
English Manual
Page 4
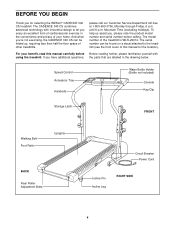
... parts that are labeled in the convenience and privacy of other treadmills. Speed Control Accessory Tray Handrails Water Bottle Holder (Bottle not included) Console Key/Clip Storage Latch FRONT Walking Belt Foot Rails Uprights BACK Rear Roller Adjustment Bolts Circuit Breaker Power Cord Incline Pin Incline Leg RIGHT SIDE 4 And when you're not exercising, the CADENCE 340 CS can be folded up, requiring less than half the floor space of your benefit, read this manual...
... parts that are labeled in the convenience and privacy of other treadmills. Speed Control Accessory Tray Handrails Water Bottle Holder (Bottle not included) Console Key/Clip Storage Latch FRONT Walking Belt Foot Rails Uprights BACK Rear Roller Adjustment Bolts Circuit Breaker Power Cord Incline Pin Incline Leg RIGHT SIDE 4 And when you're not exercising, the CADENCE 340 CS can be folded up, requiring less than half the floor space of your benefit, read this manual...
English Manual
Page 5
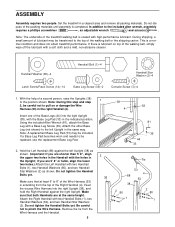
... packing materials until assembly is a normal condition and does not affect treadmill performance. Handrail Washer (80)-4 Handrail Bolt (1)-4 Handrail Star Washer (2)-4 Latch Screw/Rack Screw (14)-14 Base Leg Screw (39)-2 Console Screw (3)-4 1. With the help of the walking belt or the shipping carton. Note: A replacement Base Leg Pad (33) may be careful not to 8" of the walking belt, simply wipe off the lubricant with the Base...
... packing materials until assembly is a normal condition and does not affect treadmill performance. Handrail Washer (80)-4 Handrail Bolt (1)-4 Handrail Star Washer (2)-4 Latch Screw/Rack Screw (14)-14 Base Leg Screw (39)-2 Console Screw (3)-4 1. With the help of the walking belt or the shipping carton. Note: A replacement Base Leg Pad (33) may be careful not to 8" of the walking belt, simply wipe off the lubricant with the Base...
English Manual
Page 6
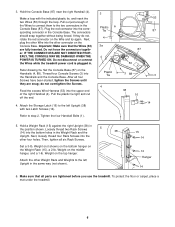
... sure that the Wires (53) are tightened before you use the treadmill. Do not disconnect or connect the Wires while the treadmill power cord is plugged in the position shown. Refer drawing 3a. Thread four Console Screws (3) into the corresponding connector in the Weight Rack and the 5 38 Upright. Then, tighten all four Screws have been started, tighten the Screws until they do not overtighten the Screws. Weight on the top...
... sure that the Wires (53) are tightened before you use the treadmill. Do not disconnect or connect the Wires while the treadmill power cord is plugged in the position shown. Refer drawing 3a. Thread four Console Screws (3) into the corresponding connector in the Weight Rack and the 5 38 Upright. Then, tighten all four Screws have been started, tighten the Screws until they do not overtighten the Screws. Weight on the top...
English Manual
Page 7
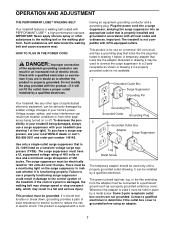
... order part number 146148. Some 2-pole receptacle outlet box covers are in damage to the walking belt or the walking platform. IMPORTANT: Never apply silicone spray or other appliances being damaged, always use a surge suppressor with a cord Lug Metal Screw The temporary adapter should malfunction or break down, grounding provides a path of electric shock. Plug the power cord into a surge suppressor, and plug the...
... order part number 146148. Some 2-pole receptacle outlet box covers are in damage to the walking belt or the walking platform. IMPORTANT: Never apply silicone spray or other appliances being damaged, always use a surge suppressor with a cord Lug Metal Screw The temporary adapter should malfunction or break down, grounding provides a path of electric shock. Plug the power cord into a surge suppressor, and plug the...
English Manual
Page 8
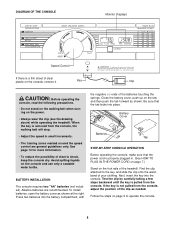
... use only a sealable water bottle. To install batteries, open the battery cover as needed. Find the clip attached to operate the console. 8 Follow the steps on the power. • Always wear the clip (see the drawing above) while operating the treadmill. Alkaline batteries are general guidelines only. Key Clip CAUTION: Before operating the console, read the following precautions. • Do not stand on the walking belt when turning...
... use only a sealable water bottle. To install batteries, open the battery cover as needed. Find the clip attached to operate the console. 8 Follow the steps on the power. • Always wear the clip (see the drawing above) while operating the treadmill. Alkaline batteries are general guidelines only. Key Clip CAUTION: Before operating the console, read the following precautions. • Do not stand on the walking belt when turning...
English Manual
Page 9
... installed batteries, the displays will turn on when the ON/RESET button is pressed or when the walking belt is started. 1 Insert the key fully into the power switch. Before changing the incline, remove the key and unplug the power cord. Adjust the incline leg to the RESET position. The modes are four incline levels. The displays will already be restarted. Step onto the foot rails, turn the speed control until the walking belt begins to the RESET position before the walking belt can be changed...
... installed batteries, the displays will turn on when the ON/RESET button is pressed or when the walking belt is started. 1 Insert the key fully into the power switch. Before changing the incline, remove the key and unplug the power cord. Adjust the incline leg to the RESET position. The modes are four incline levels. The displays will already be restarted. Step onto the foot rails, turn the speed control until the walking belt begins to the RESET position before the walking belt can be changed...
English Manual
Page 10
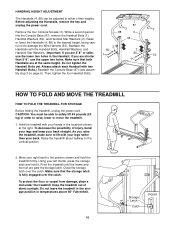
... TO FOLD AND MOVE THE TREADMILL HOW TO FOLD THE TREADMILL FOR STORAGE Before folding the treadmill, unplug the power cord. As you are past the storage latch. Do not leave the treadmill in the storage position in order to raise, lower or move the treadmill. 1. ful not to lift with two Handrail Bolts.) Reattach the Console Base (87) (see assem- CAUTION: You must be adjusted to either of direct sunlight. Using...
... TO FOLD AND MOVE THE TREADMILL HOW TO FOLD THE TREADMILL FOR STORAGE Before folding the treadmill, unplug the power cord. As you are past the storage latch. Do not leave the treadmill in the storage position in order to raise, lower or move the treadmill. 1. ful not to lift with two Handrail Bolts.) Reattach the Console Base (87) (see assem- CAUTION: You must be adjusted to either of direct sunlight. Using...
English Manual
Page 11
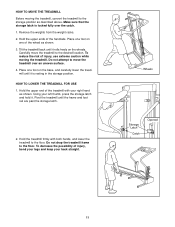
... over an uneven surface. 4. Wheels Storage Latch Catch Opened 11 Remove the weights from the weight racks. 2. Do not attempt to the floor. Hold the upper end of injury, bend your legs and keep your back straight. To decrease the possibility of the treadmill with both hands, and lower the treadmill to move the treadmill to the storage position as shown. To reduce...
... over an uneven surface. 4. Wheels Storage Latch Catch Opened 11 Remove the weights from the weight racks. 2. Do not attempt to the floor. Hold the upper end of injury, bend your legs and keep your back straight. To decrease the possibility of the treadmill with both hands, and lower the treadmill to move the treadmill to the storage position as shown. To reduce...
English Manual
Page 12
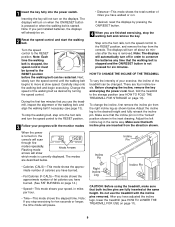
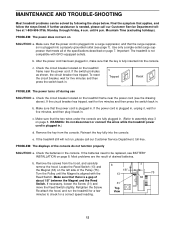
... displays of the Pulley (75). Make sure that the power cord is aligned with GFCI-equipped outlets. Remove the key from the hood, and carefully remove the hood. MAINTENANCE AND TROUBLE-SHOOTING Most treadmill problems can be replaced, see BATTERY INSTALLATION on page 8. If the switch protrudes as shown, the circuit breaker has tripped. WARNING: Do not disconnect or connect the wires while the treadmill power cord is plugged in .) d. PROBLEM: The power does not turn...
... displays of the Pulley (75). Make sure that the power cord is aligned with GFCI-equipped outlets. Remove the key from the hood, and carefully remove the hood. MAINTENANCE AND TROUBLE-SHOOTING Most treadmill problems can be replaced, see BATTERY INSTALLATION on page 8. If the switch protrudes as shown, the circuit breaker has tripped. WARNING: Do not disconnect or connect the wires while the treadmill power cord is plugged in .) d. PROBLEM: The power does not turn...
English Manual
Page 13
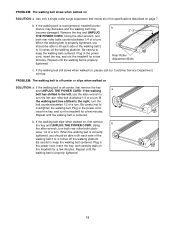
... the specifications described on SOLUTION: a. If the walking belt slips when walked on SOLUTION: a. Plug in the power cord, insert the key, and carefully walk on , please call our Customer Service Department, toll-free. PROBLEM: The walking belt is centered. b 2"-3" Rear Roller Adjustment Bolts c. If the walking belt is correctly tightened, you should be able to keep the walking belt centered. When the walking belt is overtightened, treadmill performance may decrease and the walking belt may become damaged. Use only...
... the specifications described on SOLUTION: a. If the walking belt slips when walked on SOLUTION: a. Plug in the power cord, insert the key, and carefully walk on , please call our Customer Service Department, toll-free. PROBLEM: The walking belt is centered. b 2"-3" Rear Roller Adjustment Bolts c. If the walking belt is correctly tightened, you should be able to keep the walking belt centered. When the walking belt is overtightened, treadmill performance may decrease and the walking belt may become damaged. Use only...
English Manual
Page 14
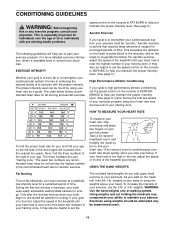
... when you walk on your training zone. WARNING: Use the hand weights only at your sides or press the weights above your physician. To measure your heart rate, stop exercising.) If your training zone. It may compromise your balance. Exercises using weights should be found by experienced users. 14 speed control on the console to PERFORMANCE to burn fat, adjust the speed of the treadmill until your heart rate is used because your body uses easily...
... when you walk on your training zone. WARNING: Use the hand weights only at your sides or press the weights above your physician. To measure your heart rate, stop exercising.) If your training zone. It may compromise your balance. Exercises using weights should be found by experienced users. 14 speed control on the console to PERFORMANCE to burn fat, adjust the speed of the treadmill until your heart rate is used because your body uses easily...
English Manual
Page 15
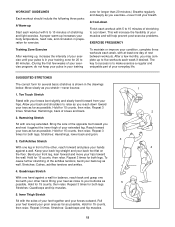
... you may complete up Start each workout with 5 to 10 minutes of the achilles tendons, bend your toes as far as you exercise-never hold your extended leg. After a few weeks of rest between workouts. Toe Touch Stretch Stand with at least one day of your exercise program, do not keep your pulse in your training zone for balance...
... you may complete up Start each workout with 5 to 10 minutes of the achilles tendons, bend your toes as far as you exercise-never hold your extended leg. After a few weeks of rest between workouts. Toe Touch Stretch Stand with at least one day of your exercise program, do not keep your pulse in your training zone for balance...
English Manual
Page 16
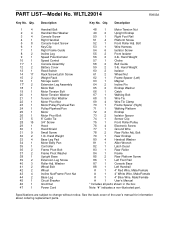
... 4 34 1 35 1 36 2 37 2 38 1 39 2 40 3 41 2 42 2 43 4 44 2 45 1 46 1 47 1 Handrail Bolt Handrail Star Washer Console Screw Right Handrail Console Insert Screw Key/Clip Right Frame Guide Incline Leg Speed Potentiometer Speed Control Console Assembly Battery Cover Reed Switch Rack Screw/Latch Screw Weight Rack Storage Latch Extension Leg Assembly Motor Belt Motor Tension Bolt Motor Tension Washer Tension Star Washer Motor Pivot Nut Motor/Pulley/Flywheel/Fan Pulley/Flywheel/Fan Motor Motor Pivot Bolt 8" Cable Tie 3/4" Screw Hood Hood Shield Small Screw 1-lb. Qty.
... 4 34 1 35 1 36 2 37 2 38 1 39 2 40 3 41 2 42 2 43 4 44 2 45 1 46 1 47 1 Handrail Bolt Handrail Star Washer Console Screw Right Handrail Console Insert Screw Key/Clip Right Frame Guide Incline Leg Speed Potentiometer Speed Control Console Assembly Battery Cover Reed Switch Rack Screw/Latch Screw Weight Rack Storage Latch Extension Leg Assembly Motor Belt Motor Tension Bolt Motor Tension Washer Tension Star Washer Motor Pivot Nut Motor/Pulley/Flywheel/Fan Pulley/Flywheel/Fan Motor Motor Pivot Bolt 8" Cable Tie 3/4" Screw Hood Hood Shield Small Screw 1-lb. Qty.
English Manual
Page 17
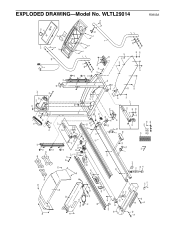
EXPLODED DRAWING-Model No. WLTL29014 22 18 28 56 15 20 21 24 23* 25 11* 10 28 14 19 32 49 6 9 59 29 30 14 28 14 36 37 16 14 17* 44 26 49 15 88 3 12 87 28 28 47 46 45 28 86 66 60 28 54 51 73 55 54 41 42 51 43 62 63 13 61 31 74 75 67 71 33 28 51 50 40 52 48 43 39 70 31 53 14 14 14 1 2 80 37 36 76 5 5 5 53 3 14 64 85 79 84 83 51 85 55 54 76 73 3 58 57 38 39 36 28 31 4 35 31 40 78 8 65 72 82 64 8 54 7 23 60 61 42 44 31 34 17* 33 31 41 28 31 33 2 80 65 40 72 78 31 77 81 27 68 28 31 28 1 R0903A 69
EXPLODED DRAWING-Model No. WLTL29014 22 18 28 56 15 20 21 24 23* 25 11* 10 28 14 19 32 49 6 9 59 29 30 14 28 14 36 37 16 14 17* 44 26 49 15 88 3 12 87 28 28 47 46 45 28 86 66 60 28 54 51 73 55 54 41 42 51 43 62 63 13 61 31 74 75 67 71 33 28 51 50 40 52 48 43 39 70 31 53 14 14 14 1 2 80 37 36 76 5 5 5 53 3 14 64 85 79 84 83 51 85 55 54 76 73 3 58 57 38 39 36 28 31 4 35 31 40 78 8 65 72 82 64 8 54 7 23 60 61 42 44 31 34 17* 33 31 41 28 31 33 2 80 65 40 72 78 31 77 81 27 68 28 31 28 1 R0903A 69
English Manual
Page 18
... information when calling: • The MODEL NUMBER of the product (WLTL29014) • The NAME of the product (WESLO CADENCE® 340 CS treadmill) • The SERIAL NUMBER of the product (see the front cover of ICON Health & Fitness, Inc. ICON HEALTH & FITNESS, INC., 1500 S. 1000 W., LOGAN, UT 84321-9813 Part No. 204542 R0903A Printed in its authorized service centers. ICON's obligation under normal use , costs of removal or installation or other warranties...
... information when calling: • The MODEL NUMBER of the product (WLTL29014) • The NAME of the product (WESLO CADENCE® 340 CS treadmill) • The SERIAL NUMBER of the product (see the front cover of ICON Health & Fitness, Inc. ICON HEALTH & FITNESS, INC., 1500 S. 1000 W., LOGAN, UT 84321-9813 Part No. 204542 R0903A Printed in its authorized service centers. ICON's obligation under normal use , costs of removal or installation or other warranties...


