

English Manual
Page 3
...damage sustained by or through the use only. Apply the decal in speed. 18. Always hold the handrails while using . The treadmill is especially important for personal injury or prop- Inspect and tighten all instructions before performing the maintenance and adjustment procedures described in -...in small increments to order a free replacement decal (see ORDERING REPLACEMENT PARTS on your balance. Always remove the key and unplug the power cord when the treadmill is missing or illegible, please call our Customer Service Department, toll-free, to avoid sudden jumps in the location...
...damage sustained by or through the use only. Apply the decal in speed. 18. Always hold the handrails while using . The treadmill is especially important for personal injury or prop- Inspect and tighten all instructions before performing the maintenance and adjustment procedures described in -...in small increments to order a free replacement decal (see ORDERING REPLACEMENT PARTS on your balance. Always remove the key and unplug the power cord when the treadmill is missing or illegible, please call our Customer Service Department, toll-free, to avoid sudden jumps in the location...
English Manual
Page 4
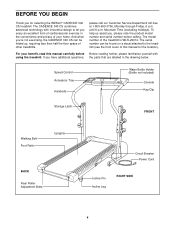
...be folded up, requiring less than half the floor space of your benefit, read this manual for selecting the WESLO® CADENCE 340 CS treadmill. To help us assist you enjoy an excellent form of cardiovascular exercise in the drawing below. Speed Control Accessory... (Bottle not included) Console Key/Clip Storage Latch FRONT Walking Belt Foot Rails Uprights BACK Rear Roller Adjustment Bolts Circuit Breaker Power Cord Incline Pin Incline Leg RIGHT SIDE 4 The CADENCE 340 CS combines advanced technology with using the treadmill. Mountain Time (excluding holidays)....
...be folded up, requiring less than half the floor space of your benefit, read this manual for selecting the WESLO® CADENCE 340 CS treadmill. To help us assist you enjoy an excellent form of cardiovascular exercise in the drawing below. Speed Control Accessory... (Bottle not included) Console Key/Clip Storage Latch FRONT Walking Belt Foot Rails Uprights BACK Rear Roller Adjustment Bolts Circuit Breaker Power Cord Incline Pin Incline Leg RIGHT SIDE 4 The CADENCE 340 CS combines advanced technology with using the treadmill. Mountain Time (excluding holidays)....
English Manual
Page 8
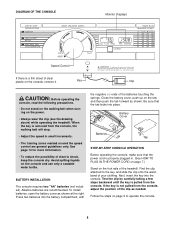
...attached to operate the console. 8 Follow the steps on the power. • Always wear the clip (see the drawing above) while operating the treadmill. DIAGRAM OF THE CONSOLE Monitor Displays Speed Control If there is removed from the console, the walking belt will stop. • Adjust the speed ...in . (See HOW TO PLUG IN THE POWER CORD on page 7.) Stand on the foot rails of the treadmill. When the key is a thin sheet of your clothing. Key Clip CAUTION: Before operating the console, read the following precautions. • Do not stand on the walking belt when turning ...
...attached to operate the console. 8 Follow the steps on the power. • Always wear the clip (see the drawing above) while operating the treadmill. DIAGRAM OF THE CONSOLE Monitor Displays Speed Control If there is removed from the console, the walking belt will stop. • Adjust the speed ...in . (See HOW TO PLUG IN THE POWER CORD on page 7.) Stand on the foot rails of the treadmill. When the key is a thin sheet of your clothing. Key Clip CAUTION: Before operating the console, read the following precautions. • Do not stand on the walking belt when turning ...
English Manual
Page 9
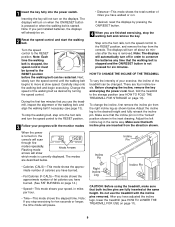
..., stop exercising for six minutes. Make sure that the incline pin is currently displayed. Do not use the treadmill, inspect the alignment of miles you stop the walking belt and remove the key. The displays will show which mode is in the "locked" position shown in the same way. Next, ...fold the treadmill to the RESET position before the walking belt can be on page 10). 1 Insert the key fully into the power switch. Next, slowly turn the speed control to move at the same height....
..., stop exercising for six minutes. Make sure that the incline pin is currently displayed. Do not use the treadmill, inspect the alignment of miles you stop the walking belt and remove the key. The displays will show which mode is in the "locked" position shown in the same way. Next, ...fold the treadmill to the RESET position before the walking belt can be on page 10). 1 Insert the key fully into the power switch. Next, slowly turn the speed control to move at the same height....
English Manual
Page 10
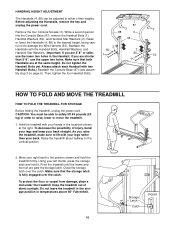
...treadmill...treadmill out of injury, bend your legs and keep your left thumb, press the storage latch and hold the treadmill... firmly. Reattach the 2 Handrails with two Handrail Bolts.) Reattach the Console Base (87) (see assem- HOW TO FOLD AND MOVE THE TREADMILL HOW TO FOLD THE TREADMILL FOR STORAGE Before folding the treadmill..., unplug the power cord. To decrease the possibility of direct sunlight. Pivot the treadmill...the treadmill,... leave the treadmill in the .... Hold the treadmill with your legs...
...treadmill...treadmill out of injury, bend your legs and keep your left thumb, press the storage latch and hold the treadmill... firmly. Reattach the 2 Handrails with two Handrail Bolts.) Reattach the Console Base (87) (see assem- HOW TO FOLD AND MOVE THE TREADMILL HOW TO FOLD THE TREADMILL FOR STORAGE Before folding the treadmill..., unplug the power cord. To decrease the possibility of direct sunlight. Pivot the treadmill...the treadmill,... leave the treadmill in the .... Hold the treadmill with your legs...
English Manual
Page 12
... the batteries in . b. Locate the Reed Switch (13) and the Magnet (63) on page 7. Retighten the Screw. Important: The treadmill is plugged in . (Refer to assembly step 3 on page 6. Reinsert the key fully into a surge suppressor, and that the power cord is fully inserted into a properly grounded outlet (see the drawing above...
... the batteries in . b. Locate the Reed Switch (13) and the Magnet (63) on page 7. Retighten the Screw. Important: The treadmill is plugged in . (Refer to assembly step 3 on page 6. Reinsert the key fully into a surge suppressor, and that the power cord is fully inserted into a properly grounded outlet (see the drawing above...
English Manual
Page 13
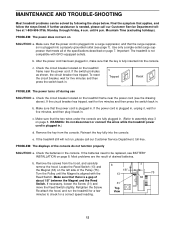
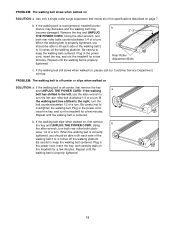
...walking platform. Be careful not to the right, turn the bolt counterclockwise 1/2 of a turn . Plug in the power cord, insert the key, and run the treadmill for a few minutes. Be careful to 4 inches off the walking platform. PROBLEM: The walking belt slows when walked on , first ...remove the key and UNPLUG THE POWER CORD. If the walking belt is overtightened, treadmill performance may decrease and the walking belt may become damaged. wise, 1/4 of the specifications described on , ...
...walking platform. Be careful not to the right, turn the bolt counterclockwise 1/2 of a turn . Plug in the power cord, insert the key, and run the treadmill for a few minutes. Be careful to 4 inches off the walking platform. PROBLEM: The walking belt slows when walked on , first ...remove the key and UNPLUG THE POWER CORD. If the walking belt is overtightened, treadmill performance may decrease and the walking belt may become damaged. wise, 1/4 of the specifications described on , ...
English Manual
Page 14
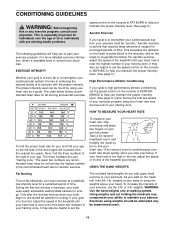
...-second heartbeat count, and multiply the result by ten to help you add upper body exercise to burn fat, adjust the speed of the treadmill until your heart rate is to strengthen your cardiovascular system, your exercise must exercise at a relatively low intensity level for you, first find ...weights above your heart rate as shown. EXERCISE INTENSITY Whether your goal is to burn fat or to strengthen your cardiovascular system, the key to achieving the desired results is activity that requires large amounts of oxygen for energy. Using weights and not holding the handrails may ...
...-second heartbeat count, and multiply the result by ten to help you add upper body exercise to burn fat, adjust the speed of the treadmill until your heart rate is to strengthen your cardiovascular system, your exercise must exercise at a relatively low intensity level for you, first find ...weights above your heart rate as shown. EXERCISE INTENSITY Whether your goal is to burn fat or to strengthen your cardiovascular system, the key to achieving the desired results is activity that requires large amounts of oxygen for energy. Using weights and not holding the handrails may ...
English Manual
Page 15
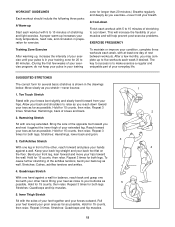
A Cool-down Finish each week if desired. The key to success is to make exercise a regular and enjoyable part of knees and back. 2. Move slowly as possible. Repeat 3 times. Stretches: Hamstrings, back of your ...
A Cool-down Finish each week if desired. The key to success is to make exercise a regular and enjoyable part of knees and back. 2. Move slowly as possible. Repeat 3 times. Stretches: Hamstrings, back of your ...

English Manual
Page 16
PART LIST-Model No. Hand Weight 57 1 Choke 58 2 Belt Guide 59 2 3-lb. WLTL29014 R0903A Key No. Description Key No. Description 1 4 2 4 3 4 4 1 5 8 6 1 7 1 8 2 9 1 10 1 11* 1 12 2 13 1 14 17 15 2 16 1 17* 2 18 1 19 1 20 1 21 1 22 1 23... 42 2 43 4 44 2 45 1 46 1 47 1 Handrail Bolt Handrail Star Washer Console Screw Right Handrail Console Insert Screw Key/Clip Right Frame Guide Incline Leg Speed Potentiometer Speed Control Console Assembly Battery Cover Reed Switch Rack Screw/Latch Screw Weight Rack Storage Latch Extension...
PART LIST-Model No. Hand Weight 57 1 Choke 58 2 Belt Guide 59 2 3-lb. WLTL29014 R0903A Key No. Description Key No. Description 1 4 2 4 3 4 4 1 5 8 6 1 7 1 8 2 9 1 10 1 11* 1 12 2 13 1 14 17 15 2 16 1 17* 2 18 1 19 1 20 1 21 1 22 1 23... 42 2 43 4 44 2 45 1 46 1 47 1 Handrail Bolt Handrail Star Washer Console Screw Right Handrail Console Insert Screw Key/Clip Right Frame Guide Incline Leg Speed Potentiometer Speed Control Console Assembly Battery Cover Reed Switch Rack Screw/Latch Screw Weight Rack Storage Latch Extension...

English Manual
Page 18
...8226; The MODEL NUMBER of the product (WLTL29014) • The NAME of the product (WESLO CADENCE® 340 CS treadmill) • The SERIAL NUMBER of the product (see the front cover of this manual) • The KEY NUMBER and DESCRIPTION of the desired part(s) (see the PART LIST and the EXPLODED DRAWING ...in workmanship and material, under this manual) WESLO is in connection with the use ...
...8226; The MODEL NUMBER of the product (WLTL29014) • The NAME of the product (WESLO CADENCE® 340 CS treadmill) • The SERIAL NUMBER of the product (see the front cover of this manual) • The KEY NUMBER and DESCRIPTION of the desired part(s) (see the PART LIST and the EXPLODED DRAWING ...in workmanship and material, under this manual) WESLO is in connection with the use ...


