
User Manual
Page 7
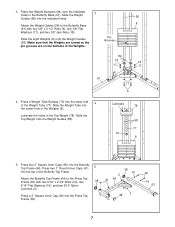
... the Butterfly Top Frame (64). Slide the Top Weight onto the Weight Guides (58). 17 6 Lubricate 78 58 77 76 8 5. Place two Weight Bumpers (84) over the indicated 3 holes in the Top Weight (78). Slide the eight Weights (8) onto the Weight Guides (58). Pin Grooves 84 18 17 58 8 18 17 61 ...Flat Washers (17), and two 3/8" Jam Nuts (18). Make sure that the Weights are turned so the pin grooves are on the bottoms of the Butterfly Top Frame. Slide the Weight Guides (58) into the top of the Weights. Lubricate the holes in the Butterfly Base (61). 3. Press two 1" Round ...
... the Butterfly Top Frame (64). Slide the Top Weight onto the Weight Guides (58). 17 6 Lubricate 78 58 77 76 8 5. Place two Weight Bumpers (84) over the indicated 3 holes in the Top Weight (78). Slide the eight Weights (8) onto the Weight Guides (58). Pin Grooves 84 18 17 58 8 18 17 61 ...Flat Washers (17), and two 3/8" Jam Nuts (18). Make sure that the Weights are turned so the pin grooves are on the bottoms of the Butterfly Top Frame. Slide the Weight Guides (58) into the top of the Weights. Lubricate the holes in the Butterfly Base (61). 3. Press two 1" Round ...

User Manual
Page 21
...you insert the Weight Pin as far as an exercise is performed, the effectiveness of the exercise will be in the correct starting position for the exercise to find the approximate amount of resistance at each exercise station may vary from the weight setting. Use the WEIGHT RESISTANCE CHART on...with a Cable Clip (57). For some exercises, the Chain (55) should be performed. CHANGING THE WEIGHT SETTING To change the setting of the weight stack, insert a Weight Pin (87) under the desired Weight (8). Adjust the length of the Chain between the Lat Bar and the Medium Cable so the Lat Bar...
...you insert the Weight Pin as far as an exercise is performed, the effectiveness of the exercise will be in the correct starting position for the exercise to find the approximate amount of resistance at each exercise station may vary from the weight setting. Use the WEIGHT RESISTANCE CHART on...with a Cable Clip (57). For some exercises, the Chain (55) should be performed. CHANGING THE WEIGHT SETTING To change the setting of the weight stack, insert a Weight Pin (87) under the desired Weight (8). Adjust the length of the Chain between the Lat Bar and the Medium Cable so the Lat Bar...
User Manual
Page 30
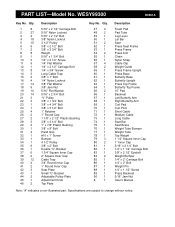
... 2 45 1 46 2 Description 5/16" x 2 1/2" Carriage Bolt 5/16" Nylon Locknut 5/16" x 2 1/2" Bolt 3/8" Nylon Locknut 3 1/2" Pulley 3/8" x 2 1/2" Bolt 3/8" x 3 3/4" Bolt Weight 5/16" x 1 3/4" Bolt 1/4" x 2 1/2" Screw 1/4" Flat Washer 1/4" x 2 1/2" Carriage Bolt 1/4" x 3/4" Screw Long Cable Trap 3/8" x 1" Bolt 1/4" Nylon Locknut 3/8" Flat Washer 3/8" Jam ...Seat Bar Seat Brace Weight Tube Bumper Weight Tube Top Weight 1 1/2" Square Inner Cap 1" Inner Cap 5/16" x 2 1/4" Bolt 1/4" x 1 1/2" Carriage Bolt 3/8" x 2 1/2" Eyebolt Weight Bumper 1/4" x 2" Carriage Bolt 1/4" x 2" Bolt Weight Pin 1/4" x 1 1/2"...
... 2 45 1 46 2 Description 5/16" x 2 1/2" Carriage Bolt 5/16" Nylon Locknut 5/16" x 2 1/2" Bolt 3/8" Nylon Locknut 3 1/2" Pulley 3/8" x 2 1/2" Bolt 3/8" x 3 3/4" Bolt Weight 5/16" x 1 3/4" Bolt 1/4" x 2 1/2" Screw 1/4" Flat Washer 1/4" x 2 1/2" Carriage Bolt 1/4" x 3/4" Screw Long Cable Trap 3/8" x 1" Bolt 1/4" Nylon Locknut 3/8" Flat Washer 3/8" Jam ...Seat Bar Seat Brace Weight Tube Bumper Weight Tube Top Weight 1 1/2" Square Inner Cap 1" Inner Cap 5/16" x 2 1/4" Bolt 1/4" x 1 1/2" Carriage Bolt 3/8" x 2 1/2" Eyebolt Weight Bumper 1/4" x 2" Carriage Bolt 1/4" x 2" Bolt Weight Pin 1/4" x 1 1/2"...


