

English Manual
Page 2
... at all of the pulleys 13. Make sure that the cables remain on a foot plate when performing an exercise that does not use the home gym system to a commercial, rental, or institutional setting. 8. NIPORTANT PRECAUTION WARNING: To reduce the risk of serious injury, read the following important .... WARNING: Before beginning this manual and in this or any time while exercising, stop immediately and make sure that all users of the home gym system are adequatety informed of all precautions 2 Read all parts often. If the cables bind while youuta e exercising, stop immediately and begin...
... at all of the pulleys 13. Make sure that the cables remain on a foot plate when performing an exercise that does not use the home gym system to a commercial, rental, or institutional setting. 8. NIPORTANT PRECAUTION WARNING: To reduce the risk of serious injury, read the following important .... WARNING: Before beginning this manual and in this or any time while exercising, stop immediately and make sure that all users of the home gym system are adequatety informed of all precautions 2 Read all parts often. If the cables bind while youuta e exercising, stop immediately and begin...

English Manual
Page 3
... goal is designed to achieve the specific results you , please note the product model number and serial number before using the WEIDER® PRO 9625 Home Gym System. If you for selecting the WEIDER® PRO 9625 Home Gym System. free HELPLINE at 1-800-736-6879, Monday through Saturday, 7 a.m. The serial number can be found on a decal attached to the...
... goal is designed to achieve the specific results you , please note the product model number and serial number before using the WEIDER® PRO 9625 Home Gym System. If you for selecting the WEIDER® PRO 9625 Home Gym System. free HELPLINE at 1-800-736-6879, Monday through Saturday, 7 a.m. The serial number can be found on a decal attached to the...
English Manual
Page 4
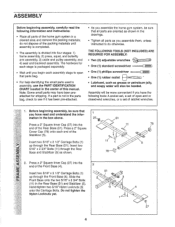
Press a 2" Square Cover Cap (78) onto each assembly stage to see if it has been pre-attached. • As you assemble the home gym system, be needed. Slide the Front Base onto the two 5/16" x 2 3/4" Bolts (11) in the Rear Base (51) and Stabilizer (5). Before beginning assembly, ... through the Front Base (4). Assembly will also be sure that all parts are oriented as shown in the drawings. • Tighten all parts of the home gym system in a cleared area and remove the packing materials; Hand-tighten two 5/16" Nylon Locknuts (3) onto the Carriage Bolts. If a part is divided...
Press a 2" Square Cover Cap (78) onto each assembly stage to see if it has been pre-attached. • As you assemble the home gym system, be needed. Slide the Front Base onto the two 5/16" x 2 3/4" Bolts (11) in the Rear Base (51) and Stabilizer (5). Before beginning assembly, ... through the Front Base (4). Assembly will also be sure that all parts are oriented as shown in the drawings. • Tighten all parts of the home gym system in a cleared area and remove the packing materials; Hand-tighten two 5/16" Nylon Locknuts (3) onto the Carriage Bolts. If a part is divided...
English Manual
Page 18
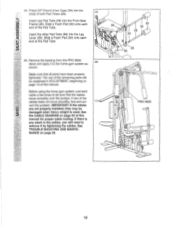
...that all parts have been properly tightened. Slide a Foam Pad (30) onto each end of this manual. Before using the home gym system, pull each cable a few times to the home gym system as 45 shown. If there is used. Make sure that the cables move smoothly, find and correct the problem. ...3/4" Round Inner Caps (34) into the Leg Lever (29). See TROUBLE-SHOOTING AND MAINTENANCE on page 22. 0 36 30 34 28 34 0 0 0 29 30 PRO 9625 VII c!) O) 6 ) 18 44. Insert the other Pad Tube (28) into the ends of both Pad Tubes (28). 44 Insert one of this manual for proper...
...that all parts have been properly tightened. Slide a Foam Pad (30) onto each end of this manual. Before using the home gym system, pull each cable a few times to the home gym system as 45 shown. If there is used. Make sure that the cables move smoothly, find and correct the problem. ...3/4" Round Inner Caps (34) into the Leg Lever (29). See TROUBLE-SHOOTING AND MAINTENANCE on page 22. 0 36 30 34 28 34 0 0 0 29 30 PRO 9625 VII c!) O) 6 ) 18 44. Insert the other Pad Tube (28) into the ends of both Pad Tubes (28). 44 Insert one of this manual for proper...

English Manual
Page 19
... of the weight stack, insert a Weight Pin (26) under the desired Weight (25). Refer to the exercise poster accompanying this manual to see how the home gym system should be attached between the Lat Bar and the Medium Cable so the Lat Bar is in the correct starting position for the exercise.... The Nylon Strap (39) can be attached in the correct starting position for each exercise. ADJUSTMENT The instructions below describe how each part of the home gym system can be changed from the weight setting. Be sure to insert the Weight Pin until the bent end of the Chain between the Lat...
... of the weight stack, insert a Weight Pin (26) under the desired Weight (25). Refer to the exercise poster accompanying this manual to see how the home gym system should be attached between the Lat Bar and the Medium Cable so the Lat Bar is in the correct starting position for the exercise.... The Nylon Strap (39) can be attached in the correct starting position for each exercise. ADJUSTMENT The instructions below describe how each part of the home gym system can be changed from the weight setting. Be sure to insert the Weight Pin until the bent end of the Chain between the Lat...

English Manual
Page 22
The home gym system can stretch slightly when it . TIGHTENING THE CABLES 1 Woven cable, the type of this you use solvents. If there... manual. 664" 86 22 Remove the cable and re-install it is first used on the back cover of cable used . Do not use the home gym system. Slack can be tightened. Remove the 3/8" Nylon Locknut (21) and the 3/8" x 2" Bolt (12) from the cables by moving the 3 1/2" Pulley... parts immediately. Insert the Weight Pin (26) under one of the Short Cable (58) (see ORDERING REPLACEMENT PARTS on the home gym system, can be replaced, see drawing 2).
The home gym system can stretch slightly when it . TIGHTENING THE CABLES 1 Woven cable, the type of this you use solvents. If there... manual. 664" 86 22 Remove the cable and re-install it is first used on the back cover of cable used . Do not use the home gym system. Slack can be tightened. Remove the 3/8" Nylon Locknut (21) and the 3/8" x 2" Bolt (12) from the cables by moving the 3 1/2" Pulley... parts immediately. Insert the Weight Pin (26) under one of the Short Cable (58) (see ORDERING REPLACEMENT PARTS on the home gym system, can be replaced, see drawing 2).

English Manual
Page 23
... are labeled. If the cables have been assembled correctly. Be sure that the three cables and the cable traps have not been correctly routed, the home gym system will not function properly and damage may occur. CABLE DIAGRAM The cable diagram below shows the proper routing of each cable.
... are labeled. If the cables have been assembled correctly. Be sure that the three cables and the cable traps have not been correctly routed, the home gym system will not function properly and damage may occur. CABLE DIAGRAM The cable diagram below shows the proper routing of each cable.

English Manual
Page 24
... to schedule repair service call the toll-free numbers listed at the center of charge. When requesting help assembling or operating the WEIDER® PRO 9625 • a part is used commercially or for immediate purchase or special order when you may also have other rights which vary...please be replaced, call the following information: • The MODEL NUMBER of the product (831.159361). • The NAME of the product (WEIDER® PRO 9625 Home Gym System). • The PART NUMBER of the PART (see the PART LIST and the EXPLODED DRAWING at the center of this manual). •...
... to schedule repair service call the toll-free numbers listed at the center of charge. When requesting help assembling or operating the WEIDER® PRO 9625 • a part is used commercially or for immediate purchase or special order when you may also have other rights which vary...please be replaced, call the following information: • The MODEL NUMBER of the product (831.159361). • The NAME of the product (WEIDER® PRO 9625 Home Gym System). • The PART NUMBER of the PART (see the PART LIST and the EXPLODED DRAWING at the center of this manual). •...


