
English Manual
Page 1
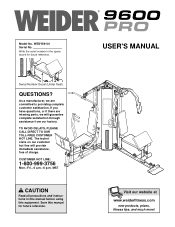
Write the serial number in this manual before using this manual for future reference. As a manufacturer, we are missing parts, we will provide immediate assistance, free of charge. If you have questions, or if there are committed to providing complete ...customer satisfaction. CUSTOMER HOT LINE: 1-800-999-3756 Mon.-Fri., 6 a.m.-6 p.m. Serial Number Decal (Under Seat) QUESTIONS? USER'S MANUAL Visit our website at ...
Write the serial number in this manual before using this manual for future reference. As a manufacturer, we are missing parts, we will provide immediate assistance, free of charge. If you have questions, or if there are committed to providing complete ...customer satisfaction. CUSTOMER HOT LINE: 1-800-999-3756 Mon.-Fri., 6 a.m.-6 p.m. Serial Number Decal (Under Seat) QUESTIONS? USER'S MANUAL Visit our website at ...

English Manual
Page 2
WEIDER is limited to replacing or repairing, at ICON's option, the ... or products used for a period of ninety (90) days from defects in workmanship and material, under this manual. All returns must be free from the date of this warranty is a registered trademark of incidental or consequential ... 5 ADJUSTMENTS 21 WEIGHT RESISTANCE CHART 23 TROUBLESHOOTING AND MAINTENANCE 24 CABLE DIAGRAMS 25 ORDERING REPLACEMENT PARTS Back Cover Note: A PART IDENTIFICATION CHART and a PART LIST/EXPLODED DRAWING are attached in the center of purchase. Some states do not allow limitations...
WEIDER is limited to replacing or repairing, at ICON's option, the ... or products used for a period of ninety (90) days from defects in workmanship and material, under this manual. All returns must be free from the date of this warranty is a registered trademark of incidental or consequential ... 5 ADJUSTMENTS 21 WEIGHT RESISTANCE CHART 23 TROUBLESHOOTING AND MAINTENANCE 24 CABLE DIAGRAMS 25 ORDERING REPLACEMENT PARTS Back Cover Note: A PART IDENTIFICATION CHART and a PART LIST/EXPLODED DRAWING are attached in the center of purchase. Some states do not allow limitations...
English Manual
Page 3
Read all instructions in this manual and in any exercise program, consult your physician. Keep ... bind while you are exercising, stop immediately and begin cooling down. 14. Always disconnect the lat bar from moving parts. 8. until 6 p.m. WARNING: Before beginning this product. 3 Make sure all instructions before using. Always wear athletic...the literature. 2. This is missing or illegible, please call our Customer Service Department toll-free at any worn parts immediately. 6. Use the weight system only on page 4. If the decal is especially important for personal injury...
Read all instructions in this manual and in any exercise program, consult your physician. Keep ... bind while you are exercising, stop immediately and begin cooling down. 14. Always disconnect the lat bar from moving parts. 8. until 6 p.m. WARNING: Before beginning this product. 3 Make sure all instructions before using. Always wear athletic...the literature. 2. This is missing or illegible, please call our Customer Service Department toll-free at any worn parts immediately. 6. Use the weight system only on page 4. If the decal is especially important for personal injury...
English Manual
Page 4
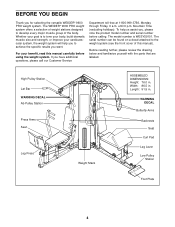
The WEIDER® 9600 PRO weight system offers a selection of weight stations designed to tone your body, build dramatic muscle size and strength, or improve your benefit, read this manual). High Pulley Station Lat Bar WARNING DECAL Ab Pulley Station Press Arms Seat Leg Press Weight Stack ASSEMBLED ... yourself with the parts that are labeled. WARNING DECAL Butterfly Arms Backrests Seat Curl Pad Leg Lever Low Pulley Station Foot Plate 4 For your cardiovascular system, the weight system will help us assist you for selecting the versatile WEIDER® 9600 PRO weight system. The...
The WEIDER® 9600 PRO weight system offers a selection of weight stations designed to tone your body, build dramatic muscle size and strength, or improve your benefit, read this manual). High Pulley Station Lat Bar WARNING DECAL Ab Pulley Station Press Arms Seat Leg Press Weight Stack ASSEMBLED ... yourself with the parts that are labeled. WARNING DECAL Butterfly Arms Backrests Seat Curl Pad Leg Lever Low Pulley Station Foot Plate 4 For your cardiovascular system, the weight system will help us assist you for selecting the versatile WEIDER® 9600 PRO weight system. The...
English Manual
Page 5
... system as shown in individual bags. The parts needed for each stage are oriented exactly as you identify the small parts used . Do not dispose of the weight system. Note: Assembly will go smoothly. Place the chart on this manual. This brief introduction will be more time ...: Wait until you begin by anyone. How to the weights. Mountain Time. Cable Assembly-During this manual is completed. Set Aside Enough Time Due to ensure that all parts of its weight and size, the weight system should be assembled successfully by assembling the base and the...
... system as shown in individual bags. The parts needed for each stage are oriented exactly as you identify the small parts used . Do not dispose of the weight system. Note: Assembly will go smoothly. Place the chart on this manual. This brief introduction will be more time ...: Wait until you begin by anyone. How to the weights. Mountain Time. Cable Assembly-During this manual is completed. Set Aside Enough Time Due to ensure that all parts of its weight and size, the weight system should be assembled successfully by assembling the base and the...
English Manual
Page 20
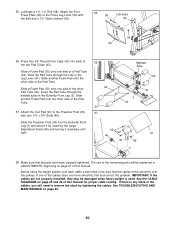
Slide another Foam Pad onto the other side of this manual for proper cable routing. Attach the Curl Pad (91) to be explained in ADJUSTMENTS, beginning on page 25 and 26 of the remaining parts will need to the Press Leg Lever (90) with four 1/4" x 3/4" Bolts (49). Before using the weight ... the Butterfly Front Leg (3). Slide the Pad Tube through the welded tube on page 24. 20 Lubricate a 1/2" x 4" Bolt (68). The use of this manual. If one side of the cables does not move smoothly over the pulleys. 55. Attach the Foot Press Plate (29) to remove the slack by...
Slide another Foam Pad onto the other side of this manual for proper cable routing. Attach the Curl Pad (91) to be explained in ADJUSTMENTS, beginning on page 25 and 26 of the remaining parts will need to the Press Leg Lever (90) with four 1/4" x 3/4" Bolts (49). Before using the weight ... the Butterfly Front Leg (3). Slide the Pad Tube through the welded tube on page 24. 20 Lubricate a 1/2" x 4" Bolt (68). The use of this manual. If one side of the cables does not move smoothly over the pulleys. 55. Attach the Foot Press Plate (29) to remove the slack by...
English Manual
Page 21
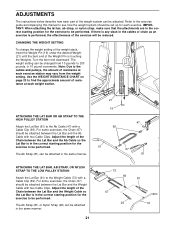
..., the Chain (67) should be attached between the Lat Bar and the Ab Cable with a Cable Clip (69). Refer to the exercise guide accompanying this manual to be performed. CHANGING THE WEIGHT SETTING To change the weight setting of the weight stack, insert the Weight Pin (19) under the desired Weight... touching the Weights. The weight setting can be adjusted. For some exercises, the Chain (67) should be reduced. ADJUSTMENTS The instructions below describe how each part of the weight system can be changed from the weight setting.
..., the Chain (67) should be attached between the Lat Bar and the Ab Cable with a Cable Clip (69). Refer to the exercise guide accompanying this manual to be performed. CHANGING THE WEIGHT SETTING To change the weight setting of the weight stack, insert the Weight Pin (19) under the desired Weight... touching the Weights. The weight setting can be adjusted. For some exercises, the Chain (67) should be reduced. ADJUSTMENTS The instructions below describe how each part of the weight system can be changed from the weight setting.
English Manual
Page 24
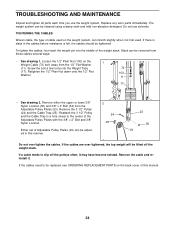
...system, can be removed from these cables several ways: • See drawing 1. If the cables need to slip off the weight stack. Replace any worn parts immediately. TIGHTENING THE CABLES Woven cable, the type of the weight stack. Loosen the 1/2" Plain Nut (100) on the 1 Weight Cable (72) bolt...). Screw the bolt a few turns into the middle of cable used . If the cables are over tighten the cables. If there is slack in this manual. 24 Retighten the 1/2" Plain Nut down onto the 1/2" Flat 100 Washer. 11 17 • See drawing 2. Either set of Adjustable Pulley Plates (23...
...system, can be removed from these cables several ways: • See drawing 1. If the cables need to slip off the weight stack. Replace any worn parts immediately. TIGHTENING THE CABLES Woven cable, the type of the weight stack. Loosen the 1/2" Plain Nut (100) on the 1 Weight Cable (72) bolt...). Screw the bolt a few turns into the middle of cable used . If the cables are over tighten the cables. If there is slack in this manual. 24 Retighten the 1/2" Plain Nut down onto the 1/2" Flat 100 Washer. 11 17 • See drawing 2. Either set of Adjustable Pulley Plates (23...
English Manual
Page 28
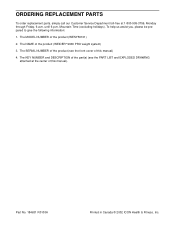
The KEY NUMBER and DESCRIPTION of the part(s) (see the front cover of this manual). The MODEL NUMBER of the product (WEIDER® 9600 PRO weight system) 3. The NAME of the product (WESY59101) 2. The SERIAL NUMBER of the product (see the PART LIST and EXPLODED DRAWING attached at 1-800-999-3756, Monday through Friday, 6 a.m. until 6 p.m. Mountain Time...
The KEY NUMBER and DESCRIPTION of the part(s) (see the front cover of this manual). The MODEL NUMBER of the product (WEIDER® 9600 PRO weight system) 3. The NAME of the product (WESY59101) 2. The SERIAL NUMBER of the product (see the PART LIST and EXPLODED DRAWING attached at 1-800-999-3756, Monday through Friday, 6 a.m. until 6 p.m. Mountain Time...
English Manual
Page 29
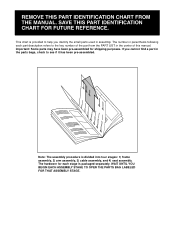
... to help you cannot find a part in the parts bags, check to the key number of the part from the PART LIST in the center of this manual. WAIT UNTIL YOU BEGIN EACH ASSEMBLY STAGE TO OPEN THE PARTS BAG LABELED FOR THAT ASSEMBLY STAGE. If you identify the small parts used in parenthesis following each stage...
... to help you cannot find a part in the parts bags, check to the key number of the part from the PART LIST in the center of this manual. WAIT UNTIL YOU BEGIN EACH ASSEMBLY STAGE TO OPEN THE PARTS BAG LABELED FOR THAT ASSEMBLY STAGE. If you identify the small parts used in parenthesis following each stage...
English Manual
Page 33
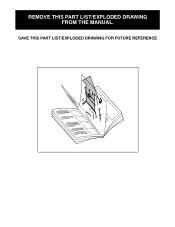
SAVE THIS PART LIST/EXPLODED DRAWING FOR FUTURE REFERENCE 81 REMOVE THIS PART LIST/EXPLODED DRAWING FROM THE MANUAL.
SAVE THIS PART LIST/EXPLODED DRAWING FOR FUTURE REFERENCE 81 REMOVE THIS PART LIST/EXPLODED DRAWING FROM THE MANUAL.
English Manual
Page 34
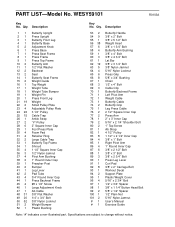
Qty. Qty. Specifications are subject to change without notice. WESY59101 R0103A Key No. PART LIST-Model No. Description Key No. Description 11 21 31 41 52 61 71 81 91 10 2 11 1 12 2 13 2 14 1 15 2 16 1 17 1 18 1 ... Lever Curl Pad 3/8" x 2" Carriage Bolt Workout Decal Support Plate Plastic Weight Cover 5/16" x 2 3/4" Bolt 1/2" x 3/4" Spacer 3/8" x 1 1/4" Button Head Bolt 5/8" x 1/2" Spacer 1/2" Plain Nut 5/16" Nylon Jamnut User's Manual Exercise Guide Note: "#" indicates a non-illustrated part.
Qty. Qty. Specifications are subject to change without notice. WESY59101 R0103A Key No. PART LIST-Model No. Description Key No. Description 11 21 31 41 52 61 71 81 91 10 2 11 1 12 2 13 2 14 1 15 2 16 1 17 1 18 1 ... Lever Curl Pad 3/8" x 2" Carriage Bolt Workout Decal Support Plate Plastic Weight Cover 5/16" x 2 3/4" Bolt 1/2" x 3/4" Spacer 3/8" x 1 1/4" Button Head Bolt 5/8" x 1/2" Spacer 1/2" Plain Nut 5/16" Nylon Jamnut User's Manual Exercise Guide Note: "#" indicates a non-illustrated part.


