
English Manual
Page 2
TABLE OF CONTENTS IMPORTANT PRECAUTIONS 3 BEFORE YOU BEGIN 4 PART IDENTIFICATION CHART 5 ASSEMBLY 7 ADJUSTMENTS 28 WEIGHT RESISTANCE CHART 31 CABLE DIAGRAM 32 MAINTENANCE 34 EXERCISE GUIDELINES 35 PART LIST 39 EXPLODED DRAWING 41 ORDERING REPLACEMENT PARTS Back Cover 90 DAY FULL WARRANTY Back Cover 2
TABLE OF CONTENTS IMPORTANT PRECAUTIONS 3 BEFORE YOU BEGIN 4 PART IDENTIFICATION CHART 5 ASSEMBLY 7 ADJUSTMENTS 28 WEIGHT RESISTANCE CHART 31 CABLE DIAGRAM 32 MAINTENANCE 34 EXERCISE GUIDELINES 35 PART LIST 39 EXPLODED DRAWING 41 ORDERING REPLACEMENT PARTS Back Cover 90 DAY FULL WARRANTY Back Cover 2
English Manual
Page 7
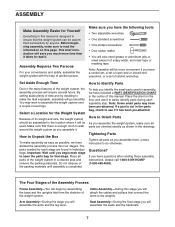
...used in assembly, we have been pre-attached. Note: Assembly will save you much more convenient if you have included a PART IDENTIFICATION CHART in the center of this manual. How to easily identify parts during each assembly step. The parts needed for each stage to read it.... By setting aside plenty of time and by anyone. To help of another person. Select a Location for the Weight System Because of its weight and size, the weight system should be assembled in the location where it will go smoothly. ASSEMBLY Make Assembly Easier for Yourself Everything in ...
...used in assembly, we have been pre-attached. Note: Assembly will save you much more convenient if you have included a PART IDENTIFICATION CHART in the center of this manual. How to easily identify parts during each assembly step. The parts needed for each stage to read it.... By setting aside plenty of time and by anyone. To help of another person. Select a Location for the Weight System Because of its weight and size, the weight system should be assembled in the location where it will go smoothly. ASSEMBLY Make Assembly Easier for Yourself Everything in ...
English Manual
Page 31
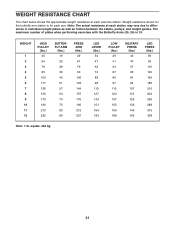
WEIGHT 1 2 3 4 5 6 7 8 9 10 11 12 HIGH PULLEY (lbs.) 45 64 76 95 103 117 136 150 173 190 210 222 BUTTERFLY ARM (lbs.) 19 22 28 36 ... plates when performing exercises with the Butterfly Arms (25, 26) is for the butterfly arm station is 10. Weight resistance shown for each arm. WEIGHT RESISTANCE CHART The chart below shows the approximate weight resistance at each station may vary due to differences in individual weight plates as well as friction between the cables, pulleys, and...
WEIGHT 1 2 3 4 5 6 7 8 9 10 11 12 HIGH PULLEY (lbs.) 45 64 76 95 103 117 136 150 173 190 210 222 BUTTERFLY ARM (lbs.) 19 22 28 36 ... plates when performing exercises with the Butterfly Arms (25, 26) is for the butterfly arm station is 10. Weight resistance shown for each arm. WEIGHT RESISTANCE CHART The chart below shows the approximate weight resistance at each station may vary due to differences in individual weight plates as well as friction between the cables, pulleys, and...

English Manual
Page 35
...are important factors in each set " is an individual matter. This requires moving only the appropriate parts of the muscles. See the muscle chart on Tuesday and Thursday. • Rest from session to session. Your muscles will leave you progressively increase the intensity of your breath....WORKING OUT Each workout should progress at least one minute after each set . Exercising in two ways: • by changing the amount of weight used • by pushing them close to their capacity. Never hold your exercise. You must gauge your exercise program. It is important ...
...are important factors in each set " is an individual matter. This requires moving only the appropriate parts of the muscles. See the muscle chart on Tuesday and Thursday. • Rest from session to session. Your muscles will leave you progressively increase the intensity of your breath....WORKING OUT Each workout should progress at least one minute after each set . Exercising in two ways: • by changing the amount of weight used • by pushing them close to their capacity. Never hold your exercise. You must gauge your exercise program. It is important ...
English Manual
Page 36
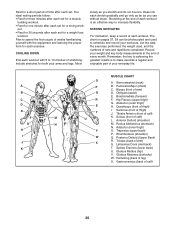
... (upper back) P. Latissimus Dorsi (mid back) T. Hamstring (back of calf) L. Gastrocnemius (back of thigh) I J K L M N O P Q R S T U V W X MUSCLE CHART A. Ease into each workout. STAYING MOTIVATED For motivation, keep a record of each stretch gradually and go only as far as you can be photocopied and... Spinae Erectors (lower back) U. List the date, the exercises performed, the weight used to schedule and record your weight and key body measurements at the end of each set for a weight loss workout. Sternomastoid (neck) B. Rectus Abdominus (stomach) N. Triceps (back ...
... (upper back) P. Latissimus Dorsi (mid back) T. Hamstring (back of calf) L. Gastrocnemius (back of thigh) I J K L M N O P Q R S T U V W X MUSCLE CHART A. Ease into each workout. STAYING MOTIVATED For motivation, keep a record of each stretch gradually and go only as far as you can be photocopied and... Spinae Erectors (lower back) U. List the date, the exercises performed, the weight used to schedule and record your weight and key body measurements at the end of each set for a weight loss workout. Sternomastoid (neck) B. Rectus Abdominus (stomach) N. Triceps (back ...


