
English Manual
Page 1
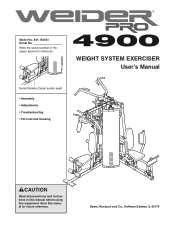
WEIGHT SYSTEM EXERCISER User's Manual Serial Number Decal (under seat) • Assembly • Adjustments • Troubleshooting • Part List and Drawing CAUTION Read all precautions and instructions in the space above for future reference. Model No. 831.154031 Serial No. Save this equipment. Sears, Roebuck and Co., Hoffman Estates, IL 60179 Write the serial number in this manual before using this manual for reference.
WEIGHT SYSTEM EXERCISER User's Manual Serial Number Decal (under seat) • Assembly • Adjustments • Troubleshooting • Part List and Drawing CAUTION Read all precautions and instructions in the space above for future reference. Model No. 831.154031 Serial No. Save this equipment. Sears, Roebuck and Co., Hoffman Estates, IL 60179 Write the serial number in this manual before using this manual for reference.
English Manual
Page 2
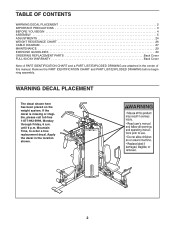
.... Apply the decal in the center of this manual. WARNING DECAL PLACEMENT The decal shown here has been placed on the weight system. Remove the PART IDENTIFICATION CHART and PART LIST/EXPLODED DRAWING before beginning assembly. TABLE OF CONTENTS WARNING DECAL PLACEMENT 2 ...IMPORTANT PRECAUTIONS 3 BEFORE YOU BEGIN 4 ASSEMBLY 5 ADJUSTMENTS 24 WEIGHT RESISTANCE CHART 26 CABLE DIAGRAM 27 MAINTENANCE 29 EXERCISE GUIDELINES 30 ORDERING REPLACEMENT PARTS Back Cover FULL 90-DAY WARRANTY Back Cover Note...
.... Apply the decal in the center of this manual. WARNING DECAL PLACEMENT The decal shown here has been placed on the weight system. Remove the PART IDENTIFICATION CHART and PART LIST/EXPLODED DRAWING before beginning assembly. TABLE OF CONTENTS WARNING DECAL PLACEMENT 2 ...IMPORTANT PRECAUTIONS 3 BEFORE YOU BEGIN 4 ASSEMBLY 5 ADJUSTMENTS 24 WEIGHT RESISTANCE CHART 26 CABLE DIAGRAM 27 MAINTENANCE 29 EXERCISE GUIDELINES 30 ORDERING REPLACEMENT PARTS Back Cover FULL 90-DAY WARRANTY Back Cover Note...
English Manual
Page 3
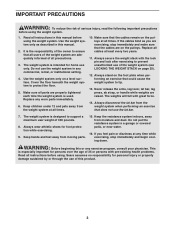
...Do not put the resistance system in this manual. 2. Sears assumes no responsibility for persons over the age of the weight system (see LOCKING THE WEIGHT STACK on the pulleys. It is especially important for personal injury or property damage sustained by or through the use of... serious injury, read the following important precautions before using the weight system. 1. Replace all times. 10. Keep hands and feet away from moisture and dust. Read all times. Replace any exercise program...
...Do not put the resistance system in this manual. 2. Sears assumes no responsibility for persons over the age of the weight system (see LOCKING THE WEIGHT STACK on the pulleys. It is especially important for personal injury or property damage sustained by or through the use of... serious injury, read the following important precautions before using the weight system. 1. Replace all times. 10. Keep hands and feet away from moisture and dust. Read all times. Replace any exercise program...
English Manual
Page 4
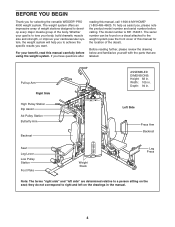
... yourself with the parts that are determined relative to achieve the specific results you have questions after reading this manual for selecting the versatile WEIDER® PRO 4900 weight system. If you want. Depth: 94 in . To help you to a person sitting on the drawings in . BEFORE YOU BEGIN... Thank you , please note the product model number and serial number before using the weight system. Whether your goal is 831.154031. Pull-up Arm...
... yourself with the parts that are determined relative to achieve the specific results you have questions after reading this manual for selecting the versatile WEIDER® PRO 4900 weight system. If you want. Depth: 94 in . To help you to a person sitting on the drawings in . BEFORE YOU BEGIN... Thank you , please note the product model number and serial number before using the weight system. Whether your goal is 831.154031. Pull-up Arm...
English Manual
Page 5
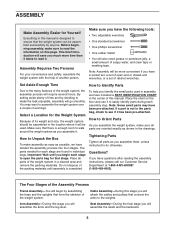
...Service Department at 1-800-4-MY-HOME® (1-800-469-4663). Arm Assembly-During this page. Select a Location for the Weight System Because of its weight and size, the weight system should be assembled successfully by anyone. If a part is completed. Questions? Cable Assembly-During this stage you identify ... of the packing materials until you have divided the assembly process into four stages. Note: Some small parts may want to assemble the weight system over a couple of evenings. The Four Stages of the Assembly Process Frame Assembly-You will be more time than it . Seat...
...Service Department at 1-800-4-MY-HOME® (1-800-469-4663). Arm Assembly-During this page. Select a Location for the Weight System Because of its weight and size, the weight system should be assembled successfully by anyone. If a part is completed. Questions? Cable Assembly-During this stage you identify ... of the packing materials until you have divided the assembly process into four stages. Note: Some small parts may want to assemble the weight system over a couple of evenings. The Four Stages of the Assembly Process Frame Assembly-You will be more time than it . Seat...
English Manual
Page 9
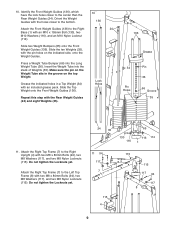
... two M8 x 80mm Bolts (94), two M8 Washers (117), and two M8 Nylon Locknuts (115). Insert the Weight Tube into the Long Weight Tube (36). Make sure the pin on the Weight Tube sits in a Top Weight (34) with two M8 x 80mm Bolts (94), two M8 Washers (117), and two M8 Nylon Locknuts (115... with an M10 x 155mm Bolt (130), two M10 Washers (116), and an M10 Nylon Locknut (114). Slide the Top Weight onto the Front Weight Guides (136). Do not tighten the Locknuts yet. 10. Identify the Front Weight Guides (136), which have the lock holes closer to the Right 24 Base (1) with the Rear...
... two M8 x 80mm Bolts (94), two M8 Washers (117), and two M8 Nylon Locknuts (115). Insert the Weight Tube into the Long Weight Tube (36). Make sure the pin on the Weight Tube sits in a Top Weight (34) with two M8 x 80mm Bolts (94), two M8 Washers (117), and two M8 Nylon Locknuts (115... with an M10 x 155mm Bolt (130), two M10 Washers (116), and an M10 Nylon Locknut (114). Slide the Top Weight onto the Front Weight Guides (136). Do not tighten the Locknuts yet. 10. Identify the Front Weight Guides (136), which have the lock holes closer to the Right 24 Base (1) with the Rear...
English Manual
Page 10
... two indicated M8 x 75mm Carriage Bolts (84) and two M8 Nylon Locknuts (115). Attach the Butterfly Frame to the Right Top Frame (7) with the Rear Weight Guides (24). 12 24 82 116 7 82 116 136 13. Repeat this step with two M10 x 38mm Screws (82) and two M10 Washers (116). Do... not tighten the Locknuts yet. Attach the Front Weight Guides (136) to the Right Upright (4) with two M8 x 80mm Bolts (94), two M8 Washers (117), and two M8 Nylon Locknuts (115). Do not tighten...
... two indicated M8 x 75mm Carriage Bolts (84) and two M8 Nylon Locknuts (115). Attach the Butterfly Frame to the Right Top Frame (7) with the Rear Weight Guides (24). 12 24 82 116 7 82 116 136 13. Repeat this step with two M10 x 38mm Screws (82) and two M10 Washers (116). Do... not tighten the Locknuts yet. Attach the Front Weight Guides (136) to the Right Upright (4) with two M8 x 80mm Bolts (94), two M8 Washers (117), and two M8 Nylon Locknuts (115). Do not tighten...
English Manual
Page 18
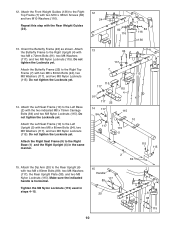
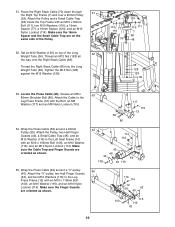
... a 90mm 48 Pulley (39). Attach the 47 Cable to the upper hole in the groove of the Short 46 Weight Tube (123). 46. Thread the Leg Lever Cable (70) into the Short Weight Tube (123). Attach the Pulley and a Small Cable Trap (48) to the Left Top Frame (8) with an M10 x 110mm...
... a 90mm 48 Pulley (39). Attach the 47 Cable to the upper hole in the groove of the Short 46 Weight Tube (123). 46. Thread the Leg Lever Cable (70) into the Short Weight Tube (123). Attach the Pulley and a Small Cable Trap (48) to the Left Top Frame (8) with an M10 x 110mm...
English Manual
Page 19
... are on top of the Pulley. 52. Set an M12 Washer (129) on the same side of the Long 52 Weight Tube (36). Thread the Right Stack Cable (68) into the Long Weight Tube (36). Wrap the Press Cable (69) around a "V"-pulley (40). Tighten the M12 Nut (128) against the M12 Washer...
... are on top of the Pulley. 52. Set an M12 Washer (129) on the same side of the Long 52 Weight Tube (36). Thread the Right Stack Cable (68) into the Long Weight Tube (36). Wrap the Press Cable (69) around a "V"-pulley (40). Tighten the M12 Nut (128) against the M12 Washer...
English Manual
Page 23
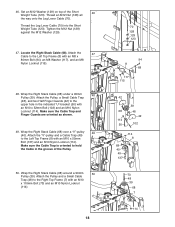
... sure that the cables move smoothly, find and correct the problem. IMPORTANT: If the cables are not properly installed, they may be damaged when heavy weight is any slack in the cables, you will be explained in ADJUSTMENTS, beginning on pages 26 and 27 of this step with four M6 x 16mm.... Slide the Pad Tube (31) through the Right Seat Frame (9). The use of the cables does not move smoothly over the pulleys. Before using the weight system, pull each cable a few times to remove the slack by tightening the cables. If one of the remaining parts will need to make sure...
... sure that the cables move smoothly, find and correct the problem. IMPORTANT: If the cables are not properly installed, they may be damaged when heavy weight is any slack in the cables, you will be explained in ADJUSTMENTS, beginning on pages 26 and 27 of this step with four M6 x 16mm.... Slide the Pad Tube (31) through the Right Seat Frame (9). The use of the cables does not move smoothly over the pulleys. Before using the weight system, pull each cable a few times to remove the slack by tightening the cables. If one of the remaining parts will need to make sure...
English Manual
Page 24
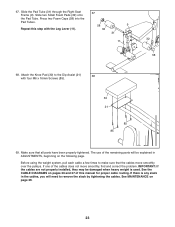
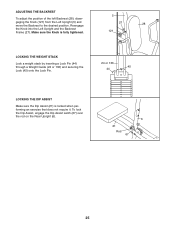
...engage the Leg Pin (83) into the Lock Plate (80) and the Leg Lever (11). CHANGING THE WEIGHT SETTING To change the setting of resistance at each exercise. The Lat Bar (not shown), the Ab Strap...Handle (78) can be attached between the Handle and the Cable so that the bent end touches the weight stack. ADJUSTMENTS This section explains how to scratch yourself when reaching through the hole in a Shroud (... (9). 35 15 119 80 103 78 103 110 70 11 83 80 9 24 Insert the Weight Pin so that the Handle is used. ATTACHING THE ACCESSORIES TO A PULLEY STATION Attach the Handle (78...
...engage the Leg Pin (83) into the Lock Plate (80) and the Leg Lever (11). CHANGING THE WEIGHT SETTING To change the setting of resistance at each exercise. The Lat Bar (not shown), the Ab Strap...Handle (78) can be attached between the Handle and the Cable so that the bent end touches the weight stack. ADJUSTMENTS This section explains how to scratch yourself when reaching through the hole in a Shroud (... (9). 35 15 119 80 103 78 103 110 70 11 83 80 9 24 Insert the Weight Pin so that the Handle is used. ATTACHING THE ACCESSORIES TO A PULLEY STATION Attach the Handle (78...
English Manual
Page 25
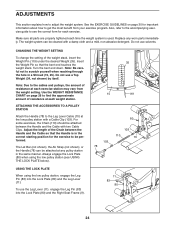
... on the Rear Upright (6). 6 21 Rod 67 25 Make sure the Knob is fully tightened. 5 27 28 121 LOCKING THE WEIGHT STACK Lock a weight stack by inserting a Lock Pin (44) through a Weight Guide (24 or 136) and securing the Lock (45) onto the Lock Pin. 24 or 136 45 44 LOCKING THE DIP...
... on the Rear Upright (6). 6 21 Rod 67 25 Make sure the Knob is fully tightened. 5 27 28 121 LOCKING THE WEIGHT STACK Lock a weight stack by inserting a Lock Pin (44) through a Weight Guide (24 or 136) and securing the Lock (45) onto the Lock Pin. 24 or 136 45 44 LOCKING THE DIP...
English Manual
Page 26
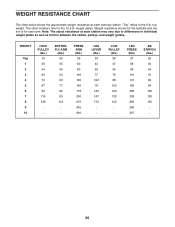
... PULLEY (lbs.) 29 47 59 75 88 100 120 132 152 - The other numbers refer to the 6 lb. WEIGHT Top 1 2 3 4 5 6 7 8 9 10 HIGH PULLEY (lbs.) 15 30 44 60 74 87 99 115 129 - LEG PRESS (lbs.) 27 58 89 110 147 183 208 238 ....) 34 44 62 77 102 111 125 147 172 - WEIGHT RESISTANCE CHART The chart below shows the approximate weight resistance at each station may vary due to differences in individual weight plates as well as friction between the cables, pulleys, and weight guides. weight plates. Weight resistance shown for the butterfly arm station is for each...
... PULLEY (lbs.) 29 47 59 75 88 100 120 132 152 - The other numbers refer to the 6 lb. WEIGHT Top 1 2 3 4 5 6 7 8 9 10 HIGH PULLEY (lbs.) 15 30 44 60 74 87 99 115 129 - LEG PRESS (lbs.) 27 58 89 110 147 183 208 238 ....) 34 44 62 77 102 111 125 147 172 - WEIGHT RESISTANCE CHART The chart below shows the approximate weight resistance at each station may vary due to differences in individual weight plates as well as friction between the cables, pulleys, and weight guides. weight plates. Weight resistance shown for the butterfly arm station is for each...
English Manual
Page 27
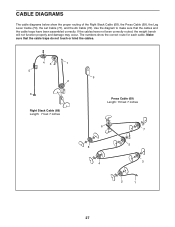
If the cables have been assembled correctly. Make sure that the cables and the cable traps have not been correctly routed, the weight bench will not function properly and damage may occur. The numbers show the proper routing of the Right Stack Cable (68), the Press Cable (69), ...
If the cables have been assembled correctly. Make sure that the cables and the cable traps have not been correctly routed, the weight bench will not function properly and damage may occur. The numbers show the proper routing of the Right Stack Cable (68), the Press Cable (69), ...
English Manual
Page 29
... 1. Retighten the M12 Nut against the M12 Washer (129). 128 129 Do not overtighten the cables. To tighten the cables, first insert the weight pin into the Weight Tube (not shown) until the slack is first used on a 3 cable. Reattach the Pulley, Cable Trap, and Finger Guards to a "U"-... If the cables are properly tightened each time the weight system is felt, the cables should be cleaned with a damp cloth and a mild, non-abrasive detergent. TIGHTENING THE CABLES Woven cable, the type of...
... 1. Retighten the M12 Nut against the M12 Washer (129). 128 129 Do not overtighten the cables. To tighten the cables, first insert the weight pin into the Weight Tube (not shown) until the slack is first used on a 3 cable. Reattach the Pulley, Cable Trap, and Finger Guards to a "U"-... If the cables are properly tightened each time the weight system is felt, the cables should be cleaned with a damp cloth and a mild, non-abrasive detergent. TIGHTENING THE CABLES Woven cable, the type of...

English Manual
Page 30
... intensity of your muscles by changing the number of the body. Find out what is right for each set . You must gauge your muscles. Weight Loss To lose weight, use a low amount of resistance and increase the number of aerobic exercise, such as you . This requires moving only the appropriate parts of...
... intensity of your muscles by changing the number of the body. Find out what is right for each set . You must gauge your muscles. Weight Loss To lose weight, use a low amount of resistance and increase the number of aerobic exercise, such as you . This requires moving only the appropriate parts of...
English Manual
Page 31
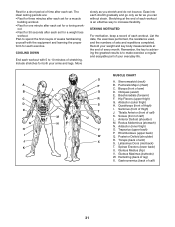
... form for each set for a short period of thigh) I J K L M N O P Q R S T U V W X MUSCLE CHART A. Record your weight and key body measurements at the end of every month. Trapezius (upper back) P. Posterior Deltoid (shoulder) R. Triceps (back of calf) 31 Latissimus Dorsi (mid back...to make exercise a regular and enjoyable part of calf) L. Include stretches for a toning work- Gluteus Medius (hip) V. Rest for a weight loss workout. out. • Rest for 30 seconds after each exercise. Plan to increase flexibility. STAYING MOTIVATED For motivation, keep a record of...
... form for each set for a short period of thigh) I J K L M N O P Q R S T U V W X MUSCLE CHART A. Record your weight and key body measurements at the end of every month. Trapezius (upper back) P. Posterior Deltoid (shoulder) R. Triceps (back of calf) 31 Latissimus Dorsi (mid back...to make exercise a regular and enjoyable part of calf) L. Include stretches for a toning work- Gluteus Medius (hip) V. Rest for a weight loss workout. out. • Rest for 30 seconds after each exercise. Plan to increase flexibility. STAYING MOTIVATED For motivation, keep a record of...
English Manual
Page 34
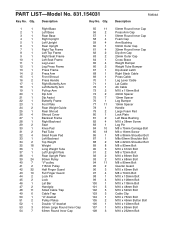
...Backrest Frame 28 1 Right Backrest 29 2 Seat 30 1 Knee Pad 31 2 Pad Tube 32 4 Small Foam Pad 33 1 Left Backrest 34 2 Top Weight 35 18 Weight 36 1 Long Weight Tube 37 1 Left Upright Plate 38 1 Rear Upright Plate 39 24 90mm Pulley 40 7 "V"-pulley 41 2 115mm Pulley 42 32 Half Finger Guard...Cap 56mm Round Inner Cap Foam Cap Arm Bushing 50mm Outer Cap 32mm Round Inner Cap Dip Arm Cap 25mm Outer Cap Cross Brace Weight Bumper Weight Tube Bumper Dip Assist Latch Right Stack Cable Press Cable Leg Lever Cable Lat Cable Ab Cable M10 x 110mm Bolt 40mm Spacer 12mm...
...Backrest Frame 28 1 Right Backrest 29 2 Seat 30 1 Knee Pad 31 2 Pad Tube 32 4 Small Foam Pad 33 1 Left Backrest 34 2 Top Weight 35 18 Weight 36 1 Long Weight Tube 37 1 Left Upright Plate 38 1 Rear Upright Plate 39 24 90mm Pulley 40 7 "V"-pulley 41 2 115mm Pulley 42 32 Half Finger Guard...Cap 56mm Round Inner Cap Foam Cap Arm Bushing 50mm Outer Cap 32mm Round Inner Cap Dip Arm Cap 25mm Outer Cap Cross Brace Weight Bumper Weight Tube Bumper Dip Assist Latch Right Stack Cable Press Cable Leg Lever Cable Lat Cable Ab Cable M10 x 110mm Bolt 40mm Spacer 12mm...
English Manual
Page 35
... M4 x 12mm Self-tapping Screw M4 x 16mm Self-tapping Screw M10 Nylon Locknut M8 Nylon Locknut M10 Washer M8 Washer Ab Strap Weight Pin Backrest Frame Bushing Knob Guard Short Weight Tube 16mm Spacer Large Cable Trap 28mm Round Inner Cap 127 1 128 2 129 3 130 2 131 1 132 9 133 1 ... 1 # 1 # 2 25mm Round Inner Cap M12 Nut M12 Washer M10 x 155mm Bolt M4 Washer M6 Washer M10 x 77mm Bolt M10 Large Washer M6 Locknut Front Weight Guide M10 x 55mm Bolt M10 x 45mm Bolt M6 x 35mm Screw 40mm x 20mm Inner Cap User's Manual Exercise Guide Allen Wrench Grease Packet Note: "#" indicates a ...
... M4 x 12mm Self-tapping Screw M4 x 16mm Self-tapping Screw M10 Nylon Locknut M8 Nylon Locknut M10 Washer M8 Washer Ab Strap Weight Pin Backrest Frame Bushing Knob Guard Short Weight Tube 16mm Spacer Large Cable Trap 28mm Round Inner Cap 127 1 128 2 129 3 130 2 131 1 132 9 133 1 ... 1 # 1 # 2 25mm Round Inner Cap M12 Nut M12 Washer M10 x 155mm Bolt M4 Washer M6 Washer M10 x 77mm Bolt M10 Large Washer M6 Locknut Front Weight Guide M10 x 55mm Bolt M10 x 45mm Bolt M6 x 35mm Screw 40mm x 20mm Inner Cap User's Manual Exercise Guide Allen Wrench Grease Packet Note: "#" indicates a ...

English Manual
Page 40
... EXERCISER, contact the nearest Sears Service Center throughout the United States and Sears will repair or replace the WEIGHT SYSTEM EXERCISER, free of charge. FULL 90-DAY WARRANTY For 90 days from state to defect in material or workmanship in China © 2004 Sears, ... may also have other rights which vary from the date of purchase, if failure occurs due to state. This warranty does not apply when the WEIGHT SYSTEM EXERCISER is used commercially or for rental purposes.
... EXERCISER, contact the nearest Sears Service Center throughout the United States and Sears will repair or replace the WEIGHT SYSTEM EXERCISER, free of charge. FULL 90-DAY WARRANTY For 90 days from state to defect in material or workmanship in China © 2004 Sears, ... may also have other rights which vary from the date of purchase, if failure occurs due to state. This warranty does not apply when the WEIGHT SYSTEM EXERCISER is used commercially or for rental purposes.


