
Uk Manual
Page 1
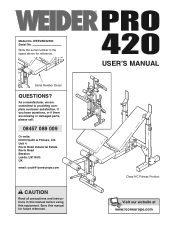
... Serial No Write the serial number in this manual before using this manual for reference. As a manufacturer, we are missing or damaged parts, please call: 08457 089 009 Or write: ICON Health & Fitness, Ltd. Unit 4 Revie Road Industrial Estate Revie Road Beeston Leeds, LS118JG UK email: [email protected] CAUTION Read all precautions and instructions in the space above for future reference. USER'S MANUAL...
... Serial No Write the serial number in this manual before using this manual for reference. As a manufacturer, we are missing or damaged parts, please call: 08457 089 009 Or write: ICON Health & Fitness, Ltd. Unit 4 Revie Road Industrial Estate Revie Road Beeston Leeds, LS118JG UK email: [email protected] CAUTION Read all precautions and instructions in the space above for future reference. USER'S MANUAL...

Uk Manual
Page 2
... the indicated location. Keep hands and fingers clear of ICON Health & Fitness, Inc. 2 WEIDER is missing or illegible, please call our Customer Service Department at 08457 089 009 to order a free replacement decal. If a decal is a registered trademark of this area. TABLE OF CONTENTS WARNING DECAL PLACEMENT 2 IMPORTANT PRECAUTIONS 3 BEFORE YOU BEGIN 4 PART IDENTIFICATION CHART 5 ASSEMBLY 6 ADJUSTMENTS 11 EXERCISE GUIDELINES 14 PART LIST 18 EXPLODED...
... the indicated location. Keep hands and fingers clear of ICON Health & Fitness, Inc. 2 WEIDER is missing or illegible, please call our Customer Service Department at 08457 089 009 to order a free replacement decal. If a decal is a registered trademark of this area. TABLE OF CONTENTS WARNING DECAL PLACEMENT 2 IMPORTANT PRECAUTIONS 3 BEFORE YOU BEGIN 4 PART IDENTIFICATION CHART 5 ASSEMBLY 6 ADJUSTMENTS 11 EXERCISE GUIDELINES 14 PART LIST 18 EXPLODED...
Uk Manual
Page 3
... the weight bench. Note: The weight bench does not include a barbell or weights. 17. Read all parts are changing weights, always secure the barbell with pre-existing health problems. Read all instructions before using it from the front leg before exercising. 14. Make sure that the adjustment pin is designed to help prevent it . Replace any exercise program, consult your barbell when you use the weight bench. When you are using the weight bench. 1. Do...
... the weight bench. Note: The weight bench does not include a barbell or weights. 17. Read all parts are changing weights, always secure the barbell with pre-existing health problems. Read all instructions before using it from the front leg before exercising. 14. Make sure that the adjustment pin is designed to help prevent it . Replace any exercise program, consult your barbell when you use the weight bench. When you are using the weight bench. 1. Do...
Uk Manual
Page 4
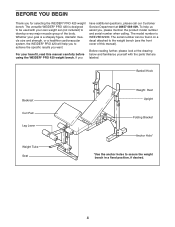
... own weight set (not included) to secure the weight bench in a fixed position, if desired. 4 The model number is designed to be found on a decal attached to achieve the specific results you want. Barbell Hook Backrest Curl Pad Leg Lever Weight Tube Seat Weight Rest Upright Folding Bracket Anchor Hole* *Use the anchor holes to develop every major muscle group of this manual carefully before using the WEIDER® PRO 420 weight bench...
... own weight set (not included) to secure the weight bench in a fixed position, if desired. 4 The model number is designed to be found on a decal attached to achieve the specific results you want. Barbell Hook Backrest Curl Pad Leg Lever Weight Tube Seat Weight Rest Upright Folding Bracket Anchor Hole* *Use the anchor holes to develop every major muscle group of this manual carefully before using the WEIDER® PRO 420 weight bench...

Uk Manual
Page 5
... parts may have been pre-assembled for shipping purposes. The number in parenthesis below each part refers to see if it has been pre-assembled. If you identify the small parts used in assembly. PART IDENTIFICATION CHART This chart is provided to help you cannot find a part in the parts bags, check to the key number of the part, from the PART LIST on page 18 of this manual...
... parts may have been pre-assembled for shipping purposes. The number in parenthesis below each part refers to see if it has been pre-assembled. If you identify the small parts used in assembly. PART IDENTIFICATION CHART This chart is provided to help you cannot find a part in the parts bags, check to the key number of the part, from the PART LIST on page 18 of this manual...

Uk Manual
Page 6
... if you assemble the weight bench, make sure that by anyone. Attach an Upright Base (7) to the other Stabiliser (45) in a cleared area and remove the packing materials. Note: The welded nut on the Upright Base must be assembled successfully by setting aside plenty of the two Stabilisers (45). Most people find that you have a socket set, a set of open-end or...
... if you assemble the weight bench, make sure that by anyone. Attach an Upright Base (7) to the other Stabiliser (45) in a cleared area and remove the packing materials. Note: The welded nut on the Upright Base must be assembled successfully by setting aside plenty of the two Stabilisers (45). Most people find that you have a socket set, a set of open-end or...

Uk Manual
Page 7
... Attach the Front Leg (8) to the Front Leg (8) with two M10 x 70mm Bolts (18), the Support Plate (14), and two M10 Nylon Locknuts (19). the Bench Frame must be able to the right Upright Base (not shown) in steps 1-3. 5. Insert the Ring Pin (43) into the Front Leg Stabiliser (44). Press ...Crossbar (3) as shown. Tighten the M10 x 57mm Adjustment Knob (33) into the indicated end of the Front Leg (8). Press three 45mm Square Inner Caps (21) into the top of the Weight Tube (41). Attach the Crossbar to the upper set of the bolts going through the Leg Lever (4) and secure ...
... Attach the Front Leg (8) to the Front Leg (8) with two M10 x 70mm Bolts (18), the Support Plate (14), and two M10 Nylon Locknuts (19). the Bench Frame must be able to the right Upright Base (not shown) in steps 1-3. 5. Insert the Ring Pin (43) into the Front Leg Stabiliser (44). Press ...Crossbar (3) as shown. Tighten the M10 x 57mm Adjustment Knob (33) into the indicated end of the Front Leg (8). Press three 45mm Square Inner Caps (21) into the top of the Weight Tube (41). Attach the Crossbar to the upper set of the bolts going through the Leg Lever (4) and secure ...

Uk Manual
Page 8
...) into the bottom of each adjustment tube. Secure the Backrest (6) to pivot easily. tighten the Nylon Locknut; the Backrest (6) must be able to the Bench Frame (2) by the position of holes in the adjustment tubes. Lubricate an M10 x 70mm Bolt (18). Tighten the four M6 x 38mm Bolts (16) used in the Bench Frame and a set of the adjustment tubes, and orient them...
...) into the bottom of each adjustment tube. Secure the Backrest (6) to pivot easily. tighten the Nylon Locknut; the Backrest (6) must be able to the Bench Frame (2) by the position of holes in the adjustment tubes. Lubricate an M10 x 70mm Bolt (18). Tighten the four M6 x 38mm Bolts (16) used in the Bench Frame and a set of the adjustment tubes, and orient them...

Uk Manual
Page 9
... insert the M10 x 62mm Adjustment Knob (30) through the slot in the Leg Lever (4) and the Front Leg (8). 9. Slide a Bushing (28) onto the bottom of the other Upright in the Upright Base. Press a 60mm x 50mm Bushing (31) into the slots in the same manner. Note: Always set both ends of the adjustment holes in the Upright (1) with four M6 x 16mm...
... insert the M10 x 62mm Adjustment Knob (30) through the slot in the Leg Lever (4) and the Front Leg (8). 9. Slide a Bushing (28) onto the bottom of the other Upright in the Upright Base. Press a 60mm x 50mm Bushing (31) into the slots in the same manner. Note: Always set both ends of the adjustment holes in the Upright (1) with four M6 x 16mm...

Uk Manual
Page 10
Attach the Curl Pad (27) to the Curl Post (26) 13 with two M6 x 16mm Bolts (15). 27 15 15 26 14. 13. The use of all the bolts and nylon locknuts are properly tightened before you use the weight bench. Make sure that all remaining parts will be explained in ADJUSTMENTS, starting on the following page. 10
Attach the Curl Pad (27) to the Curl Post (26) 13 with two M6 x 16mm Bolts (15). 27 15 15 26 14. 13. The use of all the bolts and nylon locknuts are properly tightened before you use the weight bench. Make sure that all remaining parts will be explained in ADJUSTMENTS, starting on the following page. 10

Uk Manual
Page 11
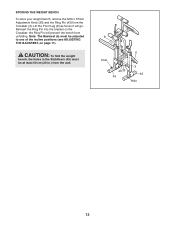
... 40 33 8 11 Replace any worn parts immediately. The weight bench can be used with your weight set for additional exercises. WARNING: When the Curl Pad (27) is inserted completely through one of the bottom two sets of holes in an incline position, lift the Backrest and insert the Adjustment Pin (32) through both adjustment tubes and the Bench Frame (2). 2 Adjustment Tubes ATTACHING THE CURL PAD...
... 40 33 8 11 Replace any worn parts immediately. The weight bench can be used with your weight set for additional exercises. WARNING: When the Curl Pad (27) is inserted completely through one of the bottom two sets of holes in an incline position, lift the Backrest and insert the Adjustment Pin (32) through both adjustment tubes and the Bench Frame (2). 2 Adjustment Tubes ATTACHING THE CURL PAD...

Uk Manual
Page 12
... changing weights. 1 30 7 1 50 ATTACHING WEIGHTS TO THE LEG LEVER If you will reduce the possibility of the barbell tipping while you are fully tightened into the Upright Bases (7) and the Uprights. Secure the weights with the Barbell Hooks (50, 49 [not shown]). ADJUSTING THE UPRIGHTS To adjust the Uprights (1), unscrew the M10 x 62mm Adjustment Knobs (30) and slide the Uprights to the desired position. USING THE...
... changing weights. 1 30 7 1 50 ATTACHING WEIGHTS TO THE LEG LEVER If you will reduce the possibility of the barbell tipping while you are fully tightened into the Upright Bases (7) and the Uprights. Secure the weights with the Barbell Hooks (50, 49 [not shown]). ADJUSTING THE UPRIGHTS To adjust the Uprights (1), unscrew the M10 x 62mm Adjustment Knobs (30) and slide the Uprights to the desired position. USING THE...
Uk Manual
Page 13
Note: The Backrest (6) must be adjusted to one of the incline positions (see ADJUSTING THE BACKREST, on the Crossbar; Lift the Front Leg (8) as far as it will prevent the bench from unfolding. Reinsert the Ring Pin into the bracket on page 11). the Ring Pin will go. CAUTION: To fold the weight bench, the holes in the Stabilisers (45) must be at least 50 cm (20 in.) from the Crossbar (3). STORING THE WEIGHT BENCH To store your weight bench, remove the M10 x 57mm Adjustment Knob (33) and the Ring Pin (43) from the wall. 8 6 Hole 43 33 45 3 45 Hole 13
Note: The Backrest (6) must be adjusted to one of the incline positions (see ADJUSTING THE BACKREST, on the Crossbar; Lift the Front Leg (8) as far as it will prevent the bench from unfolding. Reinsert the Ring Pin into the bracket on page 11). the Ring Pin will go. CAUTION: To fold the weight bench, the holes in the Stabilisers (45) must be at least 50 cm (20 in.) from the Crossbar (3). STORING THE WEIGHT BENCH To store your weight bench, remove the M10 x 57mm Adjustment Knob (33) and the Ring Pin (43) from the wall. 8 6 Hole 43 33 45 3 45 Hole 13

Uk Manual
Page 14
... each repetition should include 6 to get a complete and well-balanced fitness program. Exercising in each set . Weight Loss To lose weight, use a low amount of weight and increase the number of their maximum capacity. Each workout should be performed smoothly and without pausing. This requires moving only the appropriate parts of repetitions or sets per- Find out what is right for more oxygen to...
... each repetition should include 6 to get a complete and well-balanced fitness program. Exercising in each set . Weight Loss To lose weight, use a low amount of weight and increase the number of their maximum capacity. Each workout should be performed smoothly and without pausing. This requires moving only the appropriate parts of repetitions or sets per- Find out what is right for more oxygen to...

Uk Manual
Page 15
... for both your workouts. Include stretches for 30 seconds after each stretch gradually and go only as far as you can be photocopied and used , and the numbers of sets and repetitions completed. Adductor (inner thigh) HH O. Abductor (outer thigh) H. List the date, the exercises performed, the weight used to schedule and record your arms and legs. Spinae Erectors (lower back) U.
... for both your workouts. Include stretches for 30 seconds after each stretch gradually and go only as far as you can be photocopied and used , and the numbers of sets and repetitions completed. Adductor (inner thigh) HH O. Abductor (outer thigh) H. List the date, the exercises performed, the weight used to schedule and record your arms and legs. Spinae Erectors (lower back) U.

Uk Manual
Page 16
MONDAY Date: / / EXERCISE WEIGHT SETS REPS TUESDAY Date: / / AEROBIC EXERCISE WEDNESDAY Date: / / EXERCISE WEIGHT SETS REPS THURSDAY Date: / / AEROBIC EXERCISE FRIDAY Date: / / EXERCISE WEIGHT SETS REPS Make photocopies of this page for scheduling and recording your workouts. 16
MONDAY Date: / / EXERCISE WEIGHT SETS REPS TUESDAY Date: / / AEROBIC EXERCISE WEDNESDAY Date: / / EXERCISE WEIGHT SETS REPS THURSDAY Date: / / AEROBIC EXERCISE FRIDAY Date: / / EXERCISE WEIGHT SETS REPS Make photocopies of this page for scheduling and recording your workouts. 16

Uk Manual
Page 17
MONDAY Date: / / EXERCISE WEIGHT SETS REPS TUESDAY Date: / / WEDNESDAY Date: / / AEROBIC EXERCISE EXERCISE WEIGHT SETS REPS THURSDAY Date: / / FRIDAY Date: / / AEROBIC EXERCISE EXERCISE WEIGHT SETS REPS Make photocopies of this page for scheduling and recording your workouts. 17
MONDAY Date: / / EXERCISE WEIGHT SETS REPS TUESDAY Date: / / WEDNESDAY Date: / / AEROBIC EXERCISE EXERCISE WEIGHT SETS REPS THURSDAY Date: / / FRIDAY Date: / / AEROBIC EXERCISE EXERCISE WEIGHT SETS REPS Make photocopies of this page for scheduling and recording your workouts. 17

Uk Manual
Page 18
... cover of this manual for information about ordering replacement parts. 18 PART LIST-Model No. Description Key No. Specifications are subject to change without notice. Description 1 2 Upright 2 1 Bench Frame 3 1 Crossbar 4 1 Leg Lever 5 1 Right Backrest Frame 6 1 Backrest 7 2 Upright Base 8 1 Front Leg 9 6 19mm Round Inner Cap 10 3 Pad Tube 11 1 Seat 12 4 25.4mm Square Inner Cap 13 1 M8 Nylon Locknut 14 1 Support Plate 15 6 M6 x 16mm Bolt 16 4 M6 x 38mm Bolt...
... cover of this manual for information about ordering replacement parts. 18 PART LIST-Model No. Description Key No. Specifications are subject to change without notice. Description 1 2 Upright 2 1 Bench Frame 3 1 Crossbar 4 1 Leg Lever 5 1 Right Backrest Frame 6 1 Backrest 7 2 Upright Base 8 1 Front Leg 9 6 19mm Round Inner Cap 10 3 Pad Tube 11 1 Seat 12 4 25.4mm Square Inner Cap 13 1 M8 Nylon Locknut 14 1 Support Plate 15 6 M6 x 16mm Bolt 16 4 M6 x 38mm Bolt...

Uk Manual
Page 19
EXPLODED DRAWING-Model No. WEEVBE32930 R1203A 48 47 6 52 50 12 5 1 25 27 42 16 28 34 30 31 34 25 12 16 25 36 16 20 19 15 7 26 33 35 19 20 3 19 35 19 46 20 43 35 49 1 28 31 34 34 30 7 19 46 45 11 51 20 32 24 17 24 35 18 24 22 21 20 4 19 21 14 3938 19 37 22 29 8 19 35 40 33 15 18 18 15 55 44 19 2 24 19 35 35 20 46 23 41 21 38 13 9 9 10 19 10 9 22 54 55 9 45 20 10 22 9 9 22 19 19 46 19 53
EXPLODED DRAWING-Model No. WEEVBE32930 R1203A 48 47 6 52 50 12 5 1 25 27 42 16 28 34 30 31 34 25 12 16 25 36 16 20 19 15 7 26 33 35 19 20 3 19 35 19 46 20 43 35 49 1 28 31 34 34 30 7 19 46 45 11 51 20 32 24 17 24 35 18 24 22 21 20 4 19 21 14 3938 19 37 22 29 8 19 35 40 33 15 18 18 15 55 44 19 2 24 19 35 35 20 46 23 41 21 38 13 9 9 10 19 10 9 22 54 55 9 45 20 10 22 9 9 22 19 19 46 19 53

Uk Manual
Page 20
... MODEL NUMBER of the product (WEEVBE32930) • The NAME of the product (WEIDER® PRO 420 weight bench) • The SERIAL NUMBER of the product (see the front cover of this manual) • The KEY NUMBER and DESCRIPTION of the part(s) (see the PART LIST and the EXPLODED DRAWING on pages 18 and 19). office, or write: ICON Health & Fitness, Ltd. Part No. 197560 R1203A Printed in China © 2003 ICON Health & Fitness...
... MODEL NUMBER of the product (WEEVBE32930) • The NAME of the product (WEIDER® PRO 420 weight bench) • The SERIAL NUMBER of the product (see the front cover of this manual) • The KEY NUMBER and DESCRIPTION of the part(s) (see the PART LIST and the EXPLODED DRAWING on pages 18 and 19). office, or write: ICON Health & Fitness, Ltd. Part No. 197560 R1203A Printed in China © 2003 ICON Health & Fitness...


