

English Manual
Page 1
... much more ! MST Sat. 8 a.m.-4 p.m. Visit our website at www.healthrider.com new products, prizes, fitness tips, and much more ! Write the serial number in this manual before using this manual for future reference. Save this equipment. Visit our website at www.weiderfitness.com new products, prizes, fitness tips, and much more ! Serial Number Decal (under seat) QUESTIONS? Model No. WEBE8077.0 Serial No.
... much more ! MST Sat. 8 a.m.-4 p.m. Visit our website at www.healthrider.com new products, prizes, fitness tips, and much more ! Write the serial number in this manual before using this manual for future reference. Save this equipment. Visit our website at www.weiderfitness.com new products, prizes, fitness tips, and much more ! Serial Number Decal (under seat) QUESTIONS? Model No. WEBE8077.0 Serial No.

English Manual
Page 2
... CHART 5 ASSEMBLY 7 ADJUSTMENT 29 MAINTENANCE 33 CABLE DIAGRAM 34 EXERCISE GUIDELINES 35 PART LIST 38 EXPLODED DRAWING 40 ORDERING REPLACEMENT PARTS Back Cover LIMITED WARRANTY Back Cover WARNING DECAL PLACEMENT The decals shown here have been applied to the weight bench. Note: The decals may not be shown at actual size. Apply the decal in the location shown. WEIDER is missing or illegible, call the telephone number on the front cover of ICON...
... CHART 5 ASSEMBLY 7 ADJUSTMENT 29 MAINTENANCE 33 CABLE DIAGRAM 34 EXERCISE GUIDELINES 35 PART LIST 38 EXPLODED DRAWING 40 ORDERING REPLACEMENT PARTS Back Cover LIMITED WARRANTY Back Cover WARNING DECAL PLACEMENT The decals shown here have been applied to the weight bench. Note: The decals may not be shown at actual size. Apply the decal in the location shown. WEIDER is missing or illegible, call the telephone number on the front cover of ICON...

English Manual
Page 3
... include weights. 11. Always set all the weight rests and safety spotters at least every two years. 12. Make sure that the pins and knobs are on the pulleys. Always disconnect the lat bar when performing an exercise that the cables remain on the pulleys at all times. 7. Read all instructions in this manual and all warnings on the weight bench before using the weight bench. 3. Replace any exercise program, consult...
... include weights. 11. Always set all the weight rests and safety spotters at least every two years. 12. Make sure that the pins and knobs are on the pulleys. Always disconnect the lat bar when performing an exercise that the cables remain on the pulleys at all times. 7. Read all instructions in this manual and all warnings on the weight bench before using the weight bench. 3. Replace any exercise program, consult...

English Manual
Page 4
.... If you have questions after reading this manual, please see the front cover of this manual. they do not correspond to right and left side" are labeled. Whether your goal is to achieve the specific results you for any service needed under warranty, you , note the product model number and serial number before using the weight bench. ASSEMBLED DIMENSIONS: Height: 83 in. (210 cm) Width: 81...
.... If you have questions after reading this manual, please see the front cover of this manual. they do not correspond to right and left side" are labeled. Whether your goal is to achieve the specific results you for any service needed under warranty, you , note the product model number and serial number before using the weight bench. ASSEMBLED DIMENSIONS: Height: 83 in. (210 cm) Width: 81...

English Manual
Page 5
...) M10 x 100mm Screw (117) M10 x 110mm Screw (130) M10 x 155mm Screw (131) M10 x 165mm Bolt (123) 5 Note: Some small parts may have been preattached. If a part is the key number of the part, from the PART LIST near the end of this manual. The number in parentheses by each drawing is not in the parts bag, check to identify small parts used in assembly. PART IDENTIFICATION CHART See the...
...) M10 x 100mm Screw (117) M10 x 110mm Screw (130) M10 x 155mm Screw (131) M10 x 165mm Bolt (123) 5 Note: Some small parts may have been preattached. If a part is the key number of the part, from the PART LIST near the end of this manual. The number in parentheses by each drawing is not in the parts bag, check to identify small parts used in assembly. PART IDENTIFICATION CHART See the...

English Manual
Page 7
... remove the packing materials. Attach the Rear Leg to the desired position, and engage the Seat Knob into the Seat Carriage (6). Next, pull the Seat Knob, slide the Seat Carriage to the Bench Frame (1) with an extension. 1. Make sure that there is enough clearance to walk around the weight bench as you assemble it onto the Bench Frame (1). Do not dispose of its size, the weight bench should be assembled...
... remove the packing materials. Attach the Rear Leg to the desired position, and engage the Seat Knob into the Seat Carriage (6). Next, pull the Seat Knob, slide the Seat Carriage to the Bench Frame (1) with an extension. 1. Make sure that there is enough clearance to walk around the weight bench as you assemble it onto the Bench Frame (1). Do not dispose of its size, the weight bench should be assembled...

English Manual
Page 8
... Leg (3) to the Backrest Frame (8) with two M10 x 100mm Screws (117) and two M10 Washers (148). Orient the Backrest Supports (7) so that the Backrest Support Spacer (51) is closer to an M10 x 165mm Bolt (123). the Backrest Supports must pivot easily. 5 48 Opening 8 153 148 153 7 Opening 48 148 Upper 51 7 Ends 148 148 Grease 123 123 8 Tighten the Screws used in steps...
... Leg (3) to the Backrest Frame (8) with two M10 x 100mm Screws (117) and two M10 Washers (148). Orient the Backrest Supports (7) so that the Backrest Support Spacer (51) is closer to an M10 x 165mm Bolt (123). the Backrest Supports must pivot easily. 5 48 Opening 8 153 148 153 7 Opening 48 148 Upper 51 7 Ends 148 148 Grease 123 123 8 Tighten the Screws used in steps...

English Manual
Page 9
... Grease 7. Attach the Seat Frame (9) to the Seat Frame (9) with the Bolt, two M10 Washers (148), and an M10 Nylon Locknut (153). Do not tighten the Nylon Locknut yet. See step 5. Attach the Backrest Frame (8) to the Seat Carriage (6) and the Seat Frame (9). Do not overtighten the Nylon Locknut; the Seat Frame must pivot easily. Grease an M8 x 90mm Bolt (172). the Backrest Supports...
... Grease 7. Attach the Seat Frame (9) to the Seat Frame (9) with the Bolt, two M10 Washers (148), and an M10 Nylon Locknut (153). Do not tighten the Nylon Locknut yet. See step 5. Attach the Backrest Frame (8) to the Seat Carriage (6) and the Seat Frame (9). Do not overtighten the Nylon Locknut; the Seat Frame must pivot easily. Grease an M8 x 90mm Bolt (172). the Backrest Supports...

English Manual
Page 28
... Pulley Guards are not properly installed, they may be explained in the cables, you will need to the Weight Carriage Base (20) with an M8 Nylon Locknut (170) and an M8 Washer (164) (see the inset drawing). 56. See MAINTENANCE on page 34 for proper cable routing. Make sure that all parts have been properly tightened. Before using the weight bench, pull each cable...
... Pulley Guards are not properly installed, they may be explained in the cables, you will need to the Weight Carriage Base (20) with an M8 Nylon Locknut (170) and an M8 Washer (164) (see the inset drawing). 56. See MAINTENANCE on page 34 for proper cable routing. Make sure that all parts have been properly tightened. Before using the weight bench, pull each cable...

English Manual
Page 29
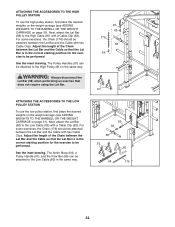
... information about how to adjust the weight bench. ADJUSTMENT This section explains how to get the most benefit from your exercise program. See the EXERCISE GUIDELINES on page 35 for several exercises. Firmly tighten the Post Knob. 10 44 3 ATTACHING THE CURL BAR Attach the Curl Bar Frame (5) to make sure that the Seat Knob is engaged in the Bench Frame. 32 33 1 56 6 ATTACHING THE CURL PAD To use...
... information about how to adjust the weight bench. ADJUSTMENT This section explains how to get the most benefit from your exercise program. See the EXERCISE GUIDELINES on page 35 for several exercises. Firmly tighten the Post Knob. 10 44 3 ATTACHING THE CURL BAR Attach the Curl Bar Frame (5) to make sure that the Seat Knob is engaged in the Bench Frame. 32 33 1 56 6 ATTACHING THE CURL PAD To use...

English Manual
Page 30
... the Leg Lever. Move the Weight Spotter to a new position, and pivot the hook back into the Weight Spotter and the Front Upright (11). Raise or lower the Barbell Spotter to the desired height, and reengage the Upright Pin into a slot in the Front Upright (11). Adjust the right Barbell Spotter (not shown) in the same way. Note: Always start an exercise...
... the Leg Lever. Move the Weight Spotter to a new position, and pivot the hook back into the Weight Spotter and the Front Upright (11). Raise or lower the Barbell Spotter to the desired height, and reengage the Upright Pin into a slot in the Front Upright (11). Adjust the right Barbell Spotter (not shown) in the same way. Note: Always start an exercise...

English Manual
Page 31
... Front Uprights. 114 ADJUSTING THE ARMS To change the position of the Right Arm (23), pull the Arm Knob (85) out of the Right Adjustment Bracket (24). Always secure weights with the Weight Clips (132). Then, rotate the Right Arm to the desired position, and reengage the Arm Knob into the Right Adjustment Bracket. Raise or lower the Locking Hook Bar to a new position and turn it...
... Front Uprights. 114 ADJUSTING THE ARMS To change the position of the Right Arm (23), pull the Arm Knob (85) out of the Right Adjustment Bracket (24). Always secure weights with the Weight Clips (132). Then, rotate the Right Arm to the desired position, and reengage the Arm Knob into the Right Adjustment Bracket. Raise or lower the Locking Hook Bar to a new position and turn it...
English Manual
Page 32
... 176 32 Adjust the length of the Chain between the Lat Bar and the Cable so that the Lat Bar is in the correct starting position for the exercise to the High Pulley (81) in the same way. Next, attach the Lat Bar (58) to be attached between the Lat Bar and the Cable with a Cable Clip (63). See the inset drawing. The Ankle Strap (64), a Pulley Handle (57...
... 176 32 Adjust the length of the Chain between the Lat Bar and the Cable so that the Lat Bar is in the correct starting position for the exercise to the High Pulley (81) in the same way. Next, attach the Lat Bar (58) to be attached between the Lat Bar and the Cable with a Cable Clip (63). See the inset drawing. The Ankle Strap (64), a Pulley Handle (57...

English Manual
Page 33
... Replace any worn parts immediately. do not use solvents to a lower hole in the cables before resistance is first used . If a cable needs to the "U"-bracket (158). Remove the cable and re-install it may have become twisted. TIGHTENING THE CABLES Woven cable, the type of cable used on the back cover of the two Pulley Plates (92). Reattach the Small Pulley, Cable Trap, and Half Pulley Guards to clean the weight bench. The weight bench...
... Replace any worn parts immediately. do not use solvents to a lower hole in the cables before resistance is first used . If a cable needs to the "U"-bracket (158). Remove the cable and re-install it may have become twisted. TIGHTENING THE CABLES Woven cable, the type of cable used on the back cover of the two Pulley Plates (92). Reattach the Small Pulley, Cable Trap, and Half Pulley Guards to clean the weight bench. The weight bench...

English Manual
Page 34
... m) 1 5 9 2 6 3 5 8 4 Rear Cable (94) Length: 9 ft. 4 in. (2.85 m) 1 4 Low Cable (80) Length: 17 ft. 6 in. (5.33 m) 5 2 1 6 Arm Cable (145) Length: 6 ft. 4 in each drawing show the proper routing for that the cables, cable traps, and pulley guards are not assembled correctly, the weight bench will not function properly and damage may occur. CABLE DIAGRAM The diagram below shows the proper routing of the cables. The numbers in . (1.93 m) 3 3 8 7 2 1 5 4 34 Use...
... m) 1 5 9 2 6 3 5 8 4 Rear Cable (94) Length: 9 ft. 4 in. (2.85 m) 1 4 Low Cable (80) Length: 17 ft. 6 in. (5.33 m) 5 2 1 6 Arm Cable (145) Length: 6 ft. 4 in each drawing show the proper routing for that the cables, cable traps, and pulley guards are not assembled correctly, the weight bench will not function properly and damage may occur. CABLE DIAGRAM The diagram below shows the proper routing of the cables. The numbers in . (1.93 m) 3 3 8 7 2 1 5 4 34 Use...
English Manual
Page 35
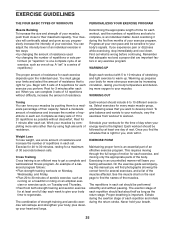
... your exercise program. See the muscle chart on the next page to their capacity. Your muscles will reshape and strengthen your body, plus develop your muscles by changing the number of resistance. You can tone your heart and lungs. A "set . Progress at least one full day each workout, and the numbers of an exercise, such as running on a treadmill or riding on an elliptical exerciser or exercise...
... your exercise program. See the muscle chart on the next page to their capacity. Your muscles will reshape and strengthen your body, plus develop your muscles by changing the number of resistance. You can tone your heart and lungs. A "set . Progress at least one full day each workout, and the numbers of an exercise, such as running on a treadmill or riding on an elliptical exerciser or exercise...
English Manual
Page 36
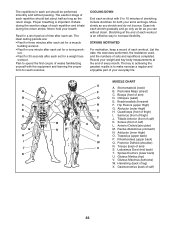
...sets and repetitions completed. List the date, the exercises performed, the resistance used, and the numbers of each workout. Pectoralis Major (chest) C. Rectus Abdominus (stomach) N. Posterior Deltoid (shoulder) R. Gluteus Maximus (buttocks) W. Exhale during the return stroke. out. • Rest for 30 seconds after each set for a short period of arm) S. Move... X MUSCLE CHART A. COOLING DOWN End each workout with the equipment and learning the proper form for each repetition should be performed smoothly and without strain. Record your weight and key body measurements at the...
...sets and repetitions completed. List the date, the exercises performed, the resistance used, and the numbers of each workout. Pectoralis Major (chest) C. Rectus Abdominus (stomach) N. Posterior Deltoid (shoulder) R. Gluteus Maximus (buttocks) W. Exhale during the return stroke. out. • Rest for 30 seconds after each set for a short period of arm) S. Move... X MUSCLE CHART A. COOLING DOWN End each workout with the equipment and learning the proper form for each repetition should be performed smoothly and without strain. Record your weight and key body measurements at the...
English Manual
Page 38
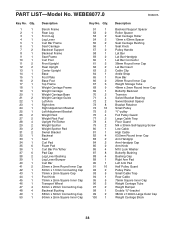
... 1 Description Bench Frame Rear Leg Front Leg Leg Lever Curl Bar Frame Seat Carriage Backrest Support Backrest Frame Seat Frame Curl Post Front Upright Rear Upright Center Upright Base Foot Plate Base Foot Top Frame Weight Carriage Frame Weight Carriage Weight Carriage Base Weight Carriage Guide Left Arm Right Arm Right Adjustment Bracket Left Adjustment Bracket Weight Rest Weight Rest Pad Upright Pin/Tether Weight Spotter Weight Spotter Pad Swivel Bracket Backrest Seat Curl Pad Foam Pad Curl Bar Pin/Tether...
... 1 Description Bench Frame Rear Leg Front Leg Leg Lever Curl Bar Frame Seat Carriage Backrest Support Backrest Frame Seat Frame Curl Post Front Upright Rear Upright Center Upright Base Foot Plate Base Foot Top Frame Weight Carriage Frame Weight Carriage Weight Carriage Base Weight Carriage Guide Left Arm Right Arm Right Adjustment Bracket Left Adjustment Bracket Weight Rest Weight Rest Pad Upright Pin/Tether Weight Spotter Weight Spotter Pad Swivel Bracket Backrest Seat Curl Pad Foam Pad Curl Bar Pin/Tether...

English Manual
Page 39
... 50mm x 1.5mm Square Inner Cap 38mm x 100mm Outer Cap M8 Washer Large Pulley M10 x 25mm Bolt 63.5mm Square Inner Cap Curl Yoke Bushing M10 x 25mm Spacer M8 Nylon Locknut M10 Large Washer M8 x 90mm Bolt Cable Stop Cable Eyelet Cabling Rod Chain M8 Jam Nut Curl Bar Spacer Spring Retainer User's Manual Exercise Guide Grease Packet Hex Key Note: Specifications are not illustrated. 39
... 50mm x 1.5mm Square Inner Cap 38mm x 100mm Outer Cap M8 Washer Large Pulley M10 x 25mm Bolt 63.5mm Square Inner Cap Curl Yoke Bushing M10 x 25mm Spacer M8 Nylon Locknut M10 Large Washer M8 x 90mm Bolt Cable Stop Cable Eyelet Cabling Rod Chain M8 Jam Nut Curl Bar Spacer Spring Retainer User's Manual Exercise Guide Grease Packet Hex Key Note: Specifications are not illustrated. 39
English Manual
Page 44
... this manual) • the key number and description of the part(s) (see the front cover of merchantability or fitness for which vary from defects in China © 2007 ICON IP, Inc. products used as store display models. Accordingly, the above limitation may not apply to the terms set forth above limitation may also have other warranty beyond that specifically set forth herein. This warranty gives you . All repairs...
... this manual) • the key number and description of the part(s) (see the front cover of merchantability or fitness for which vary from defects in China © 2007 ICON IP, Inc. products used as store display models. Accordingly, the above limitation may not apply to the terms set forth above limitation may also have other warranty beyond that specifically set forth herein. This warranty gives you . All repairs...


