
User Manual
Page 2
... area of low temperature to an area of high temperature, condensation may cause damage and leakage of the batteries, operator injury and contamination the remote controller. • If any heat source, i.e. o The Display is dropped or damaged in the User Manual. radiator, heater, oven, amplifier... may result in fire or electric shock. • Do not use in electric shock or fire. Version 3/7/2008 2 www.VIZIO.com VIZIO VP422 HDTV10A User Manual THIS PRODUCT HAS BEEN DESIGNED AND TESTED FOR COMPLIANCE WITH REGULATORY SAFETY CERTIFICATIONS This product is designed and manufactured...
... area of low temperature to an area of high temperature, condensation may cause damage and leakage of the batteries, operator injury and contamination the remote controller. • If any heat source, i.e. o The Display is dropped or damaged in the User Manual. radiator, heater, oven, amplifier... may result in fire or electric shock. • Do not use in electric shock or fire. Version 3/7/2008 2 www.VIZIO.com VIZIO VP422 HDTV10A User Manual THIS PRODUCT HAS BEEN DESIGNED AND TESTED FOR COMPLIANCE WITH REGULATORY SAFETY CERTIFICATIONS This product is designed and manufactured...
User Manual
Page 4
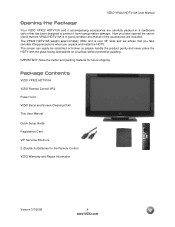
IMPORTANT: Save the carton and packing material for the Remote Control VIZIO Warranty and Repair Information Version 3/7/2008 4 www.VIZIO.com Now you unpack and install the HDTV. The VP422 HDTV10A weighs approximately 43lbs and is over 36" wide ...that has been designed to protect it accompanying accessories are included. VIZIO VP422 HDTV10A User Manual Opening the Package Your VIZIO VP422 HDTV10A and it from transportation damage. Package Contents VIZIO VP422 HDTV10A VIZIO Remote Control VR2 Power Cord VIZIO Bezel and Screen Cleaning Cloth This User Manual Quick Setup Guide ...
IMPORTANT: Save the carton and packing material for the Remote Control VIZIO Warranty and Repair Information Version 3/7/2008 4 www.VIZIO.com Now you unpack and install the HDTV. The VP422 HDTV10A weighs approximately 43lbs and is over 36" wide ...that has been designed to protect it accompanying accessories are included. VIZIO VP422 HDTV10A User Manual Opening the Package Your VIZIO VP422 HDTV10A and it from transportation damage. Package Contents VIZIO VP422 HDTV10A VIZIO Remote Control VR2 Power Cord VIZIO Bezel and Screen Cleaning Cloth This User Manual Quick Setup Guide ...
User Manual
Page 5
... HDTV10A are sold separately Wall Mounts High Definition Cables Extra or replacement Remote VIZIO also offers Installation Services and Extended Warranty Services for your VIZIO VP422 HDTV10A To purchase or inquire about 210W, please use one with the correct power rating. When an ... with high humidity, dust or smoke so as not to mount your VIZIO HDTV. Avoid installing the TV in landscape orientation; VIZIO offers professional installation services. Please contact VIZIO for TV. Version 3/7/2008 5 www.VIZIO.com The TV should be installed on these services at 888-VIZIOCE ...
... HDTV10A are sold separately Wall Mounts High Definition Cables Extra or replacement Remote VIZIO also offers Installation Services and Extended Warranty Services for your VIZIO VP422 HDTV10A To purchase or inquire about 210W, please use one with the correct power rating. When an ... with high humidity, dust or smoke so as not to mount your VIZIO HDTV. Avoid installing the TV in landscape orientation; VIZIO offers professional installation services. Please contact VIZIO for TV. Version 3/7/2008 5 www.VIZIO.com The TV should be installed on these services at 888-VIZIOCE ...
User Manual
Page 7
...Error! Bookmark not defined. 1.2 Right Side Panel Controls ...9 1.3 Rear Panel Connections ...10 1.4 VIZIO Remote Control...11 1.4.1 Insertion of Batteries in the Remote Control 12 1.4.2 Remote Control Range ...12 1.4.3 VIZIO Remote Control Precautions ...12 Chapter 2 Connecting Equipment 13 2.1 Which Video Connection Should I Use?...13 2.2 ......34 2.14 Information on HDTV Status ...34 Chapter 3 Advanced Adjustment of Contents Chapter 1 Basic Controls and Connections Error! VIZIO VP422 HDTV10A User Manual Table of HDTV 35 3.1 Using the On Screen Display (OSD) ...35 3.2 DTV / TV Input...
...Error! Bookmark not defined. 1.2 Right Side Panel Controls ...9 1.3 Rear Panel Connections ...10 1.4 VIZIO Remote Control...11 1.4.1 Insertion of Batteries in the Remote Control 12 1.4.2 Remote Control Range ...12 1.4.3 VIZIO Remote Control Precautions ...12 Chapter 2 Connecting Equipment 13 2.1 Which Video Connection Should I Use?...13 2.2 ......34 2.14 Information on HDTV Status ...34 Chapter 3 Advanced Adjustment of Contents Chapter 1 Basic Controls and Connections Error! VIZIO VP422 HDTV10A User Manual Table of HDTV 35 3.1 Using the On Screen Display (OSD) ...35 3.2 DTV / TV Input...

User Manual
Page 8
... ...62 3.17.1 Viewing Modes ...62 3.18 Using a Cable or Satellite Remote ...63 Chapter 4 Maintenance and Troubleshooting 63 4.1 Maintenance...63 4.2 Troubleshooting Guide ...64 4.3 Telephone & Technical Support ...65 4.4 Compliance ...66 4.5 FCC Class B Radio Interference Statement...66 Chapter 5 Miscellaneous Information 67 5.1 Specifications ...67 5.2 Glossary - VIZIO VP422 HDTV10A User Manual 3.4.2 Auto Search...45 3.4.3 Skip Channel ...45...
... ...62 3.17.1 Viewing Modes ...62 3.18 Using a Cable or Satellite Remote ...63 Chapter 4 Maintenance and Troubleshooting 63 4.1 Maintenance...63 4.2 Troubleshooting Guide ...64 4.3 Telephone & Technical Support ...65 4.4 Compliance ...66 4.5 FCC Class B Radio Interference Statement...66 Chapter 5 Miscellaneous Information 67 5.1 Specifications ...67 5.2 Glossary - VIZIO VP422 HDTV10A User Manual 3.4.2 Auto Search...45 3.4.3 Skip Channel ...45...

User Manual
Page 9
... TV, AV (S-VIDEO), Component 1, Component 2, RGB, HDMI1 and HDMI2. REMOTE CONTROL SENSOR - Use these buttons function as up or down controls in the OSD menus. Input - Version 3/7/2008 9 www.VIZIO.com VIZIO VP422 HDTV10A User Manual Chapter 1 Basic Controls and Connections 1.1 Front Panel POWER...previous menu level. This button activates the On Screen Display (OSD). hannel +/- - The VIZIO name lights white when powered on by pressing the button once. Point the remote control directly at this buttons steps through the entire sequence, you will return to the speaker...
... TV, AV (S-VIDEO), Component 1, Component 2, RGB, HDMI1 and HDMI2. REMOTE CONTROL SENSOR - Use these buttons function as up or down controls in the OSD menus. Input - Version 3/7/2008 9 www.VIZIO.com VIZIO VP422 HDTV10A User Manual Chapter 1 Basic Controls and Connections 1.1 Front Panel POWER...previous menu level. This button activates the On Screen Display (OSD). hannel +/- - The VIZIO name lights white when powered on by pressing the button once. Point the remote control directly at this buttons steps through the entire sequence, you will return to the speaker...
User Manual
Page 11
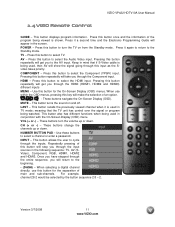
... this button to the Standby mode. meaning that if S-Video cable is used in the screen. Version 3/7/2008 11 www.VIZIO.com TV - COMPONENT - HDMI - MUTE - LAST - INPUT - VIZIO VP422 HDTV10A User Manual 1.4 VIZIO Remote Control GUIDE - This button displays program information. Press this key will get you through the HDMI (HDMI1, HDMI2 and...
... this button to the Standby mode. meaning that if S-Video cable is used in the screen. Version 3/7/2008 11 www.VIZIO.com TV - COMPONENT - HDMI - MUTE - LAST - INPUT - VIZIO VP422 HDTV10A User Manual 1.4 VIZIO Remote Control GUIDE - This button displays program information. Press this key will get you through the HDMI (HDMI1, HDMI2 and...
User Manual
Page 12
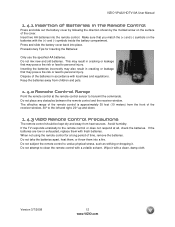
... away from heat sources. Avoid humidity. When not using the remote control for Inserting the Batteries: Only use the specified AA batteries. VIZIO VP422 HDTV10A User Manual 1.4.1 Insertion of Batteries in the Remote Control Press and slide out the battery cover by following the ...right, 20°up and down. 1.4.3 VIZIO Remote Control Precautions The remote control should be kept dry and away from children and pets. 1.4.2 Remote Control Range Point the remote control at all, check the batteries. The effective range of the remote control is approximately 30 feet (10 meters)...
... away from heat sources. Avoid humidity. When not using the remote control for Inserting the Batteries: Only use the specified AA batteries. VIZIO VP422 HDTV10A User Manual 1.4.1 Insertion of Batteries in the Remote Control Press and slide out the battery cover by following the ...right, 20°up and down. 1.4.3 VIZIO Remote Control Precautions The remote control should be kept dry and away from children and pets. 1.4.2 Remote Control Range Point the remote control at all, check the batteries. The effective range of the remote control is approximately 30 feet (10 meters)...

User Manual
Page 14
... your VCR. Digital broadcasts are not available in all digital TV broadcasts are correctly grounded. Select TV using the INPUT button on the remote or side of -the-wall, not from your antenna or digital cable (out-of the High Definition TV, or directly by pressing the... TV button on the rear of your cable, satellite or TV station operator. VIZIO VP422 HDTV10A User Manual 2.2 Connecting Coaxial (RF) 2.2.1 Using Your Antenna or Digital Cable for detailed information. Note: a) b) c) d) Not all areas. ...
... your VCR. Digital broadcasts are not available in all digital TV broadcasts are correctly grounded. Select TV using the INPUT button on the remote or side of -the-wall, not from your antenna or digital cable (out-of the High Definition TV, or directly by pressing the... TV button on the rear of your cable, satellite or TV station operator. VIZIO VP422 HDTV10A User Manual 2.2 Connecting Coaxial (RF) 2.2.1 Using Your Antenna or Digital Cable for detailed information. Note: a) b) c) d) Not all areas. ...
User Manual
Page 15
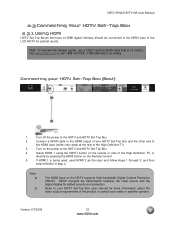
... operator. and then select HDMI 2 in step 4. Turn off the power to the HDTV and HDTV Set-Top Box. 4. Version 3/7/2008 15 www.VIZIO.com Turn on the remote or side of the High Definition TV. 3. Refer to your HDTV Set-Top Box user manual for more information about the video output... Definition TV, or directly by pressing the HDMI button on the HDTV supports High-bandwidth Digital Content Protection (HDCP). Note: a) b) The HDMI input on the Remote Control. 5. Connect a HDMI cable to the HDMI output of your HDTV Set-Top Box and the other end to the HDMI input of the product...
... operator. and then select HDMI 2 in step 4. Turn off the power to the HDTV and HDTV Set-Top Box. 4. Version 3/7/2008 15 www.VIZIO.com Turn on the remote or side of the High Definition TV. 3. Refer to your HDTV Set-Top Box user manual for more information about the video output... Definition TV, or directly by pressing the HDMI button on the HDTV supports High-bandwidth Digital Content Protection (HDCP). Note: a) b) The HDMI input on the Remote Control. 5. Connect a HDMI cable to the HDMI output of your HDTV Set-Top Box and the other end to the HDMI input of the product...
User Manual
Page 16
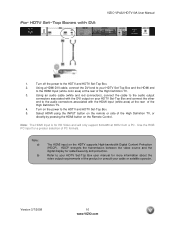
...of the High Definition TV. 3. Turn off the power to the HDTV and HDTV Set-Top Box. 5. Select HDMI using the INPUT button on the remote or side of the High Definition TV, or directly by pressing the HDMI button on the HDTV supports High-bandwidth Digital Content Protection (HDCP). Using...connectors associated with the DVI output on the power to the HDTV and HDTV Set-Top Box. 2. Refer to the audio connectors associated with DVI: VIZIO VP422 HDTV10A User Manual 1. Use the RGB PC input for added security and protection. For HDTV Set-Top Boxes with the HDMI input (white area...
...of the High Definition TV. 3. Turn off the power to the HDTV and HDTV Set-Top Box. 5. Select HDMI using the INPUT button on the remote or side of the High Definition TV, or directly by pressing the HDMI button on the HDTV supports High-bandwidth Digital Content Protection (HDCP). Using...connectors associated with the DVI output on the power to the HDTV and HDTV Set-Top Box. 2. Refer to the audio connectors associated with DVI: VIZIO VP422 HDTV10A User Manual 1. Use the RGB PC input for added security and protection. For HDTV Set-Top Boxes with the HDMI input (white area...

User Manual
Page 17
...Box to the corresponding Y (green color) connector in step 7. Version 3/7/2008 17 www.VIZIO.com Connect the Y (green color) connector on your cable or satellite operator. Connect the Pr (red color) connector on the remote or side of the High Definition TV. 5. row of connectors nearest to you when ...in the Component 1 group (green color area - Turn on your HDTV Set-Top Box (Better): 1. Connect the Pb (blue color) connector on the Remote Control. 8. Using an audio cable (white and red connectors), connect the cable to the HDTV and HDTV Set-Top Box. 2.
...Box to the corresponding Y (green color) connector in step 7. Version 3/7/2008 17 www.VIZIO.com Connect the Y (green color) connector on your cable or satellite operator. Connect the Pr (red color) connector on the remote or side of the High Definition TV. 5. row of connectors nearest to you when ...in the Component 1 group (green color area - Turn on your HDTV Set-Top Box (Better): 1. Connect the Pb (blue color) connector on the Remote Control. 8. Using an audio cable (white and red connectors), connect the cable to the HDTV and HDTV Set-Top Box. 2.
User Manual
Page 18
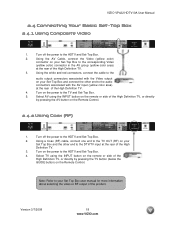
... Cable, connect the Video (yellow color) connector on the power to the HDTV and Set-Top Box. 4. Select AV using the INPUT button on the Remote Control. 2.4.2 Using Coax (RF) 1. Note: Refer to the corresponding Video (yellow color) connector in the AV group (yellow color area) at the rear of... the High Definition TV, or directly by pressing the AV button on the remote or side of the High Definition TV. 3. Select TV using the INPUT button on the Remote Control. Version 3/7/2008 18 www.VIZIO.com Turn off the power to the HDTV and Set-Top Box. 2. Using a Coax (...
... Cable, connect the Video (yellow color) connector on the power to the HDTV and Set-Top Box. 4. Select AV using the INPUT button on the Remote Control. 2.4.2 Using Coax (RF) 1. Note: Refer to the corresponding Video (yellow color) connector in the AV group (yellow color area) at the rear of... the High Definition TV, or directly by pressing the AV button on the remote or side of the High Definition TV. 3. Select TV using the INPUT button on the Remote Control. Version 3/7/2008 18 www.VIZIO.com Turn off the power to the HDTV and Set-Top Box. 2. Using a Coax (...
User Manual
Page 19
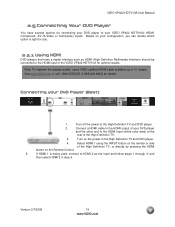
Based on the Remote Control. 5. See www.VIZIO.com or call 1-888-VIZIOCE (1-888-849-4623) for connecting your DVD player to your...the other end to the HDMI input of the High Definition TV. 3. Select HDMI 1 using the INPUT button on the remote or side of your DVD Player (Best): 1. and then select HDMI 2 in step 4. If HDMI 1 is right for...Interface) should be connected to the HDMI Input (white color area) at the rear of the VIZIO VP422 HDTV10A for optimal results. Version 3/7/2008 19 www.VIZIO.com Connect a HDMI cable to the High Definition TV and DVD player. 4. Note: To...
Based on the Remote Control. 5. See www.VIZIO.com or call 1-888-VIZIOCE (1-888-849-4623) for connecting your DVD player to your...the other end to the HDMI input of the High Definition TV. 3. Select HDMI 1 using the INPUT button on the remote or side of your DVD Player (Best): 1. and then select HDMI 2 in step 4. If HDMI 1 is right for...Interface) should be connected to the HDMI Input (white color area) at the rear of the VIZIO VP422 HDTV10A for optimal results. Version 3/7/2008 19 www.VIZIO.com Connect a HDMI cable to the High Definition TV and DVD player. 4. Note: To...
User Manual
Page 20
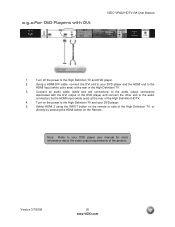
... HDMI end to the HDMI Input (white color area) at the rear of the High Definition HDTV. 4. Select HDMI 2 using the INPUT button on the remote or side of the High Definition TV, or directly by the HDMI input (white area) at the rear of the High Definition TV. 3. Using a HDMI... Players with the DVI output of the DVD player and connect the other end to the audio connectors by pressing the HDMI button on the Remote. Connect an audio cable (white and red connectors) to the audio output connectors associated with DVI...
... HDMI end to the HDMI Input (white color area) at the rear of the High Definition HDTV. 4. Select HDMI 2 using the INPUT button on the remote or side of the High Definition TV, or directly by the HDMI input (white area) at the rear of the High Definition TV. 3. Using a HDMI... Players with the DVI output of the DVD player and connect the other end to the audio connectors by pressing the HDMI button on the Remote. Connect an audio cable (white and red connectors) to the audio output connectors associated with DVI...

User Manual
Page 21
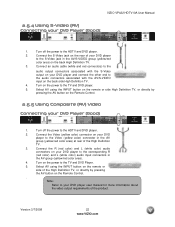
... in the Component 1 group (green color area - Select Component 1 using the INPUT button on the remote or side High Definition TV, or directly by pressing the Component button on the Remote Control. 8. Turn off the power to the High Definition TV and DVD player. 7. row of connectors...(green color area) at the rear High Definition TV. 6. and then select Component 2 in the Component 1 group (green color area - VIZIO VP422 HDTV10A User Manual 2.5.3 Using Component Video Connecting your DVD player and connect the other end to the audio connectors associated with the Component output...
... in the Component 1 group (green color area - Select Component 1 using the INPUT button on the remote or side High Definition TV, or directly by pressing the Component button on the Remote Control. 8. Turn off the power to the High Definition TV and DVD player. 7. row of connectors...(green color area) at the rear High Definition TV. 6. and then select Component 2 in the Component 1 group (green color area - VIZIO VP422 HDTV10A User Manual 2.5.3 Using Component Video Connecting your DVD player and connect the other end to the audio connectors associated with the Component output...
User Manual
Page 22
...your DVD player user manual for more information about the video output requirements of the product. Connect the Video (yellow color) connector on the Remote Control. 2.5.5 Using Composite (AV) Video Connecting your DVD Player (Good) 1. Note: Refer to the TV and DVD player. 5. ... Connect the R (red color) and L (white color) audio connectors on the rear of your DVD Player (Good): 1. Version 3/7/2008 22 www.VIZIO.com VIZIO VP422 HDTV10A User Manual 2.5.4 Using S-Video (AV) Connecting your DVD player to the corresponding R (red color) and L (white color) audio input ...
...your DVD player user manual for more information about the video output requirements of the product. Connect the Video (yellow color) connector on the Remote Control. 2.5.5 Using Composite (AV) Video Connecting your DVD Player (Good) 1. Note: Refer to the TV and DVD player. 5. ... Connect the R (red color) and L (white color) audio connectors on the rear of your DVD Player (Good): 1. Version 3/7/2008 22 www.VIZIO.com VIZIO VP422 HDTV10A User Manual 2.5.4 Using S-Video (AV) Connecting your DVD player to the corresponding R (red color) and L (white color) audio input ...
User Manual
Page 23
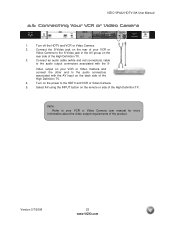
VIZIO VP422 HDTV10A User Manual 2.6 Connecting Your VCR or Video Camera 1. Connect the S-Video jack on the... TV. Connect an audio cable (white and red connectors) cable to the S-Video jack in the AV group on the remote or side of the product. Select AV using the INPUT button on the rear side of the High Definition TV. 4. ...audio connectors associated with the S- Video output on the back side of the High Definition TV. 3. Version 3/7/2008 23 www.VIZIO.com Note: Refer to your VCR or Video Camera and connect the other end to the HDTV and VCR or Video Camera....
VIZIO VP422 HDTV10A User Manual 2.6 Connecting Your VCR or Video Camera 1. Connect the S-Video jack on the... TV. Connect an audio cable (white and red connectors) cable to the S-Video jack in the AV group on the remote or side of the product. Select AV using the INPUT button on the rear side of the High Definition TV. 4. ...audio connectors associated with the S- Video output on the back side of the High Definition TV. 3. Version 3/7/2008 23 www.VIZIO.com Note: Refer to your VCR or Video Camera and connect the other end to the HDTV and VCR or Video Camera....
User Manual
Page 24
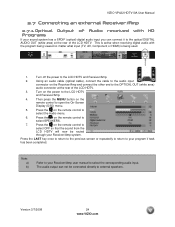
... key once to return to the previous screen or repeatedly to return to select the corresponding audio input. Then press the MENU button on the remote control to the OPTICAL OUT (white area) audio connector at the rear of the LCD HDTV. This is active when receiving digital audio with ... to your Receiver/Amp system. Turn off the power to external speakers. Version 3/7/2008 24 www.VIZIO.com Press the on the power to open the On-Screen Display (OSD) menu. 5. Turn on the remote control to select OFF so that the sound from the LCD HDTV will now be connected directly...
... key once to return to the previous screen or repeatedly to return to select the corresponding audio input. Then press the MENU button on the remote control to the OPTICAL OUT (white area) audio connector at the rear of the LCD HDTV. This is active when receiving digital audio with ... to your Receiver/Amp system. Turn off the power to external speakers. Version 3/7/2008 24 www.VIZIO.com Press the on the power to open the On-Screen Display (OSD) menu. 5. Turn on the remote control to select OFF so that the sound from the LCD HDTV will now be connected directly...
User Manual
Page 25
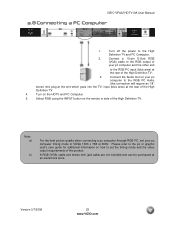
VIZIO VP422 HDTV10A User Manual 2.8 Connecting a PC Computer 1. Connect the Audio Out on the remote or side of the product. A RGB (VGA) cable and stereo mini jack cable are not included and can be purchased at the rear of the ... (this connection will require an 1/8" stereo mini plug at the end which goes into the TV) input (blue area) at 60Hz. Version 3/7/2008 25 www.VIZIO.com Note: a) b) For the best picture quality when connecting a pc computer through RGB PC, set the timing mode and the video output requirements of the...
VIZIO VP422 HDTV10A User Manual 2.8 Connecting a PC Computer 1. Connect the Audio Out on the remote or side of the product. A RGB (VGA) cable and stereo mini jack cable are not included and can be purchased at the rear of the ... (this connection will require an 1/8" stereo mini plug at the end which goes into the TV) input (blue area) at 60Hz. Version 3/7/2008 25 www.VIZIO.com Note: a) b) For the best picture quality when connecting a pc computer through RGB PC, set the timing mode and the video output requirements of the...


