VOJ320F1A HDTV User Manual
Page 1
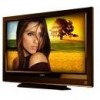
... purchase or inquire about accessories and installation services for your new VIZIO VOJ320F1A High Definition LCD Television purchase. dba V, Inc. Manufactured under license from your VIZIO VOJ320F1A either at techsupport@vizio.com. These plans give additional coverage during the standard warranty period.... Version 8/25/2008 1 www.VIZIO.com VIZIO VOJ320F1A User Manual Dear VIZIO Customer, Congratulations on your support. BRAVO, VIZIO AND THE V LOGO AND WHERE VISION MEETS VALUE AND OTHER VIZIO TRADEMARKS ARE THE INTELLECTUAL PROPERTY OF VIZIO INC. Dolby and the double-D symbol...
... purchase or inquire about accessories and installation services for your new VIZIO VOJ320F1A High Definition LCD Television purchase. dba V, Inc. Manufactured under license from your VIZIO VOJ320F1A either at techsupport@vizio.com. These plans give additional coverage during the standard warranty period.... Version 8/25/2008 1 www.VIZIO.com VIZIO VOJ320F1A User Manual Dear VIZIO Customer, Congratulations on your support. BRAVO, VIZIO AND THE V LOGO AND WHERE VISION MEETS VALUE AND OTHER VIZIO TRADEMARKS ARE THE INTELLECTUAL PROPERTY OF VIZIO INC. Dolby and the double-D symbol...

VOJ320F1A HDTV User Manual
Page 2
...stand recommended by manufacturer or sold with your HDTV. ! Slots and openings in electric shock or fire. Version 8/25/2008 2 www.VIZIO.com Do not place any object into a grounded power outlet. Doing so could short circuit parts causing a fire or electric shock....your HDTV cabinet. Do not defeat the safety purpose of power source indicated on your HDTV in a safe place for ventilation. VIZIO VOJ320F1A User Manual Important Safety Instructions Your HDTV is designed and manufactured to avoid causing fire, electric shock, or component damage. ! A distance ...
...stand recommended by manufacturer or sold with your HDTV. ! Slots and openings in electric shock or fire. Version 8/25/2008 2 www.VIZIO.com Do not place any object into a grounded power outlet. Doing so could short circuit parts causing a fire or electric shock....your HDTV cabinet. Do not defeat the safety purpose of power source indicated on your HDTV in a safe place for ventilation. VIZIO VOJ320F1A User Manual Important Safety Instructions Your HDTV is designed and manufactured to avoid causing fire, electric shock, or component damage. ! A distance ...

VOJ320F1A HDTV User Manual
Page 3
... cord immediately and contact your dealer. When your HDTV in an area with instructions. o Your HDTV is exposed to rain or moisture. VIZIO VOJ320F1A User Manual ! Do not attempt to high voltages, electric shock, and other cables are unplugged before moving your HDTV. Continuous use in accordance with ...may result in fire or electric shock. ! Insert batteries in this case may cause fire or electric shock ! Version 8/25/2008 3 www.VIZIO.com Do not overload power strips and extension cords. Keep your HDTV, hold the power plug, not the cord. Avoid using dropped or ...
... cord immediately and contact your dealer. When your HDTV in an area with instructions. o Your HDTV is exposed to rain or moisture. VIZIO VOJ320F1A User Manual ! Do not attempt to high voltages, electric shock, and other cables are unplugged before moving your HDTV. Continuous use in accordance with ...may result in fire or electric shock. ! Insert batteries in this case may cause fire or electric shock ! Version 8/25/2008 3 www.VIZIO.com Do not overload power strips and extension cords. Keep your HDTV, hold the power plug, not the cord. Avoid using dropped or ...
VOJ320F1A HDTV User Manual
Page 4
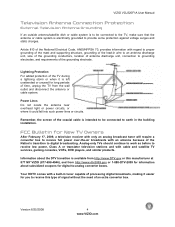
... with an antenna because of the Nation's transition to digital broadcasting. Version 8/25/2008 4 www.VIZIO.com Lightning Protection For added protection of the TV during a lightning storm or when it could fall into such power lines or circuits. Information about ... of the National Electrical Code, ANSI/NFPSA 70, provides information with cable and satellite TV services, gaming consoles, VCRs, DVD players, and similar products. VIZIO VOJ320F1A User Manual Television Antenna Connection Protection External Television Antenna Grounding If an outside antenna/satellite dish or cable...
... with an antenna because of the Nation's transition to digital broadcasting. Version 8/25/2008 4 www.VIZIO.com Lightning Protection For added protection of the TV during a lightning storm or when it could fall into such power lines or circuits. Information about ... of the National Electrical Code, ANSI/NFPSA 70, provides information with cable and satellite TV services, gaming consoles, VCRs, DVD players, and similar products. VIZIO VOJ320F1A User Manual Television Antenna Connection Protection External Television Antenna Grounding If an outside antenna/satellite dish or cable...
VOJ320F1A HDTV User Manual
Page 5
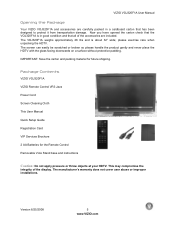
...designed to protect it from transportation damage. VIZIO VOJ320F1A User Manual Opening the Package Your VIZIO VOJ320F1A and accessories are included. IMPORTANT: Save the carton and packing material for the Remote Control Removable Vizio Stand base and instructions Caution: Do ...Manual Quick Setup Guide Registration Card VIP Services Brochure 2 AA Batteries for future shipping. The VOJ320F1A weighs approximately 28 lbs and is in a cardboard carton that all of the display. please exercise care when unpacking the HDTV. Now you have opened the carton check that the VOJ320F1A is about 32...
...designed to protect it from transportation damage. VIZIO VOJ320F1A User Manual Opening the Package Your VIZIO VOJ320F1A and accessories are included. IMPORTANT: Save the carton and packing material for the Remote Control Removable Vizio Stand base and instructions Caution: Do ...Manual Quick Setup Guide Registration Card VIP Services Brochure 2 AA Batteries for future shipping. The VOJ320F1A weighs approximately 28 lbs and is in a cardboard carton that all of the display. please exercise care when unpacking the HDTV. Now you have opened the carton check that the VOJ320F1A is about 32...

VOJ320F1A HDTV User Manual
Page 6
... TV is required, use the power cord designated for TV. Install the TV in places with the correct power rating. The TV should be installed on a flat surface to "Preparing your LCD HDTV for Wall Mounting" on the wall, please refer to avoid tipping. VIZIO offers...not to mount your TV on the wall for viewing. VIZIO VOJ320F1A User Manual Additional Certified Accessories for the VIZIO VOJ320F1A are sold separately Wall Mounts High Definition Cables Extra or replacement Remote VIZIO also offers Installation Services and Extended Warranty Services for your VIZIO VOJ320F1A To purchase or ...
... TV is required, use the power cord designated for TV. Install the TV in places with the correct power rating. The TV should be installed on a flat surface to "Preparing your LCD HDTV for Wall Mounting" on the wall, please refer to avoid tipping. VIZIO offers...not to mount your TV on the wall for viewing. VIZIO VOJ320F1A User Manual Additional Certified Accessories for the VIZIO VOJ320F1A are sold separately Wall Mounts High Definition Cables Extra or replacement Remote VIZIO also offers Installation Services and Extended Warranty Services for your VIZIO VOJ320F1A To purchase or ...

VOJ320F1A HDTV User Manual
Page 7
VIZIO VOJ320F1A User Manual TV Setup and Stand Assembly Note: We strongly recommend that the surface is free of the TV. Remove the two top foam end caps. 3. Stand Neck 1. Move the TV into an upright position. Stand Base Version 8/25/2008 7 www.VIZIO.com Remove the TV from the foam end caps. 2. Push the ...stand base onto the stand neck. 3. To attach the TV stand base: Note: If you will be wall mounting the TV, skip this step and go to the TV) with the arrows on the stand ...
VIZIO VOJ320F1A User Manual TV Setup and Stand Assembly Note: We strongly recommend that the surface is free of the TV. Remove the two top foam end caps. 3. Stand Neck 1. Move the TV into an upright position. Stand Base Version 8/25/2008 7 www.VIZIO.com Remove the TV from the foam end caps. 2. Push the ...stand base onto the stand neck. 3. To attach the TV stand base: Note: If you will be wall mounting the TV, skip this step and go to the TV) with the arrows on the stand ...
VOJ320F1A HDTV User Manual
Page 8
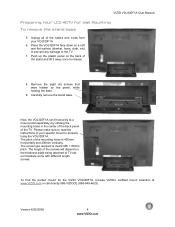
... from your specific mount to release. 8. The screw type required is 400mm horizontally and 200mm vertically. Now, the VOJ320F1A can fit securely to TV set, our brackets come with different length screws. Remove the eight (8) screws that were hidden by utilizing the mounting... to read the instructions of the mounting holes is metric M6, 1.00mm pitch. The length of the TV. VIZIO VOJ320F1A User Manual Preparing Your LCD HDTV for the VIZIO VOJ320F1A, browse VIZIO's certified mount selection at www.VIZIO.com or call directly 888-VIZIOCE (888-849-4623). Please make sure to the...
... from your specific mount to release. 8. The screw type required is 400mm horizontally and 200mm vertically. Now, the VOJ320F1A can fit securely to TV set, our brackets come with different length screws. Remove the eight (8) screws that were hidden by utilizing the mounting... to read the instructions of the mounting holes is metric M6, 1.00mm pitch. The length of the TV. VIZIO VOJ320F1A User Manual Preparing Your LCD HDTV for the VIZIO VOJ320F1A, browse VIZIO's certified mount selection at www.VIZIO.com or call directly 888-VIZIOCE (888-849-4623). Please make sure to the...

VOJ320F1A HDTV User Manual
Page 9
VIZIO VOJ320F1A User Manual Table of Contents Chapter 1 Basic Controls and Connections 11 1.1 Front Panel...11 1.2 Side Panel Controls...11 1.3 Rear Panel Connections ...12 1.4 Right-Side Panel Connection ...13 1.5 VIZIO Remote Control...14 1.5.1 Insertion of Batteries in the Remote Control 15 1.5.2 Remote Control Range ...15 1.5.3 VIZIO...) through RGB (15-Pin VGA) Input 30 Chapter 3 Setting Up to Watch Television 31 3.1 Basic LCD HDTV Start Up ...31 3.2 Watching a TV Program ...36 3.3 Adjusting Basic HDTV Settings ...37 3.4 Program Information...38 3.5 Information on HDTV Status ......
VIZIO VOJ320F1A User Manual Table of Contents Chapter 1 Basic Controls and Connections 11 1.1 Front Panel...11 1.2 Side Panel Controls...11 1.3 Rear Panel Connections ...12 1.4 Right-Side Panel Connection ...13 1.5 VIZIO Remote Control...14 1.5.1 Insertion of Batteries in the Remote Control 15 1.5.2 Remote Control Range ...15 1.5.3 VIZIO...) through RGB (15-Pin VGA) Input 30 Chapter 3 Setting Up to Watch Television 31 3.1 Basic LCD HDTV Start Up ...31 3.2 Watching a TV Program ...36 3.3 Adjusting Basic HDTV Settings ...37 3.4 Program Information...38 3.5 Information on HDTV Status ......

VOJ320F1A HDTV User Manual
Page 11
... the following sequence: TV, AV1/S-Video, AV2, Component1, Component2, RGB, HDMI 1, HDMI 2 and HDMI 3. If a sub-menu is the window through the entire sequence, you have stepped through which all of this button will return to the sensor. VIZIO VOJ320F1A User Manual Chapter 1 Basic Controls... and Connections 1.1 Front Panel POWER 'VIZIO' LIGHT- Repeated pressing of the remote control signals pass to the previous menu level. Once ...
... the following sequence: TV, AV1/S-Video, AV2, Component1, Component2, RGB, HDMI 1, HDMI 2 and HDMI 3. If a sub-menu is the window through the entire sequence, you have stepped through which all of this button will return to the sensor. VIZIO VOJ320F1A User Manual Chapter 1 Basic Controls... and Connections 1.1 Front Panel POWER 'VIZIO' LIGHT- Repeated pressing of the remote control signals pass to the previous menu level. Once ...

VOJ320F1A HDTV User Manual
Page 12
... from the LCD HDTV to an antenna or digital cable (out-of the TV indicates this connection. 9. The green color band on the rear of the TV indicates this connection. OPTICAL DIGITAL AUDIO OUT - The white color band on the rear of the TV indicates this connection.... AC IN - 1.3 Rear Panel Connections 1 3 4 5 VIZIO VOJ320F1A User Manual 8 9 10 2 6 7 1. Connect the primary source for Digital TV.* 10. Plug-in the supplied AC Power Cord here. * For digital TV stations in the rear of the TV for purchase from the same source, then use white for any purpose...
... from the LCD HDTV to an antenna or digital cable (out-of the TV indicates this connection. 9. The green color band on the rear of the TV indicates this connection. OPTICAL DIGITAL AUDIO OUT - The white color band on the rear of the TV indicates this connection.... AC IN - 1.3 Rear Panel Connections 1 3 4 5 VIZIO VOJ320F1A User Manual 8 9 10 2 6 7 1. Connect the primary source for Digital TV.* 10. Plug-in the supplied AC Power Cord here. * For digital TV stations in the rear of the TV for purchase from the same source, then use white for any purpose...

VOJ320F1A HDTV User Manual
Page 13
...COMPONENT2. 4. HDMI 3 - The white color band on the side of the TV indicates this connection. 4 Version 8/25/2008 13 www.VIZIO.com The orange color band on the side of the TV indicates this all digital connector. Note: The red and white audio connectors are ...shared between AV2 and COMPONENT2. 3. The purple color band on the side of the TV indicates this connection. 1.4 Right-Side Panel Connection VIZIO VOJ320F1A User Manual 1. Connect your headphone here for digital video such as a DVD multimedia player or set top box here....
...COMPONENT2. 4. HDMI 3 - The white color band on the side of the TV indicates this connection. 4 Version 8/25/2008 13 www.VIZIO.com The orange color band on the side of the TV indicates this all digital connector. Note: The red and white audio connectors are ...shared between AV2 and COMPONENT2. 3. The purple color band on the side of the TV indicates this connection. 1.4 Right-Side Panel Connection VIZIO VOJ320F1A User Manual 1. Connect your headphone here for digital video such as a DVD multimedia player or set top box here....
VOJ320F1A HDTV User Manual
Page 14
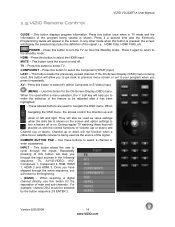
... through the input sources in the screen. This button recalls the previously viewed channel. Version 8/25/2008 14 www.VIZIO.com Press this button for the separation of the feature to the Standby mode. If the On-Screen Display (OSD...a digital channel directly use this button to select TV. Repeatedly pressing of the signal; This button displays program information. TV - COMPONENT - Press this button will display the selected input plus the definition of this button to select the HDMI input. 1.5 VIZIO Remote Control VIZIO VOJ320F1A User Manual GUIDE -
... through the input sources in the screen. This button recalls the previously viewed channel. Version 8/25/2008 14 www.VIZIO.com Press this button for the separation of the feature to the Standby mode. If the On-Screen Display (OSD...a digital channel directly use this button to select TV. Repeatedly pressing of the signal; This button displays program information. TV - COMPONENT - Press this button will display the selected input plus the definition of this button to select the HDMI input. 1.5 VIZIO Remote Control VIZIO VOJ320F1A User Manual GUIDE -

VOJ320F1A HDTV User Manual
Page 15
... Keep the batteries away from heat sources. Do not place any obstacles between the remote control and the receiver window. If the TV responds erratically to the remote control or does not respond at the remote control sensor to personal injury. If the batteries are low... Do not mix new and old batteries. When not using the remote control for Inserting the Batteries: Only use the specified AA batteries. VIZIO VOJ320F1A User Manual 1.5.1 Insertion of Batteries in the Remote Control Insert two AA batteries into a fire. The effective range of the remote control is approximately...
... Keep the batteries away from heat sources. Do not place any obstacles between the remote control and the receiver window. If the TV responds erratically to the remote control or does not respond at the remote control sensor to personal injury. If the batteries are low... Do not mix new and old batteries. When not using the remote control for Inserting the Batteries: Only use the specified AA batteries. VIZIO VOJ320F1A User Manual 1.5.1 Insertion of Batteries in the Remote Control Insert two AA batteries into a fire. The effective range of the remote control is approximately...
VOJ320F1A HDTV User Manual
Page 16
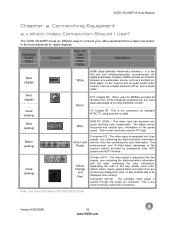
... other two containing the color information. Good (analog) Yellow, Orange and Red S-Video (AV1) - The video signal is most commonly used for standard NTSC TV using antenna or cable. It also enables text to be displayed more info refer to connect your video equipment from ATSC broadcast programming, this way...) - It is the first and only industry-supported, uncompressed, alldigital audio/video interface. This video input has separate red, green and blue color components. VIZIO VOJ320F1A User Manual Chapter 2 Connecting Equipment 2.1 Which Video Connection Should I Use?
... other two containing the color information. Good (analog) Yellow, Orange and Red S-Video (AV1) - The video signal is most commonly used for standard NTSC TV using antenna or cable. It also enables text to be displayed more info refer to connect your video equipment from ATSC broadcast programming, this way...) - It is the first and only industry-supported, uncompressed, alldigital audio/video interface. This video input has separate red, green and blue color components. VIZIO VOJ320F1A User Manual Chapter 2 Connecting Equipment 2.1 Which Video Connection Should I Use?

VOJ320F1A HDTV User Manual
Page 17
....org for DTV 1. Make sure the antenna and coaxial cable are High Definition (HD). Note: If you have an off-air antenna or cable TV, connect it to the "Antenna In" connector on the rear of your antenna or digital cable (out-of-the-wall, not from the Cable ...the HDTV. 2. Select DTV using the INPUT button on the remote or side of your VCR 1. VIZIO VOJ320F1A User Manual 2.2 Connecting Coaxial (RF) 2.2.1 Using Your Antenna or Digital Cable for detailed information. Turn on the power to TV", "RF Out" or "Antenna Out" connector on the rear of the HDTV, or directly by ...
....org for DTV 1. Make sure the antenna and coaxial cable are High Definition (HD). Note: If you have an off-air antenna or cable TV, connect it to the "Antenna In" connector on the rear of your antenna or digital cable (out-of-the-wall, not from the Cable ...the HDTV. 2. Select DTV using the INPUT button on the remote or side of your VCR 1. VIZIO VOJ320F1A User Manual 2.2 Connecting Coaxial (RF) 2.2.1 Using Your Antenna or Digital Cable for detailed information. Turn on the power to TV", "RF Out" or "Antenna Out" connector on the rear of the HDTV, or directly by ...
VOJ320F1A HDTV User Manual
Page 18
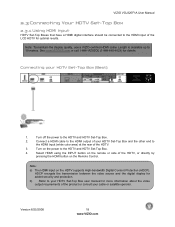
...Note: a) The HDMI input on the Remote Control. Turn on the remote or side of the LCD HDTV for more information about the video output requirements of the HDTV. 3. VIZIO VOJ320F1A User Manual 2.3 Connecting Your HDTV Set-Top Box 2.3.1 Using HDMI Input HDTV Set-Top Boxes that have a ...HDMI digital interface should be connected to 10 meters. Note: To maintain the display quality, use a VIZIO certified HDMI cable. Length is available ...
...Note: a) The HDMI input on the Remote Control. Turn on the remote or side of the LCD HDTV for more information about the video output requirements of the HDTV. 3. VIZIO VOJ320F1A User Manual 2.3 Connecting Your HDTV Set-Top Box 2.3.1 Using HDMI Input HDTV Set-Top Boxes that have a ...HDMI digital interface should be connected to 10 meters. Note: To maintain the display quality, use a VIZIO certified HDMI cable. Length is available ...

VOJ320F1A HDTV User Manual
Page 19
... protection. Refer to the HDTV and HDTV Set-Top Box. 5. Turn off the power to the audio output connectors associated with DVI: VIZIO VOJ320F1A User Manual 1. Version 8/25/2008 19 www.VIZIO.com Note: a) b) The HDMI input on the power to your cable or satellite operator. HDCP encrypts the transmission between the video source...
... protection. Refer to the HDTV and HDTV Set-Top Box. 5. Turn off the power to the audio output connectors associated with DVI: VIZIO VOJ320F1A User Manual 1. Version 8/25/2008 19 www.VIZIO.com Note: a) b) The HDMI input on the power to your cable or satellite operator. HDCP encrypts the transmission between the video source...

VOJ320F1A HDTV User Manual
Page 20
VIZIO VOJ320F1A User Manual 2.3.2 Using Component Video Connecting your HDTV Set-Top Box user manual for more information about the video output requirements of the HDTV. 6. Connect the .... 4. If Component1 is already connected to another device, or you when viewing from the rear of the TV) at the rear of the product or consult your HDTV Set-Top Box and connect the other end to... your HDTV Set-Top Box (Better): 1. row of connectors nearest to you when viewing from the rear of the TV) at the rear of the HDTV. 3. Turn off the power to use Component1, connect the green, blue and...
VIZIO VOJ320F1A User Manual 2.3.2 Using Component Video Connecting your HDTV Set-Top Box user manual for more information about the video output requirements of the HDTV. 6. Connect the .... 4. If Component1 is already connected to another device, or you when viewing from the rear of the TV) at the rear of the product or consult your HDTV Set-Top Box and connect the other end to... your HDTV Set-Top Box (Better): 1. row of connectors nearest to you when viewing from the rear of the TV) at the rear of the HDTV. 3. Turn off the power to use Component1, connect the green, blue and...

VOJ320F1A HDTV User Manual
Page 21
... of the HDTV, or directly by pressing the AV button on your Set Top Box user manual for more information about selecting the video or RF output of the HDTV, or directly by pressing the TV button on the Remote Control. Using a Coax (RF) cable, connect one end to your Set ... off the power to the HDTV and Set-Top Box. 2. Select AV1 using the INPUT button on the remote or side of the HDTV. 3. Select TV using the INPUT button on the remote or side of the product. VIZIO VOJ320F1A User Manual 2.4 Connecting Your Basic Set-Top Box 2.4.1 Using Composite Video 1.
... of the HDTV, or directly by pressing the AV button on your Set Top Box user manual for more information about selecting the video or RF output of the HDTV, or directly by pressing the TV button on the Remote Control. Using a Coax (RF) cable, connect one end to your Set ... off the power to the HDTV and Set-Top Box. 2. Select AV1 using the INPUT button on the remote or side of the HDTV. 3. Select TV using the INPUT button on the remote or side of the product. VIZIO VOJ320F1A User Manual 2.4 Connecting Your Basic Set-Top Box 2.4.1 Using Composite Video 1.

