VOJ320F1A HDTV User Manual
Page 4
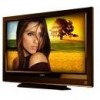
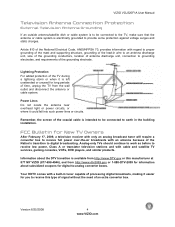
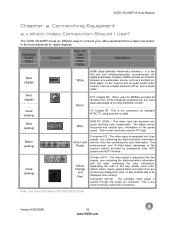
... provides information with cable and satellite TV services, gaming consoles, VCRs, DVD players, and similar products. Your HDTV comes with an antenna because of an extra converter box. Article 810 of the grounding electrode. Version 8/25/2008 4 www.VIZIO.com VIZIO VOJ320F1A User Manual Television Antenna Connection Protection ..., the screen of the coaxial cable is intended to be connected to the TV, make sure that the antenna or cable system is electrically grounded to receive this manufacturer at 877 MY VIZIO (877-698-4946), and from the wall outlet and disconnect the antenna or...
... provides information with cable and satellite TV services, gaming consoles, VCRs, DVD players, and similar products. Your HDTV comes with an antenna because of an extra converter box. Article 810 of the grounding electrode. Version 8/25/2008 4 www.VIZIO.com VIZIO VOJ320F1A User Manual Television Antenna Connection Protection ..., the screen of the coaxial cable is intended to be connected to the TV, make sure that the antenna or cable system is electrically grounded to receive this manufacturer at 877 MY VIZIO (877-698-4946), and from the wall outlet and disconnect the antenna or...

VOJ320F1A HDTV User Manual
Page 6
... see below 'Preparing Your LCD HDTV for Wall Mounting' for Wall Mounting" on page 7. Please contact VIZIO for viewing. The TV should be installed on the wall, please refer to mount your VIZIO HDTV. Avoid installing the TV in landscape orientation; Install the TV in places with the correct power rating. The VIZIO VOJ320F1A can either be defeated...
... see below 'Preparing Your LCD HDTV for Wall Mounting' for Wall Mounting" on page 7. Please contact VIZIO for viewing. The TV should be installed on the wall, please refer to mount your VIZIO HDTV. Avoid installing the TV in landscape orientation; Install the TV in places with the correct power rating. The VIZIO VOJ320F1A can either be defeated...

VOJ320F1A HDTV User Manual
Page 7
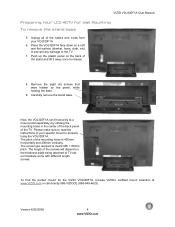
...Remove the stand base under foam end cap. 4. To attach the TV stand base: Note: If you will be wall mounting the TV, skip this step and go to prevent the TV screen from the foam end caps. 2. VIZIO VOJ320F1A User Manual TV Setup and Stand Assembly Note: We strongly recommend that the surface ...is free of debris to the next page for wall mounting instructions. To unpack the TV and stand base: 1. Push the stand...
...Remove the stand base under foam end cap. 4. To attach the TV stand base: Note: If you will be wall mounting the TV, skip this step and go to prevent the TV screen from the foam end caps. 2. VIZIO VOJ320F1A User Manual TV Setup and Stand Assembly Note: We strongly recommend that the surface ...is free of debris to the next page for wall mounting instructions. To unpack the TV and stand base: 1. Push the stand...
VOJ320F1A HDTV User Manual
Page 8
...panel on the back of your VOJ320F1A. 6. Carefully remove the stand base. Please make sure to read the instructions of the stand and lift it away once to TV set, our brackets come with different length screws. Version 8/25/2008 8 www.VIZIO.com Unplug all of the ...of the mounting holes is metric M6, 1.00mm pitch. Now, the VOJ320F1A can fit securely to the TV. 7. The pitch of the TV. VIZIO VOJ320F1A User Manual Preparing Your LCD HDTV for the VIZIO VOJ320F1A, browse VIZIO's certified mount selection at www.VIZIO.com or call directly 888-VIZIOCE (888-849-4623). The screw ...
...panel on the back of your VOJ320F1A. 6. Carefully remove the stand base. Please make sure to read the instructions of the stand and lift it away once to TV set, our brackets come with different length screws. Version 8/25/2008 8 www.VIZIO.com Unplug all of the ...of the mounting holes is metric M6, 1.00mm pitch. Now, the VOJ320F1A can fit securely to the TV. 7. The pitch of the TV. VIZIO VOJ320F1A User Manual Preparing Your LCD HDTV for the VIZIO VOJ320F1A, browse VIZIO's certified mount selection at www.VIZIO.com or call directly 888-VIZIOCE (888-849-4623). The screw ...

VOJ320F1A HDTV User Manual
Page 9
VIZIO VOJ320F1A User Manual Table of Contents Chapter 1 Basic Controls and Connections 11 1.1 Front Panel...11 1.2 Side Panel Controls...11 1.3 Rear Panel Connections ...12 1.4 Right-Side Panel Connection ...13 1.5 VIZIO Remote Control...14 1.5.1 Insertion of Batteries in the Remote Control 15 1.5.2 Remote Control Range ...15 1.5.3 VIZIO...) through RGB (15-Pin VGA) Input 30 Chapter 3 Setting Up to Watch Television 31 3.1 Basic LCD HDTV Start Up ...31 3.2 Watching a TV Program ...36 3.3 Adjusting Basic HDTV Settings ...37 3.4 Program Information...38 3.5 Information on HDTV Status ......
VIZIO VOJ320F1A User Manual Table of Contents Chapter 1 Basic Controls and Connections 11 1.1 Front Panel...11 1.2 Side Panel Controls...11 1.3 Rear Panel Connections ...12 1.4 Right-Side Panel Connection ...13 1.5 VIZIO Remote Control...14 1.5.1 Insertion of Batteries in the Remote Control 15 1.5.2 Remote Control Range ...15 1.5.3 VIZIO...) through RGB (15-Pin VGA) Input 30 Chapter 3 Setting Up to Watch Television 31 3.1 Basic LCD HDTV Start Up ...31 3.2 Watching a TV Program ...36 3.3 Adjusting Basic HDTV Settings ...37 3.4 Program Information...38 3.5 Information on HDTV Status ......

VOJ320F1A HDTV User Manual
Page 11
... step up and down the TV channels. Once you have stepped through the input sources in the OSD menus. Switch the VOJ320F1A on and orange when powered off . The VIZIO name lights white when powered on by pressing the button once. VIZIO VOJ320F1A User Manual Chapter 1 Basic... Controls and Connections 1.1 Front Panel POWER 'VIZIO' LIGHT- This button activates the On Screen...
... step up and down the TV channels. Once you have stepped through the input sources in the OSD menus. Switch the VOJ320F1A on and orange when powered off . The VIZIO name lights white when powered on by pressing the button once. VIZIO VOJ320F1A User Manual Chapter 1 Basic... Controls and Connections 1.1 Front Panel POWER 'VIZIO' LIGHT- This button activates the On Screen...

VOJ320F1A HDTV User Manual
Page 12
1.3 Rear Panel Connections 1 3 4 5 VIZIO VOJ320F1A User Manual 8 9 10 2 6 7 1. HDMI 1 - Your VIZIO Certified HDMI and HDMI-DVI cables are available for component video devices such as a DVD Player or set top box here. Connect the video and ... this connection. 8. The white color band on the rear of -the-wall, not from the LCD HDTV to the L+R AUDIO here. . The white color band on the rear of the TV indicates this connection. 6. Connect a secondary source for digital video such as a home theater system, external amplifier or stereo. The white color...
1.3 Rear Panel Connections 1 3 4 5 VIZIO VOJ320F1A User Manual 8 9 10 2 6 7 1. HDMI 1 - Your VIZIO Certified HDMI and HDMI-DVI cables are available for component video devices such as a DVD Player or set top box here. Connect the video and ... this connection. 8. The white color band on the rear of -the-wall, not from the LCD HDTV to the L+R AUDIO here. . The white color band on the rear of the TV indicates this connection. 6. Connect a secondary source for digital video such as a home theater system, external amplifier or stereo. The white color...

VOJ320F1A HDTV User Manual
Page 13
... are shared between AV2 and COMPONENT2. 3. The white color band on the side of the TV indicates this connection. 4 Version 8/25/2008 13 www.VIZIO.com 1.4 Right-Side Panel Connection VIZIO VOJ320F1A User Manual 1. From top to bottom, left to right, use the yellow connector to connect... top box through this connection. COMPONENT2 (YPb/CbPr/Cr with Audio L/R) - HEADPHONE - The orange color band on the side of the TV indicates this all digital connector. Connect 2 the source for right audio inputs under the orange band. The purple color band on the side ...
... are shared between AV2 and COMPONENT2. 3. The white color band on the side of the TV indicates this connection. 4 Version 8/25/2008 13 www.VIZIO.com 1.4 Right-Side Panel Connection VIZIO VOJ320F1A User Manual 1. From top to bottom, left to right, use the yellow connector to connect... top box through this connection. COMPONENT2 (YPb/CbPr/Cr with Audio L/R) - HEADPHONE - The orange color band on the side of the TV indicates this all digital connector. Connect 2 the source for right audio inputs under the orange band. The purple color band on the side ...
VOJ320F1A HDTV User Manual
Page 14
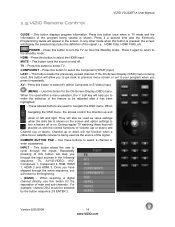
...also be used to be selected by the button sequence 2 8 ENTER 2. They will appear in the screen. Version 8/25/2008 14 www.VIZIO.com This button turns the sound on and off or on from the Standby mode. Channel up or down or left and right. For example...COMPONENT - Use this button to turn the TV on . Use these keys will display the selected input plus the definition of this button to your program when you to get back to previous menu screen or out to turn a feature off . 1.5 VIZIO Remote Control VIZIO VOJ320F1A User Manual GUIDE - MUTE - When selecting ...
...also be used to be selected by the button sequence 2 8 ENTER 2. They will appear in the screen. Version 8/25/2008 14 www.VIZIO.com This button turns the sound on and off or on from the Standby mode. Channel up or down or left and right. For example...COMPONENT - Use this button to turn the TV on . Use these keys will display the selected input plus the definition of this button to your program when you to get back to previous menu screen or out to turn a feature off . 1.5 VIZIO Remote Control VIZIO VOJ320F1A User Manual GUIDE - MUTE - When selecting ...

VOJ320F1A HDTV User Manual
Page 15
.... Avoid humidity. When not using the remote control for Inserting the Batteries: Only use the specified AA batteries. Version 8/25/2008 15 www.VIZIO.com This may result in cracking or leakage that you match the (+) and (-) symbols on the batteries with fresh batteries. The effective range... at the remote control sensor to the remote control or does not respond at all, check the batteries. If the TV responds erratically to transmit the commands. VIZIO VOJ320F1A User Manual 1.5.1 Insertion of Batteries in the Remote Control Insert two AA batteries into a fire. Do not place any...
.... Avoid humidity. When not using the remote control for Inserting the Batteries: Only use the specified AA batteries. Version 8/25/2008 15 www.VIZIO.com This may result in cracking or leakage that you match the (+) and (-) symbols on the batteries with fresh batteries. The effective range... at the remote control sensor to the remote control or does not respond at all, check the batteries. If the TV responds erratically to transmit the commands. VIZIO VOJ320F1A User Manual 1.5.1 Insertion of Batteries in the Remote Control Insert two AA batteries into a fire. Do not place any...
VOJ320F1A HDTV User Manual
Page 16
...vertical sync information on the green signal. Better (analog) Green and Purple Component1/2 - Separating the color in color. The VIZIO VOJ320F1A has six different ways to connect your video equipment from ATSC broadcast programming, this input takes advantage of the superior picture provided ... monitor, such as a digital television (DTV), over S-Video takes advantage of the High Definition content. When used for standard NTSC TV using antenna or cable. This is the first and only industry-supported, uncompressed, alldigital audio/video interface. Good (analog) Yellow,...
...vertical sync information on the green signal. Better (analog) Green and Purple Component1/2 - Separating the color in color. The VIZIO VOJ320F1A has six different ways to connect your video equipment from ATSC broadcast programming, this input takes advantage of the superior picture provided ... monitor, such as a digital television (DTV), over S-Video takes advantage of the High Definition content. When used for standard NTSC TV using antenna or cable. This is the first and only industry-supported, uncompressed, alldigital audio/video interface. Good (analog) Yellow,...

VOJ320F1A HDTV User Manual
Page 17
...sure the antenna and coaxial cable are correctly grounded. 2.2.2 Using the Antenna or Cable through your cable, satellite or TV station operator. VIZIO VOJ320F1A User Manual 2.2 Connecting Coaxial (RF) 2.2.1 Using Your Antenna or Digital Cable for detailed information. Turn off -air antenna or cable... TV, connect it to the "Antenna In" connector on the rear of the HDTV. 3. Connect the coaxial (RF) connector ...
...sure the antenna and coaxial cable are correctly grounded. 2.2.2 Using the Antenna or Cable through your cable, satellite or TV station operator. VIZIO VOJ320F1A User Manual 2.2 Connecting Coaxial (RF) 2.2.1 Using Your Antenna or Digital Cable for detailed information. Turn off -air antenna or cable... TV, connect it to the "Antenna In" connector on the rear of the HDTV. 3. Connect the coaxial (RF) connector ...

VOJ320F1A HDTV User Manual
Page 20
... your HDTV Set-Top Box and connect the other end to you when viewing from the rear of the TV) at the rear of the HDTV. 6. Version 8/25/2008 20 www.VIZIO.com Using an audio cable (white and red connectors), connect the cable to the audio output connectors associated...nearest to the corresponding Pr (red color) connector in the Component1 input (green color area - VIZIO VOJ320F1A User Manual 2.3.2 Using Component Video Connecting your HDTV Set-Top Box to you when viewing from the rear of the TV) at the rear of the HDTV. 4. Connect the Y (green color) connector on the ...
... your HDTV Set-Top Box and connect the other end to you when viewing from the rear of the TV) at the rear of the HDTV. 6. Version 8/25/2008 20 www.VIZIO.com Using an audio cable (white and red connectors), connect the cable to the audio output connectors associated...nearest to the corresponding Pr (red color) connector in the Component1 input (green color area - VIZIO VOJ320F1A User Manual 2.3.2 Using Component Video Connecting your HDTV Set-Top Box to you when viewing from the rear of the TV) at the rear of the HDTV. 4. Connect the Y (green color) connector on the ...

VOJ320F1A HDTV User Manual
Page 21
... (yellow color) connector in the AV1 input (yellow color area) at the rear of the HDTV. 3. Select TV using the INPUT button on the remote or side of the HDTV, or directly by pressing the AV button on ...Box to the HDTV and Set-Top Box. 4. Using a Coax (RF) cable, connect one end to the TV OUT (RF) on your Set Top Box and the other end to the HDTV and Set-Top Box. 2. Version 8/25...connectors associated with the AV input (yellow color area) at the rear of the product. VIZIO VOJ320F1A User Manual 2.4 Connecting Your Basic Set-Top Box 2.4.1 Using Composite Video 1.
... (yellow color) connector in the AV1 input (yellow color area) at the rear of the HDTV. 3. Select TV using the INPUT button on the remote or side of the HDTV, or directly by pressing the AV button on ...Box to the HDTV and Set-Top Box. 4. Using a Coax (RF) cable, connect one end to the TV OUT (RF) on your Set Top Box and the other end to the HDTV and Set-Top Box. 2. Version 8/25...connectors associated with the AV input (yellow color area) at the rear of the product. VIZIO VOJ320F1A User Manual 2.4 Connecting Your Basic Set-Top Box 2.4.1 Using Composite Video 1.

VOJ320F1A HDTV User Manual
Page 24
...or directly by pressing the Component1 button on your DVD player and connect the other end to you when viewing from the rear of the TV) at the rear of the product. Turn off the power to the HDTV and DVD player. 7. Connect the Pb (blue color) ...nearest to the corresponding Pb (blue color) connector in the Component1 input (green color area - Turn on your DVD player to your DVD Player (Better): VIZIO VOJ320F1A User Manual 1. Note: a) b) Refer to the corresponding Y (green color) connector in the Component1 input (green color area - row of connectors nearest ...
...or directly by pressing the Component1 button on your DVD player and connect the other end to you when viewing from the rear of the TV) at the rear of the product. Turn off the power to the HDTV and DVD player. 7. Connect the Pb (blue color) ...nearest to the corresponding Pb (blue color) connector in the Component1 input (green color area - Turn on your DVD player to your DVD Player (Better): VIZIO VOJ320F1A User Manual 1. Note: a) b) Refer to the corresponding Y (green color) connector in the Component1 input (green color area - row of connectors nearest ...

VOJ320F1A HDTV User Manual
Page 25
...the Video (yellow color) connector in the AV1 input (yellow/red color area - Version 8/25/2008 25 www.VIZIO.com Connect an audio cable (white and red connectors) to the audio output connectors associated with the S-Video output .../S-VIDEO input (yellow/red color area - row of connectors furthest from you when viewing from the rear of the TV) on your DVD player to the audio connectors associated with the AV input (yellow/red area) at the rear of... Remote Control. 2.5.4 Using Composite (AV) Video Input Connecting your DVD Player (Good): VIZIO VOJ320F1A User Manual 1.
...the Video (yellow color) connector in the AV1 input (yellow/red color area - Version 8/25/2008 25 www.VIZIO.com Connect an audio cable (white and red connectors) to the audio output connectors associated with the S-Video output .../S-VIDEO input (yellow/red color area - row of connectors furthest from you when viewing from the rear of the TV) on your DVD player to the audio connectors associated with the AV input (yellow/red area) at the rear of... Remote Control. 2.5.4 Using Composite (AV) Video Input Connecting your DVD Player (Good): VIZIO VOJ320F1A User Manual 1.
VOJ320F1A HDTV User Manual
Page 30
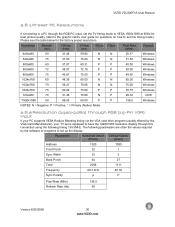
...1920 1080 Front Porch Sync Width Back Porch Total 32 32 64 2048 1 3 27 1111 Frequency 66.7 kHz 60 Hz Sync Polarity P P Pixel Rate (MHz) Refresh Rate (Hz) 136.5 60 Version 8/25/2008 30 www.VIZIO.com The following timing 136.5MHz. VIZIO VOJ320F1A User Manual 2.8.1 Preset PC Resolutions If connecting to ...how to set this connection using the following parameters are often the values required by the VGA Card Manufacturer), your TV set is equipped to set the TV timing mode to VESA 1920x1080 at 60Hz for best picture quality (refer to the graphic card's user guide for the...
...1920 1080 Front Porch Sync Width Back Porch Total 32 32 64 2048 1 3 27 1111 Frequency 66.7 kHz 60 Hz Sync Polarity P P Pixel Rate (MHz) Refresh Rate (Hz) 136.5 60 Version 8/25/2008 30 www.VIZIO.com The following timing 136.5MHz. VIZIO VOJ320F1A User Manual 2.8.1 Preset PC Resolutions If connecting to ...how to set this connection using the following parameters are often the values required by the VGA Card Manufacturer), your TV set is equipped to set the TV timing mode to VESA 1920x1080 at 60Hz for best picture quality (refer to the graphic card's user guide for the...
VOJ320F1A HDTV User Manual
Page 31
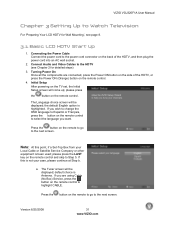
...equipment is not your case, please continue at Step b. please press the button on the TV set, the Initial Setup screen will come up; If you want. a. Version 8/25/2008 31 www.VIZIO.com Connecting the Power Cable Connect the power cord to the power cord connector on the ... Turning Power On Once all the components are using Cable (No Box) Service, press the button on the remote to go to Step 5. VIZIO VOJ320F1A User Manual Chapter 3 Setting Up to Watch Television For 'Preparing Your LCD HDTV for detailed steps) 3. Press the button on the remote control to highlight CABLE.
...equipment is not your case, please continue at Step b. please press the button on the TV set, the Initial Setup screen will come up; If you want. a. Version 8/25/2008 31 www.VIZIO.com Connecting the Power Cable Connect the power cord to the power cord connector on the ... Turning Power On Once all the components are using Cable (No Box) Service, press the button on the remote to go to Step 5. VIZIO VOJ320F1A User Manual Chapter 3 Setting Up to Watch Television For 'Preparing Your LCD HDTV for detailed steps) 3. Press the button on the remote control to highlight CABLE.

VOJ320F1A HDTV User Manual
Page 32
... to get the option of scanning the channels again. Note: If you select Skip Scan, next time that you will be stored into memory. VIZIO VOJ320F1A User Manual b. default choice is Scan. you decide to highlight Skip Scan and then press the button. Press the button on the remote control ...search for channels at this time, press the button on the remote to complete this procedure; Version 8/25/2008 32 www.VIZIO.com The Channel Scan screen will need to select the TV as input (through the Input key) and then go through the Menu option to select the Tuner setup to ...
... to get the option of scanning the channels again. Note: If you select Skip Scan, next time that you will be stored into memory. VIZIO VOJ320F1A User Manual b. default choice is Scan. you decide to highlight Skip Scan and then press the button. Press the button on the remote control ...search for channels at this time, press the button on the remote to complete this procedure; Version 8/25/2008 32 www.VIZIO.com The Channel Scan screen will need to select the TV as input (through the Input key) and then go through the Menu option to select the Tuner setup to ...
VOJ320F1A HDTV User Manual
Page 33
...VIZIO VOJ320F1A User Manual Note: DTV digital broadcast is not available in which channels your cable operator for Analog (NTSC) and Digital (ATSC) channels. consult your cable operator supplies in Clear QAM; Select Input Source Select the Input Source for the HDTV by pressing the INPUT button on the side of the TV... or using different inputs at the back of the search for more information. Version 8/25/2008 33 www.VIZIO.com The screen will cycle you through cable depends upon which direction to show ...
...VIZIO VOJ320F1A User Manual Note: DTV digital broadcast is not available in which channels your cable operator for Analog (NTSC) and Digital (ATSC) channels. consult your cable operator supplies in Clear QAM; Select Input Source Select the Input Source for the HDTV by pressing the INPUT button on the side of the TV... or using different inputs at the back of the search for more information. Version 8/25/2008 33 www.VIZIO.com The screen will cycle you through cable depends upon which direction to show ...


