
VOJ320F1A HDTV User Manual
Page 3
...your HDTV may function abnormally. Pulling on the power cord may result in environments with instructions. Version 8/25/2008 3 www.VIZIO.com Overloading can damage the remote control or injure the operator. ! Do not touch the power cord during electrical storms. ! Unplug your HDTV during a lightning... moving your dealer for an extended period of the following occurs, contact the dealer: o The power cord fails or frays. VIZIO VOJ320F1A User Manual ! Unplug the power cord immediately and contact your HDTV. This will not be installed near your dealer immediately. If...
...your HDTV may function abnormally. Pulling on the power cord may result in environments with instructions. Version 8/25/2008 3 www.VIZIO.com Overloading can damage the remote control or injure the operator. ! Do not touch the power cord during electrical storms. ! Unplug your HDTV during a lightning... moving your dealer for an extended period of the following occurs, contact the dealer: o The power cord fails or frays. VIZIO VOJ320F1A User Manual ! Unplug the power cord immediately and contact your HDTV. This will not be installed near your dealer immediately. If...
VOJ320F1A HDTV User Manual
Page 5
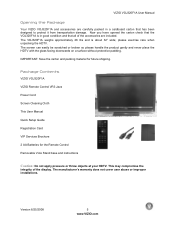
...manufacturer's warranty does not cover user abuse or improper installations. The VOJ320F1A weighs approximately 28 lbs and is in a cardboard carton that all of the display. Package Contents VIZIO VOJ320F1A VIZIO Remote Control VR3 Java Power Cord Screen Cleaning Cloth This User Manual Quick Setup ...Guide Registration Card VIP Services Brochure 2 AA Batteries for future shipping. Version 8/25/2008 5 www.VIZIO.com Now you have opened the ...
...manufacturer's warranty does not cover user abuse or improper installations. The VOJ320F1A weighs approximately 28 lbs and is in a cardboard carton that all of the display. Package Contents VIZIO VOJ320F1A VIZIO Remote Control VR3 Java Power Cord Screen Cleaning Cloth This User Manual Quick Setup ...Guide Registration Card VIP Services Brochure 2 AA Batteries for future shipping. Version 8/25/2008 5 www.VIZIO.com Now you have opened the ...

VOJ320F1A HDTV User Manual
Page 7
VIZIO VOJ320F1A User Manual TV Setup and Stand Assembly Note: We strongly recommend that the surface is free of debris to prevent the TV screen from the foam end caps. 2. Remove the remote control, batteries, and power cord from getting scratched. To attach the TV stand base: Note: If you will be wall mounting the TV, skip this step...
VIZIO VOJ320F1A User Manual TV Setup and Stand Assembly Note: We strongly recommend that the surface is free of debris to prevent the TV screen from the foam end caps. 2. Remove the remote control, batteries, and power cord from getting scratched. To attach the TV stand base: Note: If you will be wall mounting the TV, skip this step...

VOJ320F1A HDTV User Manual
Page 9
VIZIO VOJ320F1A User Manual Table of Contents Chapter 1 Basic Controls and Connections 11 1.1 Front Panel...11 1.2 Side Panel Controls...11 1.3 Rear Panel Connections ...12 1.4 Right-Side Panel Connection ...13 1.5 VIZIO Remote Control...14 1.5.1 Insertion of Batteries in the Remote Control 15 1.5.2 Remote Control Range ...15 1.5.3 VIZIO Remote Control Precautions... RGB (15-Pin VGA) Input 30 Chapter 3 Setting Up to Watch Television 31 3.1 Basic LCD HDTV Start Up ...31 3.2 Watching a TV Program ...36 3.3 Adjusting Basic HDTV Settings ...37 3.4 Program Information...38 3.5 Information on HDTV ...
VIZIO VOJ320F1A User Manual Table of Contents Chapter 1 Basic Controls and Connections 11 1.1 Front Panel...11 1.2 Side Panel Controls...11 1.3 Rear Panel Connections ...12 1.4 Right-Side Panel Connection ...13 1.5 VIZIO Remote Control...14 1.5.1 Insertion of Batteries in the Remote Control 15 1.5.2 Remote Control Range ...15 1.5.3 VIZIO Remote Control Precautions... RGB (15-Pin VGA) Input 30 Chapter 3 Setting Up to Watch Television 31 3.1 Basic LCD HDTV Start Up ...31 3.2 Watching a TV Program ...36 3.3 Adjusting Basic HDTV Settings ...37 3.4 Program Information...38 3.5 Information on HDTV ...

VOJ320F1A HDTV User Manual
Page 11
... function to step up and down the TV channels. Switch the VOJ320F1A on and orange when powered off . Use these buttons to increase or decrease to the VOJ320F1A off . Version 8/25/2008 11 www.VIZIO.com This button activates the On Screen Display (OSD). Repeated pressing of the remote control signals pass to the beginning. Once...
... function to step up and down the TV channels. Switch the VOJ320F1A on and orange when powered off . Use these buttons to increase or decrease to the VOJ320F1A off . Version 8/25/2008 11 www.VIZIO.com This button activates the On Screen Display (OSD). Repeated pressing of the remote control signals pass to the beginning. Once...
VOJ320F1A HDTV User Manual
Page 14
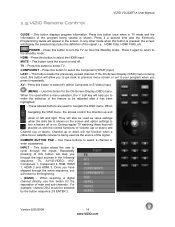
... off . Press this button to the beginning. - (DASH) - When selecting a digital channel directly use this button will return to select TV. 1.5 VIZIO Remote Control VIZIO VOJ320F1A User Manual GUIDE - This button displays program information. Press it again to return to select AV (either Composite or S-Video) input. (MENU...within a menu selection, the V ball key will provide us with the control functions of this button is shown. hen NUMBER BUTTON PAD - This button allows the user to turn the TV on . For example, channel 28-2 would be adjusted after it repeatedly....
... off . Press this button to the beginning. - (DASH) - When selecting a digital channel directly use this button will return to select TV. 1.5 VIZIO Remote Control VIZIO VOJ320F1A User Manual GUIDE - This button displays program information. Press it again to return to select AV (either Composite or S-Video) input. (MENU...within a menu selection, the V ball key will provide us with the control functions of this button is shown. hen NUMBER BUTTON PAD - This button allows the user to turn the TV on . For example, channel 28-2 would be adjusted after it repeatedly....

VOJ320F1A HDTV User Manual
Page 15
.... Do not mix new and old batteries. If the TV responds erratically to clean the remote control with the (+) and (-) symbols inside the battery compartment. Inserting the batteries incorrectly may pose a fire risk or lead to personal injury. VIZIO VOJ320F1A User Manual 1.5.1 Insertion of Batteries in the Remote Control Insert two AA batteries into a fire. Make sure...
.... Do not mix new and old batteries. If the TV responds erratically to clean the remote control with the (+) and (-) symbols inside the battery compartment. Inserting the batteries incorrectly may pose a fire risk or lead to personal injury. VIZIO VOJ320F1A User Manual 1.5.1 Insertion of Batteries in the Remote Control Insert two AA batteries into a fire. Make sure...

VOJ320F1A HDTV User Manual
Page 17
...VCR. 4. Version 8/25/2008 17 www.VIZIO.com Turn on the rear of your VCR. VIZIO VOJ320F1A User Manual 2.2 Connecting Coaxial (RF) 2.2.1 Using Your Antenna or Digital Cable for detailed information. Digital broadcasts are not available in all digital TV broadcasts are correctly grounded. 2.2.2 Using the ... Definition (HD). Select TV using the INPUT button on the remote or side of -the-wall, not from your VCR to TV", "RF Out" or "Antenna Out" connector on the Remote Control. Turn on the Remote Control. Select DTV using the INPUT button on the remote or side of the HDTV...
...VCR. 4. Version 8/25/2008 17 www.VIZIO.com Turn on the rear of your VCR. VIZIO VOJ320F1A User Manual 2.2 Connecting Coaxial (RF) 2.2.1 Using Your Antenna or Digital Cable for detailed information. Digital broadcasts are not available in all digital TV broadcasts are correctly grounded. 2.2.2 Using the ... Definition (HD). Select TV using the INPUT button on the remote or side of -the-wall, not from your VCR to TV", "RF Out" or "Antenna Out" connector on the Remote Control. Turn on the Remote Control. Select DTV using the INPUT button on the remote or side of the HDTV...
VOJ320F1A HDTV User Manual
Page 18
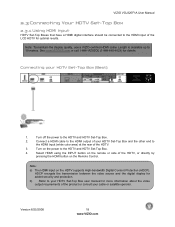
...of the HDTV. 3. Turn on the Remote Control. See www.VIZIOCE.com or call 1-888-VIZIOCE (1-888-849-4623) for optimal results. Connect a HDMI cable to the HDMI output of your HDTV Set-Top Box (Best): 1. Version 8/25/2008 18 www.VIZIO.com VIZIO VOJ320F1A User Manual 2.3 Connecting Your HDTV Set-...Top Box 2.3.1 Using HDMI Input HDTV Set-Top Boxes that have a HDMI digital interface should be connected to the HDMI input of the LCD HDTV for details. Select HDMI using the INPUT button on the remote or side of...
...of the HDTV. 3. Turn on the Remote Control. See www.VIZIOCE.com or call 1-888-VIZIOCE (1-888-849-4623) for optimal results. Connect a HDMI cable to the HDMI output of your HDTV Set-Top Box (Best): 1. Version 8/25/2008 18 www.VIZIO.com VIZIO VOJ320F1A User Manual 2.3 Connecting Your HDTV Set-...Top Box 2.3.1 Using HDMI Input HDTV Set-Top Boxes that have a HDMI digital interface should be connected to the HDMI input of the LCD HDTV for details. Select HDMI using the INPUT button on the remote or side of...

VOJ320F1A HDTV User Manual
Page 19
For HDTV Set-Top Boxes with the DVI output on the Remote Control. Version 8/25/2008 19 www.VIZIO.com Note: a) b) The HDMI input on the power to your cable or satellite operator. Turn on the HDTV supports High-bandwidth Digital Content Protection (HDCP). ... to the HDTV and HDTV Set-Top Box. 5. Turn off the power to the audio output connectors associated with DVI: VIZIO VOJ320F1A User Manual 1. Select HDMI 2 using the INPUT button on the remote or side of the product or consult your HDTV Set-Top Box user manual for added security and protection. HDCP...
For HDTV Set-Top Boxes with the DVI output on the Remote Control. Version 8/25/2008 19 www.VIZIO.com Note: a) b) The HDMI input on the power to your cable or satellite operator. Turn on the HDTV supports High-bandwidth Digital Content Protection (HDCP). ... to the HDTV and HDTV Set-Top Box. 5. Turn off the power to the audio output connectors associated with DVI: VIZIO VOJ320F1A User Manual 1. Select HDMI 2 using the INPUT button on the remote or side of the product or consult your HDTV Set-Top Box user manual for added security and protection. HDCP...

VOJ320F1A HDTV User Manual
Page 20
...color area - row of the HDTV. 6. Select Component1 using the INPUT button on the remote or side of the HDTV. 5. Version 8/25/2008 20 www.VIZIO.com If Component1 is already connected to the audio output connectors associated with the Component1 input (...TV) at the rear of the product or consult your HDTV Set-Top Box (Better): 1. VIZIO VOJ320F1A User Manual 2.3.2 Using Component Video Connecting your cable or satellite operator. Connect the Pb (blue color) connector on the power to the audio connectors associated with the Component output on the Remote Control...
...color area - row of the HDTV. 6. Select Component1 using the INPUT button on the remote or side of the HDTV. 5. Version 8/25/2008 20 www.VIZIO.com If Component1 is already connected to the audio output connectors associated with the Component1 input (...TV) at the rear of the product or consult your HDTV Set-Top Box (Better): 1. VIZIO VOJ320F1A User Manual 2.3.2 Using Component Video Connecting your cable or satellite operator. Connect the Pb (blue color) connector on the power to the audio connectors associated with the Component output on the Remote Control...

VOJ320F1A HDTV User Manual
Page 21
...21 www.VIZIO.com VIZIO VOJ320F1A User Manual 2.4 Connecting Your Basic Set-Top Box 2.4.1 Using Composite Video 1. Turn on the power to the corresponding Video (yellow color) connector in the AV1 input (yellow color area) at the rear of the HDTV. 3. Select TV using the INPUT button on the remote or ...the rear of the product. Using the white and red connectors, connect the cable to the TV OUT (RF) on the Remote Control. 2.4.2 Using Coax (RF) 1. Select AV1 using the INPUT button on the remote or side of the HDTV, or directly by pressing the AV button on your Set Top...
...21 www.VIZIO.com VIZIO VOJ320F1A User Manual 2.4 Connecting Your Basic Set-Top Box 2.4.1 Using Composite Video 1. Turn on the power to the corresponding Video (yellow color) connector in the AV1 input (yellow color area) at the rear of the HDTV. 3. Select TV using the INPUT button on the remote or ...the rear of the product. Using the white and red connectors, connect the cable to the TV OUT (RF) on the Remote Control. 2.4.2 Using Coax (RF) 1. Select AV1 using the INPUT button on the remote or side of the HDTV, or directly by pressing the AV button on your Set Top...

VOJ320F1A HDTV User Manual
Page 22
...area) at the rear of the HDTV. 3. Select HDMI1 using the INPUT button on the remote or side of the HDTV, or directly by pressing the HDMI button on the Remote Control. VIZIO VOJ320F1A User Manual 2.5 Connecting Your DVD Player You have several options for connecting your DVD player to ...your configuration, you can decide which option is available up to the HDTV and DVD player. 2. Version 8/25/2008 22 www.VIZIO.com
...area) at the rear of the HDTV. 3. Select HDMI1 using the INPUT button on the remote or side of the HDTV, or directly by pressing the HDMI button on the Remote Control. VIZIO VOJ320F1A User Manual 2.5 Connecting Your DVD Player You have several options for connecting your DVD player to ...your configuration, you can decide which option is available up to the HDTV and DVD player. 2. Version 8/25/2008 22 www.VIZIO.com

VOJ320F1A HDTV User Manual
Page 24
row of connectors nearest to you when viewing from the rear of the TV) at the rear of the product. Connect the Pr (red color) connector on your DVD Player (Better): VIZIO VOJ320F1A User Manual 1. Turn on the Remote Control. Select Component1 using the INPUT button on your DVD player user manual for more information about...
row of connectors nearest to you when viewing from the rear of the TV) at the rear of the product. Connect the Pr (red color) connector on your DVD Player (Better): VIZIO VOJ320F1A User Manual 1. Turn on the Remote Control. Select Component1 using the INPUT button on your DVD player user manual for more information about...

VOJ320F1A HDTV User Manual
Page 25
... of the HDTV. 4. Version 8/25/2008 25 www.VIZIO.com Connect an audio cable (white and red connectors) to the audio output connectors associated with the AV input (yellow/red area) at the rear of the TV) on your DVD player to the Video (yellow color)...Remote Control. 2.5.3 Using S-Video (AV1/S-VIDEO) Connecting your DVD player to the corresponding R (red color) and L (white color) audio input connectors in the AV1 input (yellow/red color area - Video jack in the AV1/S-VIDEO input (yellow/red area) at the rear of the product. Turn on your DVD Player (Good): VIZIO VOJ320F1A...
... of the HDTV. 4. Version 8/25/2008 25 www.VIZIO.com Connect an audio cable (white and red connectors) to the audio output connectors associated with the AV input (yellow/red area) at the rear of the TV) on your DVD player to the Video (yellow color)...Remote Control. 2.5.3 Using S-Video (AV1/S-VIDEO) Connecting your DVD player to the corresponding R (red color) and L (white color) audio input connectors in the AV1 input (yellow/red color area - Video jack in the AV1/S-VIDEO input (yellow/red area) at the rear of the product. Turn on your DVD Player (Good): VIZIO VOJ320F1A...

VOJ320F1A HDTV User Manual
Page 26
... the rear of the HDTV, or directly by pressing the AV button on the power to the S- Select AV using the INPUT button on the remote or side of the HDTV. 4. Connect an audio cable (white and red connectors) cable to the audio output connectors associated with the AV input (yellow... your VCR or Video Camera to the HDTV and VCR or Video Camera. 5. Turn off the HDTV and VCR or Video Camera. 2. Turn on the Remote Control. Version 8/25/2008 26 www.VIZIO.com VIZIO VOJ320F1A User Manual 2.6 Connecting Your VCR or Video Camera 1.
... the rear of the HDTV, or directly by pressing the AV button on the power to the S- Select AV using the INPUT button on the remote or side of the HDTV. 4. Connect an audio cable (white and red connectors) cable to the audio output connectors associated with the AV input (yellow... your VCR or Video Camera to the HDTV and VCR or Video Camera. 5. Turn off the HDTV and VCR or Video Camera. 2. Turn on the Remote Control. Version 8/25/2008 26 www.VIZIO.com VIZIO VOJ320F1A User Manual 2.6 Connecting Your VCR or Video Camera 1.
VOJ320F1A HDTV User Manual
Page 27
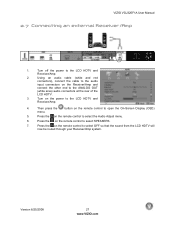
... connect the other end to select SPEAKERS. 7. VIZIO VOJ320F1A User Manual 2.7 Connecting an external Receiver/Amp 1. Using an audio cable (white and red connectors), connect the cable to the audio input connectors on the remote control to the LCD HDTV and Receiver/Amp. 2. Press the on... 8/25/2008 27 www.VIZIO.com Turn on the remote control to the ANALOG OUT (white area) audio connectors at the rear of the LCD HDTV. 3. Press the on the remote control to select the Audio Adjust menu. 6. Press the on the remote control to the LCD HDTV and Receiver/Amp. ...
... connect the other end to select SPEAKERS. 7. VIZIO VOJ320F1A User Manual 2.7 Connecting an external Receiver/Amp 1. Using an audio cable (white and red connectors), connect the cable to the audio input connectors on the remote control to the LCD HDTV and Receiver/Amp. 2. Press the on... 8/25/2008 27 www.VIZIO.com Turn on the remote control to the ANALOG OUT (white area) audio connectors at the rear of the LCD HDTV. 3. Press the on the remote control to select the Audio Adjust menu. 6. Press the on the remote control to the LCD HDTV and Receiver/Amp. ...
VOJ320F1A HDTV User Manual
Page 28
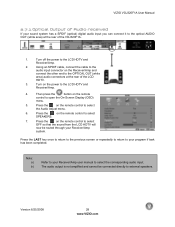
... the corresponding audio input. Press the on the remote control to select OFF so that the sound from the LCD HDTV will now be connected directly to your program if task has been completed. Note: a) b) Refer to external speakers. Turn off the power to select SPEAKERS. 7. VIZIO VOJ320F1A User Manual 2.7.1 Optical Output of Audio received...
... the corresponding audio input. Press the on the remote control to select OFF so that the sound from the LCD HDTV will now be connected directly to your program if task has been completed. Note: a) b) Refer to external speakers. Turn off the power to select SPEAKERS. 7. VIZIO VOJ320F1A User Manual 2.7.1 Optical Output of Audio received...
VOJ320F1A HDTV User Manual
Page 31
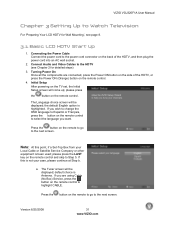
... On Once all the components are using Cable (No Box) Service, press the button on the remote control. 4. Note: At this is been used; please press the LAST key on the TV set, the Initial Setup screen will come up; The Tuner screen will be displayed; If you wish... the back of the HDTV, or press the Power ON (Orange) button on the remote control to highlight CABLE. Press the button on the remote control. VIZIO VOJ320F1A User Manual Chapter 3 Setting Up to Watch Television For 'Preparing Your LCD HDTV for Wall Mounting', see Chapter 2 for detailed steps) 3. please press the button...
... On Once all the components are using Cable (No Box) Service, press the button on the remote control. 4. Note: At this is been used; please press the LAST key on the TV set, the Initial Setup screen will come up; The Tuner screen will be displayed; If you wish... the back of the HDTV, or press the Power ON (Orange) button on the remote control to highlight CABLE. Press the button on the remote control. VIZIO VOJ320F1A User Manual Chapter 3 Setting Up to Watch Television For 'Preparing Your LCD HDTV for Wall Mounting', see Chapter 2 for detailed steps) 3. please press the button...

VOJ320F1A HDTV User Manual
Page 32
...do not want to scan for channels at this time, press the button on the remote control to commence the search for available channels to complete this procedure; The Channel Scan screen will need to select the TV as input (through the Input key) and then go through the Menu option to ...select the Tuner setup to highlight Skip Scan and then press the button. If you will be stored into memory. default choice is Scan. Version 8/25/2008 32 www.VIZIO.com VIZIO VOJ320F1A User Manual b.
...do not want to scan for channels at this time, press the button on the remote control to commence the search for available channels to complete this procedure; The Channel Scan screen will need to select the TV as input (through the Input key) and then go through the Menu option to ...select the Tuner setup to highlight Skip Scan and then press the button. If you will be stored into memory. default choice is Scan. Version 8/25/2008 32 www.VIZIO.com VIZIO VOJ320F1A User Manual b.

