
Quickstart Guide (English)
Page 2
... use abrasive cleaners. • Always use in the housing. Continuous use the accessories recommended by the manufacturer, or sold with instructions. CAUTION RISK OF ELECTRIC SHOCK DO NOT OPEN Explanation of WARNING symbols: The lighting flash with a dry cloth. • Do not block any heat sources such as when the power supply cord or plug is intended to alert the user...
... use abrasive cleaners. • Always use in the housing. Continuous use the accessories recommended by the manufacturer, or sold with instructions. CAUTION RISK OF ELECTRIC SHOCK DO NOT OPEN Explanation of WARNING symbols: The lighting flash with a dry cloth. • Do not block any heat sources such as when the power supply cord or plug is intended to alert the user...

Quickstart Guide (English)
Page 3
TABLE OF CONTENTS Package Contents 4 Controls & Connections 5 First-Time Setup 8 Using the Remote 14 LED Indicators 15 Bluetooth Pairing 16 Using Bluetooth mode 17 Advanced Setup 18 Using Button Combinations 19 Connecting a Subwoofer 20 Help & Troubleshooting 25 One-Year Limited Warranty 26 Specifications 26 Legal & Compliance 27
TABLE OF CONTENTS Package Contents 4 Controls & Connections 5 First-Time Setup 8 Using the Remote 14 LED Indicators 15 Bluetooth Pairing 16 Using Bluetooth mode 17 Advanced Setup 18 Using Button Combinations 19 Connecting a Subwoofer 20 Help & Troubleshooting 25 One-Year Limited Warranty 26 Specifications 26 Legal & Compliance 27

Quickstart Guide (English)
Page 6
Back of Sound Stand SUB Out Subwoofer Out AUX (1) Analog Audio In Service*/USB Port Service Port/USB In AUX (2) Analog Audio In Power Port DIGITAL (3) Coaxial In OPTICAL (4) Digital Optical Audio In 6
Back of Sound Stand SUB Out Subwoofer Out AUX (1) Analog Audio In Service*/USB Port Service Port/USB In AUX (2) Analog Audio In Power Port DIGITAL (3) Coaxial In OPTICAL (4) Digital Optical Audio In 6

Quickstart Guide (English)
Page 7
Side of Sound Stand Power Input Bluetooth Input (Hold to force pair, See Bluetooth Pairing for more information) Volume + / - 7
Side of Sound Stand Power Input Bluetooth Input (Hold to force pair, See Bluetooth Pairing for more information) Volume + / - 7
Quickstart Guide (English)
Page 8
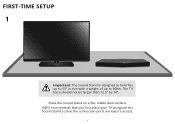
Place the Sound Stand on a flat, stable level surface. VIZIO recommends that you first place your TV alongside the Sound Stand so that the connection ports are easy to 60lbs. The TV base should not be larger than 12.5" by 14". FIRST-TIME SETUP 1 Important: The Sound Stand is designed to hold TVs up to 55" in size with a weight of up to access. 8
Place the Sound Stand on a flat, stable level surface. VIZIO recommends that you first place your TV alongside the Sound Stand so that the connection ports are easy to 60lbs. The TV base should not be larger than 12.5" by 14". FIRST-TIME SETUP 1 Important: The Sound Stand is designed to hold TVs up to 55" in size with a weight of up to access. 8

Quickstart Guide (English)
Page 9
2 Back of the Digital Inputs, if there is no audio: (A) try setting the TV output to PCM or (B) other devices (Blu-ray player, game system, etc) see your device's user manual. 9 Connect directly to your Blu-ray/other source, some TVs do not pass through digital audio. To connect the Sound Stand directly to your * When using either of Sound Stand GOOD 3.5MM TO RCA CABLE GOOD 3.5MM TO RCA CABLE BETTER DIGITAL OPTICAL CABLE* BETTER DIGITAL COAXIAL CABLE* CHOOSE ONE CABLE: GOOD BETTER AND CONNECT IT TO YOUR TV Note: Not all TVs have the audio outputs shown above.
2 Back of the Digital Inputs, if there is no audio: (A) try setting the TV output to PCM or (B) other devices (Blu-ray player, game system, etc) see your device's user manual. 9 Connect directly to your Blu-ray/other source, some TVs do not pass through digital audio. To connect the Sound Stand directly to your * When using either of Sound Stand GOOD 3.5MM TO RCA CABLE GOOD 3.5MM TO RCA CABLE BETTER DIGITAL OPTICAL CABLE* BETTER DIGITAL COAXIAL CABLE* CHOOSE ONE CABLE: GOOD BETTER AND CONNECT IT TO YOUR TV Note: Not all TVs have the audio outputs shown above.

Quickstart Guide (English)
Page 10
3 Connect the power cable to the Sound Stand. Back of Sound Stand 10 Plug the power cable into a power outlet.
3 Connect the power cable to the Sound Stand. Back of Sound Stand 10 Plug the power cable into a power outlet.

Quickstart Guide (English)
Page 13
... a Factory Reset or Press and hold the INPUT button on and begin cycling in pairs through inputs until an audio source is complete. The LED indicators on . Hardware setup is detected.* Tip: Pressing the INPUT button will automatically turn on the remote control for an active input. To enable this feature again, you connected your TV on, the Sound Stand will stop the auto detect function...
... a Factory Reset or Press and hold the INPUT button on and begin cycling in pairs through inputs until an audio source is complete. The LED indicators on . Hardware setup is detected.* Tip: Pressing the INPUT button will automatically turn on the remote control for an active input. To enable this feature again, you connected your TV on, the Sound Stand will stop the auto detect function...

Quickstart Guide (English)
Page 14
... next track. (Changes Treble and Bass levels) Treble Press to enable/disable TruVolume. TruSurround HD Press to enter bass adjustment mode. 14 Bass Press to enable/disable TruSurround HD. Mute Press to increase and decrease volume. USING THE REMOTE Input Press to change input source. (Press and hold for 5 seconds to enable auto input detection function) Bluetooth Press to enter Bluetooth input. (To enter force pair mode, press and hold...
... next track. (Changes Treble and Bass levels) Treble Press to enable/disable TruVolume. TruSurround HD Press to enter bass adjustment mode. 14 Bass Press to enable/disable TruSurround HD. Mute Press to increase and decrease volume. USING THE REMOTE Input Press to change input source. (Press and hold for 5 seconds to enable auto input detection function) Bluetooth Press to enter Bluetooth input. (To enter force pair mode, press and hold...

Quickstart Guide (English)
Page 15
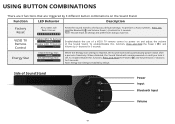
... Levels Bass Levels Dolby Digital (When searching for the Sound Stand (VIZIO SS2520) using your Bluetooth device into pairing mode prior to Right and back continuously. Dolby Digital Indicator. LED INDICATORS LED Indicators are located here. You can now search for device) Flash from Left to the Sound Stand. Press the TVOL button to increase/decrease the bass level. AUX (1) Analog Audio In - Digital (3) • Digital Optical Audio In - Note: Set your Bluetooth...
... Levels Bass Levels Dolby Digital (When searching for the Sound Stand (VIZIO SS2520) using your Bluetooth device into pairing mode prior to Right and back continuously. Dolby Digital Indicator. LED INDICATORS LED Indicators are located here. You can now search for device) Flash from Left to the Sound Stand. Press the TVOL button to increase/decrease the bass level. AUX (1) Analog Audio In - Digital (3) • Digital Optical Audio In - Note: Set your Bluetooth...

Quickstart Guide (English)
Page 16
... the device is in Bluetooth Pairing Mode, the LED Indicators on the Display Panel on the front of Sound Stand 16 BLUETOOTH PAIRING To pair the Sound Stand with your Bluetooth device. Press and hold the Bluetooth button on the Sound Stand or the Bluetooth button on your Bluetooth device. You can be controlled on the remote for the Sound Stand (VIZIO SS2520) using your source device and the Sound Stand. For more information, see the documentation...
... the device is in Bluetooth Pairing Mode, the LED Indicators on the Display Panel on the front of Sound Stand 16 BLUETOOTH PAIRING To pair the Sound Stand with your Bluetooth device. Press and hold the Bluetooth button on the Sound Stand or the Bluetooth button on your Bluetooth device. You can be controlled on the remote for the Sound Stand (VIZIO SS2520) using your source device and the Sound Stand. For more information, see the documentation...

Quickstart Guide (English)
Page 17
... source device closer to the Sound Stand. • Be sure that there are no solid obstructions in mind that Bluetooth is a compressed audio format, so streamed music may improve Bluetooth range. Your Sound Stand is not equipped with Bluetooth capability. Turning off or moving these devices may lose some integrity when compared to a wired connection. Once you change the input on the Sound Stand before pressing Play.
... source device closer to the Sound Stand. • Be sure that there are no solid obstructions in mind that Bluetooth is a compressed audio format, so streamed music may improve Bluetooth range. Your Sound Stand is not equipped with Bluetooth capability. Turning off or moving these devices may lose some integrity when compared to a wired connection. Once you change the input on the Sound Stand before pressing Play.
Quickstart Guide (English)
Page 18
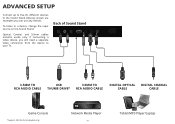
... RCA AUDIO CABLE DIGITAL OPTICAL CABLE DIGITAL COAXIAL CABLE Game Console *Supports .WAV file format playback only. Network Media Player 18 Tablet/MP3 Player/Laptop If connecting a video device, you can use any device). To listen to your TV. ADVANCED SETUP Connect up to five (5) different devices to the Sound Stand (devices shown are examples you will need a separate video connection from the device to a device, change the input...
... RCA AUDIO CABLE DIGITAL OPTICAL CABLE DIGITAL COAXIAL CABLE Game Console *Supports .WAV file format playback only. Network Media Player 18 Tablet/MP3 Player/Laptop If connecting a video device, you can use any device). To listen to your TV. ADVANCED SETUP Connect up to five (5) different devices to the Sound Stand (devices shown are examples you will need a separate video connection from the device to a device, change the input...
Quickstart Guide (English)
Page 19
... turn it off. VIZIO TV Remote Control Energy Star Enable VIZIO TV Remote: Disable VIZIO TV Remote: Enable/disable the use of inactivity. To enable/disable this function, Press and Hold the Power ( ) and Volume Down (-)buttons for 5 seconds. Note: Energy Star setting is enabled, the Sound Stand will flash 3 times: Reset the Sound Stand to power on and adjust the volume of Sound Stand Power Input Bluetooth Input Volume 19 Side of the Sound Stand. To perform a Factory Reset...
... turn it off. VIZIO TV Remote Control Energy Star Enable VIZIO TV Remote: Disable VIZIO TV Remote: Enable/disable the use of inactivity. To enable/disable this function, Press and Hold the Power ( ) and Volume Down (-)buttons for 5 seconds. Note: Energy Star setting is enabled, the Sound Stand will flash 3 times: Reset the Sound Stand to power on and adjust the volume of Sound Stand Power Input Bluetooth Input Volume 19 Side of the Sound Stand. To perform a Factory Reset...

Quickstart Guide (English)
Page 20
... mode. 2. Power Off the Sound Stand and Subwoofer. See your preference. To connect a subwoofer: 1. Press the BASS button on the remote control to the Subwoofer. 4. Use the BASS button on the remote control to the center position. 3. CONNECTING A SUBWOOFER RCA Subwoofer Cable* Optional Subwoofer* *RCA subwoofer cable and subwoofer not included. Manually adjust the SUB gain (Volume) and phase to your subwoofer's user manual for more information. 6. Power On the Sound Stand and Subwoofer. 5. Connect an RCA cable from the Sound Bar to adjust the subwoofer's output...
... mode. 2. Power Off the Sound Stand and Subwoofer. See your preference. To connect a subwoofer: 1. Press the BASS button on the remote control to the Subwoofer. 4. Use the BASS button on the remote control to the center position. 3. CONNECTING A SUBWOOFER RCA Subwoofer Cable* Optional Subwoofer* *RCA subwoofer cable and subwoofer not included. Manually adjust the SUB gain (Volume) and phase to your subwoofer's user manual for more information. 6. Power On the Sound Stand and Subwoofer. 5. Connect an RCA cable from the Sound Bar to adjust the subwoofer's output...

Quickstart Guide (English)
Page 22
... LED backlighting and 5 Active LED Zones™ produce deeper black levels and brighter colors1 that makes all -new 2015 E-Series Full-Array LED Smart TV has arrived. Featuring a new modern design, brilliant picture quality, and faster, easier-to previous generations of VIZIO E-Series TVs. VIZIO E-Series: Incredible picture, unbeatable value. 1 Compared to -use smart TV experience, VIZIO's 2015 E-Series brings you premium HD...
... LED backlighting and 5 Active LED Zones™ produce deeper black levels and brighter colors1 that makes all -new 2015 E-Series Full-Array LED Smart TV has arrived. Featuring a new modern design, brilliant picture quality, and faster, easier-to previous generations of VIZIO E-Series TVs. VIZIO E-Series: Incredible picture, unbeatable value. 1 Compared to -use smart TV experience, VIZIO's 2015 E-Series brings you premium HD...

Quickstart Guide (English)
Page 24
Sunday: 9 am to 6 pm (CST) Find Answers At SUPPORT.VIZIO.COM Find help with: • New Product Setup • Connecting Your Devices • Technical Problems • Product Updates • And More Live Chat Support Available You can also contact our award-winning support team at: Phone: (877) 878-4946 (TOLL-FREE) Email: techsupport@VIZIO.com Hours Of Operation: Monday - Friday: 7 am to 11 pm (CST) Saturday - Do You Have Questions?
Sunday: 9 am to 6 pm (CST) Find Answers At SUPPORT.VIZIO.COM Find help with: • New Product Setup • Connecting Your Devices • Technical Problems • Product Updates • And More Live Chat Support Available You can also contact our award-winning support team at: Phone: (877) 878-4946 (TOLL-FREE) Email: techsupport@VIZIO.com Hours Of Operation: Monday - Friday: 7 am to 11 pm (CST) Saturday - Do You Have Questions?
Quickstart Guide (English)
Page 25
... your Sound Stand to select a different input source. • When using either of the Digital Inputs, if there is no audio: (A) Try setting the TV output to PCM or (B) Connect directly to your Sound Stand. • Ensure the power cord is securely connected. • Plug a different device into the electrical outlet to verify that the outlet is working . • Replace the remote batteries with new ones. • Point the remote directly at the center of...
... your Sound Stand to select a different input source. • When using either of the Digital Inputs, if there is no audio: (A) Try setting the TV output to PCM or (B) Connect directly to your Sound Stand. • Ensure the power cord is securely connected. • Plug a different device into the electrical outlet to verify that the outlet is working . • Replace the remote batteries with new ones. • Point the remote directly at the center of...

Quickstart Guide (English)
Page 26
.... VIZIO Technical Support will be sent to a VIZIO service center to the VIZIO service center. Limitations and Exclusions VIZIO's one year of non-commercial usage and ninety (90) days of the original warranty or for parts or labor during the warranty period. SPECIFICATIONS Sound Stand: Inputs: Four 3.6" (W) x 1.6" (H) Full Range Drivers One 3.5mm Stereo Audio One RCA Stereo Audio One Optical (Toslink) One Digital Coaxial Audio One USB (WAV playback only) Bluetooth (Wireless) Sound Pressure Level (System): Frequency Response...
.... VIZIO Technical Support will be sent to a VIZIO service center to the VIZIO service center. Limitations and Exclusions VIZIO's one year of non-commercial usage and ninety (90) days of the original warranty or for parts or labor during the warranty period. SPECIFICATIONS Sound Stand: Inputs: Four 3.6" (W) x 1.6" (H) Full Range Drivers One 3.5mm Stereo Audio One RCA Stereo Audio One Optical (Toslink) One Digital Coaxial Audio One USB (WAV playback only) Bluetooth (Wireless) Sound Pressure Level (System): Frequency Response...

Quickstart Guide (English)
Page 27
... the instructions, may cause undesired operation. Changing the factory default settings or enabling other features will increase power consumption that may not cause interference, and 2. This device is not responsible for any interference, including interference that could void the user's authority to operate the equipment. 2. Shielded interface cables and AC power cord, if any interference received, including interference that to which power savings...
... the instructions, may cause undesired operation. Changing the factory default settings or enabling other features will increase power consumption that may not cause interference, and 2. This device is not responsible for any interference, including interference that could void the user's authority to operate the equipment. 2. Shielded interface cables and AC power cord, if any interference received, including interference that to which power savings...


