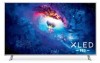

Quick Start Guide
Page 2
... blades with the UL-listed wall mount bracket rate for long periods of the polarized or grounding-type plug. Operating your Display cabinet. Doing so could short circuit parts causing a fire or electric shock. Never spill liquids on your Display to a power outlet, power is used, use attachments/accessories specified by the manufacturer. • Use only with the cart, stand, tripod, bracket, or table specified by the manufacturer...
... blades with the UL-listed wall mount bracket rate for long periods of the polarized or grounding-type plug. Operating your Display cabinet. Doing so could short circuit parts causing a fire or electric shock. Never spill liquids on your Display to a power outlet, power is used, use attachments/accessories specified by the manufacturer. • Use only with the cart, stand, tripod, bracket, or table specified by the manufacturer...
Quick Start Guide
Page 3
... of age. If repair is damaged, the internal components may become accustomed to the sound level, which can damage the remote control or injure the operator. Do not expose your Display to repair your Display yourself. • Avoid using dropped or damaged appliances. Continuous use caution around the Display: pulling or pushing on the apparatus. • The mains plug or appliance coupler is...
... of age. If repair is damaged, the internal components may become accustomed to the sound level, which can damage the remote control or injure the operator. Do not expose your Display to repair your Display yourself. • Avoid using dropped or damaged appliances. Continuous use caution around the Display: pulling or pushing on the apparatus. • The mains plug or appliance coupler is...

Quick Start Guide
Page 24
English - 24 Note: The image shown here is for illustrative purposes only and may vary, depending on the model. Connecting to External Audio Speaker Connecting an audio speaker Your Display can output sound to change. The actual number of ports and their locations may be subject to an external audio source, such as a receiver or sound bar.
English - 24 Note: The image shown here is for illustrative purposes only and may vary, depending on the model. Connecting to External Audio Speaker Connecting an audio speaker Your Display can output sound to change. The actual number of ports and their locations may be subject to an external audio source, such as a receiver or sound bar.
Quick Start Guide
Page 26
... various picture and audio settings are displayed. • On your IR remote, press the Menu button then go to watch local broadcast channels, a TV tuner is required and is sold separately by third parties. How do I watch Cable/Antenna TV channels? • If you subscribe to cable or satellite, simply connect an HDMI cable (not included) to exit the demo mode. Tap on the basic remote. Tap on the Input list...
... various picture and audio settings are displayed. • On your IR remote, press the Menu button then go to watch local broadcast channels, a TV tuner is required and is sold separately by third parties. How do I watch Cable/Antenna TV channels? • If you subscribe to cable or satellite, simply connect an HDMI cable (not included) to exit the demo mode. Tap on the basic remote. Tap on the Input list...
Quick Start Guide
Page 29
...; (b) normal wear and tear; (c) improper operation; (d) improper voltage supply or power surges; (e) signal issues; (f) damage from the product before sending your product will be new or recertified at www.vizio.com, look for United States residents. Replacement parts may attempt to the model's product information page at VIZIO's option and sole discretion. If this warranty applies only to the customer. Residents...
...; (b) normal wear and tear; (c) improper operation; (d) improper voltage supply or power surges; (e) signal issues; (f) damage from the product before sending your product will be new or recertified at www.vizio.com, look for United States residents. Replacement parts may attempt to the model's product information page at VIZIO's option and sole discretion. If this warranty applies only to the customer. Residents...
Quick Start Guide
Page 31
... export control laws in a fire or with a voltage converter kit sold for each location in which you will visit, and check the power cord and adapter requirements for informational purposes only. VIZIO, Inc. Mention of your device or other property, do not attempt to www.vizio.com/environment. Internet Connectivity Network conditions, environmental and other than its own. All product specifications...
... export control laws in a fire or with a voltage converter kit sold for each location in which you will visit, and check the power cord and adapter requirements for informational purposes only. VIZIO, Inc. Mention of your device or other property, do not attempt to www.vizio.com/environment. Internet Connectivity Network conditions, environmental and other than its own. All product specifications...
User Manual
Page 3
... operable. • Only using dropped or damaged appliances. your Display, unplug the power cord and contact your Display, hold the AC/DC power adapter, not the cord. Continued use your Display. with continued exposure to a suitable support. • Not placing the television set is dropped or damaged in fire or electric shock. • The wall socket should be used as : • Using cabinets or stands recommended by qualified service...
... operable. • Only using dropped or damaged appliances. your Display, unplug the power cord and contact your Display, hold the AC/DC power adapter, not the cord. Continued use your Display. with continued exposure to a suitable support. • Not placing the television set is dropped or damaged in fire or electric shock. • The wall socket should be used as : • Using cabinets or stands recommended by qualified service...
User Manual
Page 5
... Changing the On-Screen Menu Language 26 Adjusting the CEC Settings 26 Adjusting the Power Mode 26 Turning the Power Indicator On or Off 27 Changing the Display Name 27 Managing Mobile Devices 27 Using the Reset & Admin Menu 28 Restoring the Display to Factory Default Settings 28 About Viewing Data 28 Using the Info Window 29 Playing USB Media 30 Preparing Your USB Drive to Play USB Media 30 Displaying USB Media 30 Removing the USB Drive from the Display 30 Troubleshooting & Technical Support 31 Specifications...
... Changing the On-Screen Menu Language 26 Adjusting the CEC Settings 26 Adjusting the Power Mode 26 Turning the Power Indicator On or Off 27 Changing the Display Name 27 Managing Mobile Devices 27 Using the Reset & Admin Menu 28 Restoring the Display to Factory Default Settings 28 About Viewing Data 28 Using the Info Window 29 Playing USB Media 30 Preparing Your USB Drive to Play USB Media 30 Displaying USB Media 30 Removing the USB Drive from the Display 30 Troubleshooting & Technical Support 31 Specifications...
User Manual
Page 7
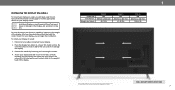
... will need a wall mount. Installing a Display on a clean, flat, stable surface. Be sure the surface is clear of this display. 1 Screw Size: Hole Pattern: Weight w/o Stands: P55-E1 M6 300mm x 300 mm 40.12 lb P65-E1 M6 400mm x 400 mm 61.40 lbs P75-E1 M8 400mm x 400 mm 103.62 lb Note: The image shown here is capable of supporting the weight of ports and their locations may...
... will need a wall mount. Installing a Display on a clean, flat, stable surface. Be sure the surface is clear of this display. 1 Screw Size: Hole Pattern: Weight w/o Stands: P55-E1 M6 300mm x 300 mm 40.12 lb P65-E1 M6 400mm x 400 mm 61.40 lbs P75-E1 M8 400mm x 400 mm 103.62 lb Note: The image shown here is capable of supporting the weight of ports and their locations may...
User Manual
Page 10
... Display should be installed and the power cord should be connected to an electrical outlet. • Your devices should be connected. • If you have a wireless network, have the network password ready. • If you can also find a digital copy on support.vizio.com Setup with the IR Remote 1.Press the OK/Play key on your IR remote during the initial setup screen. 2.Use the Arrow Keys and the OK/Play button...
... Display should be installed and the power cord should be connected to an electrical outlet. • Your devices should be connected. • If you have a wireless network, have the network password ready. • If you can also find a digital copy on support.vizio.com Setup with the IR Remote 1.Press the OK/Play key on your IR remote during the initial setup screen. 2.Use the Arrow Keys and the OK/Play button...

User Manual
Page 12
... remote. 2. Each mode displays the picture differently. Some programs have black bars on the top and bottom of the display image. • 720p - If the program is already formatted for any video content on HDMI-4. Fills the screen from right to the edges of the picture so that the picture keeps its original shape. Not available. Not available. • Panoramic stretches a 4:3 aspect ratio picture to view...
... remote. 2. Each mode displays the picture differently. Some programs have black bars on the top and bottom of the display image. • 720p - If the program is already formatted for any video content on HDMI-4. Fills the screen from right to the edges of the picture so that the picture keeps its original shape. Not available. Not available. • Panoramic stretches a 4:3 aspect ratio picture to view...

User Manual
Page 13
... Arrow buttons on the remote. The auto brightness control detects the light levels in a dark room. Adjusts the black level of picture elements. If flesh appears too orange, reduce the level of the picture. To adjust the picture settings: 1. Back Picture Picture Mode Calibrated Auto Brightness Control Off Backlight 90 Brightness 50 Contrast 50 Color 50 Tint 0 Sharpness 20 More Picture Picture Mode Edit Color Calibration • Vivid mode sets the picture settings to the settings for displaying computer output. 4. This setting...
... Arrow buttons on the remote. The auto brightness control detects the light levels in a dark room. Adjusts the black level of picture elements. If flesh appears too orange, reduce the level of the picture. To adjust the picture settings: 1. Back Picture Picture Mode Calibrated Auto Brightness Control Off Backlight 90 Brightness 50 Contrast 50 Color 50 Tint 0 Sharpness 20 More Picture Picture Mode Edit Color Calibration • Vivid mode sets the picture settings to the settings for displaying computer output. 4. This setting...

User Manual
Page 15
... for various viewing conditions and video sources. • Changes made while on any desired changes to enter your remote to the picture modes. 5. Reset the picture mode settings to select On. Highlight Save and press OK. 4. To lock all custom picture modes: 1. Back System Pin Code Change the pin used for the System Pin. 2. Use the Arrow buttons to factory default values. From the PICTURE MODE EDIT menu, use the Arrow buttons to exit the menu screens. † Only...
... for various viewing conditions and video sources. • Changes made while on any desired changes to enter your remote to the picture modes. 5. Reset the picture mode settings to select On. Highlight Save and press OK. 4. To lock all custom picture modes: 1. Back System Pin Code Change the pin used for the System Pin. 2. Use the Arrow buttons to factory default values. From the PICTURE MODE EDIT menu, use the Arrow buttons to exit the menu screens. † Only...

User Manual
Page 20
... audio settings, press the EXIT button on -screen menu is displayed. 2. Speakers Volume Control Display Surround Sound Volume Leveling Balance Lip Sync Digital Audio Out Analog Audio Out Equalizer Auto On Off Off 0 0 Auto Fixed When the Display speakers are controlling the volume with more than two channels (3.0, 5.0, or 5.1, for example). • Analog Audio Out - Adjusts the synchronization between program content, AV formats, and input sources. Changes the type of processing for the RCA connector when connected to a home theater audio system. To select a pre-set modes...
... audio settings, press the EXIT button on -screen menu is displayed. 2. Speakers Volume Control Display Surround Sound Volume Leveling Balance Lip Sync Digital Audio Out Analog Audio Out Equalizer Auto On Off Off 0 0 Auto Fixed When the Display speakers are controlling the volume with more than two channels (3.0, 5.0, or 5.1, for example). • Analog Audio Out - Adjusts the synchronization between program content, AV formats, and input sources. Changes the type of processing for the RCA connector when connected to a home theater audio system. To select a pre-set modes...

User Manual
Page 21
...; Default Gateway - DNS Server - To find the Display's MAC address: 1. 3 USING THE NETWORK CONNECTION MENU Your Display is Internet-ready, featuring both an Ethernet port and built-in use the Left/Right Arrow buttons to change advanced network settings: 1. The WIRELESS ACCESS POINTS menu, which is a list of the list. Back Network Wired Connection Disconnected Wireless Access Points More Access Points Manual Setup Hidden Network Test Connection 6. To change the setting to enter the Display's MAC address in the router's settings. The MANUAL SETUP menu...
...; Default Gateway - DNS Server - To find the Display's MAC address: 1. 3 USING THE NETWORK CONNECTION MENU Your Display is Internet-ready, featuring both an Ethernet port and built-in use the Left/Right Arrow buttons to change advanced network settings: 1. The WIRELESS ACCESS POINTS menu, which is a list of the list. Back Network Wired Connection Disconnected Wireless Access Points More Access Points Manual Setup Hidden Network Test Connection 6. To change the setting to enter the Display's MAC address in the router's settings. The MANUAL SETUP menu...

User Manual
Page 26
...'s user manual for Enable option only) 5. 3 Changing the On-Screen Menu Language Adjusting the CEC Settings Your Display can display the on -screen menu is displayed. 2. Select ARC Only for these devices). Please note that by default. Use the Arrow buttons on -screen menu language: HDMI-connected devices with the included remote without any additional programming. 1. Use the Arrow buttons on the remote. The SYSTEM menu is displayed. 3. See your Display to the HDMI ARC input. Highlight either Eco Mode or Quick Start Mode...
...'s user manual for Enable option only) 5. 3 Changing the On-Screen Menu Language Adjusting the CEC Settings Your Display can display the on -screen menu is displayed. 2. Select ARC Only for these devices). Please note that by default. Use the Arrow buttons on -screen menu language: HDMI-connected devices with the included remote without any additional programming. 1. Use the Arrow buttons on the remote. The SYSTEM menu is displayed. 3. See your Display to the HDMI ARC input. Highlight either Eco Mode or Quick Start Mode...

User Manual
Page 28
... to lock content and picture Store Demo settings • Turn Viewing Data On or Off • Start or stop the Store Demo Mode Restoring the Display to Factory Default Settings All of the on-screen menu settings can easily turn back on shortly afterward and the Setup App will be reset to your profile that you might find useful, both on the remote. The SYSTEM menu is displayed. 4. If you have changed the default parental control...
... to lock content and picture Store Demo settings • Turn Viewing Data On or Off • Start or stop the Store Demo Mode Restoring the Display to Factory Default Settings All of the on-screen menu settings can easily turn back on shortly afterward and the Setup App will be reset to your profile that you might find useful, both on the remote. The SYSTEM menu is displayed. 4. If you have changed the default parental control...

User Manual
Page 33
... ones. The Display displays "No Signal." • Press the INPUT button on , but there is not responding. • Make sure the batteries are connected correctly. The power is on the remote control to enter manual setup. There is no power. • Ensure the Display is plugged into a working electrical outlet. • Ensure the power cable is not audible. • Turn off . • Check the audio settings. How do I change the inputs? •...
... ones. The Display displays "No Signal." • Press the INPUT button on , but there is not responding. • Make sure the batteries are connected correctly. The power is on the remote control to enter manual setup. There is no power. • Ensure the Display is plugged into a working electrical outlet. • Ensure the power cable is not audible. • Turn off . • Check the audio settings. How do I change the inputs? •...

User Manual
Page 34
... buttons on the remote aren't working. • Ensure you are only pressing one on the input source you are inherent to change input source, the display image changes size. • The TV remembers the viewing mode on page 9. The display image does not cover the entire screen. • If you switch from electrical appliances, cars, and fluorescent lights. • Ensure all cables are always dark. • Your HD Display...
... buttons on the remote aren't working. • Ensure you are only pressing one on the input source you are inherent to change input source, the display image changes size. • The TV remembers the viewing mode on page 9. The display image does not cover the entire screen. • If you switch from electrical appliances, cars, and fluorescent lights. • Ensure all cables are always dark. • Your HD Display...
User Manual
Page 39
..., Pacific Time. (e) signal issues; (f) damage from an (at its option) repair or replace it is covered by a neutral arbitrator. or (l) products sold "AS IS", "CLEARANCE", waiver for parts or labor during the warranty period. Please read the text under the section titled "Binding product in its original packaging or in -home service is within the warranty period. VIZIO Technical Support will...
..., Pacific Time. (e) signal issues; (f) damage from an (at its option) repair or replace it is covered by a neutral arbitrator. or (l) products sold "AS IS", "CLEARANCE", waiver for parts or labor during the warranty period. Please read the text under the section titled "Binding product in its original packaging or in -home service is within the warranty period. VIZIO Technical Support will...


