M320SL User Manua
Page 3
...your TV. • Read these instructions. • Keep these instructions before operating your TV. To get the most out of your new VIZIO product, read these instructions. • Heed all warnings. • Follow all instructions. • Do not use this apparatus near any ventilation...Read the following instructions should be observed for the installation, use attachments/accessories specified by the manufacturer, or sold When Reading this Manual When you see this symbol, please read the accompanying important warning or notice. When you see this symbol, please read the ...
...your TV. • Read these instructions. • Keep these instructions before operating your TV. To get the most out of your new VIZIO product, read these instructions. • Heed all warnings. • Follow all instructions. • Do not use this apparatus near any ventilation...Read the following instructions should be observed for the installation, use attachments/accessories specified by the manufacturer, or sold When Reading this Manual When you see this symbol, please read the accompanying important warning or notice. When you see this symbol, please read the ...

M320SL User Manua
Page 18
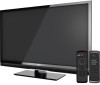
2 Remote Control (Models M320SL, M370SL) Input Change the currently-displayed input. Number Pad Manually enter a channel. App launcher Quickly launch the pictured app. Guide Display the info window. Exit Close the on . Ok Select the highlighted menu option. Volume .... Dash Use with number pad to the previous on -screen menu. Power Turn TV on -screen menu. Wide Switch the display mode. Back Go to manually enter a digital sub-channel. (For example, 18-4 or 18-5.) Remote Control 11 A/V Controls Control USB media player. Last Return to the channel last viewed. Closed...
2 Remote Control (Models M320SL, M370SL) Input Change the currently-displayed input. Number Pad Manually enter a channel. App launcher Quickly launch the pictured app. Guide Display the info window. Exit Close the on . Ok Select the highlighted menu option. Volume .... Dash Use with number pad to the previous on -screen menu. Power Turn TV on -screen menu. Wide Switch the display mode. Back Go to manually enter a digital sub-channel. (For example, 18-4 or 18-5.) Remote Control 11 A/V Controls Control USB media player. Last Return to the channel last viewed. Closed...

M320SL User Manua
Page 19
FRONT (Models M420SL, M470SL, M550SL) Input Change the currently-displayed input. Number Pad Manually enter a channel. Arrow Navigate the on -screen menu. V Button Open the VIA dock. Ok Select the highlighted menu option. Wide Switch the display mode. Menu Display the on -screen menu. Last Return to manually enter a digital sub-channel. (For example...
FRONT (Models M420SL, M470SL, M550SL) Input Change the currently-displayed input. Number Pad Manually enter a channel. Arrow Navigate the on -screen menu. V Button Open the VIA dock. Ok Select the highlighted menu option. Wide Switch the display mode. Menu Display the on -screen menu. Last Return to manually enter a digital sub-channel. (For example...
M320SL User Manua
Page 30
...; Caption Style - Press the MENU button on the remote to highlight the setting you wish to change, then use the Left/ Right Arrow buttons to manually change the appearance of the text. • BG Color - To change each setting. • Text Size - Use the Up/Down Arrow buttons on the remote...
...; Caption Style - Press the MENU button on the remote to highlight the setting you wish to change, then use the Left/ Right Arrow buttons to manually change the appearance of the text. • BG Color - To change each setting. • Text Size - Use the Up/Down Arrow buttons on the remote...
M320SL User Manua
Page 32
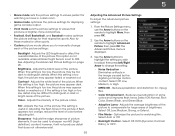
.... Tint - This setting is too high, the picture may be difficult to affect the overall brilliance of the picture. It can be too dark to manually change the setting: • Noise Reduction Diminishes artifacts in the picture. Use the Arrow buttons to highlight the setting you to distinguish details. Reduces oversaturation...
.... Tint - This setting is too high, the picture may be difficult to affect the overall brilliance of the picture. It can be too dark to manually change the setting: • Noise Reduction Diminishes artifacts in the picture. Use the Arrow buttons to highlight the setting you to distinguish details. Reduces oversaturation...
M320SL User Manua
Page 33
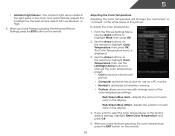
... to reset the color temperatures to change each of each color in the room and automatically adjusts the backlight for use the Arrow buttons to manually change the color temperature preset: • Cool produces a blue-hued picture. • Computer optimizes the picture for the best picture. The ambient light sensor detects...
... to reset the color temperatures to change each of each color in the room and automatically adjusts the backlight for use the Arrow buttons to manually change the color temperature preset: • Cool produces a blue-hued picture. • Computer optimizes the picture for the best picture. The ambient light sensor detects...
M320SL User Manua
Page 38
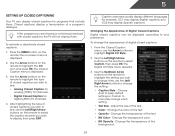
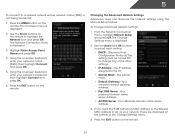
...name (SSID), then highlight Connect and press OK. 5. Changing the Advanced Network Settings Advanced users can fine-tune the network settings using the Manual Setup feature. Your network's default gateway address. • Pref. Press the MENU button on the remote to highlight the Network icon and ...to the TV. • Subnet Mask - Your preferred domain name server address. • Alt DNS Server - From the Network Connection menu, highlight Manual Setup and press OK. The subnet mask. • Default Gateway - The on the remote. 31 Use the Arrow buttons on the remote. 5...
...name (SSID), then highlight Connect and press OK. 5. Changing the Advanced Network Settings Advanced users can fine-tune the network settings using the Manual Setup feature. Your network's default gateway address. • Pref. Press the MENU button on the remote to highlight the Network icon and ...to the TV. • Subnet Mask - Your preferred domain name server address. • Alt DNS Server - From the Network Connection menu, highlight Manual Setup and press OK. The subnet mask. • Default Gateway - The on the remote. 31 Use the Arrow buttons on the remote. 5...
M320SL User Manua
Page 46
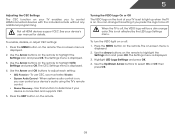
... CEC. The on the remote to control HDMI-connected devices with the included remote without any additional programming. The CEC Settings menu is off, the VIZIO logo will be off : 1. The on the remote. Press the MENU button on -screen menu is on your device is displayed. 3. When ... press OK. The Settings menu is connected and supports CEC. 5. Highlight LED Logo Settings and press OK. 4. You can control your device's user manual for details. Use the Up/Down Arrow buttons to be a dim orange color. Use the Arrow buttons on or off . Use this setting if ...
... CEC. The on the remote to control HDMI-connected devices with the included remote without any additional programming. The CEC Settings menu is off, the VIZIO logo will be off : 1. The on the remote. Press the MENU button on -screen menu is on your device is displayed. 3. When ... press OK. The Settings menu is connected and supports CEC. 5. Highlight LED Logo Settings and press OK. 4. You can control your device's user manual for details. Use the Up/Down Arrow buttons to be a dim orange color. Use the Arrow buttons on or off . Use this setting if ...

M320SL User Manua
Page 58
... cable is securely attached to ensure mute is on the remote to a window for details. • Adjust Brightness, Contrast, or Backlight. Ensure your device's user manual for the best signal. The buttons on the screen. • Ensure all devices are only pressing one button at a time. • Point the remote directly...
... cable is securely attached to ensure mute is on the remote to a window for details. • Adjust Brightness, Contrast, or Backlight. Ensure your device's user manual for the best signal. The buttons on the screen. • Ensure all devices are only pressing one button at a time. • Point the remote directly...

