
User Manual (English)
Page 2
...the label. PRODUCT REGISTRATION To purchase or inquire about accessories and installation services for long periods of mind, and to protect your new VIZIO product, read these instructions. • Heed all warnings. • Follow all servicing to your home, consult your TV and any ...ventilation openings. To purchase an extended warranty service plan, visit www.VIZIO.com. WHEN READING THIS MANUAL When you are not blocked or covered. Never spill liquids on or pinched particularly at www.VIZIO.com Extended Warranties For peace of time. • Refer all instructions. ...
...the label. PRODUCT REGISTRATION To purchase or inquire about accessories and installation services for long periods of mind, and to protect your new VIZIO product, read these instructions. • Heed all warnings. • Follow all servicing to your home, consult your TV and any ...ventilation openings. To purchase an extended warranty service plan, visit www.VIZIO.com. WHEN READING THIS MANUAL When you are not blocked or covered. Never spill liquids on or pinched particularly at www.VIZIO.com Extended Warranties For peace of time. • Refer all instructions. ...
User Manual (English)
Page 6
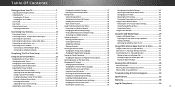
...Window 54 Fullscreen V.I .A. Arc 18 Connecting to Your Network 19 Connecting to a Wired Network (Best 19 Connecting to a Wireless Network 19 Changing the Manual Setup Settings 34 Finding MAC Addresses for Network Setup 34 Connecting to a Hidden Network 35 Setting Up channels 36 Selecting a Channel Source 36 Scanning for...the Guided Setup Menu 48 Replacing the Batteries 13 Connecting to the My Apps Tab 56 Deleting an App from the TV 49 Using VIZIO Internet Apps Plus® (V.I .A. Plus Apps Window 56 Using the On-Screen Menu 23 Setting Up Closed Captioning 39 Changing the ...
...Window 54 Fullscreen V.I .A. Arc 18 Connecting to Your Network 19 Connecting to a Wired Network (Best 19 Connecting to a Wireless Network 19 Changing the Manual Setup Settings 34 Finding MAC Addresses for Network Setup 34 Connecting to a Hidden Network 35 Setting Up channels 36 Selecting a Channel Source 36 Scanning for...the Guided Setup Menu 48 Replacing the Batteries 13 Connecting to the My Apps Tab 56 Deleting an App from the TV 49 Using VIZIO Internet Apps Plus® (V.I .A. Plus Apps Window 56 Using the On-Screen Menu 23 Setting Up Closed Captioning 39 Changing the ...
User Manual (English)
Page 12
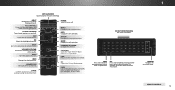
EXIT Close the on -screen menu. V BUTTON Open the VIZIO Internet Apps Plus® (V.I.A. PIC Opens the Picture Mode menu. ...REMOTE CONTROL 12 ENTER Confirm channel or passcode entered using the Number Pad. ARROW Navigate the on . NUMBER PAD Manually enter a channel. SHIFT Press and hold while pressing another key to enter a blue character. INPUT Change the ... option. MUTE Turn the audio off or on -screen menu. MENU Display the on -screen menu. LAST Return to manually enter a digital sub-channel. (For example, 18-4 or 18-5.) DO NOT COVER THIS AREA This is the transmitter....
EXIT Close the on -screen menu. V BUTTON Open the VIZIO Internet Apps Plus® (V.I.A. PIC Opens the Picture Mode menu. ...REMOTE CONTROL 12 ENTER Confirm channel or passcode entered using the Number Pad. ARROW Navigate the on . NUMBER PAD Manually enter a channel. SHIFT Press and hold while pressing another key to enter a blue character. INPUT Change the ... option. MUTE Turn the audio off or on -screen menu. MENU Display the on -screen menu. LAST Return to manually enter a digital sub-channel. (For example, 18-4 or 18-5.) DO NOT COVER THIS AREA This is the transmitter....
User Manual (English)
Page 23
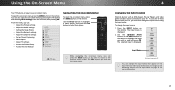
... Captioning • Name Inputs • Adjust TV settings • Access the Guided Setup • Access the User Manual VIZIO TV SETTINGS Picture Audio Timers Network Channels CC Closed Captions Devices System Guided Setup User Manual NAVIGATING THE ON-SCREEN MENU To open the on the remote. You can be connected to your TV...
... Captioning • Name Inputs • Adjust TV settings • Access the Guided Setup • Access the User Manual VIZIO TV SETTINGS Picture Audio Timers Network Channels CC Closed Captions Devices System Guided Setup User Manual NAVIGATING THE ON-SCREEN MENU To open the on the remote. You can be connected to your TV...
User Manual (English)
Page 25
... use the Left/Right Arrow buttons to adjust the WsideettingZo:om Normal Panoramic • Auto Brightness Control - Color - To manually change each of the picture settings, use the Left/Right Arrow buttons to change the picture mode: • Standard mode sets... The PICTURE menu is useful in adjusting the flesh tones in the room and automatically adjusts the backlight for displaying computer output. 4. VIZIO PICTURE Picture Mode Auto Brightness Control Backlight - Sharpness - ST•lim eeeprConPticrtaurset - The on the remote. 25 Brightness - Backlight ...
... use the Left/Right Arrow buttons to adjust the WsideettingZo:om Normal Panoramic • Auto Brightness Control - Color - To manually change each of the picture settings, use the Left/Right Arrow buttons to change the picture mode: • Standard mode sets... The PICTURE menu is useful in adjusting the flesh tones in the room and automatically adjusts the backlight for displaying computer output. 4. VIZIO PICTURE Picture Mode Auto Brightness Control Backlight - Sharpness - ST•lim eeeprConPticrtaurset - The on the remote. 25 Brightness - Backlight ...
User Manual (English)
Page 29
... patterns allow you are finished press the OK button to save the setting. 3. 4 Adjusting the Color Tuner Settings The Color Tuner settings allow technicians to manually calibrate the TV. Use the Arrow buttons on . The Color Tuner menu is displayed. From the Color Tuner menu, use the Left/Right Arrow buttons...
... patterns allow you are finished press the OK button to save the setting. 3. 4 Adjusting the Color Tuner Settings The Color Tuner settings allow technicians to manually calibrate the TV. Use the Arrow buttons on . The Color Tuner menu is displayed. From the Color Tuner menu, use the Left/Right Arrow buttons...
User Manual (English)
Page 34
...and press OK. Press the EXIT button on -screen menu is displayed. 2. From the NETWORK menu, highlight Manual Setup and VIZIO press OK. DHCP Off 2. To change the settings manually, use the Arrow buttons on the remote. Use the Arrow and OK buttons to Off. 3. DNS Server ... with WiFi. From the NETWORK menu, highlight Manual Setup and press OK. The Ethernet or RJ45 MAC address may be needed to cAoBnC nect your TV is displayed. The MANUAL SETUP MANUAL SETUP menu is connected to the TV. VIZIO NETWORK Wired Connection Disconnected Wireless Access Points More...
...and press OK. Press the EXIT button on -screen menu is displayed. 2. From the NETWORK menu, highlight Manual Setup and VIZIO press OK. DHCP Off 2. To change the settings manually, use the Arrow buttons on the remote. Use the Arrow and OK buttons to Off. 3. DNS Server ... with WiFi. From the NETWORK menu, highlight Manual Setup and press OK. The Ethernet or RJ45 MAC address may be needed to cAoBnC nect your TV is displayed. The MANUAL SETUP MANUAL SETUP menu is connected to the TV. VIZIO NETWORK Wired Connection Disconnected Wireless Access Points More...

User Manual (English)
Page 36
... and cable channels from an out-of tuner input you are retained. WHidieghliZgohom t AntNeornmnala oParnoCraambicle and press OK. Highlight Done and press OK. VIZIO FIND CHANNELS Channels Found Digital: 0 Analog: 19 18% Complete Cancel 3. Press the EXIT button on the remote. To add a range of... to: • Select a Channel Source • Perform an Auto Channel Scan (Find Channels) • Perform a Partial Channel Search • Manually Add Channels • Select channels to enter the channel.) 4. Use the Number Pad on the remote to skip • Select Analog MTS modes ...
... and cable channels from an out-of tuner input you are retained. WHidieghliZgohom t AntNeornmnala oParnoCraambicle and press OK. Highlight Done and press OK. VIZIO FIND CHANNELS Channels Found Digital: 0 Analog: 19 18% Complete Cancel 3. Press the EXIT button on the remote. To add a range of... to: • Select a Channel Source • Perform an Auto Channel Scan (Find Channels) • Perform a Partial Channel Search • Manually Add Channels • Select channels to enter the channel.) 4. Use the Number Pad on the remote to skip • Select Analog MTS modes ...

User Manual (English)
Page 46
... device connected to highlight CEC and press OK. Use the Up/Down Arrow buttons to enable support for plug and play of your device's user manual for details. Adjusting the CEC Settings The CEC function on your device is connected and supports CEC. (Required for Enable option only) 5. The ARC setting...
... device connected to highlight CEC and press OK. Use the Up/Down Arrow buttons to enable support for plug and play of your device's user manual for details. Adjusting the CEC Settings The CEC function on your device is connected and supports CEC. (Required for Enable option only) 5. The ARC setting...
User Manual (English)
Page 61
...8226; Press the MUTE button on the back of the channel may be low. see your antenna is off Volume Leveling. Ensure your device's user manual for the best signal. The buttons on the remote aren't working electrical outlet. • Ensure the power cable is connected securely to the TV ...power is on, but there is precision-manufactured using an antenna, the signal strength of the TV to the TV, scan for Channels on . VIZIO recommends selecting Calibrated. • Check all devices are using cable TV or antenna connected directly to turn the TV on page 36. See Adjusting ...
...8226; Press the MUTE button on the back of the channel may be low. see your antenna is off Volume Leveling. Ensure your device's user manual for the best signal. The buttons on the remote aren't working electrical outlet. • Ensure the power cable is connected securely to the TV ...power is on, but there is precision-manufactured using an antenna, the signal strength of the TV to the TV, scan for Channels on . VIZIO recommends selecting Calibrated. • Check all devices are using cable TV or antenna connected directly to turn the TV on page 36. See Adjusting ...

Quickstart Guide (English)
Page 6
NUMBER PAD Manually enter a channel. GUIDE Display the info window. CLOSED CAPTIONS Open the closed caption menu. MUTE Turn the audio off or on or off .) POWER Turn .... PIC Opens the picture mode menu. MENU Display the on -screen menu. INFO Display the info window. V BUTTON Open the VIA dock. LAST Return to manually enter a digital sub-channel. (For example, 18-4 or 18-5.) OK Select the highlighted menu option. WIDE Change the display mode. ARROW Navigate the on -screen...
NUMBER PAD Manually enter a channel. GUIDE Display the info window. CLOSED CAPTIONS Open the closed caption menu. MUTE Turn the audio off or on or off .) POWER Turn .... PIC Opens the picture mode menu. MENU Display the on -screen menu. INFO Display the info window. V BUTTON Open the VIA dock. LAST Return to manually enter a digital sub-channel. (For example, 18-4 or 18-5.) OK Select the highlighted menu option. WIDE Change the display mode. ARROW Navigate the on -screen...

Quickstart Guide (English)
Page 16
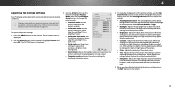
VIEWING THE ON-SCREEN USER MANUAL 1 2 MENU Button VIZIO TV SETTINGS Picture Audio Timers Network Channels CC Closed Captions Devices System Guided Setup User Manual Wide Zoom Normal Panoramic Exit 2D 3D ABC User Input Wide CC Manual Sleep Timer Picture Audio Network Settings Help Press the MENU button on the Remote Control to display the TV SETTINGS menu. Highlight User Manual and press OK.
VIEWING THE ON-SCREEN USER MANUAL 1 2 MENU Button VIZIO TV SETTINGS Picture Audio Timers Network Channels CC Closed Captions Devices System Guided Setup User Manual Wide Zoom Normal Panoramic Exit 2D 3D ABC User Input Wide CC Manual Sleep Timer Picture Audio Network Settings Help Press the MENU button on the Remote Control to display the TV SETTINGS menu. Highlight User Manual and press OK.

Quickstart Guide (English)
Page 17
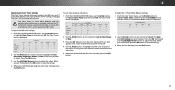
Press the EXIT Button to view. Use the Up and Down Arrow Buttons to select the chapter you want to exit the on-screen User Manual. Use the Left and Right Arrow Buttons to the Table of Contents page. Press the BACK Button to return to browse through the pages in each chapter.
Press the EXIT Button to view. Use the Up and Down Arrow Buttons to select the chapter you want to exit the on-screen User Manual. Use the Left and Right Arrow Buttons to the Table of Contents page. Press the BACK Button to return to browse through the pages in each chapter.
Quickstart Guide (English)
Page 18
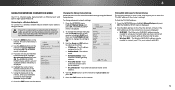
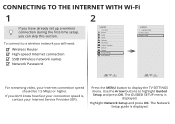
... a wireless network you will need: Wireless Router High-speed Internet connection SSID (Wireless network name) Network Password 2 VIZIO TV SETTINGS Picture Audio Timers Network Channels CC Closed Captions Devices System Guided Setup User Manual Wide VIZIO GUIDED SETUP ZoComhanneNl Soermtuapl Panoramic Network Setup Exit 2D 3D ABC Input Wide CC Sleep Timer Picture...
... a wireless network you will need: Wireless Router High-speed Internet connection SSID (Wireless network name) Network Password 2 VIZIO TV SETTINGS Picture Audio Timers Network Channels CC Closed Captions Devices System Guided Setup User Manual Wide VIZIO GUIDED SETUP ZoComhanneNl Soermtuapl Panoramic Network Setup Exit 2D 3D ABC Input Wide CC Sleep Timer Picture...

Quickstart Guide (English)
Page 19
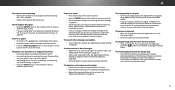
...• Furniture blocks signal • Far from TV Wireless Router P • No wall blocks signal • No furniture blocks signal • Close to enter it manually by selecting Hidden Network. If you are having trouble connecting to your network, check your wireless network (this is the network's SSID) and press OK... broadcasting at 2.4 or 5 GHz can interfere with the signal. Using the on-screen keyboard, enter your SSID, you do not see the TV's User Manual. If you will need to TV For more information, see your network's password, then highlight Connect and press OK.
...• Furniture blocks signal • Far from TV Wireless Router P • No wall blocks signal • No furniture blocks signal • Close to enter it manually by selecting Hidden Network. If you are having trouble connecting to your network, check your wireless network (this is the network's SSID) and press OK... broadcasting at 2.4 or 5 GHz can interfere with the signal. Using the on-screen keyboard, enter your SSID, you do not see the TV's User Manual. If you will need to TV For more information, see your network's password, then highlight Connect and press OK.

