M420NV User Manual
Page 12
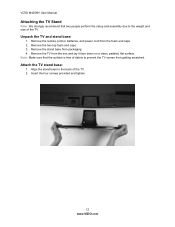
Remove the two top foam end caps. 3. VIZIO M420NV User Manual Attaching the TV Stand Note: We strongly recommend that the surface is free of debris to prevent the TV screen from getting scratched. Insert the four screws provided and tighten. 12 www.VIZIO.com Unpack the TV and stand base: 1. Remove the remote control, batteries, and...
Remove the two top foam end caps. 3. VIZIO M420NV User Manual Attaching the TV Stand Note: We strongly recommend that the surface is free of debris to prevent the TV screen from getting scratched. Insert the four screws provided and tighten. 12 www.VIZIO.com Unpack the TV and stand base: 1. Remove the remote control, batteries, and...
M420NV User Manual
Page 13
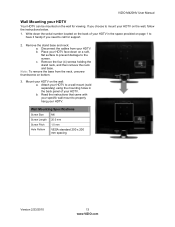
... your specific wall mount to the screen. b. Mount your HDTV. VIZIO M420NV User Manual Wall Mounting your HDTV on the wall, follow the instructions below. 1. Remove the four (4) screws holding the stand neck, and then remove the neck and base. Remove the stand base and neck: a. Attach your HDTV to a wall mount (... back of your HDTV in the back panel of your HDTV. c. Note: To remove the base from your HDTV. Wall Mounting Specifications Screw Size M6 Screw Length 20.0 mm Screw Pitch 1.0 mm Hole Pattern VESA standard 200 x 200 mm spacing Version 2/23/2010 13 www...
... your specific wall mount to the screen. b. Mount your HDTV. VIZIO M420NV User Manual Wall Mounting your HDTV on the wall, follow the instructions below. 1. Remove the four (4) screws holding the stand neck, and then remove the neck and base. Remove the stand base and neck: a. Attach your HDTV to a wall mount (... back of your HDTV in the back panel of your HDTV. c. Note: To remove the base from your HDTV. Wall Mounting Specifications Screw Size M6 Screw Length 20.0 mm Screw Pitch 1.0 mm Hole Pattern VESA standard 200 x 200 mm spacing Version 2/23/2010 13 www...


