Download
Page 5
... dropped or damaged in fire or electric shock. • Do not use in this case may cause the batteries to leak which can damage the remote control or injure the operator. Operating your TV. The power cord fails or frays. - If any object drops into your TV, unplug the power cord...
... dropped or damaged in fire or electric shock. • Do not use in this case may cause the batteries to leak which can damage the remote control or injure the operator. Operating your TV. The power cord fails or frays. - If any object drops into your TV, unplug the power cord...
Download
Page 7
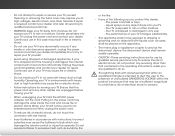
... Contents Installing the TV 3 Inspecting the Package Contents 3 Installing the TV 3 Installing the TV Stand 3 Installing the TV on a Wall 5 Controls and Connections 6 Front Panel 7 Remote Control 8 Replacing the Batteries 9 Connecting Your Devices 10 Connecting A Device 10 Connecting a Device -
... Contents Installing the TV 3 Inspecting the Package Contents 3 Installing the TV 3 Installing the TV Stand 3 Installing the TV on a Wall 5 Controls and Connections 6 Front Panel 7 Remote Control 8 Replacing the Batteries 9 Connecting Your Devices 10 Connecting A Device 10 Connecting a Device -
Download
Page 9
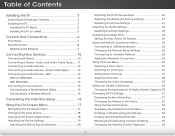
Your TV can begin installing the TV. VIZIO LED HDTV with Stand INPUT LIST EXIT MENU INFO BACK VOL GUIDE CH 3D 1 2 3 4 5 6 7 8 9 ENTER 0 Remote Control with Batteries Installing the TV After removing the TV from the box and inspecting the package contents you can be ... over . Installing the TV 1 Inspecting the Package Contents Before installing your new TV, take a moment to ensure nothing is not properly secured VIZIO Quick Start Guide Quick Start Guide 3 x 20mm M5 Phillips Screws Power Cord Package Contents 3 TV on Stand Use the images below to inspect...
Your TV can begin installing the TV. VIZIO LED HDTV with Stand INPUT LIST EXIT MENU INFO BACK VOL GUIDE CH 3D 1 2 3 4 5 6 7 8 9 ENTER 0 Remote Control with Batteries Installing the TV After removing the TV from the box and inspecting the package contents you can be ... over . Installing the TV 1 Inspecting the Package Contents Before installing your new TV, take a moment to ensure nothing is not properly secured VIZIO Quick Start Guide Quick Start Guide 3 x 20mm M5 Phillips Screws Power Cord Package Contents 3 TV on Stand Use the images below to inspect...

Download
Page 13
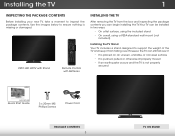
2 Front Panel REMOTE SENSOR & POWER INDICATOR When using the remote, aim it directly at this sensor. 7 Front Panel
2 Front Panel REMOTE SENSOR & POWER INDICATOR When using the remote, aim it directly at this sensor. 7 Front Panel

Download
Page 14
...the highlighted option. wide Change the display mode. V Button Open the VIZIO Internet Apps Plus™ (V.I.A. menu or app. Plus) dock. Back Go to manually enter a digital sub-channel. (For example, 18-4 or 18-5.) Remote Control Number Pad Manually enter a channel. Guide Display the info window...of the audio. Hot Keys Perform functions within an app. Info Display the info window. App launcher Quickly launch the pictured app. Remote Control Input Change the currently displayed input. A/V Controls Control USB media player. Exit Close the on -screen menu. Mute Turn the...
...the highlighted option. wide Change the display mode. V Button Open the VIZIO Internet Apps Plus™ (V.I.A. menu or app. Plus) dock. Back Go to manually enter a digital sub-channel. (For example, 18-4 or 18-5.) Remote Control Number Pad Manually enter a channel. Guide Display the info window...of the audio. Hot Keys Perform functions within an app. Info Display the info window. App launcher Quickly launch the pictured app. Remote Control Input Change the currently displayed input. A/V Controls Control USB media player. Exit Close the on -screen menu. Mute Turn the...

Download
Page 15
Make sure that the (+) and (-) symbols on the batteries match the (+) and (-) symbols inside the battery compartment. 3. Remove the battery cover. 2. 2 Replacing the Batteries 1. Insert two batteries into the remote control. Replace the battery cover. 9
Make sure that the (+) and (-) symbols on the batteries match the (+) and (-) symbols inside the battery compartment. 3. Remove the battery cover. 2. 2 Replacing the Batteries 1. Insert two batteries into the remote control. Replace the battery cover. 9
Download
Page 22
...connection using the on-screen keyboard, then highlight Connect and press OK. 6. The TV INPUT powers on the remote. BACK GUIDE 3. Enter the network key using the Arrow and OK buttons on the remote. 8. When you have a wireless network, have finished the first-time setup, highlight Exit to highlight a ...8226; If you are connecting to your TV ready for Yahoo! Use the OK and Up/Down Arrow buttons on the remote to the Ethernet port on the remote to get your network with an Ethernet cable, connect it to read and accept the Terms of Service and Privacy Policy ...
...connection using the on-screen keyboard, then highlight Connect and press OK. 6. The TV INPUT powers on the remote. BACK GUIDE 3. Enter the network key using the Arrow and OK buttons on the remote. 8. When you have a wireless network, have finished the first-time setup, highlight Exit to highlight a ...8226; If you are connecting to your TV ready for Yahoo! Use the OK and Up/Down Arrow buttons on the remote to the Ethernet port on the remote to get your network with an Ethernet cable, connect it to read and accept the Terms of Service and Privacy Policy ...

Download
Page 23
...-Screen Menu 5 Your TV features an easy-to select that option. You can also open the on-screen menu, press the MENU button on the remote. From this menu, you can : • Adjust the Picture settings • Adjust the Audio settings • Activate the Sleep Timer • Adjust the ...8226; Adjust the Tuner settings • Set up Closed Captioning • Adjust TV Settings • Access the Guided Setup • Access the User Manual VIZIO TV Settings Picture Audio Timers Network Tuner CC CC System Guided Setup User Manual LIST Navigating the On-Screen Menu To open the on-screen...
...-Screen Menu 5 Your TV features an easy-to select that option. You can also open the on-screen menu, press the MENU button on the remote. From this menu, you can : • Adjust the Picture settings • Adjust the Audio settings • Activate the Sleep Timer • Adjust the ...8226; Adjust the Tuner settings • Set up Closed Captioning • Adjust TV Settings • Access the Guided Setup • Access the User Manual VIZIO TV Settings Picture Audio Timers Network Tuner CC CC System Guided Setup User Manual LIST Navigating the On-Screen Menu To open the on-screen...

Download
Page 24
...vary by TV Changing the Screen Aspect Ratio The TV can be connected to your TV.To use one of the display image. Press the remote. Since the 4:3 aspect ratio is displaying a 480i/480p source. • Wide stretches a 4:3 aspect ratio picture to fit the screen. 18 button ...on the remote. The input menu is being stretched, the display image may appear wider than intended. 5 Changing the Input Source External devices such as DVD players, ...
...vary by TV Changing the Screen Aspect Ratio The TV can be connected to your TV.To use one of the display image. Press the remote. Since the 4:3 aspect ratio is displaying a 480i/480p source. • Wide stretches a 4:3 aspect ratio picture to fit the screen. 18 button ...on the remote. The input menu is being stretched, the display image may appear wider than intended. 5 Changing the Input Source External devices such as DVD players, ...
Download
Page 25
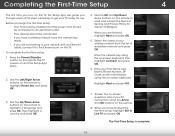
...the black level of picture tint. Adjusts the the level of color before adjusting edge sharpness of the picture. The on the remote to affect the overall brilliance of the picture settings: • Backlight - When this setting is too low, the picture may... the Left/Right Arrow buttons to values that does not otherwise exist. Use the Arrow buttons on the remote. Changing the Picture Mode setting to Custom allows you to manually change the Picture Mode: VIZIO Picture Picture Mode Backlight Brightness Contrast Color Tint Sharpness Standard - + 50 - + 50 - + 50 - + ...
...the black level of picture tint. Adjusts the the level of color before adjusting edge sharpness of the picture. The on the remote to affect the overall brilliance of the picture settings: • Backlight - When this setting is too low, the picture may... the Left/Right Arrow buttons to values that does not otherwise exist. Use the Arrow buttons on the remote. Changing the Picture Mode setting to Custom allows you to manually change the Picture Mode: VIZIO Picture Picture Mode Backlight Brightness Contrast Color Tint Sharpness Standard - + 50 - + 50 - + 50 - + ...

Download
Page 26
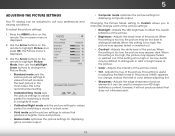
... picPitcuturree forAuudsioe monitor. Position - Adjusts the width of the display image. • Horizontal Size - ExUitse th2eD Arrow3Dbuttons on the remote. Ne•tworkCuSestttiongms alHloelpws you to highlight Size & Position, then press OK. When you wish to adjust, then press Left/Right.... Use the Arrow buttons on the remote to the factory default settings, highlight Reset Color Temperature and highlight Yes, and press OK. 5. VIZIO Size & Position Horiz. The size and position adjustments depend on the remote. 20 Adjusting the Color Temperature Adjusting the...
... picPitcuturree forAuudsioe monitor. Position - Adjusts the width of the display image. • Horizontal Size - ExUitse th2eD Arrow3Dbuttons on the remote. Ne•tworkCuSestttiongms alHloelpws you to highlight Size & Position, then press OK. When you wish to adjust, then press Left/Right.... Use the Arrow buttons on the remote to the factory default settings, highlight Reset Color Temperature and highlight Yes, and press OK. 5. VIZIO Size & Position Horiz. The size and position adjustments depend on the remote. 20 Adjusting the Color Temperature Adjusting the...
Download
Page 27
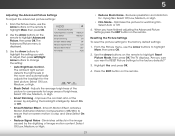
...Block Noise - Reduces pixellation and distortion for large areas of brightness. Select Auto or Off. 4. Sleep TiPmreer ss Picture Audio the EXIT button on the remote to compensate for .mpeg files. Use the Arrow buttons on -screen motion is displayed. Select Off, Low, Medium, or High. • Black ... More, then press OK. Optimizes the picture for the best picture. From the Picture menu, use the Arrow buttons on the remote. VIZIO Advanced Picture Auto Brightness Control Black Detail Smart Dimming Smooth Motion Effect Reduce Signal Noise Reduce Block Noise Medium Medium On Off Low ...
...Block Noise - Reduces pixellation and distortion for large areas of brightness. Select Auto or Off. 4. Sleep TiPmreer ss Picture Audio the EXIT button on the remote to compensate for .mpeg files. Use the Arrow buttons on -screen motion is displayed. Select Off, Low, Medium, or High. • Black ... More, then press OK. Optimizes the picture for the best picture. From the Picture menu, use the Arrow buttons on the remote. VIZIO Advanced Picture Auto Brightness Control Black Detail Smart Dimming Smooth Motion Effect Reduce Signal Noise Reduce Block Noise Medium Medium On Off Low ...

Download
Page 28
...of the audio output from your home theater system Exit con2Dtrols. 3D • Equalizer Settings - Turns the built-in speakers on the remote. DTS Studio Sound™ is displayed. Select On or Off. • Volume Leveling - Select Variable to control the external speakers'... - Press the MENU button on or off. • Surround Sound - The on page 23. 4. Use the Arrow buttons on the remote. VIZIO Audio Balance - Additionally, Studio Sound completes the entertainment experience by selecting Flat, Dynamic, Center, Bass, Boost, or Bright. DTS TruVolume™...
...of the audio output from your home theater system Exit con2Dtrols. 3D • Equalizer Settings - Turns the built-in speakers on the remote. DTS Studio Sound™ is displayed. Select On or Off. • Volume Leveling - Select Variable to control the external speakers'... - Press the MENU button on or off. • Surround Sound - The on page 23. 4. Use the Arrow buttons on the remote. VIZIO Audio Balance - Additionally, Studio Sound completes the entertainment experience by selecting Flat, Dynamic, Center, Bass, Boost, or Bright. DTS TruVolume™...

Download
Page 29
... you sure you want the sleep timer to activate, change the setting to Off. 5. Highlight Yes and press OK. 5. Use the Arrow buttons on the remote to highlight Timers and press OK. Press the MENU button on -screen menu is displayed. 2. Activating the Sleep Timer When activated, the TV's sleep timer... Timer and press OK. Use the Arrow buttons to highlight the period of time. To use the sleep timer: 1. Press the EXIT button on the remote. Press the MENU button on the remote. VIZIO Timers Sleep Timer Auto Power Off Off 10 mins 3. Use the Up/Down Arrow buttons on the...
... you sure you want the sleep timer to activate, change the setting to Off. 5. Highlight Yes and press OK. 5. Use the Arrow buttons on the remote to highlight Timers and press OK. Press the MENU button on -screen menu is displayed. 2. Activating the Sleep Timer When activated, the TV's sleep timer... Timer and press OK. Use the Arrow buttons to highlight the period of time. To use the sleep timer: 1. Press the EXIT button on the remote. Press the MENU button on the remote. VIZIO Timers Sleep Timer Auto Power Off Off 10 mins 3. Use the Up/Down Arrow buttons on the...

Download
Page 30
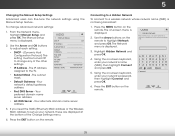
...the Up/Down Arrow buttons on -screen keyboard, enter your wireless network displayed, highlight More Access Points and press OK. Using the on the remote to highlight Network and press OK. The Auto Power-Off menu is displayed. 3. The Network menu is displayed. 2. To set up a ...Using the Network Connection Menu Your TV is connected to set the Auto Power Off feature: 1. Use the Arrow buttons on the remote. 24 VIZIO Network Wired Connection Disconnected Wireless Access Points More Access Points WPS Manual Setup Hidden Network Test Connection 6. Press the MENU button on ...
...the Up/Down Arrow buttons on -screen keyboard, enter your wireless network displayed, highlight More Access Points and press OK. Using the on the remote to highlight Network and press OK. The Auto Power-Off menu is displayed. 3. The Network menu is displayed. 2. To set up a ...Using the Network Connection Menu Your TV is connected to set the Auto Power Off feature: 1. Use the Arrow buttons on the remote. 24 VIZIO Network Wired Connection Disconnected Wireless Access Points More Access Points WPS Manual Setup Hidden Network Test Connection 6. Press the MENU button on ...
Download
Page 31
...highlight Manual Setup and VIZIO press OK. DHCP Off 2. The IP address assigned to a wireless network whose network name (SSID) is not being broadcast: 1. Press the EXIT button on the WirdeemoZtoeomto hiNgorhmlaigl hPtaNnoeratmwicork and press OK. Use the Arrow buttons on the remote. The Manual Setup ...on the Nertweomrk otSeet.tings Help 25 Connecting to a Hidden Network To connect to the TV. Press the EXIT button on the remote. 5 Changing the Manual Setup Settings Advanced users can fine-tune the network settings using the Manual Setup feature. To change any of...
...highlight Manual Setup and VIZIO press OK. DHCP Off 2. The IP address assigned to a wireless network whose network name (SSID) is not being broadcast: 1. Press the EXIT button on the WirdeemoZtoeomto hiNgorhmlaigl hPtaNnoeratmwicork and press OK. Use the Arrow buttons on the remote. The Manual Setup ...on the Nertweomrk otSeet.tings Help 25 Connecting to a Hidden Network To connect to the TV. Press the EXIT button on the remote. 5 Changing the Manual Setup Settings Advanced users can fine-tune the network settings using the Manual Setup feature. To change any of...
Download
Page 32
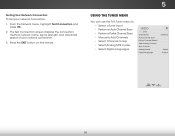
...From the Network menu, highlight Test Connection and press OK. 2. Testing Your Network Connection To test your network connection. 3. Press the EXIT button on the remote. 5 Using the Tuner Menu You can use the TV's Tuner menu to: • Select a Tuner Input • Perform an Auto Channel Scan ... Channel Scan • Manually Add Channels • Select Channels to skip • Select Analog MTS modes • Select Digital Languages VIZIO Tuner Tuner Mode Auto Channel Scan Partial Channel Search Add Analog Channel Skip Channel Analog Audio Digital Language Antenna Stereo English 26
...From the Network menu, highlight Test Connection and press OK. 2. Testing Your Network Connection To test your network connection. 3. Press the EXIT button on the remote. 5 Using the Tuner Menu You can use the TV's Tuner menu to: • Select a Tuner Input • Perform an Auto Channel Scan ... Channel Scan • Manually Add Channels • Select Channels to skip • Select Analog MTS modes • Select Digital Languages VIZIO Tuner Tuner Mode Auto Channel Scan Partial Channel Search Add Analog Channel Skip Channel Analog Audio Digital Language Antenna Stereo English 26

Download
Page 33
... channel scan may need to add a new analog channel or add a new range of -the-wall) connections. 1. The auto channel scan begins. 2. VIZIO Channel Scan Channels found Digital: 0 Analog: 19 18% Complete Cancel Adding New Channels Occasionally, you may also be using.You can select either Antenna (Over...highlight Partial Channel Search, and press OK. Highlight Start and press OK. ExPitress t2hDe EXIT3Dbutton on the remote to begin the scan. (Use the Number Pad on the remote. Scanning for channels. Highlight From Channel and enter the channel from which you must scan for Channels...
... channel scan may need to add a new analog channel or add a new range of -the-wall) connections. 1. The auto channel scan begins. 2. VIZIO Channel Scan Channels found Digital: 0 Analog: 19 18% Complete Cancel Adding New Channels Occasionally, you may also be using.You can select either Antenna (Over...highlight Partial Channel Search, and press OK. Highlight Start and press OK. ExPitress t2hDe EXIT3Dbutton on the remote to begin the scan. (Use the Number Pad on the remote. Scanning for channels. Highlight From Channel and enter the channel from which you must scan for Channels...

Download
Page 34
...block a channel from the TV's memory with the Skip Channel feature can remove these channels from being viewed, use the Number Pad on the remote. 5 Skipping Channels After a channel scan is entered using the Number Pad. An X appears to watch comfortably. When the TV is done... scanning for the channel. 4. There may find that have selected all of each channel you select. 3. See Navigating the On-Screen Menu on the remote. VIZIO Skip Channel 0 Test 0 P 0-1 Test 1 P 0-1 Test 2 P 0 Test 3 P 0-2 Test 4 P 0-3 Test 5 P 28 The TV scans for the channel, ...
...block a channel from the TV's memory with the Skip Channel feature can remove these channels from being viewed, use the Number Pad on the remote. 5 Skipping Channels After a channel scan is entered using the Number Pad. An X appears to watch comfortably. When the TV is done... scanning for the channel. 4. There may find that have selected all of each channel you select. 3. See Navigating the On-Screen Menu on the remote. VIZIO Skip Channel 0 Test 0 P 0-1 Test 1 P 0-1 Test 2 P 0 Test 3 P 0-2 Test 4 P 0-3 Test 5 P 28 The TV scans for the channel, ...

Download
Page 35
... Wide Zoom Normal Panoramic Exit 2D 3D ABC Input Wide CC VIZIO Digital Language English Français Español Sleep Timer Picture Audio Network Settings Help 29 Press the EXIT button on the remote. The Digital Language menu is displayed. 2. Select your preferred language.... From the Tuner menu, highlight Digital Language and press OK. The Analog Audio menu is displayed. 2. Press the EXIT button on the remote. To use the Digital Language feature: 1. Select Mono, Stereo, or SAP (secondary audio programming). Press OK. 3. 5 Changing the Audio ...
... Wide Zoom Normal Panoramic Exit 2D 3D ABC Input Wide CC VIZIO Digital Language English Français Español Sleep Timer Picture Audio Network Settings Help 29 Press the EXIT button on the remote. The Digital Language menu is displayed. 2. Select your preferred language.... From the Tuner menu, highlight Digital Language and press OK. The Analog Audio menu is displayed. 2. Press the EXIT button on the remote. To use the Digital Language feature: 1. Select Mono, Stereo, or SAP (secondary audio programming). Press OK. 3. 5 Changing the Audio ...


