Download
Page 4
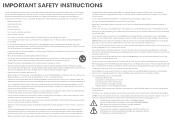
... push any heat source, such as when the power-supply cord or plug is a safety feature. • Use only with the cart, stand, tripod, bracket, or table specified by the manufacturer, or sold with a third grounding pin). Do not place your TV in fire or electric shock. • The wall socket should be operated only from the type of power source indicated on...
... push any heat source, such as when the power-supply cord or plug is a safety feature. • Use only with the cart, stand, tripod, bracket, or table specified by the manufacturer, or sold with a third grounding pin). Do not place your TV in fire or electric shock. • The wall socket should be operated only from the type of power source indicated on...
Download
Page 5
... can damage the remote control or injure the operator. Pulling on the power cord may be placed on the apparatus. • The mains plug or appliance coupler is damaged, the internal components may cause the batteries to rain or moisture. When your TV yourself. Do not expose batteries to repair or service your TV will not be used as the...
... can damage the remote control or injure the operator. Pulling on the power cord may be placed on the apparatus. • The mains plug or appliance coupler is damaged, the internal components may cause the batteries to rain or moisture. When your TV yourself. Do not expose batteries to repair or service your TV will not be used as the...
Download
Page 6
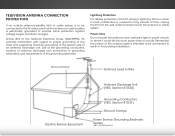
...-20) Grounding Conductors (NEC Section 810-21) Ground Clamps Power Service Grounding Electrode System (NEC ART 250, part H) Television Antenna Connection Protection If an outside antenna/satellite dish or cable system is to be connected to earth in wire to an antenna discharge unit, size of the grounding conductors, location of antenna discharge unit, connection to grounding electrodes, and requirements of the coaxial...
...-20) Grounding Conductors (NEC Section 810-21) Ground Clamps Power Service Grounding Electrode System (NEC ART 250, part H) Television Antenna Connection Protection If an outside antenna/satellite dish or cable system is to be connected to earth in wire to an antenna discharge unit, size of the grounding conductors, location of antenna discharge unit, connection to grounding electrodes, and requirements of the coaxial...
Download
Page 7
... of Digital Closed Captions.. 30 Changing the TV Settings 31 Displaying System Information 31 Changing the Names of Contents Installing the TV 3 Inspecting the Package Contents 3 Installing the TV 3 Installing the TV Stand 3 Installing the TV on a Wall 5 Controls and Connections 6 Front Panel 7 Remote Control 8 Replacing the Batteries 9 Connecting Your Devices 10 Connecting A Device 10 Connecting a Device - Table of the Inputs 32 Using the Parental Controls 32 Accessing the Parental Controls Menu 32 Enabling or Disabling Program Ratings 33 Locking and Unlocking Channels...
... of Digital Closed Captions.. 30 Changing the TV Settings 31 Displaying System Information 31 Changing the Names of Contents Installing the TV 3 Inspecting the Package Contents 3 Installing the TV 3 Installing the TV Stand 3 Installing the TV on a Wall 5 Controls and Connections 6 Front Panel 7 Remote Control 8 Replacing the Batteries 9 Connecting Your Devices 10 Connecting A Device 10 Connecting a Device - Table of the Inputs 32 Using the Parental Controls 32 Accessing the Parental Controls Menu 32 Enabling or Disabling Program Ratings 33 Locking and Unlocking Channels...

Download
Page 11
.... Disconnect any cables connected to help you can scratch or damage the TV. 3. Remove the base and neck by loosening and removing the screws. 4. Specifications for the weight/load of debris that you have the correct mount for your mount. See Appendix B - After you will need a wall mount. To prevent injury or damage to the TV, ask someone to your TV. 2. M401i-A3 Screw Size: Screw Length: Hole Pattern: M6...
.... Disconnect any cables connected to help you can scratch or damage the TV. 3. Remove the base and neck by loosening and removing the screws. 4. Specifications for the weight/load of debris that you have the correct mount for your mount. See Appendix B - After you will need a wall mount. To prevent injury or damage to the TV, ask someone to your TV. 2. M401i-A3 Screw Size: Screw Length: Hole Pattern: M6...

Download
Page 12
... cable from home network. Optical Audio Out - Connect Ethernet cable from cable, satellite, or antenna. Controls and Connections 2 USB - Connect component or composite device. Connect HDMI device. Press once to play photo, music, or video. Rear Panel 6 Connect USB thumb drive to access the input menu. Connect optical/SPDIF audio device, such as sound bar. Ethernet - Press and hold to turn off the TV. Component/Composite - HDMI - Power/Input - Coaxial - Stereo Audio Out - Connect RCA audio device, such as home audio receiver. HDMI - Connect HDMI...
... cable from home network. Optical Audio Out - Connect Ethernet cable from cable, satellite, or antenna. Controls and Connections 2 USB - Connect component or composite device. Connect HDMI device. Press once to play photo, music, or video. Rear Panel 6 Connect USB thumb drive to access the input menu. Connect optical/SPDIF audio device, such as sound bar. Ethernet - Press and hold to turn off the TV. Component/Composite - HDMI - Power/Input - Coaxial - Stereo Audio Out - Connect RCA audio device, such as home audio receiver. HDMI - Connect HDMI...

Download
Page 24
... mode displays the picture differently. This option is only available when the TV is already formatted for widescreen viewing (1.85:1 or 2.35:1), then black bars will still appear on -screen menu. 5 Changing the Input Source External devices such as DVD players, Blu-Ray Players, and video game consoles can display images in the on the top and bottom of the display image. To change the input device: 1. button on the remote. The selected input...
... mode displays the picture differently. This option is only available when the TV is already formatted for widescreen viewing (1.85:1 or 2.35:1), then black bars will still appear on -screen menu. 5 Changing the Input Source External devices such as DVD players, Blu-Ray Players, and video game consoles can display images in the on the top and bottom of the display image. To change the input device: 1. button on the remote. The selected input...
Download
Page 25
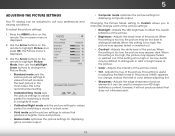
.... To adjust the picture settings: 1. Adjusts the black level of the picture. Press the MENU button on the remote to highlight Picture and press OK. The Picture menu is displayed. 2. Changing the Picture Mode setting to Custom allows you to manually change the Picture Mode: VIZIO Picture Picture Mode Backlight Brightness Contrast Color Tint Sharpness Standard - + 50 - + 50 - + 50 - + 50 - +0 - +0 More • Standard mode sets the various picture settings to values perfect for displaying computer output. Adjusts the hue of the picture. Standard picture mode meets...
.... To adjust the picture settings: 1. Adjusts the black level of the picture. Press the MENU button on the remote to highlight Picture and press OK. The Picture menu is displayed. 2. Changing the Picture Mode setting to Custom allows you to manually change the Picture Mode: VIZIO Picture Picture Mode Backlight Brightness Contrast Color Tint Sharpness Standard - + 50 - + 50 - + 50 - + 50 - +0 - +0 More • Standard mode sets the various picture settings to values perfect for displaying computer output. Adjusts the hue of the picture. Standard picture mode meets...

Download
Page 28
... and HDMI output when connected to Basic, then adjust Bass and Trebel settings. • Reset Audio Mode - Network Settings Help When the TV speakers are set EQ Mode to a home theater audio system. TV Speakers Surround Sound Volume Leveling +0 +0 On On On 3. Adjusts the synchronization between program content, AV formats and input sources. Changes the type of processing for the analog RCA (red/white) connectors when Wide coZononmectNeodrmtaol aPahnoorammiec theater audio system. See Resetting the Audio Settings on -screen menu is displayed. 2. Press the MENU button...
... and HDMI output when connected to Basic, then adjust Bass and Trebel settings. • Reset Audio Mode - Network Settings Help When the TV speakers are set EQ Mode to a home theater audio system. TV Speakers Surround Sound Volume Leveling +0 +0 On On On 3. Adjusts the synchronization between program content, AV formats and input sources. Changes the type of processing for the analog RCA (red/white) connectors when Wide coZononmectNeodrmtaol aPahnoorammiec theater audio system. See Resetting the Audio Settings on -screen menu is displayed. 2. Press the MENU button...

Download
Page 29
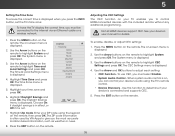
Use the Arrow buttons to the factory defaults?" 4. The TV displays, "Are you sure you want to RESET Audio Settings to highlight Reset Audio Mode and press OK. To use the sleep timer: 1. VIZIO Timers Sleep Timer Auto Power Off Off 10 mins 3. Use the Arrow buttons on the remote to highlight Timers and press OK. Use the Arrow buttons on the remote to turn the TV off : 30, 60, 90, 120, or 180 minutes. Use the Up/Down Arrow...
Use the Arrow buttons to the factory defaults?" 4. The TV displays, "Are you sure you want to RESET Audio Settings to highlight Reset Audio Mode and press OK. To use the sleep timer: 1. VIZIO Timers Sleep Timer Auto Power Off Off 10 mins 3. Use the Arrow buttons on the remote to highlight Timers and press OK. Use the Arrow buttons on the remote to turn the TV off : 30, 60, 90, 120, or 180 minutes. Use the Up/Down Arrow...
Download
Page 41
... function on your device's user manual for details. 1. See your TV enables you to control HDMI-connected devices with the included remote without any additional programming. Press the MENU button on the remote. The System menu is displayed. 2. VIZIO Time Zone Alaska Hawaii Pacific Mountain Central Eastern Atlantic Newfoundland Indiana Arizona 5. To use CEC, you can control your ZIP code using the TV's remote control. Sleep • Timer DePvicitcuree DiAsucdoiovery - The on...
... function on your device's user manual for details. 1. See your TV enables you to control HDMI-connected devices with the included remote without any additional programming. Press the MENU button on the remote. The System menu is displayed. 2. VIZIO Time Zone Alaska Hawaii Pacific Mountain Central Eastern Atlantic Newfoundland Indiana Arizona 5. To use CEC, you can control your ZIP code using the TV's remote control. Sleep • Timer DePvicitcuree DiAsucdoiovery - The on...
Download
Page 44
... button on -screen menu is displayed. 2. 5 Using the Guided Setup Menu Using Guided Setup The TV's Setup App can be used to easily set up the TV tuner. • Network Setup - Set up the TV tuner or to connect the TV with your network. 4. Wide Zoom Normal Panoramic Exit 2D 3D ABC Input Wide CC Sleep Timer Picture Audio Network Settings Help 38 Connect the TV to access and press OK: • Tuner Setup - Highlight Guided Setup and press OK. The on the remote. VIZIO Guided Setup Tuner Setup Network Setup 3. Highlight the guided setup...
... button on -screen menu is displayed. 2. 5 Using the Guided Setup Menu Using Guided Setup The TV's Setup App can be used to easily set up the TV tuner. • Network Setup - Set up the TV tuner or to connect the TV with your network. 4. Wide Zoom Normal Panoramic Exit 2D 3D ABC Input Wide CC Sleep Timer Picture Audio Network Settings Help 38 Connect the TV to access and press OK: • Tuner Setup - Highlight Guided Setup and press OK. The on the remote. VIZIO Guided Setup Tuner Setup Network Setup 3. Highlight the guided setup...

Download
Page 52
... Adjusting the Picture Settings on page 19. • Press the INPUT button on page 24 • Reset the picture settings. Ensure your device's user manual for channels. See on the remote to select a different input source. See Adjusting the Audio Settings on page 22. • Ensure the speakers are set to On. • Ensure no headphones are connected to the TV. • Check the audio connections of external devices (Blu-ray player, game console, cable/satellite box...
... Adjusting the Picture Settings on page 19. • Press the INPUT button on page 24 • Reset the picture settings. Ensure your device's user manual for channels. See on the remote to select a different input source. See Adjusting the Audio Settings on page 22. • Ensure the speakers are set to On. • Ensure no headphones are connected to the TV. • Check the audio connections of external devices (Blu-ray player, game console, cable/satellite box...

Download
Page 53
... new input source differs from the one on the input source you switch from, the difference may be noticeable. • Use the Volume Up/Down buttons on the remote to adjust the volume. These types of occurrences are securely attached. I change the screen mode. The picture is not good. • For the best image quality, view high-definition programs using digital sources. Ensure your devices with HDMI cables. • If you are using an antenna, the signal...
... new input source differs from the one on the input source you switch from, the difference may be noticeable. • Use the Volume Up/Down buttons on the remote to adjust the volume. These types of occurrences are securely attached. I change the screen mode. The picture is not good. • For the best image quality, view high-definition programs using digital sources. Ensure your devices with HDMI cables. • If you are using an antenna, the signal...
Download
Page 56
... operation, improper voltage supply or power surges, signal issues, damages from the unit before it is within the warranty period,VIZIO will either the original carton box and shipping material or packaging that a Product is serviced, regardless of the model's product information page (www.VIZIO.com) or look for packing and shipping the covered Product to 4:00PM Saturday and Sunday, Pacific Time...
... operation, improper voltage supply or power surges, signal issues, damages from the unit before it is within the warranty period,VIZIO will either the original carton box and shipping material or packaging that a Product is serviced, regardless of the model's product information page (www.VIZIO.com) or look for packing and shipping the covered Product to 4:00PM Saturday and Sunday, Pacific Time...
Download
Page 2
... to constitute a risk of electric shock to repair or service your TV may form in any way, such as when the power-supply cord or plug is damaged, liquid has been spilled or objects have an electrician install the correct outlet, or use an adapter to avoid causing fire, electric shock, or component damage. • A distance of at least three...
... to constitute a risk of electric shock to repair or service your TV may form in any way, such as when the power-supply cord or plug is damaged, liquid has been spilled or objects have an electrician install the correct outlet, or use an adapter to avoid causing fire, electric shock, or component damage. • A distance of at least three...

Download
Page 11
Table of Contents Installing the TV Controls and Connections Connecting your Devices Completing the First-Time Setup Using the On-Screen Menu Using the USB Media Player Using VIZIO Internet Apps How to View 3D Troubleshooting & Technical Support Specifications Limited Warranty Legal & Compliance LCD HDTV WITH VIZIO INTERNET APPS® MENU Press the EXIT Button to browse through the pages in each chapter. GUIDE Use the Left and Right Arrow Buttons to exit the on-screen User Manual. INFO Use the Up and Down Arrow Buttons to...
Table of Contents Installing the TV Controls and Connections Connecting your Devices Completing the First-Time Setup Using the On-Screen Menu Using the USB Media Player Using VIZIO Internet Apps How to View 3D Troubleshooting & Technical Support Specifications Limited Warranty Legal & Compliance LCD HDTV WITH VIZIO INTERNET APPS® MENU Press the EXIT Button to browse through the pages in each chapter. GUIDE Use the Left and Right Arrow Buttons to exit the on-screen User Manual. INFO Use the Up and Down Arrow Buttons to...
Download
Page 14
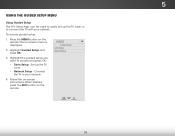
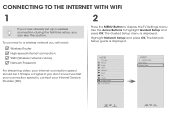
...TV Settings menu. VIZIO TV Settings Picture Audio Timers Network Tuner CC CC System Guided Setup User Manual Wide VIZIO Guided Setup ZoToumner SeNtuoprmal Panoramic Network Setup Exit 2D 3D ABC Input Wide CC Wide Exit Input Sleep Timer Picture Audio Sleep Timer Network Settings Help Networ The Guided Setup menu is displayed. To connect to a wireless network you will need: Wireless Router High-speed Internet connection SSID (Wireless network name) Network Password For streaming video, your Internet Service Provider (ISP). 2 Press the MENU Button to highlight Guided Setup...
...TV Settings menu. VIZIO TV Settings Picture Audio Timers Network Tuner CC CC System Guided Setup User Manual Wide VIZIO Guided Setup ZoToumner SeNtuoprmal Panoramic Network Setup Exit 2D 3D ABC Input Wide CC Wide Exit Input Sleep Timer Picture Audio Sleep Timer Network Settings Help Networ The Guided Setup menu is displayed. To connect to a wireless network you will need: Wireless Router High-speed Internet connection SSID (Wireless network name) Network Password For streaming video, your Internet Service Provider (ISP). 2 Press the MENU Button to highlight Guided Setup...
Download
Page 17
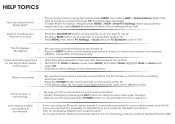
... is connected (HDMI-1, Composite, Component, etc). HELP TOPICS How do not work, try repositioning your router for the best connection. • Turn off . • Press MENU, then select TV Settings > Audio. Be sure TV Speakers is not working , call your Internet Service Provider (ISP) Select the type of setup you are turned on. • Press the INPUT button on the remote and select the input to Wide or Zoom mode. Press MENU, then select HELP > Guided Setup.
... is connected (HDMI-1, Composite, Component, etc). HELP TOPICS How do not work, try repositioning your router for the best connection. • Turn off . • Press MENU, then select TV Settings > Audio. Be sure TV Speakers is not working , call your Internet Service Provider (ISP) Select the type of setup you are turned on. • Press the INPUT button on the remote and select the input to Wide or Zoom mode. Press MENU, then select HELP > Guided Setup.

Download
Page 19
... either repair or replace the Product at VIZIO's option and sole discretion. Replacement parts and Products are not covered. Type of customer misuse, modifications or adjustments, as well as installation and set-up issues or any repairs attempted by anyone other information, ALL CONTENTS AND INFORMATION WILL BE DELETED IN THE COURSE OF SOME IN-HOME AND ALL SHIP-IN WARRANTY SERVICE. THERE...
... either repair or replace the Product at VIZIO's option and sole discretion. Replacement parts and Products are not covered. Type of customer misuse, modifications or adjustments, as well as installation and set-up issues or any repairs attempted by anyone other information, ALL CONTENTS AND INFORMATION WILL BE DELETED IN THE COURSE OF SOME IN-HOME AND ALL SHIP-IN WARRANTY SERVICE. THERE...


