
M3D651SV User Manual
Page 1
USER GUIDE MMODDEELLS // E3D320VX M// E33DD46205VX1SV // E3D470VX INSTALLING YOUR new TV CONTROLS & CONNECTIONS CONNECTING YOUR DEVICES USING THE ON-SCREEN MENU USING THE USB MEDIA PLAYER USING VIZIO INTERNET APPS Viewing 3d on your tv TROUBLESHOOTING & SUPPORT Help, SPECs, warranty & LEGAL
USER GUIDE MMODDEELLS // E3D320VX M// E33DD46205VX1SV // E3D470VX INSTALLING YOUR new TV CONTROLS & CONNECTIONS CONNECTING YOUR DEVICES USING THE ON-SCREEN MENU USING THE USB MEDIA PLAYER USING VIZIO INTERNET APPS Viewing 3d on your tv TROUBLESHOOTING & SUPPORT Help, SPECs, warranty & LEGAL

M3D651SV User Manual
Page 3
...Connecting to a Wireless Network 31 Changing the Advanced Network Settings 32 Testing Your Network Connection 32 Changing the TV Settings 33 Changing the Input Source 33 Setting the Tuner Mode 33 Scanning for Channels 33 Adding New Channels 34 Skipping Channels 35 Changing the Audio Language 35 Using the Parental Controls 36 Accessing the Parental Controls Menu 36 Enabling or Disabling Program Ratings 36 Locking and Unlocking Channels 36 Blocking and Unblocking Content by Rating 37 Changing the Parental Control Passcode 37 Resetting the Content Locks 37 1 Back 15 Replacing...
...Connecting to a Wireless Network 31 Changing the Advanced Network Settings 32 Testing Your Network Connection 32 Changing the TV Settings 33 Changing the Input Source 33 Setting the Tuner Mode 33 Scanning for Channels 33 Adding New Channels 34 Skipping Channels 35 Changing the Audio Language 35 Using the Parental Controls 36 Accessing the Parental Controls Menu 36 Enabling or Disabling Program Ratings 36 Locking and Unlocking Channels 36 Blocking and Unblocking Content by Rating 37 Changing the Parental Control Passcode 37 Resetting the Content Locks 37 1 Back 15 Replacing...

M3D651SV User Manual
Page 4
... of the Inputs 38 Changing the On-Screen Menu Language 38 Setting the Time Zone 39 Adjusting the CEC Settings 39 Using the Help Menu 40 Displaying System Information 40 Resetting the TV Settings 40 Restoring the TV to Factory Default Settings 41 Using Guided Setup 41 Using the Info Window 42 Using the USB Media Player 43 Using the USB Media Player 43 Connecting a USB Thumb Drive to the TV 43 Playing USB Media 43 Using VIZIO Internet Apps 46 Using the VIA Shortcut Buttons 46 Using the VIA...
... of the Inputs 38 Changing the On-Screen Menu Language 38 Setting the Time Zone 39 Adjusting the CEC Settings 39 Using the Help Menu 40 Displaying System Information 40 Resetting the TV Settings 40 Restoring the TV to Factory Default Settings 41 Using Guided Setup 41 Using the Info Window 42 Using the USB Media Player 43 Using the USB Media Player 43 Connecting a USB Thumb Drive to the TV 43 Playing USB Media 43 Using VIZIO Internet Apps 46 Using the VIA Shortcut Buttons 46 Using the VIA...
M3D651SV User Manual
Page 7
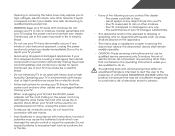
...other cables are qualified to persons. These servicing instructions are for moving your TV. • When unplugging your TV, hold the AC/DC power adapter, not the cord. Do not expose your TV to leak which can damage the remote control or injure the operator....removing the back cover may expose you are unplugged before moving your TV. If repair is intended to alert the user to the presence of uninsulated DANGEROUS VOLTAGE within an equilateral triangle is required, contact your dealer and refer all servicing to high voltages, electric shock, and other than that may be used...
...other cables are qualified to persons. These servicing instructions are for moving your TV. • When unplugging your TV, hold the AC/DC power adapter, not the cord. Do not expose your TV to leak which can damage the remote control or injure the operator....removing the back cover may expose you are unplugged before moving your TV. If repair is intended to alert the user to the presence of uninsulated DANGEROUS VOLTAGE within an equilateral triangle is required, contact your dealer and refer all servicing to high voltages, electric shock, and other than that may be used...
M3D651SV User Manual
Page 9
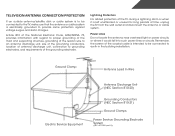
... added protection of time, unplug the TV from the wall outlet and disconnect the antenna or cable system. Ground Clamp Antenna Lead In Wire Electric Service Equipment Antenna Discharge Unit (NEC Section 810-20) Grounding Conductors (NEC Section 810-21) Ground Clamps Power Service Grounding Electrode System (NEC ART 250, part H) Power Lines Do not locate the antenna near overhead light or power circuits, or...
... added protection of time, unplug the TV from the wall outlet and disconnect the antenna or cable system. Ground Clamp Antenna Lead In Wire Electric Service Equipment Antenna Discharge Unit (NEC Section 810-20) Grounding Conductors (NEC Section 810-21) Ground Clamps Power Service Grounding Electrode System (NEC ART 250, part H) Power Lines Do not locate the antenna near overhead light or power circuits, or...
M3D651SV User Manual
Page 10
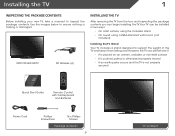
... a flat surface, using the included stand • On a wall, using a VESA-standard wall mount (not included) Installing the TV Stand Your TV includes a stand designed to ensure nothing is not properly secured MODEL M3D651SV VIZIO QUICK START GUIDE SMART TV + WIFI FULL HD + 3D SLIM DESIGN LED FULL USER MANUAL AVAILABLE AT VIZIO.COM Quick Start Guide INPUT CC EXIT BACK OK INFO MENU GUIDE VOL CH VOL CH 1 2 3 4 5 6 7 8 9 3D 0 INPUT CC EXIT BACK OK INFO MENU GUIDE VOL...
... a flat surface, using the included stand • On a wall, using a VESA-standard wall mount (not included) Installing the TV Stand Your TV includes a stand designed to ensure nothing is not properly secured MODEL M3D651SV VIZIO QUICK START GUIDE SMART TV + WIFI FULL HD + 3D SLIM DESIGN LED FULL USER MANUAL AVAILABLE AT VIZIO.COM Quick Start Guide INPUT CC EXIT BACK OK INFO MENU GUIDE VOL CH VOL CH 1 2 3 4 5 6 7 8 9 3D 0 INPUT CC EXIT BACK OK INFO MENU GUIDE VOL...

M3D651SV User Manual
Page 12
... Pattern: M3D651SV M8 20mm 1.25mm 400mm (V) x 600mm (H) Be sure the mount you . Remove the base by loosening and removing the screws. 4. Use only with your TV and wall mount to find the appropriate mount for the weight/load of the TV. To prevent injury or damage to the TV, ask someone to your TV model: Installing a TV on a wall requires lifting. Disconnect any cables connected to help you...
... Pattern: M3D651SV M8 20mm 1.25mm 400mm (V) x 600mm (H) Be sure the mount you . Remove the base by loosening and removing the screws. 4. Use only with your TV and wall mount to find the appropriate mount for the weight/load of the TV. To prevent injury or damage to the TV, ask someone to your TV model: Installing a TV on a wall requires lifting. Disconnect any cables connected to help you...

M3D651SV User Manual
Page 27
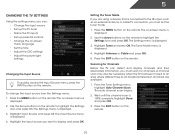
... buttons on the remote to highlight the Sleep Timer icon and press OK. 5 Changing the Appearance of Digital Closed Captions Digital closed captions can be displayed according to your TV is set by default to turn off after 10 minutes if no signal is being displayed on the remote to highlight Auto Power Off and press OK. The Digital CC Style menu appears. 3. Change the edge color. • Window Opacity - To set period of time. Choose Auto...
... buttons on the remote to highlight the Sleep Timer icon and press OK. 5 Changing the Appearance of Digital Closed Captions Digital closed captions can be displayed according to your TV is set by default to turn off after 10 minutes if no signal is being displayed on the remote to highlight Auto Power Off and press OK. The Digital CC Style menu appears. 3. Change the edge color. • Window Opacity - To set period of time. Choose Auto...

M3D651SV User Manual
Page 28
... setting. • Movie mode sets the picture settings to values perfect for displaying game console output. • Vivid mode sets the picture settings to affect the overall brilliance of the picture. 5 Adjusting the Picture Settings Your TV display can be adjusted to suit your preferences and viewing conditions. The on the remote to highlight Picture Mode, then use the Left/Right Arrow buttons to change each of the picture. The Picture Settings menu is displayed. 4. The Picture Settings menu is displayed. 3. This is useful in adjusting...
... setting. • Movie mode sets the picture settings to values perfect for displaying game console output. • Vivid mode sets the picture settings to affect the overall brilliance of the picture. 5 Adjusting the Picture Settings Your TV display can be adjusted to suit your preferences and viewing conditions. The on the remote to highlight Picture Mode, then use the Left/Right Arrow buttons to change each of the picture. The Picture Settings menu is displayed. 4. The Picture Settings menu is displayed. 3. This is useful in adjusting...

M3D651SV User Manual
Page 31
... - Select On or Off. • Advanced Audio - From the Picture Settings menu, use the Arrow buttons to highlight Reset Picture Mode, then press OK. Turns the built-in speakers on the remote. 29 The Audio Settings menu is displayed. 2. Use the Arrow buttons on -screen menu is displayed. 3. Press the MENU button on page 30. 4. Additionally, StudioSound HD completes the entertainment experience by selecting Jazz, Classical, Pop, Rock, or Flat. See Resetting the Audio Settings on the...
... - Select On or Off. • Advanced Audio - From the Picture Settings menu, use the Arrow buttons to highlight Reset Picture Mode, then press OK. Turns the built-in speakers on the remote. 29 The Audio Settings menu is displayed. 2. Use the Arrow buttons on -screen menu is displayed. 3. Press the MENU button on page 30. 4. Additionally, StudioSound HD completes the entertainment experience by selecting Jazz, Classical, Pop, Rock, or Flat. See Resetting the Audio Settings on the...

M3D651SV User Manual
Page 32
... to change the setting: • Digital Audio Out Changes the type of processing for the analog RCA (red/ white) connectors when connected to the factory defaults?" 4. Highlight Yes and press OK. 5. Select Off, Dolby Digital, or PCM. • Analog Audio Out - Press the MENU button on -screen menu is displayed. 2. Adjusting the Advanced Audio Settings To adjust the advanced audio settings: 1. The Advanced Audio menu is displayed. 3. Use the Arrow buttons to highlight the setting you want to RESET Audio Settings to a home theater audio system...
... to change the setting: • Digital Audio Out Changes the type of processing for the analog RCA (red/ white) connectors when connected to the factory defaults?" 4. Highlight Yes and press OK. 5. Select Off, Dolby Digital, or PCM. • Analog Audio Out - Press the MENU button on -screen menu is displayed. 2. Adjusting the Advanced Audio Settings To adjust the advanced audio settings: 1. The Advanced Audio menu is displayed. 3. Use the Arrow buttons to highlight the setting you want to RESET Audio Settings to a home theater audio system...
M3D651SV User Manual
Page 35
... external antenna or cable TV connection, you must scan for Channels Before the TV can : • Change the input source • Set up the TV tuner • Name the TV inputs • Set up parental controls • Change the on-screen menu language • Set the time • Adjust the CEC settings • Adjust the power light settings Changing the Input Source To quickly access the Input Source menu, press the INPUT button on the remote. Setting the Tuner Mode If you are available. 1. The Settings menu is displayed. 4. The Tuner Mode menu is displayed. 3. Press the MENU button...
... external antenna or cable TV connection, you must scan for Channels Before the TV can : • Change the input source • Set up the TV tuner • Name the TV inputs • Set up parental controls • Change the on-screen menu language • Set the time • Adjust the CEC settings • Adjust the power light settings Changing the Input Source To quickly access the Input Source menu, press the INPUT button on the remote. Setting the Tuner Mode If you are available. 1. The Settings menu is displayed. 4. The Tuner Mode menu is displayed. 3. Press the MENU button...
M3D651SV User Manual
Page 43
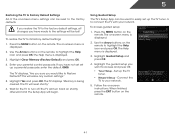
... to the factory default settings, all changes you have made to the settings will erase any custom settings." 5. If you have not yet set up the TV tuner or to connect the TV with your network. The TV will begin. To access guided setup: 1. The Help menu is displayed. 2. The on the remote. Press the MENU button on -screen menu is displayed. 3. Enter your network. 5. Use the Arrow buttons on -screen menu settings can be reset to the factory defaults. 5 Restoring...
... to the factory default settings, all changes you have made to the settings will erase any custom settings." 5. If you have not yet set up the TV tuner or to connect the TV with your network. The TV will begin. To access guided setup: 1. The Help menu is displayed. 2. The on the remote. Press the MENU button on -screen menu is displayed. 3. Enter your network. 5. Use the Arrow buttons on -screen menu settings can be reset to the factory defaults. 5 Restoring...

M3D651SV User Manual
Page 55
... the Power/Standby button on the remote or on . The buttons on the remote aren't working electrical outlet. • Ensure the power cable is securely attached to On. • Ensure no image on page 16 53 See Resetting the Picture Settings on page 26 • Reset the picture settings. See Scanning for the best signal. Ensure your device's user manual for channels. See Replacing the Batteries on the screen. • Ensure all cables are...
... the Power/Standby button on the remote or on . The buttons on the remote aren't working electrical outlet. • Ensure the power cable is securely attached to On. • Ensure no image on page 16 53 See Resetting the Picture Settings on page 26 • Reset the picture settings. See Scanning for the best signal. Ensure your device's user manual for channels. See Replacing the Batteries on the screen. • Ensure all cables are...

M3D651SV User Manual
Page 56
... for the best signal. When I change input source, the display image changes size. • The TV remembers the viewing mode on -screen menu are set correctly. • If you switch from electrical appliances, cars, or flourescent lights. • Ensure all cables are always dark or always lit. • Your HDTV is connected securely to the TV and move the antenna around the room or close to match your antenna is distorted...
... for the best signal. When I change input source, the display image changes size. • The TV remembers the viewing mode on -screen menu are set correctly. • If you switch from electrical appliances, cars, or flourescent lights. • Ensure all cables are always dark or always lit. • Your HDTV is connected securely to the TV and move the antenna around the room or close to match your antenna is distorted...

M3D651SV User Manual
Page 58
... VIZIO service center. Type of Service Defective Products must utilize either repair or replace the Product at its sole option and discretion. This warranty does not cover, for example: cosmetic damage, normal wear and tear, improper operation, improper voltage supply or power surges, signal issues, damages from shipping, acts of God, any type of customer misuse, modifications or adjustments, as well as installation and set-up issues...
... VIZIO service center. Type of Service Defective Products must utilize either repair or replace the Product at its sole option and discretion. This warranty does not cover, for example: cosmetic damage, normal wear and tear, improper operation, improper voltage supply or power surges, signal issues, damages from shipping, acts of God, any type of customer misuse, modifications or adjustments, as well as installation and set-up issues...
M3D651SV Quick Start Guide
Page 2
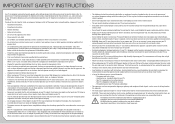
... area with the cart, stand, tripod, bracket, or table specified by qualified service personnel only. Opening or removing the back cover may cause fire or electric shock. • Do not touch the power cord during lightning storms or when unused for long periods of your TV. Continued use by the manufacturer, or sold with instructions. Operating your TV in environments...
... area with the cart, stand, tripod, bracket, or table specified by qualified service personnel only. Opening or removing the back cover may cause fire or electric shock. • Do not touch the power cord during lightning storms or when unused for long periods of your TV. Continued use by the manufacturer, or sold with instructions. Operating your TV in environments...
M3D651SV Quick Start Guide
Page 4
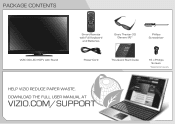
... VIZIO 3D LED HDTV with Stand INPUT CC EXIT BACK OK INFO MENU GUIDE VOL CH VOL CH 1 2 3 4 5 6 7 8 9 3D 0 INPUT CC EXIT BACK OK INFO MENU GUIDE VOL CH VOL CH 1 2 3 4 5 6 7 8 9 3D 0 Smart Remote with Full Keyboard and Batteries Power Cord Basic Theater 3D Glasses (4)* MODEL M3D651SV VIZIO QUICK START GUIDE SMART TV + WIFI FULL HD + 3D SLIM DESIGN LED FULL USER MANUAL AVAILABLE AT VIZIO.COM This Quick Start Guide Phillips Screwdriver 16 x Phillips Screws...
... VIZIO 3D LED HDTV with Stand INPUT CC EXIT BACK OK INFO MENU GUIDE VOL CH VOL CH 1 2 3 4 5 6 7 8 9 3D 0 INPUT CC EXIT BACK OK INFO MENU GUIDE VOL CH VOL CH 1 2 3 4 5 6 7 8 9 3D 0 Smart Remote with Full Keyboard and Batteries Power Cord Basic Theater 3D Glasses (4)* MODEL M3D651SV VIZIO QUICK START GUIDE SMART TV + WIFI FULL HD + 3D SLIM DESIGN LED FULL USER MANUAL AVAILABLE AT VIZIO.COM This Quick Start Guide Phillips Screwdriver 16 x Phillips Screws...
M3D651SV Quick Start Guide
Page 23
...", "FACTORY RECERTIFIED", or by a VIZIO authorized service center. You will be sent to a VIZIO service center to the VIZIO service center. LIMITED WARRANTY ON PARTS AND LABOR Covers units purchased as installation and set-up issues or any type of customer misuse, modifications or adjustments, as well as new in United States and Puerto Rico Only. To obtain warranty service, contact VIZIO Technical Support via phone at VIZIO's option...
...", "FACTORY RECERTIFIED", or by a VIZIO authorized service center. You will be sent to a VIZIO service center to the VIZIO service center. LIMITED WARRANTY ON PARTS AND LABOR Covers units purchased as installation and set-up issues or any type of customer misuse, modifications or adjustments, as well as new in United States and Puerto Rico Only. To obtain warranty service, contact VIZIO Technical Support via phone at VIZIO's option...
M3D651SV Data Sheet
Page 2
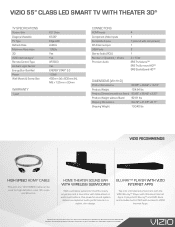
...; Player with Wireless Internet Apps. VIZIO 55" CLASS LED SMART TV WITH THEATER 3D® TV SPECIFICATIONS Screen Size Diagonal Viewable TV Type Refresh Rate Maximum Resolution 3D VIZIO Internet Apps® Remote Control Type Ambient Light Sensor Energy Star Qualified Power Wall Mount & Screw Size WARRANTY 1 year 65" Class 65.00" Edge LED 240Hz 1080p Yes Yes XRT303 Yes ENERGY STAR® 5.3 103W 400mm (V) x 600mm (H), M8 x 1.25mm x 20mm CONNECTIONS HDMI Inputs Component Video Inputs Composite Inputs RF Antenna Input USB Ports Stereo Audio (RCA) Number of Speakers...
...; Player with Wireless Internet Apps. VIZIO 55" CLASS LED SMART TV WITH THEATER 3D® TV SPECIFICATIONS Screen Size Diagonal Viewable TV Type Refresh Rate Maximum Resolution 3D VIZIO Internet Apps® Remote Control Type Ambient Light Sensor Energy Star Qualified Power Wall Mount & Screw Size WARRANTY 1 year 65" Class 65.00" Edge LED 240Hz 1080p Yes Yes XRT303 Yes ENERGY STAR® 5.3 103W 400mm (V) x 600mm (H), M8 x 1.25mm x 20mm CONNECTIONS HDMI Inputs Component Video Inputs Composite Inputs RF Antenna Input USB Ports Stereo Audio (RCA) Number of Speakers...


