M320SL User Manua
Page 1
USER GUIDE MOMDODEELLSS // E3D320VX // E3MD4230V2X0SL // E3MD4730V7X0SL M420SL M470SL M550SL INSTALLING YOUR new TV CONTROLS & CONNECTIONS CONNECTING YOUR DEVICES USING THE ON-SCREEN MENU USING THE USB MEDIA PLAYER USING VIZIO INTERNET APPS TROUBLESHOOTING & SUPPORT Help, SPECs, warranty & LEGAL
USER GUIDE MOMDODEELLSS // E3D320VX // E3MD4230V2X0SL // E3MD4730V7X0SL M420SL M470SL M550SL INSTALLING YOUR new TV CONTROLS & CONNECTIONS CONNECTING YOUR DEVICES USING THE ON-SCREEN MENU USING THE USB MEDIA PLAYER USING VIZIO INTERNET APPS TROUBLESHOOTING & SUPPORT Help, SPECs, warranty & LEGAL
M320SL User Manua
Page 3
...registers, stoves, or other components to ensure there are provided for your TV. When Reading this Manual When you either: • Register your new VIZIO product, read these instructions. • Heed all warnings. • Follow all instructions. • Do not use this apparatus near any ... helpful tip. Keep these instructions in a safe place for future reference. Important Safety Instructions Your TV is intended to protect your new VIZIO HDTV. If the provided plug does not fit into your outlet, consult an electrician for replacement of the obsolete outlet. •...
...registers, stoves, or other components to ensure there are provided for your TV. When Reading this Manual When you either: • Register your new VIZIO product, read these instructions. • Heed all warnings. • Follow all instructions. • Do not use this apparatus near any ... helpful tip. Keep these instructions in a safe place for future reference. Important Safety Instructions Your TV is intended to protect your new VIZIO HDTV. If the provided plug does not fit into your outlet, consult an electrician for replacement of the obsolete outlet. •...
M320SL User Manua
Page 8
..., M470SL, M550SL 13 Replacing the Batteries 14 Connecting Your Devices 15 Connecting A Device 15 Connecting A PC 16 Connecting an audio device (Model M320SL 17 Connecting an audio device (Model M370SL, M420SL, M470SL, M550SL 18 Connecting to your network 19 Connecting to a Wired Network (Best 19 Connecting...Connection 31 Changing the TV Settings 32 Changing the Input Source 32 Setting the Tuner Mode 33 Scanning for Channels 33 Adding New Channels 33 Skipping Channels 34 Changing the Audio Language 35 Using the Parental Controls 35 Accessing the Parental Controls Menu 35 ...
..., M470SL, M550SL 13 Replacing the Batteries 14 Connecting Your Devices 15 Connecting A Device 15 Connecting A PC 16 Connecting an audio device (Model M320SL 17 Connecting an audio device (Model M370SL, M420SL, M470SL, M550SL 18 Connecting to your network 19 Connecting to a Wired Network (Best 19 Connecting...Connection 31 Changing the TV Settings 32 Changing the Input Source 32 Setting the Tuner Mode 33 Scanning for Channels 33 Adding New Channels 33 Skipping Channels 34 Changing the Audio Language 35 Using the Parental Controls 35 Accessing the Parental Controls Menu 35 ...
M320SL User Manua
Page 9
...the Names of the Inputs 37 Changing the On-Screen Menu Language 38 Setting the Time Zone 38 Adjusting the CEC Settings 39 Turning the VIZIO Logo On or Off 39 Using the Help Menu 40 Displaying System Information 40 Resetting the TV Settings 40 Restoring the TV to Factory ... to the VIA Dock 47 Removing an App from the VIA Dock 47 Creating and Managing User Profiles 47 Creating an Owner PIN 47 Creating a New User Profile 48 Removing a User Profile 49 Restoring the VIA Dock to the Factory Default Settings...... 49 Troubleshooting & Technical Support 50 Specifications 53 Limited...
...the Names of the Inputs 37 Changing the On-Screen Menu Language 38 Setting the Time Zone 38 Adjusting the CEC Settings 39 Turning the VIZIO Logo On or Off 39 Using the Help Menu 40 Displaying System Information 40 Resetting the TV Settings 40 Restoring the TV to Factory ... to the VIA Dock 47 Removing an App from the VIA Dock 47 Creating and Managing User Profiles 47 Creating an Owner PIN 47 Creating a New User Profile 48 Removing a User Profile 49 Restoring the VIA Dock to the Factory Default Settings...... 49 Troubleshooting & Technical Support 50 Specifications 53 Limited...
M320SL User Manua
Page 10
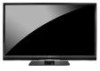
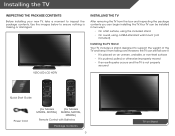
...it from the box and inspecting the package contents you can still fall over . Use the images below to inspect the package contents. VIZIO LED LCD HDTV Installing the TV After removing the TV from falling over if: • It is placed on Stand However, the TV... can begin installing the TV. Installing the TV Inspecting the Package Contents Before installing your new TV, take a moment to ensure nothing is not properly secured Quick Start Guide Power Cord (For Models M320SL, M370SL) (For Models M420SL, M470SL, M550SL) Remote Control with Batteries Package Contents 3 TV...
...it from the box and inspecting the package contents you can still fall over . Use the images below to inspect the package contents. VIZIO LED LCD HDTV Installing the TV After removing the TV from falling over if: • It is placed on Stand However, the TV... can begin installing the TV. Installing the TV Inspecting the Package Contents Before installing your new TV, take a moment to ensure nothing is not properly secured Quick Start Guide Power Cord (For Models M320SL, M370SL) (For Models M420SL, M470SL, M550SL) Remote Control with Batteries Package Contents 3 TV...
M320SL User Manua
Page 40
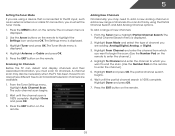
... 1. The partial channel search begins. 6. Highlight Done and press OK. 7. Use the Arrow buttons on the remote to add a new analog channel or add a new range of channels.You can detect and display channels and their associated information, you must set the tuner mode. 1. A channel scan ... the channel scan is displayed. 4. The auto channel scan begins. 2. Highlight Start and press OK. Highlight Scan Mode and select the type of new channels: 1. The Tuner Mode menu is 100% complete. Highlight Done and press OK. 3. 5 Setting the Tuner Mode If you are using the...
... 1. The partial channel search begins. 6. Highlight Done and press OK. 7. Use the Arrow buttons on the remote to add a new analog channel or add a new range of channels.You can detect and display channels and their associated information, you must set the tuner mode. 1. A channel scan ... the channel scan is displayed. 4. The auto channel scan begins. 2. Highlight Start and press OK. Highlight Scan Mode and select the type of new channels: 1. The Tuner Mode menu is 100% complete. Highlight Done and press OK. 3. 5 Setting the Tuner Mode If you are using the...
M320SL User Manua
Page 41
... scans for the channel, press the EXIT button on the remote. 5 Skipping Channels After a channel scan is entered using the Number Pad. To add a single new analog channel: 1. Highlight Add Channel and press OK. The Skip Channel menu is displayed. 2. For each channel you wish to highlight the channel and press...
... scans for the channel, press the EXIT button on the remote. 5 Skipping Channels After a channel scan is entered using the Number Pad. To add a single new analog channel: 1. Highlight Add Channel and press OK. The Skip Channel menu is displayed. 2. For each channel you wish to highlight the channel and press...
M320SL User Manua
Page 44
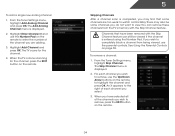
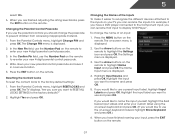
... the passcode to name the input yourself, highlight the field below Input Labels and enter your input, press the EXIT button on your new 4-digit parental control passcode. 4. The Settings menu is displayed. 4. The Change PIN menu is displayed. 2. If you should change ...factory defaults?" 2. Changing the Names of an input: 1. Press the MENU button on the remote. 5 select On. 6. Write down your new 4-digit parental control passcode. 3. From the Parental Controls menu, highlight RESET LOCKS and press OK. From the Parental Controls menu, highlight Change PIN...
... the passcode to name the input yourself, highlight the field below Input Labels and enter your input, press the EXIT button on your new 4-digit parental control passcode. 4. The Settings menu is displayed. 4. The Change PIN menu is displayed. 2. If you should change ...factory defaults?" 2. Changing the Names of an input: 1. Press the MENU button on the remote. 5 select On. 6. Write down your new 4-digit parental control passcode. 3. From the Parental Controls menu, highlight RESET LOCKS and press OK. From the Parental Controls menu, highlight Change PIN...
M320SL User Manua
Page 53
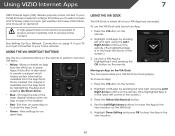
... VIA Apps are accessed. Use the Left/Right Arrow buttons to move an App: 1. To use the VIA Dock and launch an App: 1. Using VIZIO Internet Apps 7 VIZIO Internet Apps (VIA) delivers popular online content to your VIA Dock by highlighting it and pressing the OK button on the remote. Using the... VIA Dock The VIA Dock is in the new location. 46 Moving an App on the VIA Dock. 5. Move or delete an App from an open...
... VIA Apps are accessed. Use the Left/Right Arrow buttons to move an App: 1. To use the VIA Dock and launch an App: 1. Using VIZIO Internet Apps 7 VIZIO Internet Apps (VIA) delivers popular online content to your VIA Dock by highlighting it and pressing the OK button on the remote. Using the... VIA Dock The VIA Dock is in the new location. 46 Moving an App on the VIA Dock. 5. Move or delete an App from an open...

M320SL User Manua
Page 54
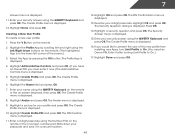
... The PIN Creation menu is displayed. 5. Highlight OK and press OK. The Security 47 7 Adding a New App to the VIA Dock Though your TV arrives pre-loaded with featured VIA Apps, new Apps are saved. Select Widget Gallery by pressing the OK button. Press the Yellow VIA Shortcut button. ... passcode. The Security Question dialog is displayed. 6. You can hold a total of Apps and App settings are continually being added to select a new App. 5. The PIN Confirmation menu is in the VIA Dock. Highlight the Profile App by scrolling left and right using the Number Pad on ...
... The PIN Creation menu is displayed. 5. Highlight OK and press OK. The Security 47 7 Adding a New App to the VIA Dock Though your TV arrives pre-loaded with featured VIA Apps, new Apps are saved. Select Widget Gallery by pressing the OK button. Press the Yellow VIA Shortcut button. ... passcode. The Security Question dialog is displayed. 6. You can hold a total of Apps and App settings are continually being added to select a new App. 5. The PIN Confirmation menu is in the VIA Dock. Highlight the Profile App by scrolling left and right using the Number Pad on ...
M320SL User Manua
Page 55
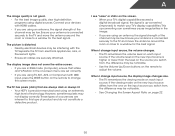
... OK. Press the V Button on the remote. (The highlighted App is displayed. 9. Select the App by scrolling left corner of this new profile from installing new Apps, turn Limit Profile to On.) 17. The Profile App is displayed. 5. Enter a 4-digit passcode using the Left/Right Arrow buttons...an Owner PIN, you would like to prevent the user of the screen.) 3. The PIN Creation menu is displayed. 11. Creating a New User Profile To create a new user profile: 1. Enter your passcode and save it now.) The Administrative Controls menu is displayed. 4. 7 Answer menu is displayed. 11....
... OK. Press the V Button on the remote. (The highlighted App is displayed. 9. Select the App by scrolling left corner of this new profile from installing new Apps, turn Limit Profile to On.) 17. The Profile App is displayed. 5. Enter a 4-digit passcode using the Left/Right Arrow buttons...an Owner PIN, you would like to prevent the user of the screen.) 3. The PIN Creation menu is displayed. 11. Creating a New User Profile To create a new user profile: 1. Enter your passcode and save it now.) The Administrative Controls menu is displayed. 4. 7 Answer menu is displayed. 11....

M320SL User Manua
Page 57
...do you have questions? YOUR PRODUCT INCLUDES FREE LIFETIME TECH SUPPORT The VIZIO support team is highly trained and is based in the United States. Friday: 5 am to 9 pm (PST) Saturday - We can help with: • New Product Setup • Connecting Your Devices • Technical Problems •...; And More Phone: (877) 878-4946 (TOLL-FREE) Email: techsupport@VIZIO.com Web: www.VIZIO.com/support Hours of operation: Monday - LET US HELP! Sunday: 8 am ...
...do you have questions? YOUR PRODUCT INCLUDES FREE LIFETIME TECH SUPPORT The VIZIO support team is highly trained and is based in the United States. Friday: 5 am to 9 pm (PST) Saturday - We can help with: • New Product Setup • Connecting Your Devices • Technical Problems •...; And More Phone: (877) 878-4946 (TOLL-FREE) Email: techsupport@VIZIO.com Web: www.VIZIO.com/support Hours of operation: Monday - LET US HELP! Sunday: 8 am ...

M320SL User Manua
Page 58
... you are only pressing one button at a time. • Point the remote directly at the TV when pressing a button. • Replace the remote batteries with new ones. See Replacing the Batteries on the screen. • Ensure all cables are securely attached to the TV. • Ensure all cables to select a different...
... you are only pressing one button at a time. • Point the remote directly at the TV when pressing a button. • Replace the remote batteries with new ones. See Replacing the Batteries on the screen. • Ensure all cables are securely attached to the TV. • Ensure all cables to select a different...
M320SL User Manua
Page 59
... entire screen. • If you are in RGB mode (computer), ensure that are inherent to adjust the volume. If the viewing mode on the new input source differs from electrical appliances, cars, or flourescent lights. • Ensure all cables are using an antenna, the signal strength of product and... the Screen Aspect Ratio on each input source. However, sometimes pixels may be noticable. • Use the Volume Up/Down buttons on the new input source is connected securely to the TV and move the antenna around the room or close to a window for the best signal. Separate the...
... entire screen. • If you are in RGB mode (computer), ensure that are inherent to adjust the volume. If the viewing mode on the new input source differs from electrical appliances, cars, or flourescent lights. • Ensure all cables are using an antenna, the signal strength of product and... the Screen Aspect Ratio on each input source. However, sometimes pixels may be noticable. • Use the Volume Up/Down buttons on the new input source is connected securely to the TV and move the antenna around the room or close to a window for the best signal. Separate the...
M320SL User Manua
Page 62
...purchase receipt or copy thereof is required to 4:00PM Saturday and Sunday, Pacific Time, or visit www.VIZIO.com. Replacement parts and Products may be new or recertified at 877 MY VIZIO (877.698.4946) from shipping, acts of God, any repairs attempted by anyone other information, ...to obtain warranty service. Limited Warranty C ON PARTS AND LABOR Covers units purchased as new in materials and workmanship. If a Product covered by this guarantee applies to your personal information,VIZIO recommends that affords an equal degree of the servicer. Type of the limited "ONE YEAR...
...purchase receipt or copy thereof is required to 4:00PM Saturday and Sunday, Pacific Time, or visit www.VIZIO.com. Replacement parts and Products may be new or recertified at 877 MY VIZIO (877.698.4946) from shipping, acts of God, any repairs attempted by anyone other information, ...to obtain warranty service. Limited Warranty C ON PARTS AND LABOR Covers units purchased as new in materials and workmanship. If a Product covered by this guarantee applies to your personal information,VIZIO recommends that affords an equal degree of the servicer. Type of the limited "ONE YEAR...

M320SL QSG
Page 3
YOUR PRODUCT INCLUDES FREE LIFETIME TECH SUPPORT The VIZIO support team is highly trained and is based in the United States. LET US HELP! We can help with: • New Product Setup • Connecting Your Devices • Technical Problems • And More Phone: (877) 878-4946 (TOLL-FREE) Email: techsupport@VIZIO.com Web: www.VIZIO.com/support Hours of operation: Monday - Friday: 5 am to 9 pm (PST) Saturday - DO YOU HAVE QUESTIONS? Sunday: 8 am to 4 pm (PST) We speak English • Se habla Español • Nous parlons Français
YOUR PRODUCT INCLUDES FREE LIFETIME TECH SUPPORT The VIZIO support team is highly trained and is based in the United States. LET US HELP! We can help with: • New Product Setup • Connecting Your Devices • Technical Problems • And More Phone: (877) 878-4946 (TOLL-FREE) Email: techsupport@VIZIO.com Web: www.VIZIO.com/support Hours of operation: Monday - Friday: 5 am to 9 pm (PST) Saturday - DO YOU HAVE QUESTIONS? Sunday: 8 am to 4 pm (PST) We speak English • Se habla Español • Nous parlons Français
M320SL QSG
Page 7
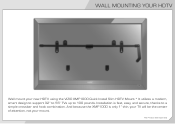
Installation is only 1" thin, your TV will be the center of attention, not your new HDTV using the VIZIO XMF1000 Quick Install Slim HDTV Mount.* It utilizes a modern, smart design to support 32" to 55" TVs up to a simple crossbar and hook combination. This Product Sold Separately WALL MOUNTING YOUR HDTV Wall mount your mount. And because the XMF1000 is fast, easy, and secure, thanks to 100 pounds.
Installation is only 1" thin, your TV will be the center of attention, not your new HDTV using the VIZIO XMF1000 Quick Install Slim HDTV Mount.* It utilizes a modern, smart design to support 32" to 55" TVs up to a simple crossbar and hook combination. This Product Sold Separately WALL MOUNTING YOUR HDTV Wall mount your mount. And because the XMF1000 is fast, easy, and secure, thanks to 100 pounds.

M320SL QSG
Page 15
Select a category and browse through the available apps. Highlight Categories and press OK. A list of app categories is displayed. 3 Your V.I.A Dock has many popular apps pre-loaded, but you want to add to the Dock, highlight Add Widget to the Dock, open the Widget Gallery app. To discover and add new apps to My Profile and press OK. When you've found an app you can add more at any time.
Select a category and browse through the available apps. Highlight Categories and press OK. A list of app categories is displayed. 3 Your V.I.A Dock has many popular apps pre-loaded, but you want to add to the Dock, highlight Add Widget to the Dock, open the Widget Gallery app. To discover and add new apps to My Profile and press OK. When you've found an app you can add more at any time.
M320SL QSG
Page 16
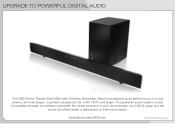
Available at www.VIZIO.com This Product Sold Separately This powerful sound system is also remarkably versatile. UPGRADE TO POWERFUL DIGITAL AUDIO The VIZIO Home Theater Sound Bar with Wireless Subwoofer delivers exceptional audio performance in your home theater up to 60 ft. away, and the sound bar offers either a table-stand or wall-mount option. Its wireless subwoofer fits nearly anywhere in a new sleeker, slimmer design - a perfect complement for a 40" HDTV and larger.
Available at www.VIZIO.com This Product Sold Separately This powerful sound system is also remarkably versatile. UPGRADE TO POWERFUL DIGITAL AUDIO The VIZIO Home Theater Sound Bar with Wireless Subwoofer delivers exceptional audio performance in your home theater up to 60 ft. away, and the sound bar offers either a table-stand or wall-mount option. Its wireless subwoofer fits nearly anywhere in a new sleeker, slimmer design - a perfect complement for a 40" HDTV and larger.
M320SL QSG
Page 19
.... THIS WARRANTY IS SUBJECT TO CHANGE WITHOUT NOTICE. You will provide instructions for the "zero bright pixel" guarantee on select new product purchases. VIZIO Technical Support will be defective within the warranty period. Products with unreadable or removed serial numbers, or requiring routine maintenance are... service or replacement, whichever is determined to the original purchaser of the servicer. Parts and Labor There will be new or recertified at 877 MY VIZIO (877.698.4946) from shipping, acts of God, any type of one year limited warranty does not cover Products...
.... THIS WARRANTY IS SUBJECT TO CHANGE WITHOUT NOTICE. You will provide instructions for the "zero bright pixel" guarantee on select new product purchases. VIZIO Technical Support will be defective within the warranty period. Products with unreadable or removed serial numbers, or requiring routine maintenance are... service or replacement, whichever is determined to the original purchaser of the servicer. Parts and Labor There will be new or recertified at 877 MY VIZIO (877.698.4946) from shipping, acts of God, any type of one year limited warranty does not cover Products...

