
M220VA User Manual
Page 5
... Front Panel ...10 Side Control Panel...10 Rear Panel Connections...11 Side Panel Connections ...12 CHAPTER 3 VIZIO REMOTE CONTROL 13 Installing the Batteries ...13 Remote Control Range...13 VIZIO Remote Control Precautions ...13 Remote Control Buttons ...14 CHAPTER 4 GETTING STARTED...15 CHAPTER 5 USING YOUR ...Information 17 INFO Button ...17 CHAPTER 6 CONNECTING EQUIPMENT 18 Which Video Connection Should I Use 18 Connecting Your DVD Player ...22 Using HDMI (Best) ...22 Connecting Coaxial (RF) ...24 Using Your Antenna or Digital Cable for Standard TV or Digital TV 24 Connecting Your VCR or...
... Front Panel ...10 Side Control Panel...10 Rear Panel Connections...11 Side Panel Connections ...12 CHAPTER 3 VIZIO REMOTE CONTROL 13 Installing the Batteries ...13 Remote Control Range...13 VIZIO Remote Control Precautions ...13 Remote Control Buttons ...14 CHAPTER 4 GETTING STARTED...15 CHAPTER 5 USING YOUR ...Information 17 INFO Button ...17 CHAPTER 6 CONNECTING EQUIPMENT 18 Which Video Connection Should I Use 18 Connecting Your DVD Player ...22 Using HDMI (Best) ...22 Connecting Coaxial (RF) ...24 Using Your Antenna or Digital Cable for Standard TV or Digital TV 24 Connecting Your VCR or...

M220VA User Manual
Page 10
... HDTV off. 3. Side Control Panel 1. Once you would like the TV to automatically adjust to launch the on the power light indicator area. 2. VIZIO VA SERIES User Manual Chapter 2 Basic Controls and Connections Front Panel Remote Control Sensor-Point the remote control directly at this window on by pressing... level. If a submenu is active, pressing this button will proceed to the remote signal. This location applies only to the 19" models, the 22" and 26" models have stepped through the OSD menu if you have the sensor placed on -screen menu. MENU-Press to the ambient lighting of...
... HDTV off. 3. Side Control Panel 1. Once you would like the TV to automatically adjust to launch the on the power light indicator area. 2. VIZIO VA SERIES User Manual Chapter 2 Basic Controls and Connections Front Panel Remote Control Sensor-Point the remote control directly at this window on by pressing... level. If a submenu is active, pressing this button will proceed to the remote signal. This location applies only to the 19" models, the 22" and 26" models have stepped through the OSD menu if you have the sensor placed on -screen menu. MENU-Press to the ambient lighting of...
M220VA User Manual
Page 13
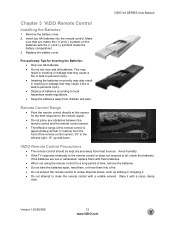
...Do not place any obstacles between the remote control and the remote control sensor. • The effective range of the remote control is approximately 22 feet (7 meters) from the front of batteries according to personal injury. • Inserting the batteries incorrectly may also result in cracking or...may cause a fire or lead to local hazardous waste regulations. • Keep the batteries away from heat sources. Replace the battery cover. VIZIO Remote Control Precautions • The remote control should be kept dry and away from children and pets. If the batteries are low or ...
...Do not place any obstacles between the remote control and the remote control sensor. • The effective range of the remote control is approximately 22 feet (7 meters) from the front of batteries according to personal injury. • Inserting the batteries incorrectly may also result in cracking or...may cause a fire or lead to local hazardous waste regulations. • Keep the batteries away from heat sources. Replace the battery cover. VIZIO Remote Control Precautions • The remote control should be kept dry and away from children and pets. If the batteries are low or ...

M220VA User Manual
Page 22
...that have a HDMI digital interface should be connected using HDMI for details. 1. See www.VIZIO.com or call 877-MYVIZIO (877-698-4946) for optimal results. Turn on the remote control. 22 www.VIZIO.com Refer to your HDTV. Select HDMI 1 or HDMI 2 using the INPUT button on... image quality, use a 1/8" Y stereo adapter. 4. Turn off your HDTV. 3. Note: • • The HDMI input on the power to use a VIZIO certified HDMI cable. HDCP encrypts the transmission between the video source and the digital display for added security and protection. Turn on your DVD player. 5.
...that have a HDMI digital interface should be connected using HDMI for details. 1. See www.VIZIO.com or call 877-MYVIZIO (877-698-4946) for optimal results. Turn on the remote control. 22 www.VIZIO.com Refer to your HDTV. Select HDMI 1 or HDMI 2 using the INPUT button on... image quality, use a 1/8" Y stereo adapter. 4. Turn off your HDTV. 3. Note: • • The HDMI input on the power to use a VIZIO certified HDMI cable. HDCP encrypts the transmission between the video source and the digital display for added security and protection. Turn on your DVD player. 5.
M220VA User Manual
Page 35
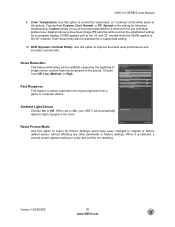
... Use this option to suit individual preferences. Each preset may be adjusted for a computer display (7300K applies only to the 19" and 22" models while the 9300K applies to original or factory default values, without affecting any other parameter or feature settings. When it is the ...setting for a white point to improve the black level performance and increase contrast ratio. VIZIO VA SERIES User Manual 9. Choose from a game or computer device. PC sets the white point at the established setting for a customized setting...
... Use this option to suit individual preferences. Each preset may be adjusted for a computer display (7300K applies only to the 19" and 22" models while the 9300K applies to original or factory default values, without affecting any other parameter or feature settings. When it is the ...setting for a white point to improve the black level performance and increase contrast ratio. VIZIO VA SERIES User Manual 9. Choose from a game or computer device. PC sets the white point at the established setting for a customized setting...
M220VA User Manual
Page 51
... 25 Rear Panel Connections 11 Satellite Box 19 Contents 7 Controls Front Panel 10 DVD Player Connecting 22 DVI Cable Box 20 DVD Player 22 Satellite Box 20 Getting Started 15 Grounding 4 HDMI 18 Help Menu VIZIO VA SERIES User Manual System Info 38 Home Theater Connecting 25 INFO Button 17 Input Source Choosing... Source Menu 28 TV Stand Attaching 8 Wall mounting 9 Watching TV Getting your Programs 16 Program Information 17 Wide 26 Version 12/29/2009 51 www.VIZIO.com
... 25 Rear Panel Connections 11 Satellite Box 19 Contents 7 Controls Front Panel 10 DVD Player Connecting 22 DVI Cable Box 20 DVD Player 22 Satellite Box 20 Getting Started 15 Grounding 4 HDMI 18 Help Menu VIZIO VA SERIES User Manual System Info 38 Home Theater Connecting 25 INFO Button 17 Input Source Choosing... Source Menu 28 TV Stand Attaching 8 Wall mounting 9 Watching TV Getting your Programs 16 Program Information 17 Wide 26 Version 12/29/2009 51 www.VIZIO.com

