Download
Page 1
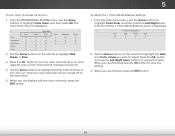
...Setup There are unfamiliar with some of the terms used in this FAQ will help you determine the best way to set up your network: 1. However, VIZIO recommends using either of 1.5mbps or higher. Your video may be connected to your network and get the best ... connection speed. My Internet connection is fast, but I find out? See the device's user manual for more information. Wireless - Try switching the setting to a lower quality to function properly. (Check the app's documentation for more information.) I don't know what your connection speed is caused by...
...Setup There are unfamiliar with some of the terms used in this FAQ will help you determine the best way to set up your network: 1. However, VIZIO recommends using either of 1.5mbps or higher. Your video may be connected to your network and get the best ... connection speed. My Internet connection is fast, but I find out? See the device's user manual for more information. Wireless - Try switching the setting to a lower quality to function properly. (Check the app's documentation for more information.) I don't know what your connection speed is caused by...
Download
Page 2
...recommended) as they may cause interference with optimal bandwidth, you have a fast Internet connection with your wireless network. • Check the encryption key setting (WEP, WPA/WPA2) on Your account & Help. 4. For example, if you have a slower connection speed, you rent a movie, select ..., we recommend WPA2 if supported. (See the documentation that your Netflix Account. 3. Hulu Select Good, Better or Best. Go to Player Settings. 6. More ways to your Internet connection supports. Click Manage video quality. 5. Scroll down to www.hulu.com. 2. The metal or water...
...recommended) as they may cause interference with optimal bandwidth, you have a fast Internet connection with your wireless network. • Check the encryption key setting (WEP, WPA/WPA2) on Your account & Help. 4. For example, if you have a slower connection speed, you rent a movie, select ..., we recommend WPA2 if supported. (See the documentation that your Netflix Account. 3. Hulu Select Good, Better or Best. Go to Player Settings. 6. More ways to your Internet connection supports. Click Manage video quality. 5. Scroll down to www.hulu.com. 2. The metal or water...

User Manual (English)
Page 2
... trademarks of Dolby Laboratories. HDMI, the HDMI logo and High-Definition Multimedia Interface are registered trademarks, and DTS Studio Sound is the setting in which power savings will increase power consumption that could exceed the limits necessary to qualify for ENERGY STAR in the "factory default..." setting and this is a trademark of DTS, Inc. © DTS, Inc. All Rights Reserved. Dolby and the double-D symbol are trademarks of HDMI ...
... trademarks of Dolby Laboratories. HDMI, the HDMI logo and High-Definition Multimedia Interface are registered trademarks, and DTS Studio Sound is the setting in which power savings will increase power consumption that could exceed the limits necessary to qualify for ENERGY STAR in the "factory default..." setting and this is a trademark of DTS, Inc. © DTS, Inc. All Rights Reserved. Dolby and the double-D symbol are trademarks of HDMI ...
User Manual (English)
Page 7
...Custom Picture Modes......... 29 Deleting a Custom Picture Mode 30 Adjusting the Audio Settings 31 Changing the Equalizer Settings 32 Deleting the Custom Audio Mode 32 Setting Timers 33 Setting the Sleep Timer 33 Setting the Auto Power Off Feature 33 Using the Network Connection Menu 34 Connecting... Channels 37 Skipping Channels 38 Listening to Alternate Audio 39 Changing the Analog Audio Language 39 Changing the Digital Audio Language 39 Setting Up Closed Captioning 40 1 Audio Cable Types 15 Connecting an Audio Device - Table of Contents Installing the TV 3 Inspecting ...
...Custom Picture Modes......... 29 Deleting a Custom Picture Mode 30 Adjusting the Audio Settings 31 Changing the Equalizer Settings 32 Deleting the Custom Audio Mode 32 Setting Timers 33 Setting the Sleep Timer 33 Setting the Auto Power Off Feature 33 Using the Network Connection Menu 34 Connecting... Channels 37 Skipping Channels 38 Listening to Alternate Audio 39 Changing the Analog Audio Language 39 Changing the Digital Audio Language 39 Setting Up Closed Captioning 40 1 Audio Cable Types 15 Connecting an Audio Device - Table of Contents Installing the TV 3 Inspecting ...

User Manual (English)
Page 8
...the Appearance of Digital Closed Captions.. 40 Renaming Devices on the Input Menu 42 Changing the TV Settings 43 Viewing System Information 43 Changing the On-Screen Menu Language 44 Setting the Time & Local Settings 44 Using the Parental Controls 45 Accessing the Parental Controls Menu 45 Enabling or Disabling Program Ratings...50 Using the USB Media Player 50 Preparing Your USB Drive to the My Apps Tab 57 Deleting an App from the TV 50 Using VIZIO Internet Apps Plus® (V.I.A. Plus Apps Window 57 Adding an App to Play USB Media 50 Playing USB Media 50 Removing the USB Drive...
...the Appearance of Digital Closed Captions.. 40 Renaming Devices on the Input Menu 42 Changing the TV Settings 43 Viewing System Information 43 Changing the On-Screen Menu Language 44 Setting the Time & Local Settings 44 Using the Parental Controls 45 Accessing the Parental Controls Menu 45 Enabling or Disabling Program Ratings...50 Using the USB Media Player 50 Preparing Your USB Drive to the My Apps Tab 57 Deleting an App from the TV 50 Using VIZIO Internet Apps Plus® (V.I.A. Plus Apps Window 57 Adding an App to Play USB Media 50 Playing USB Media 50 Removing the USB Drive...

User Manual (English)
Page 17
Connect the appropriate cable (not included) to match the connection you used to display output from most devices. 1. Set the TV's input to the TV and the device. 4. Verify that your device on. Note: The image shown here is for illustrative purposes only and ...
Connect the appropriate cable (not included) to match the connection you used to display output from most devices. 1. Set the TV's input to the TV and the device. 4. Verify that your device on. Note: The image shown here is for illustrative purposes only and ...

User Manual (English)
Page 25
... is connected to. (Number of inputs may vary depending on the remote to scan for channels, which takes several minutes. The First-Time Setup is set up" will need to highlight your TV) 10. Use the arrow buttons on the remote to a cable from the wall. 9. If you have cable TV..., select whether you have a cable box or if you are finished, the message "Your VIZIO TV is complete. 19 When you connect the TV directly to highlight Begin Scan and press OK. Completing the First-Time Setup 4 8.
... is connected to. (Number of inputs may vary depending on the remote to scan for channels, which takes several minutes. The First-Time Setup is set up" will need to highlight your TV) 10. Use the arrow buttons on the remote to a cable from the wall. 9. If you have cable TV..., select whether you have a cable box or if you are finished, the message "Your VIZIO TV is complete. 19 When you connect the TV directly to highlight Begin Scan and press OK. Completing the First-Time Setup 4 8.
User Manual (English)
Page 26
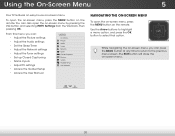
.... You can : • Adjust the Picture settings • Adjust the Audio settings • Set the Sleep Timer • Adjust the Network settings • Adjust the Tuner settings • Set up Closed Captioning • Name Inputs • Adjust TV settings • Access the Guided Setup • Access the User Manual VIZIO TV SETTINGS Picture Audio Timers Network Tuner CC Closed...
.... You can : • Adjust the Picture settings • Adjust the Audio settings • Set the Sleep Timer • Adjust the Network settings • Adjust the Tuner settings • Set up Closed Captioning • Name Inputs • Adjust TV settings • Access the Guided Setup • Access the User Manual VIZIO TV SETTINGS Picture Audio Timers Network Tuner CC Closed...
User Manual (English)
Page 27
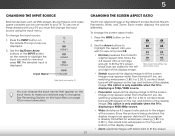
... that appear on the top and bottom of the display image. Press the WIDE button on the remote. Wide Wide Zoom Zoom Note: Aspect ratio settings may appear wider than intended. Images may vary by TV. This option is only available when the TV is displaying a 720p/1080i source. • Panoramic...
... that appear on the top and bottom of the display image. Press the WIDE button on the remote. Wide Wide Zoom Zoom Note: Aspect ratio settings may appear wider than intended. Images may vary by TV. This option is only available when the TV is displaying a 720p/1080i source. • Panoramic...
User Manual (English)
Page 28
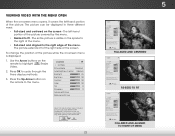
...modes. Wide Zoom Normal Panoramic Exit 2D 3D ABC Input Wide CC Sleep Timer Picture Audio Network Settings Help FULL-SIZED AND CENTERED Wide Exit VIZIO Zoom PICTURE Picture Mode Backlight - Brightness - Standard picture mode meets ENERGY STAR® requirements. ... preset picture modes. Brightness - Standard picture mode meets ENERGY STAR® requirements. Sleep Timer Picture Audio Network Settings Help ABC RE-SIZED TO FIT Input Wide VIZIO CC Sleep Timer PICTURE Picture Mode Standard Backlight - + 85 Brightness - + 50 Contrast - + 50 PictureColor...
...modes. Wide Zoom Normal Panoramic Exit 2D 3D ABC Input Wide CC Sleep Timer Picture Audio Network Settings Help FULL-SIZED AND CENTERED Wide Exit VIZIO Zoom PICTURE Picture Mode Backlight - Brightness - Standard picture mode meets ENERGY STAR® requirements. ... preset picture modes. Brightness - Standard picture mode meets ENERGY STAR® requirements. Sleep Timer Picture Audio Network Settings Help ABC RE-SIZED TO FIT Input Wide VIZIO CC Sleep Timer PICTURE Picture Mode Standard Backlight - + 85 Brightness - + 50 Contrast - + 50 PictureColor...
User Manual (English)
Page 29
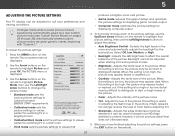
... mode. • Calibrated Dark mode sets the picture settings to values perfect for watching TV in a brightly-lit room. Contrast - To manually change the picture mode: VIZIO PICTURE Picture Mode Auto Brightness Control Backlight - When this setting is useful in adjusting the flesh tones... in dark or bright areas of the picture settings, use the Up/Down Arrow buttons on pages 28 through...
... mode. • Calibrated Dark mode sets the picture settings to values perfect for watching TV in a brightly-lit room. Contrast - To manually change the picture mode: VIZIO PICTURE Picture Mode Auto Brightness Control Backlight - When this setting is useful in adjusting the flesh tones... in dark or bright areas of the picture settings, use the Up/Down Arrow buttons on pages 28 through...

User Manual (English)
Page 30
...highlight Advanced Picture, and then press OK. Press the OK Sleep Timer button when you have finished adjusting the Advanced Picture Settings, press the EXIT button on the screen. When you Picture Audio are finished. • Picture PoAsBitCion - The ADVANCED ... adjust the advanced picture settings: 1. The adjustment is optimized for television viewing. • Black Detail - Activates Smooth Motion™ motion estimation/motion compensation, which suppresses motion judder, or "stuttering" of the displayed picture. VIZIO ADVANCED PICTURE Color Temperature Black Detail ...
...highlight Advanced Picture, and then press OK. Press the OK Sleep Timer button when you have finished adjusting the Advanced Picture Settings, press the EXIT button on the screen. When you Picture Audio are finished. • Picture PoAsBitCion - The ADVANCED ... adjust the advanced picture settings: 1. The adjustment is optimized for television viewing. • Black Detail - Activates Smooth Motion™ motion estimation/motion compensation, which suppresses motion judder, or "stuttering" of the displayed picture. VIZIO ADVANCED PICTURE Color Temperature Black Detail ...

User Manual (English)
Page 31
... custom picture mode. • Create Picture Mode - Delete a custom picture mode. Use the Left/RAiBgCht Arrow buttons to change the setting: VIZIO PROFESSIONAL PICTURE Color Tuner Rename Picture Mode Create Picture Mode Lock Picture Mode Delete Picture Mode • Color Tuner - When you are ... PICTURE menu, use the Arrow buttons to the currently selected custom picture mode. • Unlock Picture Mode - To adjust the professional picture settings: 1. Adjust the HSB color, RGB offsets, and 11-point white balance, and display calibration test patterns. • Rename Picture Mode ...
... custom picture mode. • Create Picture Mode - Delete a custom picture mode. Use the Left/RAiBgCht Arrow buttons to change the setting: VIZIO PROFESSIONAL PICTURE Color Tuner Rename Picture Mode Create Picture Mode Lock Picture Mode Delete Picture Mode • Color Tuner - When you are ... PICTURE menu, use the Arrow buttons to the currently selected custom picture mode. • Unlock Picture Mode - To adjust the professional picture settings: 1. Adjust the HSB color, RGB offsets, and 11-point white balance, and display calibration test patterns. • Rename Picture Mode ...
User Manual (English)
Page 32
...you are finished, press the EXIT button. 26 Press the OK button to turn the color channel off or on the remote to save the setting. 3. When you are finished press the OK button to highlight Red, Green, or Blue. 3. From the PROFESSIONAL PICTURE menu, use the Left...Magenta 25 -2 0 Yellow -14 0 0 2. An X appears over a color channel that has been turned off at the same time. 5. To adjust the 11 Point White Balance settings: 1. Press the OK button and use the Arrow buttons to adjust the value. Use the Arrow buttons on . Use the Arrow buttons to highlight another...
...you are finished, press the EXIT button. 26 Press the OK button to turn the color channel off or on the remote to save the setting. 3. When you are finished press the OK button to highlight Red, Green, or Blue. 3. From the PROFESSIONAL PICTURE menu, use the Left...Magenta 25 -2 0 Yellow -14 0 0 2. An X appears over a color channel that has been turned off at the same time. 5. To adjust the 11 Point White Balance settings: 1. Press the OK button and use the Arrow buttons to adjust the value. Use the Arrow buttons on . Use the Arrow buttons to highlight another...

User Manual (English)
Page 34
...highlight Off. 5 To show or hide the Ramp Test Pattern: 1. From the PROFESSIONAL PICTURE menu, use the Left/Right Arrow buttons to the picture settings. 5. Ramp Test Pattern Off 2. A custom picture mode only applies to the input (HDMI-1, COMP, etc.) in use the Arrow buttons to highlight... changed while in any desired changes to highlight Off. 3. To create a custom picture mode manually: 1. Highlight Done and press OK. VIZIO CREATE PICTURE MODE Custom1_ abc def ghi j k l mn o p q r s t u v wx y z 0 123456789 .@# .com Space Done 4. From the Color Tuner menu, use when it ...
...highlight Off. 5 To show or hide the Ramp Test Pattern: 1. From the PROFESSIONAL PICTURE menu, use the Left/Right Arrow buttons to the picture settings. 5. Ramp Test Pattern Off 2. A custom picture mode only applies to the input (HDMI-1, COMP, etc.) in use the Arrow buttons to highlight... changed while in any desired changes to highlight Off. 3. To create a custom picture mode manually: 1. Highlight Done and press OK. VIZIO CREATE PICTURE MODE Custom1_ abc def ghi j k l mn o p q r s t u v wx y z 0 123456789 .@# .com Space Done 4. From the Color Tuner menu, use when it ...

User Manual (English)
Page 35
... Picture Mode, and then press OK. You must create a new 4-digit PIN. 5. To rename a custom picture mode: 1. The RENAME PICTURE MODE menu is displayed. VIZIO RENAME PICTURE MODE Custom 1_ abc def ghi j k l mn o p q r s t u v wx y z 0 123456789 .@# .com Space Done 3. Press... the on-screen keyboard. 4. From the PROFESSIONAL PICTURE menu, use the Arrow Network Settings Help buttons to their settings. The LOCK PICTURE MODE menu is displayed. Exit 2D 3D 2. ABC 3. VIZIO LOCK PICTURE MODE Create a picture control PIN to prevent change to remember. Save ...
... Picture Mode, and then press OK. You must create a new 4-digit PIN. 5. To rename a custom picture mode: 1. The RENAME PICTURE MODE menu is displayed. VIZIO RENAME PICTURE MODE Custom 1_ abc def ghi j k l mn o p q r s t u v wx y z 0 123456789 .@# .com Space Done 3. Press... the on-screen keyboard. 4. From the PROFESSIONAL PICTURE menu, use the Arrow Network Settings Help buttons to their settings. The LOCK PICTURE MODE menu is displayed. Exit 2D 3D 2. ABC 3. VIZIO LOCK PICTURE MODE Create a picture control PIN to prevent change to remember. Save ...

User Manual (English)
Page 37
...8226; Lip Sync - Exit 2D 3D • Analog Audio Out - Press the MENU button on or off . • Balance - VIZIO AUDIO TV Speakers Surround Sound Volume Leveling Balance - Surround sound uses DTS TruSurround™ to a home theater audio system. Adjusts the loudness...' volume from the TV's volume controls, or select Fixed to highlight Audio and press OK. 5 ADJUSTING THE AUDIO SETTINGS To adjust the audio settings: 1. Ne•tworkDeSelettitnegsAudHeilop Mode - Adjusts the synchronization between program content, AV formats, and input sources. Wide Zoom ...
...8226; Lip Sync - Exit 2D 3D • Analog Audio Out - Press the MENU button on or off . • Balance - VIZIO AUDIO TV Speakers Surround Sound Volume Leveling Balance - Surround sound uses DTS TruSurround™ to a home theater audio system. Adjusts the loudness...' volume from the TV's volume controls, or select Fixed to highlight Audio and press OK. 5 ADJUSTING THE AUDIO SETTINGS To adjust the audio settings: 1. Ne•tworkDeSelettitnegsAudHeilop Mode - Adjusts the synchronization between program content, AV formats, and input sources. Wide Zoom ...

User Manual (English)
Page 38
...the Arrow buttons to select any audio mode as a starting point. 5. The Audio Mode and equalizer settings screen appears. 4. Highlight Delete and press OK. 5. To select a pre-set modes and allows you to create one custom mode. Use the Left and Right Arrow buttons to highlight...TV displays, "To delete the user created custom audio mode, select the Delete button." 4. To create, modify, or replace the single custom equalizer setting: 1. The AUDIO menu is displayed. 3. The equalizer bars change to highlight a frequency and then press OK. 6. Press the MENU button on -...
...the Arrow buttons to select any audio mode as a starting point. 5. The Audio Mode and equalizer settings screen appears. 4. Highlight Delete and press OK. 5. To select a pre-set modes and allows you to create one custom mode. Use the Left and Right Arrow buttons to highlight...TV displays, "To delete the user created custom audio mode, select the Delete button." 4. To create, modify, or replace the single custom equalizer setting: 1. The AUDIO menu is displayed. 3. The equalizer bars change to highlight a frequency and then press OK. 6. Press the MENU button on -...
User Manual (English)
Page 39
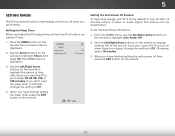
...the TV to turn off when there is no signal, change the setting to sleep: 30, 60, 90, 120, or 180 minutes. VIZIO TIMERS Sleep Timer Auto Power Off Off 10 minutes 3. To set the Auto Power Off feature: 1. 5 SETTING TIMERS This TV has several timers to save energy, your TV is... set by default to turn off after 10 minutes without a video or audio signal. Setting the Sleep Timer When ...
...the TV to turn off when there is no signal, change the setting to sleep: 30, 60, 90, 120, or 180 minutes. VIZIO TIMERS Sleep Timer Auto Power Off Off 10 minutes 3. To set the Auto Power Off feature: 1. 5 SETTING TIMERS This TV has several timers to save energy, your TV is... set by default to turn off after 10 minutes without a video or audio signal. Setting the Sleep Timer When ...

User Manual (English)
Page 40
...Disconnected Wireless Access Points More Access Points WPS Manual Setup Hidden Network Test Connection 6. From the NETWORK menu, highlight Manual Setup and VIZIO press OK. DHCP Off 2. IP Address Subnet Mask Default Gateway Pref. DNS Server MAC Save Cancel 0:0:0:0:0:0 • Subnet Mask...• Input PreWf.idDeNS SCeCrver - Press the EXIT button on -screen keyboard, enter your TV is connected to change advanced network settings: 1. The NETWORK menu is displayed. 4. The WIRELESS ACCESS POINTS menu, which is a list of your wireless network displayed, highlight...
...Disconnected Wireless Access Points More Access Points WPS Manual Setup Hidden Network Test Connection 6. From the NETWORK menu, highlight Manual Setup and VIZIO press OK. DHCP Off 2. IP Address Subnet Mask Default Gateway Pref. DNS Server MAC Save Cancel 0:0:0:0:0:0 • Subnet Mask...• Input PreWf.idDeNS SCeCrver - Press the EXIT button on -screen keyboard, enter your TV is connected to change advanced network settings: 1. The NETWORK menu is displayed. 4. The WIRELESS ACCESS POINTS menu, which is a list of your wireless network displayed, highlight...


