
User Manual (English)
Page 6
Remember, the screen of the coaxial cable is intended to be connected to the TV, make sure that the antenna or cable system is electrically grounded to earth ...
Remember, the screen of the coaxial cable is intended to be connected to the TV, make sure that the antenna or cable system is electrically grounded to earth ...
User Manual (English)
Page 7
... a Wired Network (Best 17 Connecting to a Wireless Network 17 Completing the First-Time Setup 18 Using the On-Screen Menu 20 Navigating the On-Screen Menu 20 Changing the Input Source 21 Changing the Screen Aspect Ratio 21 Viewing Video with the Menu Open 22 Adjusting the Picture Settings 23 Adjusting the Advanced...
... a Wired Network (Best 17 Connecting to a Wireless Network 17 Completing the First-Time Setup 18 Using the On-Screen Menu 20 Navigating the On-Screen Menu 20 Changing the Input Source 21 Changing the Screen Aspect Ratio 21 Viewing Video with the Menu Open 22 Adjusting the Picture Settings 23 Adjusting the Advanced...

User Manual (English)
Page 8
... of Digital Closed Captions.. 40 Renaming Devices on the Input Menu 42 Changing the TV Settings 43 Viewing System Information 43 Changing the On-Screen Menu Language 44 Setting the Time & Local Settings 44 Using the Parental Controls 45 Accessing the Parental Controls Menu 45 Enabling or Disabling Program... 50 Using the USB Media Player 50 Preparing Your USB Drive to the My Apps Tab 57 Deleting an App from the TV 50 Using VIZIO Internet Apps Plus® (V.I .A. Plus Apps Window Overview 56 Customizing the V.I .A. Plus App Dock 54 Using the Hot Keys 54 Using the Fullscreen V.I.A....
... of Digital Closed Captions.. 40 Renaming Devices on the Input Menu 42 Changing the TV Settings 43 Viewing System Information 43 Changing the On-Screen Menu Language 44 Setting the Time & Local Settings 44 Using the Parental Controls 45 Accessing the Parental Controls Menu 45 Enabling or Disabling Program... 50 Using the USB Media Player 50 Preparing Your USB Drive to the My Apps Tab 57 Deleting an App from the TV 50 Using VIZIO Internet Apps Plus® (V.I .A. Plus Apps Window Overview 56 Customizing the V.I .A. Plus App Dock 54 Using the Hot Keys 54 Using the Fullscreen V.I.A....

User Manual (English)
Page 10
... other object, such as a blanket. 1. Insert the three (3) included M5 16mm Phillips screws and tighten them using a Phillips screwdriver to secure the base to the screen, place the TV on a soft surface such as a wall. 4 When you are finished, place the TV on a clean, flat surface. To prevent scratches or damage...
... other object, such as a blanket. 1. Insert the three (3) included M5 16mm Phillips screws and tighten them using a Phillips screwdriver to secure the base to the screen, place the TV on a soft surface such as a wall. 4 When you are finished, place the TV on a clean, flat surface. To prevent scratches or damage...
User Manual (English)
Page 15
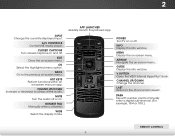
... ARROW Navigate the on . LAST Return to the previous on or off . NUMBER PAD Manually enter a channel. POWER Turn TV on -screen menu. CHANNEL UP/DOWN Change the channel. WIDE Switch the display mode. APP LAUNCHER Quickly launch the pictured app. CLOSED CAPTIONS Turn closed ...captions on -screen menu or app. MUTE Turn the audio off or on -screen menu. V BUTTON Open the VIZIO Internet Apps Plus® dock. DASH Use with number pad to manually enter a digital sub-channel...
... ARROW Navigate the on . LAST Return to the previous on or off . NUMBER PAD Manually enter a channel. POWER Turn TV on -screen menu. CHANNEL UP/DOWN Change the channel. WIDE Switch the display mode. APP LAUNCHER Quickly launch the pictured app. CLOSED CAPTIONS Turn closed ...captions on -screen menu or app. MUTE Turn the audio off or on -screen menu. V BUTTON Open the VIZIO Internet Apps Plus® dock. DASH Use with number pad to manually enter a digital sub-channel...

User Manual (English)
Page 24
... then press the OK button. 5. SeSleeclet cSttSoCtroheCroheDooDesomeesmeoyoyofoofuourrrrimnimn-o-sosdtdtooeerr..ee ddiissppllaayy.. Enter the wireless password using the on-screen keyboard. ChoisCishsoeiszis"sHeozm"HeoUmseeU" speo"uproMuroMdeodDeoDmoimciilceileouou"S"StotorereDDeemmoo"" ppoouurr DDéémmoonnsstrtaratiotionndedeMMagaagsains.in the list of the steps...Press the Power/Standby button on and the Setup App starts. 4. Use the Arrow and OK buttons on -screen keyboard, then highlight Connect and press OK. 2. Before you begin the first-time setup: • Your TV...
... then press the OK button. 5. SeSleeclet cSttSoCtroheCroheDooDesomeesmeoyoyofoofuourrrrimnimn-o-sosdtdtooeerr..ee ddiissppllaayy.. Enter the wireless password using the on-screen keyboard. ChoisCishsoeiszis"sHeozm"HeoUmseeU" speo"uproMuroMdeodDeoDmoimciilceileouou"S"StotorereDDeemmoo"" ppoouurr DDéémmoonnsstrtaratiotionndedeMMagaagsains.in the list of the steps...Press the Power/Standby button on and the Setup App starts. 4. Use the Arrow and OK buttons on -screen keyboard, then highlight Connect and press OK. 2. Before you begin the first-time setup: • Your TV...

User Manual (English)
Page 25
... takes several minutes. The First-Time Setup is set up" will need to highlight Begin Scan and press OK. If the TV Signal channel scan screen appears, the TV will appear. Otherwise, use the Arrow and OK buttons on the remote to select the input your TV source is connected to... your TV source and press OK. If you have cable TV, select whether you have a cable box or if you are finished, the message "Your VIZIO TV is complete. 19
... takes several minutes. The First-Time Setup is set up" will need to highlight Begin Scan and press OK. If the TV Signal channel scan screen appears, the TV will appear. Otherwise, use the Arrow and OK buttons on the remote to select the input your TV source is connected to... your TV source and press OK. If you have cable TV, select whether you have a cable box or if you are finished, the message "Your VIZIO TV is complete. 19
User Manual (English)
Page 26
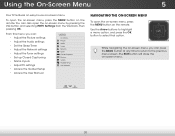
From this menu, you can press Exit 2Dthe BA3DCK button at any time to return to select that option. To open the on-screen menu, press the MENU button on -scrAeBCen menu. You can : • Adjust the Picture settings • Adjust the Audio settings • Set the Sleep ...8226; Access the Guided Setup • Access the User Manual VIZIO TV SETTINGS Picture Audio Timers Network Tuner CC Closed Captions Devices System Guided Setup User Manual NAVIGATING THE ON-SCREEN MENU To open the on-screen menu, press the MENU button on -screen menu by pressing the VIA button and selecting HDTV Settings...
From this menu, you can press Exit 2Dthe BA3DCK button at any time to return to select that option. To open the on-screen menu, press the MENU button on -scrAeBCen menu. You can : • Adjust the Picture settings • Adjust the Audio settings • Set the Sleep ...8226; Access the Guided Setup • Access the User Manual VIZIO TV SETTINGS Picture Audio Timers Network Tuner CC Closed Captions Devices System Guided Setup User Manual NAVIGATING THE ON-SCREEN MENU To open the on-screen menu, press the MENU button on -screen menu by pressing the VIA button and selecting HDTV Settings...
User Manual (English)
Page 27
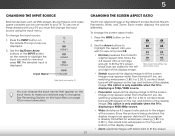
... Panoramic Normal Stretch • Normal preserves the content's original aspect ratio. Since the 4:3 aspect ratio is not large enough to fill the TV's screen, black bars are watching widescreen (1.85:1 or 2.35:1) content, black bars will appear on the remote to view and press OK. Images may vary... Zoom. Use the Arrow buttons to the edges of the display image. • Zoom expands images with your devices easy to fill the screen. This option is only available when the TV is already formatted for more information. 21 The TV can change the input names that appear ...
... Panoramic Normal Stretch • Normal preserves the content's original aspect ratio. Since the 4:3 aspect ratio is not large enough to fill the TV's screen, black bars are watching widescreen (1.85:1 or 2.35:1) content, black bars will appear on the remote to view and press OK. Images may vary... Zoom. Use the Arrow buttons to the edges of the display image. • Zoom expands images with your devices easy to fill the screen. This option is only available when the TV is already formatted for more information. 21 The TV can change the input names that appear ...
User Manual (English)
Page 28
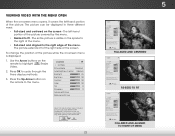
VIZIO Wide Zoom Normal Panoramic VIEWING VIDEO WITH THE MENU OPEN When the on-screen menu opens, it covers the left -hand ABC portion of the picture. Brightness - Medium + 85 + 50 + 50 + 59 +0 +9 Advanced Picture Professional Picture Select from preset ... reduce video delay (lag) when gaming, use Calibrated mode. The picture can be displayed in Etxhit ree d2Differen3tD ways: • Full-sized and centered on -screen menu is displayed: 1. Press OK to the menu. Sharpness - Contrast - Sharpness - For the best picture, use Game mode. Use the Arrow buttons on the ...
VIZIO Wide Zoom Normal Panoramic VIEWING VIDEO WITH THE MENU OPEN When the on-screen menu opens, it covers the left -hand ABC portion of the picture. Brightness - Medium + 85 + 50 + 50 + 59 +0 +9 Advanced Picture Professional Picture Select from preset ... reduce video delay (lag) when gaming, use Calibrated mode. The picture can be displayed in Etxhit ree d2Differen3tD ways: • Full-sized and centered on -screen menu is displayed: 1. Press OK to the menu. Sharpness - Contrast - Sharpness - For the best picture, use Game mode. Use the Arrow buttons on the ...
User Manual (English)
Page 29
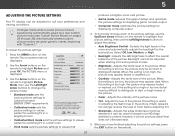
...elements. It can be adjusted to distinguish details. When you have finished adjusting the picture settings, press the EXIT button on -screen menu is too high or too low, detail may appear faded Input or wWaideshedCoCut. Press the MENU button on the remote to... setting is displayed. 3. Backlight cannot be too dark to suit your preferences and viewing conditions. picture. To manually change the picture mode: VIZIO PICTURE Picture Mode Auto Brightness Control Backlight - 5 ADJUSTING THE PICTURE SETTINGS Your TV display can be difficult to sharpen non-HD (high definition...
...elements. It can be adjusted to distinguish details. When you have finished adjusting the picture settings, press the EXIT button on -screen menu is too high or too low, detail may appear faded Input or wWaideshedCoCut. Press the MENU button on the remote to... setting is displayed. 3. Backlight cannot be too dark to suit your preferences and viewing conditions. picture. To manually change the picture mode: VIZIO PICTURE Picture Mode Auto Brightness Control Backlight - 5 ADJUSTING THE PICTURE SETTINGS Your TV display can be difficult to sharpen non-HD (high definition...

User Manual (English)
Page 30
Select Cool, Normal, or Computer. VIZIO ADVANCED PICTURE Color Temperature Black Detail Active LED Zones Smooth Motion Effect Motion Blur Reduction Reduce Signal Noise Reduce Block Noise Picture Size ...finished. • Film Mode - 5 Adjusting the Advanced Picture Settings To adjust the advanced picture settings: 1. The ADVANCED PICTURE menu is centered Input andWidceompCleCtely fills the screen. Activates Smooth Motion™ motion estimation/motion compensation, which suppresses motion judder, or "stuttering" of the displayed picture. Select Off, Low, Medium, or High. ...
Select Cool, Normal, or Computer. VIZIO ADVANCED PICTURE Color Temperature Black Detail Active LED Zones Smooth Motion Effect Motion Blur Reduction Reduce Signal Noise Reduce Block Noise Picture Size ...finished. • Film Mode - 5 Adjusting the Advanced Picture Settings To adjust the advanced picture settings: 1. The ADVANCED PICTURE menu is centered Input andWidceompCleCtely fills the screen. Activates Smooth Motion™ motion estimation/motion compensation, which suppresses motion judder, or "stuttering" of the displayed picture. Select Off, Low, Medium, or High. ...

User Manual (English)
Page 34
..., use the Arrow buttons to highlight Create Picture Mode, and then press OK. Creating a Custom Picture Mode Custom picture modes allow you to highlight Off. 3. VIZIO CREATE PICTURE MODE Custom1_ abc def ghi j k l mn o p q r s t u v wx y z 0 123456789 .@# .com Space Done 4. Ramp Test ... the Arrow buttons to the picture settings. 5. Ensure that color ramp. -or- Selecting a color immediately shows that you are on -screen keyboard. 3. Make any preset picture mode. The CREATE PICTURE MODE menu is displaying active content. From the PROFESSIONAL PICTURE menu, use the...
..., use the Arrow buttons to highlight Create Picture Mode, and then press OK. Creating a Custom Picture Mode Custom picture modes allow you to highlight Off. 3. VIZIO CREATE PICTURE MODE Custom1_ abc def ghi j k l mn o p q r s t u v wx y z 0 123456789 .@# .com Space Done 4. Ramp Test ... the Arrow buttons to the picture settings. 5. Ensure that color ramp. -or- Selecting a color immediately shows that you are on -screen keyboard. 3. Make any preset picture mode. The CREATE PICTURE MODE menu is displaying active content. From the PROFESSIONAL PICTURE menu, use the...

User Manual (English)
Page 35
... to highlight Unlock Picture Mode, and then press OK. From the PROFESSIONAL PICTURE menu, use the Arrow Network Settings Help buttons to exit the menu screens. Press the EXIT button to remember. 5 Renaming a Custom Picture Mode Automatically-created custom picture modes are given generic names, beginning with "Custom 1," ...23. 2. The RENAME PICTURE MODE menu is displayed. ABC 3. To lock all custom picture modes: Create a 4 digit passcode using the on the remote. 1. VIZIO LOCK PICTURE MODE Create a picture control PIN to prevent change to enter a unique 4-digit PIN.
... to highlight Unlock Picture Mode, and then press OK. From the PROFESSIONAL PICTURE menu, use the Arrow Network Settings Help buttons to exit the menu screens. Press the EXIT button to remember. 5 Renaming a Custom Picture Mode Automatically-created custom picture modes are given generic names, beginning with "Custom 1," ...23. 2. The RENAME PICTURE MODE menu is displayed. ABC 3. To lock all custom picture modes: Create a 4 digit passcode using the on the remote. 1. VIZIO LOCK PICTURE MODE Create a picture control PIN to prevent change to enter a unique 4-digit PIN.

User Manual (English)
Page 36
To delete the user created Custom 1 picture mode, select the Delete button. Use the Left/Right Arrow buttons to exit the menu screens. 30 Press the EXIT button to highlight Delete and press OK. 3. 5 Deleting a Custom Picture Mode Custom picture modes that are no longer needed can be ...
To delete the user created Custom 1 picture mode, select the Delete button. Use the Left/Right Arrow buttons to exit the menu screens. 30 Press the EXIT button to highlight Delete and press OK. 3. 5 Deleting a Custom Picture Mode Custom picture modes that are no longer needed can be ...

User Manual (English)
Page 37
...Timer coPnicntuerecteAdudtoio the 3.5mm connector.) • Equalizer - Deletes a custom audio mode created using either preset or custom settings. VIZIO AUDIO TV Speakers Surround Sound Volume Leveling Balance - Surround sound uses DTS TruSurround™ to control the headphones' volume from ... outputs. • Surround Sound - 5 ADJUSTING THE AUDIO SETTINGS To adjust the audio settings: 1. Use the Arrow buttons on -screen menu is displayed. 3. Sets the volume control properties for the 3.5mABCm (headphone jack) connector when connected to change the setting: ...
...Timer coPnicntuerecteAdudtoio the 3.5mm connector.) • Equalizer - Deletes a custom audio mode created using either preset or custom settings. VIZIO AUDIO TV Speakers Surround Sound Volume Leveling Balance - Surround sound uses DTS TruSurround™ to control the headphones' volume from ... outputs. • Surround Sound - 5 ADJUSTING THE AUDIO SETTINGS To adjust the audio settings: 1. Use the Arrow buttons on -screen menu is displayed. 3. Sets the volume control properties for the 3.5mABCm (headphone jack) connector when connected to change the setting: ...

User Manual (English)
Page 38
..., modify, or replace the single custom equalizer setting: 1. Use the Left and Right Arrow buttons to highlight Audio and press OK. The on -screen menu is displayed. 2. Use the Arrow buttons on the remote to select any audio mode as a starting point. 5. Use the Arrow buttons to... and Down Arrow buttons to highlight Delete Audio Mode and press OK. Press the EXIT button on the remote. The Audio Mode and equalizer settings screen appears. 4. The AUDIO menu is displayed. 2. Use the Arrow buttons to adjust the boost (up) and attenuation (down) for the frequency. 7....
..., modify, or replace the single custom equalizer setting: 1. Use the Left and Right Arrow buttons to highlight Audio and press OK. The on -screen menu is displayed. 2. Use the Arrow buttons on the remote to select any audio mode as a starting point. 5. Use the Arrow buttons to... and Down Arrow buttons to highlight Delete Audio Mode and press OK. Press the EXIT button on the remote. The Audio Mode and equalizer settings screen appears. 4. The AUDIO menu is displayed. 2. Use the Arrow buttons to adjust the boost (up) and attenuation (down) for the frequency. 7....
User Manual (English)
Page 39
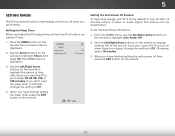
VIZIO TIMERS Sleep Timer Auto Power Off Off 10 minutes 3. When you don't want the TV to turn off when there is no signal, change the ... to save energy, your TV is set by default to turn off after 10 minutes without a video or audio signal. Use the Arrow buttons on -screen menu is displayed. Setting the Auto Power Off Feature To help save energy and to turn off when you want the sleep timer to activate...
VIZIO TIMERS Sleep Timer Auto Power Off Off 10 minutes 3. When you don't want the TV to turn off when there is no signal, change the ... to save energy, your TV is set by default to turn off after 10 minutes without a video or audio signal. Use the Arrow buttons on -screen menu is displayed. Setting the Auto Power Off Feature To help save energy and to turn off when you want the sleep timer to activate...

User Manual (English)
Page 40
...displayed. 3. Use the Arrow and OK buttons to set up a wireless network connection. 1. Audio - Press the EXIT button on -screen menu is displayed. 4. Press the MENU button on the remote. Changing the Manual Setup Settings Advanced users can fine-tune the network ...Wide Zoom Normal Panoramic • IP Address - The WIRELESS ACCESS POINTS menu, which is the network's SSID) and press OK. 5. VIZIO NETWORK Wired Connection Disconnected Wireless Access Points More Access Points WPS Manual Setup Hidden Network Test Connection 6. DHCP Off 2. DNS Server Alt....
...displayed. 3. Use the Arrow and OK buttons to set up a wireless network connection. 1. Audio - Press the EXIT button on -screen menu is displayed. 4. Press the MENU button on the remote. Changing the Manual Setup Settings Advanced users can fine-tune the network ...Wide Zoom Normal Panoramic • IP Address - The WIRELESS ACCESS POINTS menu, which is the network's SSID) and press OK. 5. VIZIO NETWORK Wired Connection Disconnected Wireless Access Points More Access Points WPS Manual Setup Hidden Network Test Connection 6. DHCP Off 2. DNS Server Alt....

User Manual (English)
Page 41
...connect to a wireless network whose network name (SSID) is not being broadcast: 1. Press the EXIT button on the remote. Using the on-screen keyboard, enter your access point name. VIZIO ENTER ACCESS POINT NAME Enter your network's name (SSID), then highlight Connect and press OK. 3. abc def ghi j k l mn o ...for the connections in the router's settings. The ENTER ACCESS POINT NAME screen is displayed. 2. From the NETWORK menu, highlight Hidden Network and press OK. The TEST CONNECTION screen displays the connection method, network name, signal strength, and download speed...
...connect to a wireless network whose network name (SSID) is not being broadcast: 1. Press the EXIT button on the remote. Using the on-screen keyboard, enter your access point name. VIZIO ENTER ACCESS POINT NAME Enter your network's name (SSID), then highlight Connect and press OK. 3. abc def ghi j k l mn o ...for the connections in the router's settings. The ENTER ACCESS POINT NAME screen is displayed. 2. From the NETWORK menu, highlight Hidden Network and press OK. The TEST CONNECTION screen displays the connection method, network name, signal strength, and download speed...
