
E472VL User Manual
Page 10
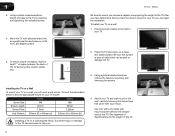
... any cables connected to the TV by loosening and removing the screws. Attach your mount. Using a philips-head screwdriver, attach the base to your TV on a wall, you . 4. E472VL / E552VL Be sure the mount you have determined that came with a UL-listed wall mount bracket rated for the weight of this TV...
... any cables connected to the TV by loosening and removing the screws. Attach your mount. Using a philips-head screwdriver, attach the base to your TV on a wall, you . 4. E472VL / E552VL Be sure the mount you have determined that came with a UL-listed wall mount bracket rated for the weight of this TV...
E472VL User Manual
Page 30
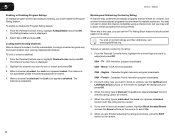
... rating cannot be inaccessible. Content with this rating can use the TV's Rating Block feature to block content based on its rating: 1. When you want to lock or unlock and press OK. 3. 5 E472VL / E552VL Enabling or Disabling Program Ratings To manage program content according to its rating, you want to block all...
... rating cannot be inaccessible. Content with this rating can use the TV's Rating Block feature to block content based on its rating: 1. When you want to lock or unlock and press OK. 3. 5 E472VL / E552VL Enabling or Disabling Program Ratings To manage program content according to its rating, you want to block all...
E472VL User Manual
Page 32
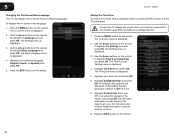
... displayed when you press the INFO button, set the TV's time zone: To have the TV display the correct time, you the most accurate location-based information, such as weather or news. 8. Press the EXIT button on the remote to the internet via an Ethernet cable or a wireless network. 1. Highlight ...Savings and press OK. Highlight your time zone and press OK. 6. The on -screen menu language: 1. Use the Arrow buttons on the remote. 24 E472VL / E552VL Setting the Time Zone To ensure the correct time is in different languages. The Daylight Savings menu is displayed. 5.
... displayed when you press the INFO button, set the TV's time zone: To have the TV display the correct time, you the most accurate location-based information, such as weather or news. 8. Press the EXIT button on the remote to the internet via an Ethernet cable or a wireless network. 1. Highlight ...Savings and press OK. Highlight your time zone and press OK. 6. The on -screen menu language: 1. Use the Arrow buttons on the remote. 24 E472VL / E552VL Setting the Time Zone To ensure the correct time is in different languages. The Daylight Savings menu is displayed. 5.


