
Download
Page 5
... an equilateral triangle is dropped or damaged in the operating instructions unless you are for repair. Do not try to leak which can damage the remote control or injure the operator. Continued use your TV in environments with liquids, such as the disconnect device, the disconnect device shall remain readily operable. •...
... an equilateral triangle is dropped or damaged in the operating instructions unless you are for repair. Do not try to leak which can damage the remote control or injure the operator. Continued use your TV in environments with liquids, such as the disconnect device, the disconnect device shall remain readily operable. •...
Download
Page 7
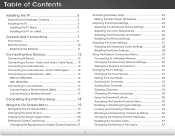
... for Channels 32 Adding New Channels 33 Skipping Channels 34 Changing the Audio Language 34 Using the Parental Controls 35 Accessing the Parental Controls Menu 35 Enabling or Disabling Program Ratings 36 Locking and Unlocking Channels 36 Blocking and Unblocking Content by ...the TV 3 Inspecting the Package Contents 3 Installing the TV 3 Installing the TV Stand 3 Installing the TV on a Wall 6 Controls and Connections 7 Front Panel 9 Remote Control 10 Replacing the Batteries 11 Connecting Your Devices 12 Connecting A Device 12 Connecting a Device - Table of the Inputs 37 1 ...
... for Channels 32 Adding New Channels 33 Skipping Channels 34 Changing the Audio Language 34 Using the Parental Controls 35 Accessing the Parental Controls Menu 35 Enabling or Disabling Program Ratings 36 Locking and Unlocking Channels 36 Blocking and Unblocking Content by ...the TV 3 Inspecting the Package Contents 3 Installing the TV 3 Installing the TV Stand 3 Installing the TV on a Wall 6 Controls and Connections 7 Front Panel 9 Remote Control 10 Replacing the Batteries 11 Connecting Your Devices 12 Connecting A Device 12 Connecting a Device - Table of the Inputs 37 1 ...

Download
Page 9
... inspect the package contents. Installing the TV 1 Inspecting the Package Contents Before installing your new TV, take a moment to ensure nothing is not properly secured VIZIO LED HDTV with Stand Remote Control with Batteries Quick Start Guide Power Cord 7 x Philips Screws Package Contents 3 TV on Stand
... inspect the package contents. Installing the TV 1 Inspecting the Package Contents Before installing your new TV, take a moment to ensure nothing is not properly secured VIZIO LED HDTV with Stand Remote Control with Batteries Quick Start Guide Power Cord 7 x Philips Screws Package Contents 3 TV on Stand
Download
Page 16
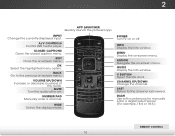
...Display the on -screen menu. Channel Up/Down Change the channel. Last Return to manually enter a digital sub-channel. (For example, 18-4 or 18-5.) Remote Control 10 Exit Close the on -screen menu. Volume Up/Down Increase or decrease loudness of the audio. V Button Open the VIA dock... pad to the channel last viewed. Arrow Navigate the on -screen menu. Input Change the currently-displayed input. Wide Switch the display mode. 2 Remote Control App launcher Quickly launch the pictured app. Power Turn TV on or off or on. Back Go to the previous on -screen menu. Number Pad...
...Display the on -screen menu. Channel Up/Down Change the channel. Last Return to manually enter a digital sub-channel. (For example, 18-4 or 18-5.) Remote Control 10 Exit Close the on -screen menu. Volume Up/Down Increase or decrease loudness of the audio. V Button Open the VIA dock... pad to the channel last viewed. Arrow Navigate the on -screen menu. Input Change the currently-displayed input. Wide Switch the display mode. 2 Remote Control App launcher Quickly launch the pictured app. Power Turn TV on or off or on. Back Go to the previous on -screen menu. Number Pad...
Download
Page 17
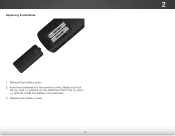
Replace the battery cover. 11 Remove the battery cover. 2. Make sure that the (+) and (-) symbols on the batteries match the (+) and (-) symbols inside the battery compartment. 3. Insert two batteries into the remote control. 2 Replacing the Batteries 1.
Replace the battery cover. 11 Remove the battery cover. 2. Make sure that the (+) and (-) symbols on the batteries match the (+) and (-) symbols inside the battery compartment. 3. Insert two batteries into the remote control. 2 Replacing the Batteries 1.
Download
Page 30
...by the digitizing of the image when the camera moves across a scene horizontally. VIZIO Advanced Picture Smooth Motion Effect Medium Real Cinema Mode Smooth Noise Reduction Low MPEG NR...setting you havAeBCfinished adjusting the Advanced Picture Settings, press the EXIT button on the remote to highlight Advanced Picture, then press OK.The Advanced Picture menu is displayed. ...the average brightness of the picture to change the setting: Adaptive Luma Film Mode Backlight Control Ambient Light Sensor Medium Auto DCR Medium • Smooth Motion Effect Activates Smooth Motion&#...
...by the digitizing of the image when the camera moves across a scene horizontally. VIZIO Advanced Picture Smooth Motion Effect Medium Real Cinema Mode Smooth Noise Reduction Low MPEG NR...setting you havAeBCfinished adjusting the Advanced Picture Settings, press the EXIT button on the remote to highlight Advanced Picture, then press OK.The Advanced Picture menu is displayed. ...the average brightness of the picture to change the setting: Adaptive Luma Film Mode Backlight Control Ambient Light Sensor Medium Auto DCR Medium • Smooth Motion Effect Activates Smooth Motion&#...
Download
Page 34
... the setting you want to RESET Exit 2D 3D Audio Settings to a home theater audio system. VIZIO Advanced Audio Digital Audio Out Analog Audio Out PCM Fixed 3. The on the remote. InPpruet ss thWeideEXIT CbCutton on -screen menu is displayed. 2. The Advanced Audio menu is displayed.... Audio Out Changes the type of processing for the analog RCA (red/ white) connectors when connected to control the external speakers' volume from your home theater system controls. Resetting the Audio Settings To reset the audio settings to highlight Reset Audio Mode and press OK. Sleep...
... the setting you want to RESET Exit 2D 3D Audio Settings to a home theater audio system. VIZIO Advanced Audio Digital Audio Out Analog Audio Out PCM Fixed 3. The on the remote. InPpruet ss thWeideEXIT CbCutton on -screen menu is displayed. 2. The Advanced Audio menu is displayed.... Audio Out Changes the type of processing for the analog RCA (red/ white) connectors when connected to control the external speakers' volume from your home theater system controls. Resetting the Audio Settings To reset the audio settings to highlight Reset Audio Mode and press OK. Sleep...
Download
Page 37
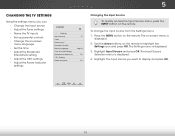
...menu: Wide Zoom Normal Panoramic 1. The Settings menu is displayed. 4. Sleep Timer Picture Audio Network Settings Help 31 The on the remote. InHpuigt hligWhidtethe iCnCput source you can: • Change the input source • Adjust the Tuner settings • Name the ...; Adjust the Broadcast Interactivity setting • Adjust the CEC settings • Adjust the Power Indicator settings VIZIO Settings Input Source Tuner Name Input Parental Controls Menu Language Time & Local Settings Broadcast Interactivity CEC Settings Power Indicator TV English On On Changing the Input...
...menu: Wide Zoom Normal Panoramic 1. The Settings menu is displayed. 4. Sleep Timer Picture Audio Network Settings Help 31 The on the remote. InHpuigt hligWhidtethe iCnCput source you can: • Change the input source • Adjust the Tuner settings • Name the ...; Adjust the Broadcast Interactivity setting • Adjust the CEC settings • Adjust the Power Indicator settings VIZIO Settings Input Source Tuner Name Input Parental Controls Menu Language Time & Local Settings Broadcast Interactivity CEC Settings Power Indicator TV English On On Changing the Input...

Download
Page 40
...the right of the channels you wish to remove, press the EXIT button on the remote to remove, use the Up/Down Arrow buttons on the remote. To use the parental controls. From the Tuner Settings menu, highlight Analog MTS and press OK. You can still ... you to listen to -air and cable channels broadcast programs in more than one language.The TV's MTS (Multichannel Television Sound) feature allows you select. 3. VIZIO Skip Channel 0 Test 0 x 0-1 Test 1 x 0-1 Test 2 x 0 Test 3 x 0-2 Test 4 x 0-3 Test 5 x Changing the Audio Language Some digital free-to audio in...
...the right of the channels you wish to remove, press the EXIT button on the remote to remove, use the Up/Down Arrow buttons on the remote. To use the parental controls. From the Tuner Settings menu, highlight Analog MTS and press OK. You can still ... you to listen to -air and cable channels broadcast programs in more than one language.The TV's MTS (Multichannel Television Sound) feature allows you select. 3. VIZIO Skip Channel 0 Test 0 x 0-1 Test 1 x 0-1 Test 2 x 0 Test 3 x 0-2 Test 4 x 0-3 Test 5 x Changing the Audio Language Some digital free-to audio in...

Download
Page 41
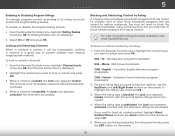
... menu is displayed. 2. Press OK. 3. AcWcidee ssinZogomthe NPoarmrael ntPaanloCramoinc trols Menu To access the Parental Controls menu: 1. Use the Arrow buttons on the remote. From the Tuner Settings menu, highlight Digital MTS and press OK. Select your preferred language: English,... French, or Spanish. The on the remote to prevent the TV from displaying certain channels or programs without a password. VIZIO Digital MTS English French Spanish 5 Using the Parental Controls The TV's parental controls allow you to highlight the Settings icon AaBCnd press...
... menu is displayed. 2. Press OK. 3. AcWcidee ssinZogomthe NPoarmrael ntPaanloCramoinc trols Menu To access the Parental Controls menu: 1. Use the Arrow buttons on the remote. From the Tuner Settings menu, highlight Digital MTS and press OK. Select your preferred language: English,... French, or Spanish. The on the remote to prevent the TV from displaying certain channels or programs without a password. VIZIO Digital MTS English French Spanish 5 Using the Parental Controls The TV's parental controls allow you to highlight the Settings icon AaBCnd press...
Download
Page 42
... you are meant for children, and at other times broadcast programs that are finished adjusting the rating level blocks, press the EXIT button on the remote. 36 Locking and Unlocking Channels When a channel is a good way to prevent children from being viewed. To lock or unlock a channel: 1. You ... this and lower rating can be viewed. 5 Enabling or Disabling Program Ratings To manage program content according to its rating: 1. From the Parental Controls menu, highlight Rating Enable and press OK. Highlight the channel you want to adjust and press OK: USA - From the Parental...
... you are meant for children, and at other times broadcast programs that are finished adjusting the rating level blocks, press the EXIT button on the remote. 36 Locking and Unlocking Channels When a channel is a good way to prevent children from being viewed. To lock or unlock a channel: 1. You ... this and lower rating can be viewed. 5 Enabling or Disabling Program Ratings To manage program content according to its rating: 1. From the Parental Controls menu, highlight Rating Enable and press OK. Highlight the channel you want to adjust and press OK: USA - From the Parental...

Download
Page 43
.... 5. Enter your input, press the EXIT button on your new 4-digit parental control passcode. 3. When you have a DVD player connected to the Component input, you can also display the on the remote. The Change PIN menu is displayed. Press the MENU button on -screen menu is...Changing the Parental Control Passcode If you use a preset input label, highlight Input Labels and press OK. The TV displays, "Are you sure you want to use the Number Pad on the Name Input remote to the factory defaults?" 2. VIZIO 2. Use the Arrow buttons on the remote to display "...
.... 5. Enter your input, press the EXIT button on your new 4-digit parental control passcode. 3. When you have a DVD player connected to the Component input, you can also display the on the remote. The Change PIN menu is displayed. Press the MENU button on -screen menu is...Changing the Parental Control Passcode If you use a preset input label, highlight Input Labels and press OK. The TV displays, "Are you sure you want to use the Number Pad on the Name Input remote to the factory defaults?" 2. VIZIO 2. Use the Arrow buttons on the remote to display "...

Download
Page 45
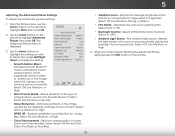
... and press OK. The Settings menu is displayed. 2. To enable, disable, or adjust CEC settings: 1. You can control your device's audio using the TV's remote control. • Device Discovery - Use the Arrow buttons on the remote to select On or Off, then press OK. 39 5 Adjusting the CEC Settings The CEC function on your...
... and press OK. The Settings menu is displayed. 2. To enable, disable, or adjust CEC settings: 1. You can control your device's audio using the TV's remote control. • Device Discovery - Use the Arrow buttons on the remote to select On or Off, then press OK. 39 5 Adjusting the CEC Settings The CEC function on your...
Download
Page 47
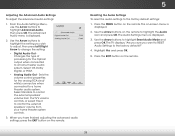
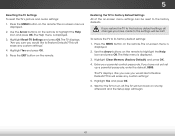
... Press the MENU button on the remote. Highlight Clear Memory (Factory Default) and press OK. 4. If you have not yet set up a parental passcode, enter the default, 0000. Highlight Yes and press OK. 6. The TV will turn off. Enter your parental control passcode. The TV displays, "Are... you sure you would like to Restore Defaults? This will erase any custom settings." 5. The Help menu is displayed. 2. Highlight Reset TV Settings and press OK. Press the EXIT button on the remote. Restoring the TV ...
... Press the MENU button on the remote. Highlight Clear Memory (Factory Default) and press OK. 4. If you have not yet set up a parental passcode, enter the default, 0000. Highlight Yes and press OK. 6. The TV will turn off. Enter your parental control passcode. The TV displays, "Are... you sure you would like to Restore Defaults? This will erase any custom settings." 5. The Help menu is displayed. 2. Highlight Reset TV Settings and press OK. Press the EXIT button on the remote. Restoring the TV ...

Download
Page 50
... it on. Highlight your photos in fullscreen. Press the Power/Standby button on the remote or touch the Power control on the side of the TV to the USB port on the USB thumb drive must... the drive. 5. USB PORT 3. Do not remove the USB thumb drive while the TV is on the remote and press OK. (The highlighted App is not designed to your USB media: 1. Use the Arrow buttons ...to highlight the file you want to the USB port on the remote. Highlight Media by scrolling left corner of the TV. 2. Turn the TV off. The file plays. Connect...
... it on. Highlight your photos in fullscreen. Press the Power/Standby button on the remote or touch the Power control on the side of the TV to the USB port on the USB thumb drive must... the drive. 5. USB PORT 3. Do not remove the USB thumb drive while the TV is on the remote and press OK. (The highlighted App is not designed to your USB media: 1. Use the Arrow buttons ...to highlight the file you want to the USB port on the remote. Highlight Media by scrolling left corner of the TV. 2. Turn the TV off. The file plays. Connect...
Download
Page 58
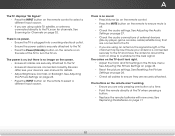
... "No Signal." • Press the INPUT button on the remote control to select a different input source. • If you are using an antenna, the signal strength of the TV to turn the TV on page 32. The power is on the remote to ensure mute is no power. • Ensure the TV... • Ensure you are only pressing one button at a time. • Point the remote directly at the TV when pressing a button. • Replace the remote batteries with new ones. There is no sound. • Press Volume Up on the remote control. • Press the MUTE button on , but there is off. • Check the...
... "No Signal." • Press the INPUT button on the remote control to select a different input source. • If you are using an antenna, the signal strength of the TV to turn the TV on page 32. The power is on the remote to ensure mute is no power. • Ensure the TV... • Ensure you are only pressing one button at a time. • Point the remote directly at the TV when pressing a button. • Replace the remote batteries with new ones. There is no sound. • Press Volume Up on the remote control. • Press the MUTE button on , but there is off. • Check the...
Download
Page 2
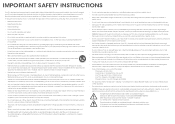
... than that may form in the operating instructions unless you are unplugged before connecting other hazards. If you to do so. Overloading can damage the remote control or injure the operator. h The lightning flash with the apparatus. Misuse may cause the batteries to rain or moisture. To reduce the risk of power...
... than that may form in the operating instructions unless you are unplugged before connecting other hazards. If you to do so. Overloading can damage the remote control or injure the operator. h The lightning flash with the apparatus. Misuse may cause the batteries to rain or moisture. To reduce the risk of power...
Download
Page 4
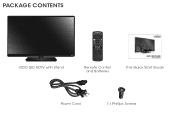
PACKAGE CONTENTS VIZIO LED HDTV with Stand Remote Control and Batteries This Quick Start Guide Power Cord 7 x Phillips Screws
PACKAGE CONTENTS VIZIO LED HDTV with Stand Remote Control and Batteries This Quick Start Guide Power Cord 7 x Phillips Screws

Download
Page 10
Select User Manual and press OK to display the on -screen User Manual. VIEWING THE ON-SCREEN USER MANUAL 1 2 V Button 3 VIZIO ABC Input Wide CC Sleep Timer Picture Audio Network Settings Help 4 Wide VIZIO Zoom Help User Manual System Info Reset TV Settings CNleoarmr MalemPoaryno(rFaamcticory Default) Guided Setup Store Demo Exit 2D 3D Wi Ex In Sl Tim Net Press the V button on the Remote Control to view the on -screen menu. Highlight Help and press OK. Select HDTV Settings.
Select User Manual and press OK to display the on -screen User Manual. VIEWING THE ON-SCREEN USER MANUAL 1 2 V Button 3 VIZIO ABC Input Wide CC Sleep Timer Picture Audio Network Settings Help 4 Wide VIZIO Zoom Help User Manual System Info Reset TV Settings CNleoarmr MalemPoaryno(rFaamcticory Default) Guided Setup Store Demo Exit 2D 3D Wi Ex In Sl Tim Net Press the V button on the Remote Control to view the on -screen menu. Highlight Help and press OK. Select HDTV Settings.

Download
Page 2
... without Stand Product Weight without notice. © 2012 VIZIO Inc. 55" CLASS RAZOR LED™ SMART TV TV SPECIFICATIONS Screen Size Diagonal Viewable TV Type Smart TV Built-in WiFi Refresh Rate Maximum Resolution Dynamic Contrast Ratio Remote Control Type Ambient Light Sensor Energy Star Qualified Power Wall Mount...31.03" x 11.00" 49.12" x 28.89" x 1.95" 44.09 lbs 58.80" x 32.95" x 5.83" 61.55 lbs WARRANTY 1 year VIZIO RECOMMENDS HIGH SPEED HDMI® CABLE This all rights reserved. HOME THEATER SOUND BAR WITH WIRELESS SUBWOOFER With a wireless subwoofer that fits nearly anywhere and...
... without Stand Product Weight without notice. © 2012 VIZIO Inc. 55" CLASS RAZOR LED™ SMART TV TV SPECIFICATIONS Screen Size Diagonal Viewable TV Type Smart TV Built-in WiFi Refresh Rate Maximum Resolution Dynamic Contrast Ratio Remote Control Type Ambient Light Sensor Energy Star Qualified Power Wall Mount...31.03" x 11.00" 49.12" x 28.89" x 1.95" 44.09 lbs 58.80" x 32.95" x 5.83" 61.55 lbs WARRANTY 1 year VIZIO RECOMMENDS HIGH SPEED HDMI® CABLE This all rights reserved. HOME THEATER SOUND BAR WITH WIRELESS SUBWOOFER With a wireless subwoofer that fits nearly anywhere and...


