

Download
Page 2
...-D symbol are incorporated under license from SRS Labs, Inc. StudioSound HD and TruVolume technologies are trademarks of SRS Labs, Inc. Changing the factory default picture settings or enabling other features will increase power consumption that could exceed the limits necessary to qualify for ENERGY STAR in the "factory default...
...-D symbol are incorporated under license from SRS Labs, Inc. StudioSound HD and TruVolume technologies are trademarks of SRS Labs, Inc. Changing the factory default picture settings or enabling other features will increase power consumption that could exceed the limits necessary to qualify for ENERGY STAR in the "factory default...
Download
Page 7
... Using the Network Connection Menu 29 Connecting to a Wireless Network 29 Changing the Advanced Network Settings 30 Testing Your Network Connection 30 Changing the TV Settings 31 Changing the Input Source 31 Setting the Tuner Mode 32 Scanning for Channels 32 Adding New Channels 33 Skipping Channels 34 Changing the Audio Language 34...
... Using the Network Connection Menu 29 Connecting to a Wireless Network 29 Changing the Advanced Network Settings 30 Testing Your Network Connection 30 Changing the TV Settings 31 Changing the Input Source 31 Setting the Tuner Mode 32 Scanning for Channels 32 Adding New Channels 33 Skipping Channels 34 Changing the Audio Language 34...
Download
Page 8
... Turning the Power Indicator On or Off 39 Using the Help Menu 40 Displaying System Information 40 Resetting the TV Settings 41 Restoring the TV to Factory Default Settings 41 Performing a Service Check 41 Using Guided Setup 42 Using the Info Window 43 Limited Warranty 56 Legal & Compliance 57... Using the USB Media Player 44 Using the USB Media Player 44 Connecting a USB Thumb Drive to the TV 44 Playing USB Media 44 Using VIZIO Internet...
... Turning the Power Indicator On or Off 39 Using the Help Menu 40 Displaying System Information 40 Resetting the TV Settings 41 Restoring the TV to Factory Default Settings 41 Performing a Service Check 41 Using Guided Setup 42 Using the Info Window 43 Limited Warranty 56 Legal & Compliance 57... Using the USB Media Player 44 Using the USB Media Player 44 Connecting a USB Thumb Drive to the TV 44 Playing USB Media 44 Using VIZIO Internet...

Download
Page 18
Verify that your device has a video port that matches an available port on . Set the TV's input to match the connection you used to the TV and the device. 4. Connecting Your Devices Connecting A Device Your TV can be used (...
Verify that your device has a video port that matches an available port on . Set the TV's input to match the connection you used to the TV and the device. 4. Connecting Your Devices Connecting A Device Your TV can be used (...
Download
Page 25
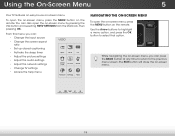
... the screen aspect ratio • Set up closed captioning • Activate the sleep timer • Adjust the picture settings • Adjust the audio settings • Adjust the network settings • Change TV settings • Access the help menu VIZIO ABC Input Wide CC Sleep Timer Picture... Audio Network Settings Help Navigating the On-Screen Menu To open...
... the screen aspect ratio • Set up closed captioning • Activate the sleep timer • Adjust the picture settings • Adjust the audio settings • Adjust the network settings • Change TV settings • Access the help menu VIZIO ABC Input Wide CC Sleep Timer Picture... Audio Network Settings Help Navigating the On-Screen Menu To open...
Download
Page 27
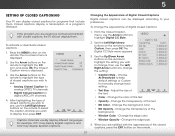
...Style menu appears. Use the Up/Down Arrow WibdeuttoZnoosmon tNhoremarel mPaontoeramtoic highlight the setting you wish to change, then use the Left/ Right Arrow buttons to change each Input settWinidge . VIZIO Closed Caption Analog Closed Caption Off Digital Closed Caption Off Digital CC Style.... CC BG Color BG Opacity Window Color Window Opacity As Broadcast As Broadcast As Broadcast As Broadcast • Text Size - VIZIO Digital CC Style Caption Style Custom Text Size As Broadcast Color As Broadcast Opacity As Broadcast 3. To change the appearance of the...
...Style menu appears. Use the Up/Down Arrow WibdeuttoZnoosmon tNhoremarel mPaontoeramtoic highlight the setting you wish to change, then use the Left/ Right Arrow buttons to change each Input settWinidge . VIZIO Closed Caption Analog Closed Caption Off Digital Closed Caption Off Digital CC Style.... CC BG Color BG Opacity Window Color Window Opacity As Broadcast As Broadcast As Broadcast As Broadcast • Text Size - VIZIO Digital CC Style Caption Style Custom Text Size As Broadcast Color As Broadcast Opacity As Broadcast 3. To change the appearance of the...
Download
Page 28
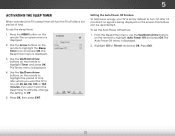
... displayed on the screen. Use the Up/Down Arrow buttons on the remote to Off. 5. Setting the Auto Power Off Feature To help save energy, your TV is VIZIO displayed. To set period of time after a set the Auto Power Off feature: 1. Highlight Off or 10 min and press OK. The Sleep ...Timer menu is displayed. 4. If you want the sleep timer to activate, change the setting to highlight Timer and press OK. ...
... displayed on the screen. Use the Up/Down Arrow buttons on the remote to Off. 5. Setting the Auto Power Off Feature To help save energy, your TV is VIZIO displayed. To set period of time after a set the Auto Power Off feature: 1. Highlight Off or 10 min and press OK. The Sleep ...Timer menu is displayed. 4. If you want the sleep timer to activate, change the setting to highlight Timer and press OK. ...
Download
Page 29
...picture mode allows you to manually change the picture mode: VIZIO Picture Picture Mode Backlight Brightness Contrast Color Tint Sharpness Custom - + 50 - + 50 - + 50 - + 50 - +0 - +0 More • Standard mode sets the various picture settings to values that will not produce detail that produce a ... or washed out. If flesh appears too orange, reduce the level of picture elements. Network Settings Help To adjust the picture settings: 1. Contrast - This setting is too low, the picture may be used to sharpen non-HD (high Sleep Timer PidcteurfeinitiAoundi...
...picture mode allows you to manually change the picture mode: VIZIO Picture Picture Mode Backlight Brightness Contrast Color Tint Sharpness Custom - + 50 - + 50 - + 50 - + 50 - +0 - +0 More • Standard mode sets the various picture settings to values that will not produce detail that produce a ... or washed out. If flesh appears too orange, reduce the level of picture elements. Network Settings Help To adjust the picture settings: 1. Contrast - This setting is too low, the picture may be used to sharpen non-HD (high Sleep Timer PidcteurfeinitiAoundi...
Download
Page 30
VIZIO Advanced Picture Smooth Motion Effect Medium Real Cinema Mode Smooth Noise Reduction Low MPEG NR Low Color Enhancement Normal 3. Select Off, Precision or Smooth. • ..., Medium, or High. • Color Enhancement - Select Off, Low, Medium, or High. • MPEG NR - Adjusts the average brightness of the picture to change the setting: Adaptive Luma Film Mode Backlight Control Ambient Light Sensor Medium Auto DCR Medium • Smooth Motion Effect Activates Smooth Motion™ motion estimation/motion compensation...
VIZIO Advanced Picture Smooth Motion Effect Medium Real Cinema Mode Smooth Noise Reduction Low MPEG NR Low Color Enhancement Normal 3. Select Off, Precision or Smooth. • ..., Medium, or High. • Color Enhancement - Select Off, Low, Medium, or High. • MPEG NR - Adjusts the average brightness of the picture to change the setting: Adaptive Luma Film Mode Backlight Control Ambient Light Sensor Medium Auto DCR Medium • Smooth Motion Effect Activates Smooth Motion™ motion estimation/motion compensation...

Download
Page 31
...up/down) NetworkpoSestittiinogns ofHethlpe display image. • Horizontal Size - Use the Arrow buttons on the remote to change the setting: • Horiz. Green Gain Blue Gain - Adjusts the width of the display image. 4. When you want to ...setting you have finished adjusting the picture size and position, press the EXIT button on the Horiz. The Size Horizontal Size - +0 & Exit Posit2iDon me3nDu is displayed. 3. Size & Position 2. 5 Adjusting the Color Temperature Adjusting the color temperature will change each of the color temperature settings: VIZIO...
...up/down) NetworkpoSestittiinogns ofHethlpe display image. • Horizontal Size - Use the Arrow buttons on the remote to change the setting: • Horiz. Green Gain Blue Gain - Adjusts the width of the display image. 4. When you want to ...setting you have finished adjusting the picture size and position, press the EXIT button on the Horiz. The Size Horizontal Size - +0 & Exit Posit2iDon me3nDu is displayed. 3. Size & Position 2. 5 Adjusting the Color Temperature Adjusting the color temperature will change each of the color temperature settings: VIZIO...

Download
Page 32
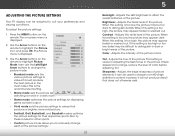
Press the EXIT button on the remote to highlight More, then press OK. 2. The TV displays, "Are you sure you want to RESET Picture Settings to the factory default settings: 1. 5 Resetting the Picture Settings To reset the picture settings to the factory defaults?" 3. From the Picture menu, use the Arrow buttons to highlight Reset Picture Mode, then press OK. Highlight Yes and press OK. 4. Use the Arrow buttons on the remote. 26
Press the EXIT button on the remote to highlight More, then press OK. 2. The TV displays, "Are you sure you want to RESET Picture Settings to the factory default settings: 1. 5 Resetting the Picture Settings To reset the picture settings to the factory defaults?" 3. From the Picture menu, use the Arrow buttons to highlight Reset Picture Mode, then press OK. Highlight Yes and press OK. 4. Use the Arrow buttons on the remote. 26
Download
Page 33
VIZIO Audio Settings Audio Mode Balance - Turns the built-in speakers on page 28. 4. Select Surround or Standard. • SRS TruVolume - TruVolume® intelligently normalizes volume fluctuations due ... Off. • Advanced Audio - Adjust the boost or attenuation of the audio output from the TV's internal speakers. The Audio Settings menu is set to Standard. Lip Sync - See Resetting the Audio Settings on or off. • SRS StudioSound HD - Press the MENU button on -screen menu is displayed. 2. TV Speakers Flat +0 +0 Off...
VIZIO Audio Settings Audio Mode Balance - Turns the built-in speakers on page 28. 4. Select Surround or Standard. • SRS TruVolume - TruVolume® intelligently normalizes volume fluctuations due ... Off. • Advanced Audio - Adjust the boost or attenuation of the audio output from the TV's internal speakers. The Audio Settings menu is set to Standard. Lip Sync - See Resetting the Audio Settings on or off. • SRS StudioSound HD - Press the MENU button on -screen menu is displayed. 2. TV Speakers Flat +0 +0 Off...
Download
Page 34
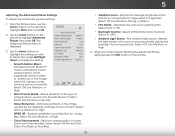
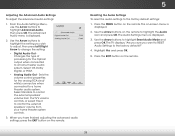
...audio system. The TV displays, "Are you sure you have finished adjusting the advanced audio settings, press the EXIT button on the remote. 5 Adjusting the Advanced Audio Settings To adjust the advanced audio settings: 1. Select Off, Dolby Digital, or PCM. • Analog Audio Out - Press... the MENU button on -screen menu is displayed. 2. Sleep Timer Picture Audio Network Settings Help 28 VIZIO Advanced Audio Digital Audio Out Analog Audio Out PCM Fixed 3. The on the remote. Select Variable to control the external speakers'...
...audio system. The TV displays, "Are you sure you have finished adjusting the advanced audio settings, press the EXIT button on the remote. 5 Adjusting the Advanced Audio Settings To adjust the advanced audio settings: 1. Select Off, Dolby Digital, or PCM. • Analog Audio Out - Press... the MENU button on -screen menu is displayed. 2. Sleep Timer Picture Audio Network Settings Help 28 VIZIO Advanced Audio Digital Audio Out Analog Audio Out PCM Fixed 3. The on the remote. Select Variable to control the external speakers'...
Download
Page 35
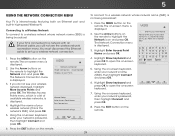
...If your network's name (SSID), then highlight Connect Exaitnd p2reD ss OK3.D 6. VIZIO Network connection Wired Connection Disconnected Wireless Access Points Manual Setup Enter Access Point Name Test Connection Advanced network settings 6. The on -screen menu is connected to a wireless network whose network name...TV is a list of your network's password, then highlight Connect and Slpeerpess Timer OK. Highlight Show keyboard and press OK to set up a wireless network connection. 1. Picture Audio 8. Input Wide CC 7. The Wireless Access Points menu, which is internet-ready...
...If your network's name (SSID), then highlight Connect Exaitnd p2reD ss OK3.D 6. VIZIO Network connection Wired Connection Disconnected Wireless Access Points Manual Setup Enter Access Point Name Test Connection Advanced network settings 6. The on -screen menu is connected to a wireless network whose network name...TV is a list of your network's password, then highlight Connect and Slpeerpess Timer OK. Highlight Show keyboard and press OK to set up a wireless network connection. 1. Picture Audio 8. Input Wide CC 7. The Wireless Access Points menu, which is internet-ready...
Download
Page 36
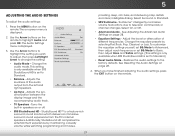
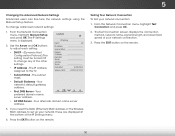
... the bottom of your network connection: 1. Your alternate domain name server address. 3. Press the EXIT button on the remote. VIZIO IP Setting DHCP Off IP Address Subnet Mask Default Gateway Pref. If you need the RJ45 (Ethernet) MAC address or the Wireless MAC ... 30 From the Network Connection menu, highlight Manual Setup and press OK. The IP Settings menu is displayed. 2. 5 Changing the Advanced Network Settings Advanced users can fine-tune the network settings using the Manual Setup feature. The subnet mask. • Default Gateway - DNS Server - Your ...
... the bottom of your network connection: 1. Your alternate domain name server address. 3. Press the EXIT button on the remote. VIZIO IP Setting DHCP Off IP Address Subnet Mask Default Gateway Pref. If you need the RJ45 (Ethernet) MAC address or the Wireless MAC ... 30 From the Network Connection menu, highlight Manual Setup and press OK. The IP Settings menu is displayed. 2. 5 Changing the Advanced Network Settings Advanced users can fine-tune the network settings using the Manual Setup feature. The subnet mask. • Default Gateway - DNS Server - Your ...
Download
Page 37
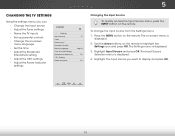
... parental controls • Change the on-screen menu language • Set the time • Adjust the Broadcast Interactivity setting • Adjust the CEC settings • Adjust the Power Indicator settings VIZIO Settings Input Source Tuner Name Input Parental Controls Menu Language Time & Local Settings Broadcast Interactivity CEC Settings Power Indicator TV English On On Changing the Input Source...
... parental controls • Change the on-screen menu language • Set the time • Adjust the Broadcast Interactivity setting • Adjust the CEC settings • Adjust the Power Indicator settings VIZIO Settings Input Source Tuner Name Input Parental Controls Menu Language Time & Local Settings Broadcast Interactivity CEC Settings Power Indicator TV English On On Changing the Input Source...
Download
Page 38
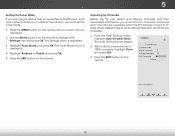
... is displayed. 3. Press the EXIT button on the remote. 5 Setting the Tuner Mode If you are available. 1. The Settings menu is 100% complete. The Tuner Mode menu is displayed. 2. Press the EXIT button on the remote. VIZIO Channel Scan Channel Scan Digital Channels: 0 Analog Channels: 19 18%... Complete Cancel Press OK to the RF input, such as an external antenna or cable TV connection, you must set the tuner mode. 1. Highlight Tuner Mode and press...
... is displayed. 3. Press the EXIT button on the remote. 5 Setting the Tuner Mode If you are available. 1. The Settings menu is 100% complete. The Tuner Mode menu is displayed. 2. Press the EXIT button on the remote. VIZIO Channel Scan Channel Scan Digital Channels: 0 Analog Channels: 19 18%... Complete Cancel Press OK to the RF input, such as an external antenna or cable TV connection, you must set the tuner mode. 1. Highlight Tuner Mode and press...

Download
Page 39
...Channel options. Highlight To Channel and enter the channel to which you want to end the scan. (Use the Number Pad on the remote. VIZIO Add Analog Channel Enter Channel # __ Add Channel 3. Press the EXIT button on the remote to enter the channel.) 5. Highlight Start and ...channel or add a new range of new channels: 1. Wait until the partial channel search is done scanning for the channel. 4. From the Tuner Settings menu, highlight Add Analog Channel and press OK. The partial channel search begins. 6. Highlight Scan Mode and select the type of the channel you ...
...Channel options. Highlight To Channel and enter the channel to which you want to end the scan. (Use the Number Pad on the remote. VIZIO Add Analog Channel Enter Channel # __ Add Channel 3. Press the EXIT button on the remote to enter the channel.) 5. Highlight Start and ...channel or add a new range of new channels: 1. Wait until the partial channel search is done scanning for the channel. 4. From the Tuner Settings menu, highlight Add Analog Channel and press OK. The partial channel search begins. 6. Highlight Scan Mode and select the type of the channel you ...

Download
Page 40
...find that have selected all programs are too weak to watch comfortably. ABC VIZIO Analog MTS Mono Stereo SAP Input Wide CC Sleep Timer Picture Audio Network Settings Help 34 From the Tuner Settings menu, highlight Analog MTS and press OK. 5 Skipping Channels After a ... EXIT button on the remote to highlight the channel and press OK. To remove a channel: 1. When you have been removed with the Skip Channel feature. VIZIO Skip Channel 0 Test 0 x 0-1 Test 1 x 0-1 Test 2 x 0 Test 3 x 0-2 Test 4 x 0-3 Test 5 x Changing the Audio Language Some digital ...
...find that have selected all programs are too weak to watch comfortably. ABC VIZIO Analog MTS Mono Stereo SAP Input Wide CC Sleep Timer Picture Audio Network Settings Help 34 From the Tuner Settings menu, highlight Analog MTS and press OK. 5 Skipping Channels After a ... EXIT button on the remote to highlight the channel and press OK. To remove a channel: 1. When you have been removed with the Skip Channel feature. VIZIO Skip Channel 0 Test 0 x 0-1 Test 1 x 0-1 Test 2 x 0 Test 3 x 0-2 Test 4 x 0-3 Test 5 x Changing the Audio Language Some digital ...

Download
Page 41
.... To use the Digital MTS feature: 1. Press OK. 3. VIZIO Digital MTS English French Spanish 5 Using the Parental Controls The TV's parental controls allow you to prevent the TV from displaying certain channels or programs without a password. The TV Settings menu is displayed. To set a custom parental passcode, see Changing Network StehtteingPsareHneltpal Control Passcode...
.... To use the Digital MTS feature: 1. Press OK. 3. VIZIO Digital MTS English French Spanish 5 Using the Parental Controls The TV's parental controls allow you to prevent the TV from displaying certain channels or programs without a password. The TV Settings menu is displayed. To set a custom parental passcode, see Changing Network StehtteingPsareHneltpal Control Passcode...


