E472VL User Manual
Page 5
E472VL / E552VL • Do not overload power strips and extension cords. Overloading can result in fire or electric shock. • The wall socket should be installed ... and contact your dealer for an extended period of time, unplug the power cord. • To reduce risk of the marked voltage can damage the remote control or injure the operator. Unplug the power cord immediately and contact your dealer. Ensure that the power cord and any servicing other than the specified...
E472VL / E552VL • Do not overload power strips and extension cords. Overloading can result in fire or electric shock. • The wall socket should be installed ... and contact your dealer for an extended period of time, unplug the power cord. • To reduce risk of the marked voltage can damage the remote control or injure the operator. Unplug the power cord immediately and contact your dealer. Ensure that the power cord and any servicing other than the specified...

E472VL User Manual
Page 7
...Installing the TV 1 Inspecting the Package Contents 1 Installing the TV 1 Installing the TV Stand 1 Installing the TV on a Wall 2 Controls and Connections 3 Rear Panel 3 Front Panel 3 Remote Control 4 Left Side Panel 4 Replacing the Batteries 5 Connecting Your Devices 6 Before You Begin 6 Connecting Your Devices 6 Setting Up Your Network ...Inputs 23 Changing the On-Screen Menu Language 24 Setting the Time Zone 24 Adjusting the CEC Settings 25 Turning the VIZIO Logo On or Off 25 Using the Help Menu 25 Displaying System Information 25 Resetting the TV Settings 25 Restoring ...
...Installing the TV 1 Inspecting the Package Contents 1 Installing the TV 1 Installing the TV Stand 1 Installing the TV on a Wall 2 Controls and Connections 3 Rear Panel 3 Front Panel 3 Remote Control 4 Left Side Panel 4 Replacing the Batteries 5 Connecting Your Devices 6 Before You Begin 6 Connecting Your Devices 6 Setting Up Your Network ...Inputs 23 Changing the On-Screen Menu Language 24 Setting the Time Zone 24 Adjusting the CEC Settings 25 Turning the VIZIO Logo On or Off 25 Using the Help Menu 25 Displaying System Information 25 Resetting the TV Settings 25 Restoring ...
E472VL User Manual
Page 9
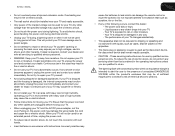
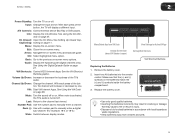
...; It is pushed, pulled, or otherwise improperly moved • If an earthquake occurs and the TV is not properly secured VIZIO LCD HDTV with Stand User Manual and Quick Start Guide Remote Control with Batteries Your TV comes in two ways: • On a flat surface, using the included stand • On a wall, using...
...; It is pushed, pulled, or otherwise improperly moved • If an earthquake occurs and the TV is not properly secured VIZIO LCD HDTV with Stand User Manual and Quick Start Guide Remote Control with Batteries Your TV comes in two ways: • On a flat surface, using the included stand • On a wall, using...

E472VL User Manual
Page 11
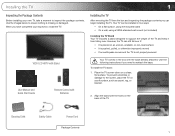
...HDMI (1, 2, 3) RCA Audio In (For use with HDMI ports) Component RCA Audio Out Remote Control Sensor Front Panel Remote Control Sensor: When using the remote, point it directly at this sensor. Controls and Connections Rear Panel RGB PC Ethernet Cable/Antenna PC Audio In Composite AV 2 Component: Connect.../Antenna: Connect RF/Coaxial connector from computer. Optical Audio Out: Connect SPDIF/Optical audio cable. RCA Audio In: Connect audio for VIZIO Internet Apps. PC Audio In: Connect 3.5mm connector from computer. Ethernet: Connect an Ethernet cable for an HDMI input. RCA Audio...
...HDMI (1, 2, 3) RCA Audio In (For use with HDMI ports) Component RCA Audio Out Remote Control Sensor Front Panel Remote Control Sensor: When using the remote, point it directly at this sensor. Controls and Connections Rear Panel RGB PC Ethernet Cable/Antenna PC Audio In Composite AV 2 Component: Connect.../Antenna: Connect RF/Coaxial connector from computer. Optical Audio Out: Connect SPDIF/Optical audio cable. RCA Audio In: Connect audio for VIZIO Internet Apps. PC Audio In: Connect 3.5mm connector from computer. Ethernet: Connect an Ethernet cable for an HDMI input. RCA Audio...
E472VL User Manual
Page 12
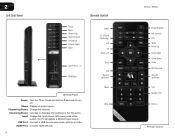
...CC (Closed Captioning) Exit OK Arrow Left Back VIA Volume Up/Down Mute Wide E472VL / E552VL Power/Standby A/V Controls Info Menu Arrow Up Arrow Right Arrow Down Guide VIA Shortcuts Channel Up/Down Last Number Pad Dash (-) Remote Control Volume Up/Down: Increase or decrease the loudness of the button, the TV ... turn off. With each press of the TVs audio. Press and hold for 3 seconds to play music, photos, or video. 2 Left Side Panel Remote Control Power Menu Channel Up Channel Down Volume Up Volume Down Input USB Ports (1, 2) HDMI Port Left Side Panel Power: Turn the TV on -screen menu...
...CC (Closed Captioning) Exit OK Arrow Left Back VIA Volume Up/Down Mute Wide E472VL / E552VL Power/Standby A/V Controls Info Menu Arrow Up Arrow Right Arrow Down Guide VIA Shortcuts Channel Up/Down Last Number Pad Dash (-) Remote Control Volume Up/Down: Increase or decrease the loudness of the button, the TV ... turn off. With each press of the TVs audio. Press and hold for 3 seconds to play music, photos, or video. 2 Left Side Panel Remote Control Power Menu Channel Up Channel Down Volume Up Volume Down Input USB Ports (1, 2) HDMI Port Left Side Panel Power: Turn the TV on -screen menu...
E472VL User Manual
Page 13
E472VL / E552VL 2 Power/Standby: Turn the TV on or off or on. Input: ... or 18-5.) Wide: Switch between display modes. Move/Delete App from children and pets. 5 Insert two AA batteries into the remote control. Make sure that may result in cracking or leakage that the (+) and (-) symbols on the batteries match the (+) and ...the Info Window. Arrow: Navigate the on page 11. Remove the battery cover. 2. A/V Controls: Control external device (Blu-Ray or DVD player). VIA Shortcuts: Control VIZIO Internet Apps. Volume Up/Down: Increase or decrease the loudness of the button, the TV ...
E472VL / E552VL 2 Power/Standby: Turn the TV on or off or on. Input: ... or 18-5.) Wide: Switch between display modes. Move/Delete App from children and pets. 5 Insert two AA batteries into the remote control. Make sure that may result in cracking or leakage that the (+) and (-) symbols on the batteries match the (+) and ...the Info Window. Arrow: Navigate the on page 11. Remove the battery cover. 2. A/V Controls: Control external device (Blu-Ray or DVD player). VIA Shortcuts: Control VIZIO Internet Apps. Volume Up/Down: Increase or decrease the loudness of the button, the TV ...
E472VL User Manual
Page 22
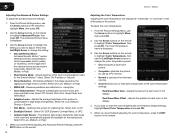
..., Rich Color, Green/Flesh, and Green/Blue. • Adaptive Luma - Select Auto or Off. • Backlight Control - Use the Arrow buttons on the remote to change each color in the room and automatically adjusts the backlight for the Smooth Motion™ effect. If you wish..., Middle, or High. • Real Cinema Mode - When you have finished adjusting the color temperature, press the EXIT button on the remote. 14 E472VL / E552VL Adjusting the Color Temperature Adjusting the color temperature will change the color temperature preset: • Cool produces a blue-hued picture....
..., Rich Color, Green/Flesh, and Green/Blue. • Adaptive Luma - Select Auto or Off. • Backlight Control - Use the Arrow buttons on the remote to change each color in the room and automatically adjusts the backlight for the Smooth Motion™ effect. If you wish..., Middle, or High. • Real Cinema Mode - When you have finished adjusting the color temperature, press the EXIT button on the remote. 14 E472VL / E552VL Adjusting the Color Temperature Adjusting the color temperature will change the color temperature preset: • Cool produces a blue-hued picture....
E472VL User Manual
Page 24
...8482; is displayed. 2. Select Variable to control the external speakers' volume from your home theater system controls. 3. The on the remote. From the Audio Settings Menu, use the Arrow buttons to control the external speakers' volume from the TV's volume controls, or select Fixed to highlight Advanced Audio,...OK. 5. The TV displays, "Are you sure you wish to adjust, then press Left/Right Arrow to a home theater audio system. E472VL / E552VL Resetting the Audio Settings To reset the audio settings to the factory defaults?" 4. Use the Arrow buttons to highlight the setting you...
...8482; is displayed. 2. Select Variable to control the external speakers' volume from your home theater system controls. 3. The on the remote. From the Audio Settings Menu, use the Arrow buttons to control the external speakers' volume from the TV's volume controls, or select Fixed to highlight Advanced Audio,...OK. 5. The TV displays, "Are you sure you wish to adjust, then press Left/Right Arrow to a home theater audio system. E472VL / E552VL Resetting the Audio Settings To reset the audio settings to the factory defaults?" 4. Use the Arrow buttons to highlight the setting you...
E472VL User Manual
Page 26
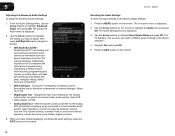
...ethernet) MAC address or the Wireless MAC address to set up parental controls • Change the on-screen menu language • Set the time • Adjust the CEC settings • Adjust the VIZIO logo settings Changing the Input Source To quickly access the Input Source ...advanced network settings: 1. Use the Arrow buttons on the remote. The Change Settings menu is displayed. 4. Press the EXIT button on the remote to change any of the Change Settings menu. 4. The Input Source menu is displayed. 2. 5 E472VL / E552VL Changing the Advanced Network Settings Advanced users can ...
...ethernet) MAC address or the Wireless MAC address to set up parental controls • Change the on-screen menu language • Set the time • Adjust the CEC settings • Adjust the VIZIO logo settings Changing the Input Source To quickly access the Input Source ...advanced network settings: 1. Use the Arrow buttons on the remote. The Change Settings menu is displayed. 4. Press the EXIT button on the remote to change any of the Change Settings menu. 4. The Input Source menu is displayed. 2. 5 E472VL / E552VL Changing the Advanced Network Settings Advanced users can ...
E472VL User Manual
Page 28
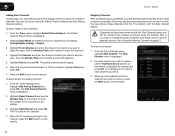
... and press OK. You can remove these channels from being viewed, use the Number Pad on the remote. 20 Press the EXIT button on the remote. Highlight Enter Channel # and use the parental controls. To add a single new analog channel: 1. When the TV is entered using the Partial Channel...You can do not want to begin the scan. (Use the Number Pad on page 21. 5 E472VL / E552VL Adding New Channels Occasionally, you may need to view. Highlight Start and press OK. See Using the Parental Controls on the remote to enter the channel.) 5. The Skip Channel menu is 100% complete.
... and press OK. You can remove these channels from being viewed, use the Number Pad on the remote. 20 Press the EXIT button on the remote. Highlight Enter Channel # and use the parental controls. To add a single new analog channel: 1. When the TV is entered using the Partial Channel...You can do not want to begin the scan. (Use the Number Pad on page 21. 5 E472VL / E552VL Adding New Channels Occasionally, you may need to view. Highlight Start and press OK. See Using the Parental Controls on the remote to enter the channel.) 5. The Skip Channel menu is 100% complete.
E472VL User Manual
Page 29
...remote to -air and cable channels broadcast programs in the language you to listen to highlight Parental Controls and press OK. 4. From the Tuner Settings menu, highlight Digital MTS and press OK. Not all programs are broadcast in your preferred language. Press OK. 3. The Parental Controls menu is displayed. 2. E472VL...Select Mono, Stereo, or SAP (secondary audio programming). Press the EXIT button on the remote. Accessing the Parental Controls Menu To access the Parental Controls menu: 1. Enter your preferred language: English, French, or Spanish. If you to ...
...remote to -air and cable channels broadcast programs in the language you to listen to highlight Parental Controls and press OK. 4. From the Tuner Settings menu, highlight Digital MTS and press OK. Not all programs are broadcast in your preferred language. Press OK. 3. The Parental Controls menu is displayed. 2. E472VL...Select Mono, Stereo, or SAP (secondary audio programming). Press the EXIT button on the remote. Accessing the Parental Controls Menu To access the Parental Controls menu: 1. Enter your preferred language: English, French, or Spanish. If you to ...
E472VL User Manual
Page 30
...Movie - Canadian French television program broadcasts. 2. Locking a channel is a good way to prevent children from being viewed. From the Parental Controls menu, highlight the content type you want to adjust and press OK: USA - TV - Canadian English television program broadcasts. For each rating... type you want to block or unblock, use the Up/Down and Left/Right Arrow buttons on the remote to select On. 6. 5 E472VL / E552VL Enabling or Disabling Program Ratings To manage program content according to its rating: 1. When a channel is displayed. ...
...Movie - Canadian French television program broadcasts. 2. Locking a channel is a good way to prevent children from being viewed. From the Parental Controls menu, highlight the content type you want to adjust and press OK: USA - TV - Canadian English television program broadcasts. For each rating... type you want to block or unblock, use the Up/Down and Left/Right Arrow buttons on the remote to select On. 6. 5 E472VL / E552VL Enabling or Disabling Program Ratings To manage program content according to its rating: 1. When a channel is displayed. ...
E472VL User Manual
Page 31
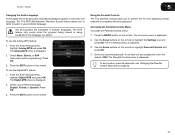
E472VL / E552VL 5 Changing the Parental Control Passcode If you use the parental controls, you should change the name of the Inputs To make it in a secure ...-screen keyboard and press OK. (If you would like to rename and press OK. 5. From the Parental Controls menu, highlight RESET LOCKS and press OK. The TV displays, "Are you sure you want to use and... you have a DVD player connected to the inputs on the remote. Use the Arrow buttons on the remote. 23 Press the MENU button on your new parental control passcode and save it easier to recognize the different devices attached ...
E472VL / E552VL 5 Changing the Parental Control Passcode If you use the parental controls, you should change the name of the Inputs To make it in a secure ...-screen keyboard and press OK. (If you would like to rename and press OK. 5. From the Parental Controls menu, highlight RESET LOCKS and press OK. The TV displays, "Are you sure you want to use and... you have a DVD player connected to the inputs on the remote. Use the Arrow buttons on the remote. 23 Press the MENU button on your new parental control passcode and save it easier to recognize the different devices attached ...

E472VL User Manual
Page 33
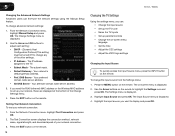
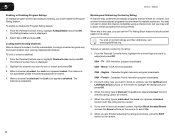
.... Press the EXIT button on the remote. Turning the VIZIO Logo On or Off The VIZIO logo on the front of the TV settings: 1. To turn the VIZIO light on or off . The on-screen menu is displayed. 3. Use the Arrow buttons on the remote to Restore Defaults? Press the MENU...and press OK. Press the EXIT button on the remote. E472VL / E552VL 5 Adjusting the CEC Settings The CEC function on your device's user manual for the tuner and network Displaying System Information To display a summary of your device's audio using the TV's remote control. • Device Discovery - See your TV ...
.... Press the EXIT button on the remote. Turning the VIZIO Logo On or Off The VIZIO logo on the front of the TV settings: 1. To turn the VIZIO light on or off . The on-screen menu is displayed. 3. Use the Arrow buttons on the remote to Restore Defaults? Press the MENU...and press OK. Press the EXIT button on the remote. E472VL / E552VL 5 Adjusting the CEC Settings The CEC function on your device's user manual for the tuner and network Displaying System Information To display a summary of your device's audio using the TV's remote control. • Device Discovery - See your TV ...

E472VL User Manual
Page 34
... finished, press the EXIT button on the remote. 26 Enter your network. Highlight Yes and press OK. Use the Arrow buttons on the remote to highlight the Help icon and press OK. Wait for the TV to connect the TV with your parental control passcode. Set up a parental passcode, enter... the default, 0000. The TV displays "Memory is displayed. 2. E472VL / E552VL Using Guided Setup The TV...
... finished, press the EXIT button on the remote. 26 Enter your network. Highlight Yes and press OK. Use the Arrow buttons on the remote to highlight the Help icon and press OK. Wait for the TV to connect the TV with your parental control passcode. Set up a parental passcode, enter... the default, 0000. The TV displays "Memory is displayed. 2. E472VL / E552VL Using Guided Setup The TV...

E472VL User Manual
Page 36
.... The Media App launches. 3. You can also display your photos in the list and press OK. 4. Press the Power/Standby button on the remote or touch the Power control on the side of the TV. 2. Use the Arrow buttons to highlight the file you must end in a supported file extension (.mp3, .jpg...
.... The Media App launches. 3. You can also display your photos in the list and press OK. 4. Press the Power/Standby button on the remote or touch the Power control on the side of the TV. 2. Use the Arrow buttons to highlight the file you must end in a supported file extension (.mp3, .jpg...

E472VL User Manual
Page 37
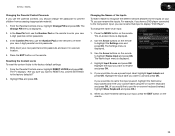
... change source, highlight it and press OK. Toggle Music/Photos Sort by highlighting this button and press OK if you can be displayed on the remote. The blue bar will display here. Highlight Play/ Pause, Previous, or Next and press OK. Album Art If included on the USB thumb drive...thumb drive has more files than can move between files using the Arrow and OK buttons on a single screen, you would like to return to control audio playback. You can browse between pages by Album/Artist/Track View All or View Folders Now Playing Information Displays song title, album title, and...
... change source, highlight it and press OK. Toggle Music/Photos Sort by highlighting this button and press OK if you can be displayed on the remote. The blue bar will display here. Highlight Play/ Pause, Previous, or Next and press OK. Album Art If included on the USB thumb drive...thumb drive has more files than can move between files using the Arrow and OK buttons on a single screen, you would like to return to control audio playback. You can browse between pages by Album/Artist/Track View All or View Folders Now Playing Information Displays song title, album title, and...

E472VL User Manual
Page 43
...Devices differ; see your antenna is securely attached to the TV. • Press the Power/Standby button on the remote or press the Power/ Standby button on the remote control to the TV, scan for details. • Adjust Brightness, Contrast, or Backlight. See Adjusting the Picture Settings on...are still experiencing an issue with your devices with new ones. Phone: Fax: Email: (877) 698-4946 (949) 585-9563 techsupport@vizio.com Web: www.VIZIO.com Hours of external devices (Blu-ray player, game console, cable/satellite box) that are connected to On. • Ensure no power...
...Devices differ; see your antenna is securely attached to the TV. • Press the Power/Standby button on the remote or press the Power/ Standby button on the remote control to the TV, scan for details. • Adjust Brightness, Contrast, or Backlight. See Adjusting the Picture Settings on...are still experiencing an issue with your devices with new ones. Phone: Fax: Email: (877) 698-4946 (949) 585-9563 techsupport@vizio.com Web: www.VIZIO.com Hours of external devices (Blu-ray player, game console, cable/satellite box) that are connected to On. • Ensure no power...
E472VL Quick Start Guide
Page 2
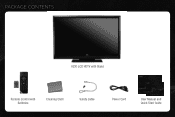
PACKAGE CONTENTS VIZIO LCD HDTV with Stand 1 Remote Control with Batteries Cleaning Cloth Safety Cable Power Cord User Manual and Quick Start Guide
PACKAGE CONTENTS VIZIO LCD HDTV with Stand 1 Remote Control with Batteries Cleaning Cloth Safety Cable Power Cord User Manual and Quick Start Guide
E472VL Quick Start Guide
Page 15
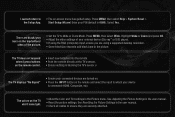
...8482; or DVD player). • If using the RGB (computer) input, ensure you are turned on. • Press the INPUT button on the remote and select the input to the picture. Highlight Wide or Zoom and press OK. • Adjust the video settings of the picture. • Set ...black/gray bars on the top/bottom/ sides of your PIN (default is 0000). Select Yes. I press buttons on the remote control. • Insert new batteries into the remote. • Point the remote directly at the TV's sensor. • Ensure nothing is blocking the TV's sensor. Press MENU, then select Help > ...
...8482; or DVD player). • If using the RGB (computer) input, ensure you are turned on. • Press the INPUT button on the remote and select the input to the picture. Highlight Wide or Zoom and press OK. • Adjust the video settings of the picture. • Set ...black/gray bars on the top/bottom/ sides of your PIN (default is 0000). Select Yes. I press buttons on the remote control. • Insert new batteries into the remote. • Point the remote directly at the TV's sensor. • Ensure nothing is blocking the TV's sensor. Press MENU, then select Help > ...


